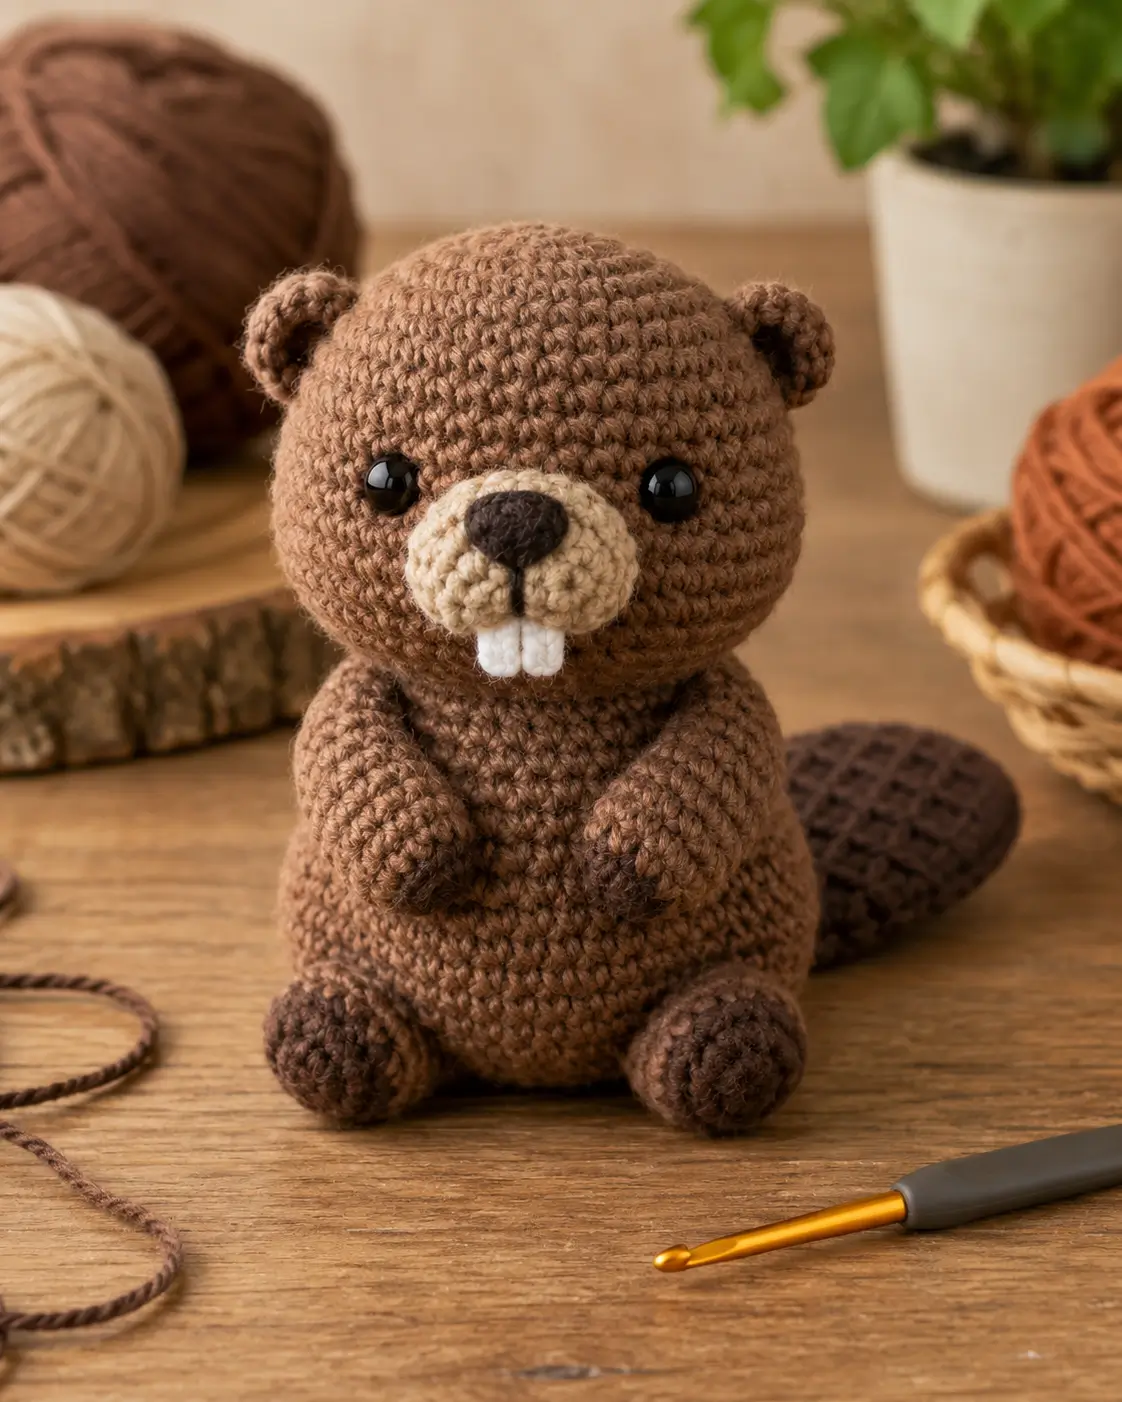
A beaver tail is not a furry plume; it is a flat rudder, so the back piece must read broad, dark, and low. This beaver amigurumi crochet pattern uses worsted yarn, a 4 mm hook, 12 mm safety eyes, and separate cheek patches to make a 14 cm seated toy. Skill level is beginner-plus. Make it when a woodland pattern needs a clear profile from the front and back.
The Design: What Makes This Beaver Different
Start by controlling the silhouette. You need a round face, but the body cannot become a second sphere; the beaver crochet pattern uses a 42-stitch head and a 36-stitch body so the eyes and muzzle stay dominant. The tail is dark, flattened, and sewn low because a beaver reads from the rear as much as from the face. Low and flat. For the crochet beaver amigurumi muzzle, two cream circles are better than one oval: they form cheek volume without hiding the teeth. The maker’s common mistake is placing the tail high like a squirrel tail. That shifts the animal away from woodland animal amigurumi logic and makes the body tip backward during display. Photo accuracy comes from those separations, not extra decoration.
Project Info at a Glance
| Skill Level | Time | Finished Size | Hook | Best For |
|---|---|---|---|---|
| Beginner+ | 4–8 hours | 14 cm seated | 4.0 mm | Woodland toy, desk display, pattern photo prop |
Materials and Tools
Yarn
- Medium warm brown — #4 worsted — 60 g — smooth acrylic or acrylic-cotton amigurumi yarn
- Dark brown — #4 worsted — 36 g — tail, paw tips, nose embroidery
- Cream — #4 worsted — 5 g — cheek patches and muzzle area
- White — #4 worsted or firm cotton — 3 g — teeth
- Black embroidery thread — scrap amount — mouth line and optional eye tightening
Tools
- Hook 4.0 mm
- Safety eyes 12 mm
- Polyester stuffing
- Yarn needle
- Locking stitch markers
- Sewing pins
- Scissors
Abbreviations
MR = magic ring; sc = single crochet; inc = 2 sc in one stitch; dec = decrease; sl st = slip stitch; ch = chain; BLO = back loop only; FO = fasten off; R = round or row.
Work the invisible decrease through the front loops of the next two stitches so the closing rounds compress without a ridge.
Pattern — Step by Step
Continuous spiral unless noted. Use a stitch marker at the first stitch of every round.
Head
Yarn: medium warm brown
R1: 6 sc in MR (6)
R2: inc ×6 (12)
R3: (sc, inc) ×6 (18)
R4: (2 sc, inc) ×6 (24)
R5: (3 sc, inc) ×6 (30)
R6: (4 sc, inc) ×6 (36)
R7: (5 sc, inc) ×6 (42)
R8: sc around (42)
R9: sc around (42)
R10: sc around (42)
R11: sc around (42)
R12: sc around (42)
R13: sc around (42)
R14: sc around (42)
R15: (5 sc, dec) ×6 (36)
R16: (4 sc, dec) ×6 (30)
R17: (3 sc, dec) ×6 (24)
Insert 12 mm safety eyes between R10 and R11, 8 stitches apart. Center the future muzzle below them.
R18: (2 sc, dec) ×6 (18)
R19: (sc, dec) ×6 (12)
Stuff firmly, especially around the crown and lower cheeks.
R20: dec ×6 (6)
Fasten off. Close the last 6 front loops and weave in a 10 cm tail.
Body
Yarn: medium warm brown
R1: 6 sc in MR (6)
R2: inc ×6 (12)
R3: (sc, inc) ×6 (18)
R4: (2 sc, inc) ×6 (24)
R5: (3 sc, inc) ×6 (30)
R6: (4 sc, inc) ×6 (36)
R7: sc around (36)
R8: sc around (36)
R9: sc around (36)
R10: sc around (36)
R11: sc around (36)
R12: sc around (36)
R13: sc around (36)
R14: sc around (36)
R15: (4 sc, dec) ×6 (30)
R16: (3 sc, dec) ×6 (24)
Stuff the lower half firmly. Keep the neck area slightly flatter so the head sits forward.
R17: (2 sc, dec) ×6 (18)
R18: (sc, dec) ×6 (12)
R19: dec ×6 (6)
Fasten off. Leave a 30 cm tail if you want to sew the body to the head with the body yarn.
Arms / Front Legs — Make 2
Yarn: dark brown for paw tip, then medium warm brown
R1: with dark brown, 6 sc in MR (6)
R2: inc ×6 (12)
R3: sc around (12)
R4: sc around (12)
R5: change to medium warm brown, sc around (12)
R6: sc around (12)
R7: sc around (12)
R8: dec ×6 (6)
R9: sc around (6)
Stuff the dark paw tip only. Flatten the upper edge before sewing.
Fasten off. Leave a 25 cm tail.
Back Legs — Make 2
Yarn: dark brown for foot front, then medium warm brown
R1: with dark brown, 6 sc in MR (6)
R2: inc ×6 (12)
R3: (sc, inc) ×6 (18)
R4: sc around (18)
R5: change to medium warm brown, sc around (18)
R6: sc around (18)
R7: (sc, dec) ×6 (12)
R8: dec ×6 (6)
Stuff firmly enough that each foot supports the seated body without rolling.
Fasten off. Leave a 25 cm tail.
Ears — Make 2
Yarn: medium warm brown
R1: 6 sc in MR (6)
R2: inc ×6 (12)
R3: sc around (12)
R4: dec ×6 (6)
Do not overstuff. Pinch the base flat to form a small rounded ear.
Fasten off. Leave an 18 cm tail.
Cheek Patches — Make 2
Yarn: cream
R1: 6 sc in MR (6)
R2: inc ×6 (12)
R3: (sc, inc) ×6 (18)
Sl st to next stitch (18)
Keep these flat. They form the two-lobed muzzle visible below the eyes.
Fasten off. Leave a 25 cm tail on each patch.
Flat Paddle Tail
Yarn: dark brown
R1: ch 6, sc in next 4 ch, 3 sc in last ch, work underside, sc in next 4 ch, 3 sc in first ch (14)
R2: (4 sc, inc ×3) ×2 (20)
R3: sc around (20)
R4: sc around (20)
R5: (4 sc, dec ×3) ×2 (14)
R6: sc around (14)
R7: sc around (14)
R8: sc around (14)
R9: (dec ×3, sc) ×2 (8)
R10: sc around (8)
Flatten the tail. Do not stuff; the photo tail is broad, flat, and slightly textured.
R11: sc through both layers ×4 (4)
Fasten off. Leave a 30 cm tail for sewing.
Nose and Mouth
Yarn: dark brown
Cut 45 cm dark brown yarn. Embroider a horizontal oval nose across the top join of the two cream cheek patches, about 1.5 cm wide. Wrap the same path 6–8 times until the nose is solid. Bring the yarn down from the nose center and make one vertical stitch, 1 cm long, between the teeth.
Fasten off inside the head and knot discreetly.
Buck Teeth — Make 2
Yarn: white
R1: ch 3, sc in 2nd ch from hook, sc in next ch (2)
R2: ch 1, turn, sc across (2)
R3: ch 1, turn, sc across (2)
R4: ch 1, turn, sc across (2)
Block each tooth with fingers so it stays rectangular.
Fasten off. Leave a 15 cm tail for sewing.
Mini Yarn Ball Photo Prop — Optional, Make 1
Yarn: any background color
R1: 6 sc in MR (6)
R2: inc ×6 (12)
R3: (sc, inc) ×6 (18)
R4: sc around (18)
R5: sc around (18)
R6: sc around (18)
R7: (sc, dec) ×6 (12)
R8: dec ×6 (6)
Stuff lightly. Wrap a separate strand around the ball in three crossing directions.
Fasten off. Weave in a 10 cm tail.
Assembly
- Sew the head to the body with the head leaning forward by about 5 mm.
- Pin the cream cheek patches side by side between the eyes, with their inner edges touching.
- Sew both cheek patches down, leaving the lower third slightly raised for muzzle volume.
- Embroider the dark nose across the top center of the cheek patches.
- Sew the two white teeth below the nose, separated by one vertical dark stitch.
- Attach the front legs on the upper belly, angled inward so the paws frame the muzzle.
- Sew the back legs at the lower front of the body, spaced 4–5 stitches apart.
- Sew the ears between head R8 and R11, slightly behind the eye line.
- Attach the flat tail low on the back of the body, centered and touching the table surface.
- Weave all remaining tails through stuffed areas, then trim only after checking the seated balance.
The finished beaver sits upright with the tail visible from a side view.
7 Technical Tips
- Stitch marker drift: Failure mode: the spiral seam moves across the forehead. Move the marker up every round and check the eye markers at R10 with exactly 8 stitches between posts.
- Stuffing firmness: Failure mode: the head collapses above the muzzle. Pack the crown until it resists light finger pressure, then add smaller pieces around R16–R19.
- Invisible decrease: Failure mode: visible bars appear across the cheek curve. Work each decrease through front loops only and keep the hook angle shallow.
- Eye placement timing: Failure mode: the eyes sit too high and the beaver reads like a bear. Place 12 mm eyes between R10 and R11 before closing the head.
- Worsted tension: Failure mode: stuffing shows through the dark tail. With #4 yarn and a 4 mm hook, tighten tail stitches slightly or drop to 3.75 mm for that part only.
- Pinning order: Failure mode: the muzzle shifts off center after sewing the first cheek patch. Pin both cream circles and the nose position before sewing either patch.
- Tail weaving: Failure mode: the tail droops or twists after display. Sew through the tail base twice, then weave the final 10 cm tail upward inside the body.
Conclusion
This pattern is built around the features that make a beaver readable: low paddle tail, dark nose, twin teeth, and a divided cream muzzle. Keep the head firm, pin the tail before sewing, and check the back silhouette after the legs are attached. The next concrete step is to crochet the tail first, then hold it behind the body while choosing the final body stuffing amount. Share the finished beaver amigurumi crochet pattern project on Pinterest and Instagram with the front and side views shown together. Use hashtag #FlatTailBeaver. Which tail angle makes your beaver read more like a swimmer: horizontal, slightly lifted, or tucked low?









