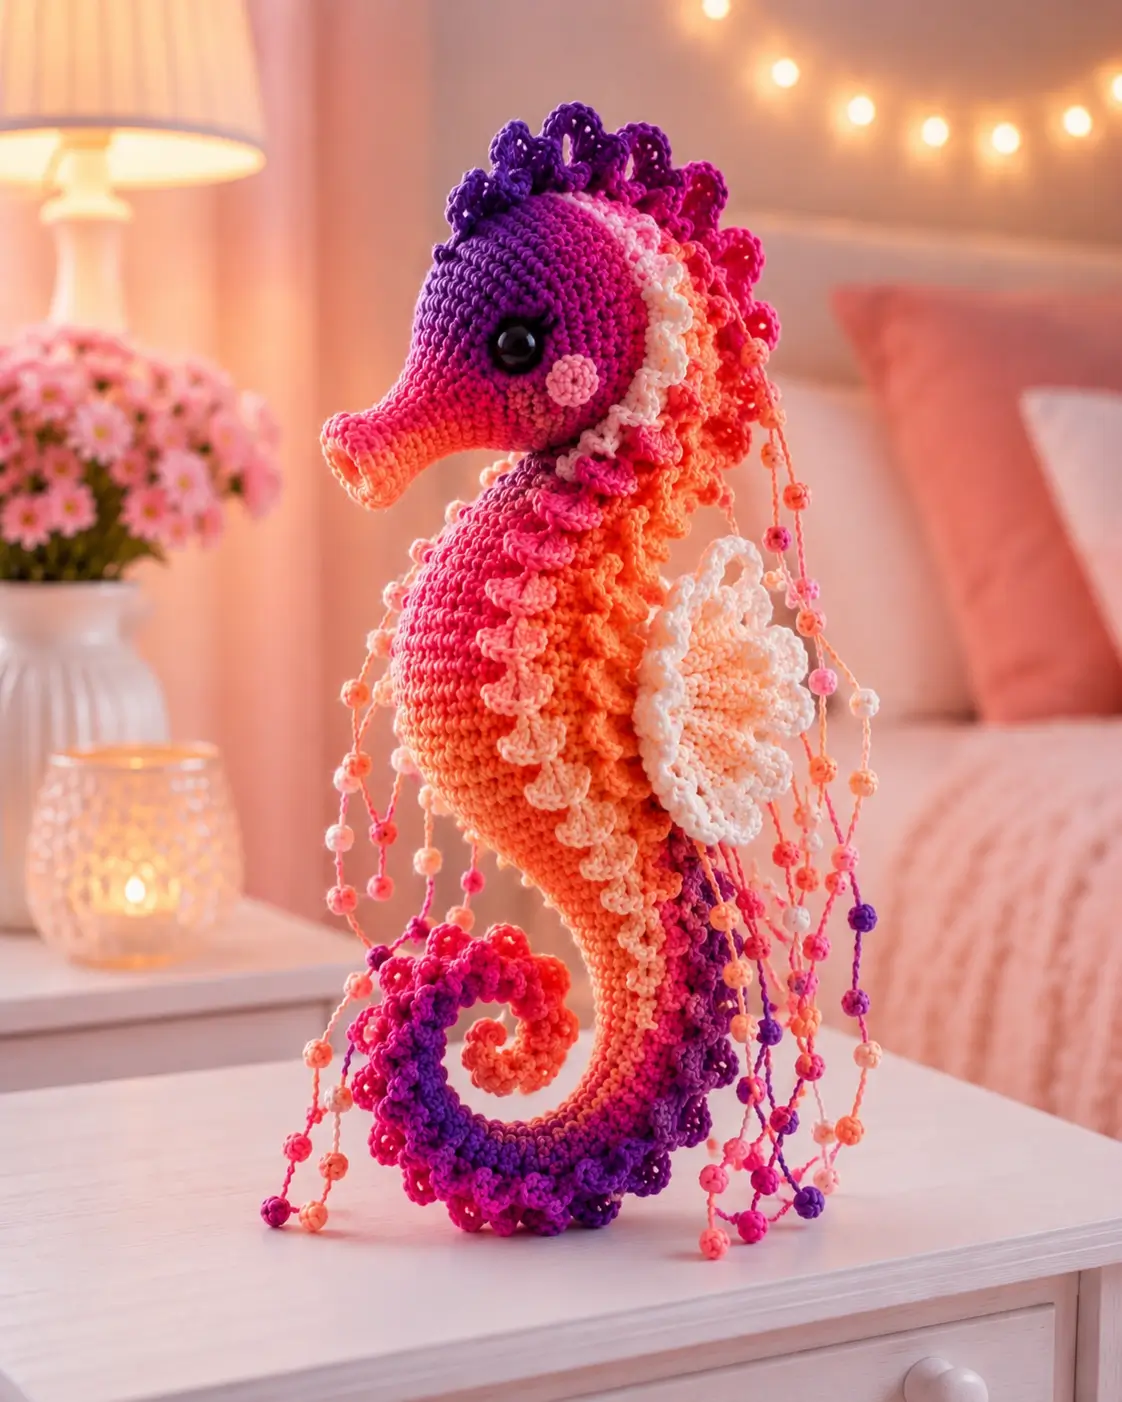
Seahorses have a horse-shaped skull, a prehensile spiral tail, and no tail fin; this seahorse amigurumi crochet pattern has to show all three. The project uses worsted cotton, a 3.5 mm hook, 10 mm safety eyes, and a 42-stitch body plateau for a 23 cm display piece. Work it at intermediate level when you need a sea-animal centerpiece that stands upright for photography or nursery styling.
The Design: What Makes Coral Spiral Different
This crochet seahorse pattern is built around three shapes: a round head with a separate trumpet snout, a tapered body that closes before assembly, and a tail long enough to curl without wire. That choice keeps the toy safer for display shelves and prevents the lower body from collapsing. The side fin is treated like a flat shell, not a narrow flap, because the photo shows a wide cream fin with scalloped edges. A free seahorse crochet pattern often uses a short mane only; this version extends the crest from head to back so the purple ridge reads clearly from the side. The common mistake is placing the snout too low. When that happens, the face looks like a fish instead of a seahorse, and the eye line loses its upright profile.
Project Info at a Glance
| Skill Level | Time | Finished Size | Hook | Best For |
|---|---|---|---|---|
| Intermediate | 6–8 hours | 23 cm | 3.5 mm | Shelf decor, photo props, sea-animal collections |
The 23 cm target follows verified seahorse size examples in chenille and worsted-weight work; hook and eye choices are matched to published worsted seahorse materials.
Materials and Tools
Yarn
- Coral-orange main color — Worsted/Aran #4 — 65–75 g — Paintbox Cotton Aran, I Love This Yarn, or similar smooth yarn
- Fuchsia accent — Worsted/Aran #4 — 10 g — for snout, cheek, belly ruffle, and bead strands
- Magenta accent — Worsted/Aran #4 — 8–10 g — for head shading and crest
- Purple accent — Worsted/Aran #4 — 8–10 g — for tail curl and dorsal crest
- Cream/white accent — Worsted/Aran #4 — 10–15 g — for shell fins and light ruffle sections
Tools
- Hook 3.5 mm
- 10 mm black safety eyes
- Polyester stuffing
- Tapestry needle
- Locking stitch markers
- Straight pins
- Scissors
- Optional black embroidery thread for eye catchlights
Safety eyes are not suitable for children under 3. Embroider the eyes when the item will be handled by babies or toddlers.
Abbreviations
- MR = magic ring
- sc = single crochet
- inc = increase, 2 sc in one stitch
- dec = invisible decrease over 2 stitches
- sl st = slip stitch
- ch = chain
- BLO = back loop only
- FLO = front loop only
- hdc = half double crochet
- dc = double crochet
Invisible decrease is worked through front loops only so the closing rounds stay flat and do not leave six visible gaps.
Pattern — Step by Step
Continuous spiral unless noted. This is an original pattern drafted from the photo, using standard 6-stitch amigurumi math and verified seahorse construction references.
Head — Make 1
Yarn: magenta for R1–R8, fuchsia for R9–R15, coral for R16–R20.
R1: 6 sc in MR (6)
R2: inc ×6 (12)
R3: (sc, inc) ×6 (18)
R4: (2 sc, inc) ×6 (24)
R5: (3 sc, inc) ×6 (30)
R6: (4 sc, inc) ×6 (36)
R7: (5 sc, inc) ×6 (42)
R8: sc around (42)
R9: sc around (42)
R10: sc around (42)
R11: sc around (42)
R12: sc around (42)
R13: sc around (42)
R14: (5 sc, dec) ×6 (36)
R15: sc around (36)
R16: (4 sc, dec) ×6 (30)
R17: (3 sc, dec) ×6 (24)
R18: (2 sc, dec) ×6 (18)
R19: (sc, dec) ×6 (12)
R20: dec ×6 (6)
Insert safety eyes between R10 and R11, 11 stitches apart, before R18. Stuff firmly after R17.
Fasten off. Leave 20 cm tail.
Body and Curled Tail — Make 1
Yarn: purple for R1–R10, fuchsia for R11–R18, coral-orange for R19–R44.
R1: 6 sc in MR (6)
R2: sc around (6)
R3: sc around (6)
R4: sc around (6)
R5: sc around (6)
R6: sc around (6)
R7: sc around (6)
R8: sc around (6)
R9: sc around (6)
R10: sc around (6)
R11: sc around (6)
R12: sc around (6)
R13: inc ×6 (12)
R14: sc around (12)
R15: (sc, inc) ×6 (18)
R16: sc around (18)
R17: (2 sc, inc) ×6 (24)
R18: sc around (24)
R19: (3 sc, inc) ×6 (30)
R20: sc around (30)
R21: (4 sc, inc) ×6 (36)
R22: sc around (36)
R23: (5 sc, inc) ×6 (42)
R24: sc around (42)
R25: sc around (42)
R26: sc around (42)
R27: sc around (42)
R28: sc around (42)
R29: sc around (42)
R30: sc around (42)
R31: sc around (42)
R32: sc around (42)
R33: sc around (42)
R34: sc around (42)
R35: (5 sc, dec) ×6 (36)
R36: sc around (36)
R37: (4 sc, dec) ×6 (30)
R38: sc around (30)
R39: (3 sc, dec) ×6 (24)
R40: sc around (24)
R41: (2 sc, dec) ×6 (18)
R42: sc around (18)
R43: (sc, dec) ×6 (12)
R44: dec ×6 (6)
Do not stuff R1–R10. Add firm stuffing from R15 upward, with extra fill through the belly so the seahorse can sit against its curled tail.
Fasten off. Leave 35 cm tail. Curl R1–R14 inward and tack the spiral with the ending tail.
Snout — Make 1
Yarn: coral-pink.
R1: 6 sc in MR (6)
R2: inc ×6 (12)
R3: BLO sc around (12)
R4: sc around (12)
R5: sc around (12)
R6: sc around (12)
R7: sc around (12)
Work 12 sl st around the front edge of R1 to form a slight lip. Keep the tube open at R7 for sewing.
Fasten off. Leave 30 cm tail.
Dorsal Crest — Make 1
Yarn: purple, magenta, fuchsia in short sections.
Row 1: ch 37, sc in 2nd ch from hook and across (36)
Row 2: (sl st in next st, 5 hdc in next st, sl st in next st) ×12 (84)
Change color every 3 shells if you want the photo’s purple-to-pink ridge.
Fasten off. Leave 50 cm tail.
Belly Ruffle — Make 1
Yarn: cream for first 5 shells, peach for middle 5 shells, fuchsia for last 4 shells.
Row 1: ch 43, sc in 2nd ch from hook and across (42)
Row 2: (sl st in next st, 5 hdc in next st, sl st in next st) ×14 (98)
This ruffle runs from lower cheek, down the neck, and along the front belly line.
Fasten off. Leave 45 cm tail.
Large Shell Side Fins — Make 2
Yarn: cream/white with peach center.
R1: 6 sc in MR (6)
R2: inc ×6 (12)
R3: (sc, inc) ×6 (18)
R4: (2 sc, inc) ×6 (24)
R5: (3 sc, inc) ×6 (30)
R6: sc around (30)
Edging: (sl st, ch 2, 3 dc in next st, ch 2, sl st in next st) ×6 across the outer edge (30 base sts)
Block the fin flat with pins before sewing. Place one fin on each side even when only one is visible in front-view photos.
Fasten off. Leave 35 cm tail on each fin.
Front Pectoral Fins — Make 2
Yarn: peach or fuchsia.
R1: 6 sc in MR (6)
R2: inc ×6 (12)
R3: (sc, inc) ×6 (18)
R4: sc around (18)
R5: (sc, dec) ×6 (12)
R6: dec ×6 (6)
Flatten without stuffing. These small fins sit under the large shell fins and read as front limbs in the silhouette.
Fasten off. Leave 25 cm tail.
Cheek Patches — Make 2
Yarn: blush pink.
R1: 6 sc in MR (6)
R2: inc ×6 (12)
Do not stuff. Pull the starting tail tight so the circle stays flat.
Fasten off. Leave 20 cm tail.
Tail Ridge Scallops — Make 1
Yarn: purple and fuchsia.
Row 1: ch 31, sc in 2nd ch from hook and across (30)
Row 2: (sl st in next st, 5 hdc in next st, sl st in next st) ×10 (70)
Attach only after the tail curl is stitched in place, or the ridge will twist to the underside.
Fasten off. Leave 35 cm tail.
Bead Garland Strands — Make 6
Yarn: coral, fuchsia, peach, cream, and purple.
For each strand: ch 46 (46). Fasten off both ends, leaving 15 cm tails.
For each bead bobble, make 5–7 per strand:
R1: 6 sc in MR (6)
R2: sc around (6)
Fasten off each bead and cinch closed. Sew beads along the chain at uneven spacing, 3–6 chains apart, so the strands hang like the photo instead of forming a stiff ladder.
Assembly
- Pin the head to the closed top of the body with the snout area facing left or right, not straight forward.
- Sew the head to the body through R18–R20 of the head and R40–R44 of the body.
- Attach the snout centered between the eyes, with its upper edge slightly higher than the lower eye line.
- Sew cheek patches 2 rounds below each eye and 1 stitch behind the snout seam.
- Pin the large shell fins to the body between R25 and R32, then sew only the inner third so the outer edge stays raised.
- Attach the small pectoral fins under the shell fins, angled toward the belly.
- Sew the dorsal crest from the top of the head down the back, stopping before the tightest part of the tail curl.
- Add the belly ruffle from the lower cheek to the lower belly, following the curve rather than a straight vertical line.
- Stitch the tail ridge scallops around the visible outer tail curl.
- Tie bead garlands behind the crest and beside the shell fins, then weave every tail inside the body.
The finished seahorse stands as a closed, stuffed display figure with sewn-on decorative parts.
7 Technical Tips
- Stitch marker drift: Move the stitch marker up every round on the body; a 2-stitch drift will send the dorsal crest off center. Check the marker again at R23 when the body reaches 42 stitches.
- Stuffing firmness: The belly needs firm stuffing from R20–R36, but the first 10 tail rounds need almost none. Overstuffing the tail tip blocks the spiral and makes it sit flat.
- Invisible decrease gaps: Use invisible dec on R35, R37, R39, R41, R43, and R44. Standard decreases leave six pale holes across the coral body.
- Eye placement timing: Install the 10 mm eyes after R16 and before R18 of the head. Waiting past R18 makes the washer hard to press into the stuffed curve.
- Ruffle length error: Measure the belly ruffle against the body before sewing; it should reach from cheek to lower belly without pulling. A ruffle shorter than 16 cm will pucker the neck.
- Pinning failure: Pin the shell fin at three points before stitching: top, center, and lower curve. Sewing from one end without pins makes the fin rotate backward.
- Tail weaving: Weave crest and garland tails at least 4 cm inside the stuffed body. Shorter woven tails work loose when the bead strands are lifted for styling.
Conclusion
This pattern works because the seahorse is not treated like a fish with a curled tail. The long snout, upright head, scalloped crest, belly ruffle, and shell fin all carry part of the identification. Make the body first, pin the head angle before sewing, then compare the dorsal crest placement from both sides before adding bead garlands. Save the finished project to Pinterest and post a side-view photo on Instagram so the tail spiral and fin depth are visible. Use #CoralSpiralSeahorse. For the next seahorse amigurumi crochet pattern test, which detail should change first: a taller crest, a tighter tail curl, or more bead strands?









