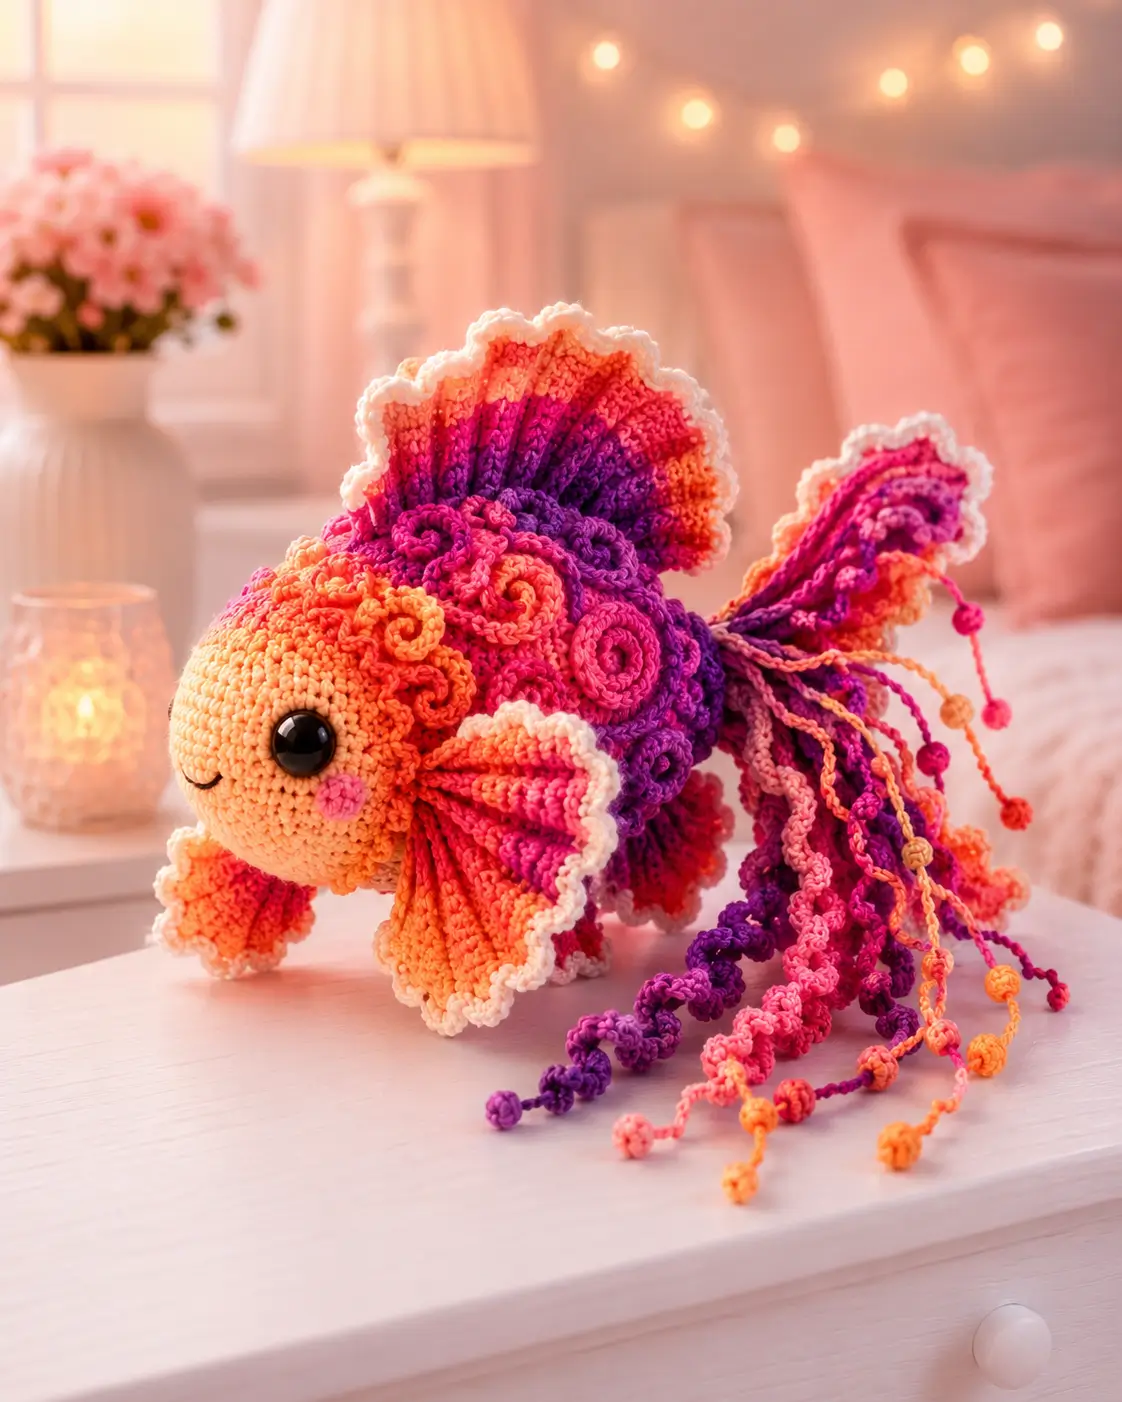
A fancy goldfish is all tail after round 20. This fancy goldfish amigurumi uses worsted yarn, a 4 mm hook, and layered fan fins to build a shelf-size fish at roughly 19 cm long. You shape the face first so the mouth stays blunt; the body then carries the weight backward into a broad veil tail. It works well as desk decor where glass bowls are impractical.
The Design: What Makes This Fish Different
Start with a separate head instead of a one-piece oval. That keeps the face round, lets you set the lips slightly forward, and stops the side fins from dragging the eye line off level. The second structural choice is the fin build: each fan is worked flat, widened in small steps, then edged last so the white ruffle stays on the perimeter rather than collapsing into the body. A third change is the rosette overlay. Those spirals break up a plain torso and give this crochet goldfish pattern the crowded texture visible in the photo. Many published fish builds stay smooth or push the tail directly out of the body; a fantail goldfish crochet pattern reads better when the dorsal fin, pectorals, and tail sit on separate planes. The common maker error is overstuffing the rear body, which turns a veil-tail silhouette into a round ball.
Project Info at a Glance
| Skill Level | Time | Finished Size | Hook | Best For |
|---|---|---|---|---|
| Intermediate | 3–5 hours | 19 cm long / 14 cm high incl. fins | 4 mm | Desk shelf, office pet, aquarium-free decor |
Materials and Tools
Amounts below are working estimates for this photo-led version. They sit between the worsted 4 mm goldfish benchmark on Etsy and the 7.5-inch worsted fantail benchmark on LoveCrafts, so buy by color family rather than by one exact brand.
Yarn
- Apricot/peach — worsted — 45 g — Caron Simply Soft or I Love This Cotton
- Coral/orange — worsted — 20 g — Caron Simply Soft or I Love This Cotton
- Hot pink — worsted — 20 g — Caron Simply Soft
- Purple/violet — worsted — 20 g — Caron Simply Soft
- White — worsted — 10 g — any smooth cotton or acrylic for edging
- Pink blush — worsted — small scrap — any matching smooth yarn
Tools
- Hook 4 mm
- Safety eyes 8–10 mm
- Polyester stuffing
- Yarn needle
- Stitch markers
- Pins
- Small embroidery scissors
Abbreviations
MR / sc / inc / dec / sl st / ch / BLO / hdc / dc
Use invisible decrease for the head and body taper; the front loops keep the face cleaner than a standard sc2tog and reduce visible pits around the cheeks.
Pattern — Step by Step
This is a fresh photo-led build, not a transcription of any searched PDF. Work in a continuous spiral unless noted.
Head (Make 1)
Yarn: apricot
R1: 6 sc in MR (6)
R2: inc x6 (12)
R3: (sc, inc) x6 (18)
R4: (2 sc, inc) x6 (24)
R5: (3 sc, inc) x6 (30)
R6: (4 sc, inc) x6 (36)
R7: sc around (36)
R8: sc around (36)
R9: sc around (36)
R10: sc around (36)
R11: (4 sc, dec) x6 (30)
R12: (3 sc, dec) x6 (24)
R13: (2 sc, dec) x6 (18)
Insert safety eyes between R7 and R8, 10 stitches apart. Stuff firmly from the front and flatten the back slightly before closing.
Fasten off. Leave a 30 cm tail.
Body (Make 1)
Yarn: begin in magenta or purple and fade toward orange at the neck
R1: 6 sc in MR (6)
R2: inc x6 (12)
R3: (sc, inc) x6 (18)
R4: (2 sc, inc) x6 (24)
R5: (3 sc, inc) x6 (30)
R6: (4 sc, inc) x6 (36)
R7: sc around (36)
R8: sc around (36)
R9: sc around (36)
R10: (4 sc, dec) x6 (30)
R11: sc around (30)
R12: (3 sc, dec) x6 (24)
R13: sc around (24)
R14: (2 sc, dec) x6 (18)
Change colors every 2–3 rounds if you want the rear-body fade from the photo. Stuff the front half more firmly than the back half so the tail can sit open.
Fasten off. Leave a 30 cm tail.
Pectoral Fins (Make 2)
Yarn: coral to pink ombré with white edge
Ch 9.
Row 1: sc in 2nd ch from hook and across (8)
Row 2: ch 1, turn, inc, 6 sc, inc (10)
Row 3: ch 1, turn, sc across (10)
Row 4: ch 1, turn, inc, 8 sc, inc (12)
Row 5: ch 1, turn, sc across (12)
Row 6: ch 1, turn, inc, 10 sc, inc (14)
Row 7: ch 1, turn, sc across (14)
Switch to white and work an edging around the outer curve only: 14 sc evenly across the curved edge, 3 sc in the tip, 14 sc back along the opposite side (31).
Do not stuff. Steam lightly under a cloth if the wedge curls backward.
Fasten off. Leave a 20 cm tail.
Belly Fins (Make 2)
Yarn: orange with white edge
Ch 7.
Row 1: sc in 2nd ch from hook and across (6)
Row 2: ch 1, turn, inc, 4 sc, inc (8)
Row 3: ch 1, turn, sc across (8)
Row 4: ch 1, turn, inc, 6 sc, inc (10)
Row 5: ch 1, turn, sc across (10)
Switch to white and work 22 sc evenly around the outer edge.
These are small stabilizers. Keep them thinner than the side fins.
Fasten off. Leave a 15 cm tail.
Dorsal Fin (Make 1)
Yarn: pink to purple with white edge
Ch 13.
Row 1: sc in 2nd ch from hook and across (12)
Row 2: ch 1, turn, inc, 10 sc, inc (14)
Row 3: ch 1, turn, sc across (14)
Row 4: ch 1, turn, inc, 12 sc, inc (16)
Row 5: ch 1, turn, sc across (16)
Row 6: ch 1, turn, inc, 14 sc, inc (18)
Row 7: ch 1, turn, sc across (18)
Row 8: ch 1, turn, inc, 16 sc, inc (20)
Row 9: ch 1, turn, sc across (20)
Switch to white and work 43 sc around the outer edge, putting 3 sc in the top point.
Pin this piece before sewing. The dorsal fin controls the whole silhouette from the side view.
Fasten off. Leave a 25 cm tail.
Tail Fan Lobes (Make 2)
Yarn: one pink-purple lobe and one coral-pink lobe, both with white edging
Ch 17.
Row 1: sc in 2nd ch from hook and across (16)
Row 2: ch 1, turn, inc, 14 sc, inc (18)
Row 3: ch 1, turn, sc across (18)
Row 4: ch 1, turn, inc, 16 sc, inc (20)
Row 5: ch 1, turn, sc across (20)
Row 6: ch 1, turn, inc, 18 sc, inc (22)
Row 7: ch 1, turn, sc across (22)
Row 8: ch 1, turn, inc, 20 sc, inc (24)
Row 9: ch 1, turn, sc across (24)
Switch to white and work 51 sc around the outer edge, placing 3 sc in the tip.
Overlap the two lobes by 3 stitches at the base when attaching. That overlap gives the veil-tail look instead of a flat paddle tail.
Fasten off. Leave a 30 cm tail on each lobe.
Tail Tendrils (Make 6)
Yarn: 2 short, 2 medium, 2 long in pink, orange, and purple
Short Tendrils (make 2)
Ch 16.
Row 1: 4 sc in 2nd ch from hook, 2 sc in each remaining ch (32)
Medium Tendrils (make 2)
Ch 22.
Row 1: 4 sc in 2nd ch from hook, 2 sc in each remaining ch (44)
Long Tendrils (make 2)
Ch 28.
Row 1: 4 sc in 2nd ch from hook, 2 sc in each remaining ch (56)
The 4 sc at the tip creates the bead-like nub. Let the rest curl naturally; do not block these pieces flat.
Fasten off. Leave a 15 cm tail on each.
Lips (Make 1)
Yarn: coral with a white upper edge
Ch 10.
Row 1: sc in 2nd ch from hook and across (9)
Row 2: ch 1, turn, inc, 7 sc, inc (11)
Row 3: ch 1, turn, sc across (11)
With white, sl st 6 stitches across the upper front edge only.
Pin the center of the strip inward before sewing so the piece forms two lips instead of one flat bar.
Fasten off. Leave a 20 cm tail.
Cheek Patches (Make 2)
Yarn: blush pink
R1: 6 sc in MR (6)
R2: inc x6 (12)
Flatten lightly. These stay flat circles.
Fasten off. Leave a 12 cm tail.
Rosette Scales (Make 8)
Yarn: mixed orange, pink, and purple scraps
Small Rosettes (make 4)
Ch 12.
Row 1: 2 sc in 2nd ch from hook and in each remaining ch (22)
Large Rosettes (make 4)
Ch 16.
Row 1: 2 sc in 2nd ch from hook and in each remaining ch (30)
Roll each strip from the narrow end into a tight spiral and tack through the base only. Mix sizes so the body surface stays uneven, not gridded.
Fasten off. Leave a 15 cm tail on each.
Assembly
- Sew the head to the body, matching the 18-stitch openings and keeping the apricot side forward.
- Add a final pinch of stuffing at the neck before the seam closes so the head does not tilt down.
- Sew the lips to the center front of the head, spanning roughly R5 to R8.
- Attach the cheek patches one round below the eye line and two stitches out from the mouth corners.
- Embroider a shallow smile under the lip strip with black or brown thread, no longer than 6 stitches.
- Sew the pectoral fins to the sides where the head meets the body, angled slightly downward and back.
- Sew the belly fins under the body, centered between the pectorals and the tail base.
- Pin and sew the dorsal fin from the upper back of the head across the first half of the body.
- Overlap and attach the tail fan lobes to the rear of the body, then sew the six tendrils under and between those lobes.
- Scatter the rosette scales across the crown, upper shoulder, and rear body, then weave all tails deep into the stuffing.
The completed fish lands near the 19 cm fantail benchmark in worsted yarn, though the added rosettes and tendrils increase visual volume.
7 Technical Tips
- Move one stitch marker every round. On a 36-stitch head, losing even one stitch before R10 shifts the mouth center by several millimeters and the lips will read crooked.
- Pack the head firmer than the body. If both sections are stuffed to the same density, the rear body becomes too rigid and the tail lobes sit flat instead of opening.
- Use invisible decreases on every taper round. Standard decreases leave paired holes on the face and side walls, and those holes stand out most on the apricot front.
- Place the eyes before the last stuffing pass. In this build, 10 stitches between eyes gives the compact face from the photo; 12 stitches makes the head look wider and less ornamental.
- Drop to a 3.5 mm hook if you switch to velvet or chenille. Plush yarn expands after handling, and the white fin edge will flare if the base rows are too loose.
- Pin every fan in at least five places before sewing. One center pin is not enough for the tail or dorsal fin, and the outer corners will twist while you stitch.
- Weave tendril tails back through at least 3 cm of stuffed body, not just surface stitches. Surface-only weaving fails first when the fish is picked up by the tail.
Conclusion
Next step: pick your six fin colors before you start the body, then group each scrap with one matching rosette so the gradient stays controlled. When the fish is finished, photograph it from the side and from above; the top view shows whether the dorsal fan and tail lobes are balanced. Save the final image to Pinterest, post it on Instagram, and tag it with #FancyGoldfishRuffle. This fancy goldfish amigurumi also works as a base for oranda, telescope-eye, or betta-inspired variations because the lips, rosettes, and tail length can be changed without rewriting the core body. Would you keep the six curled tail tendrils, or extend the veil to eight?









