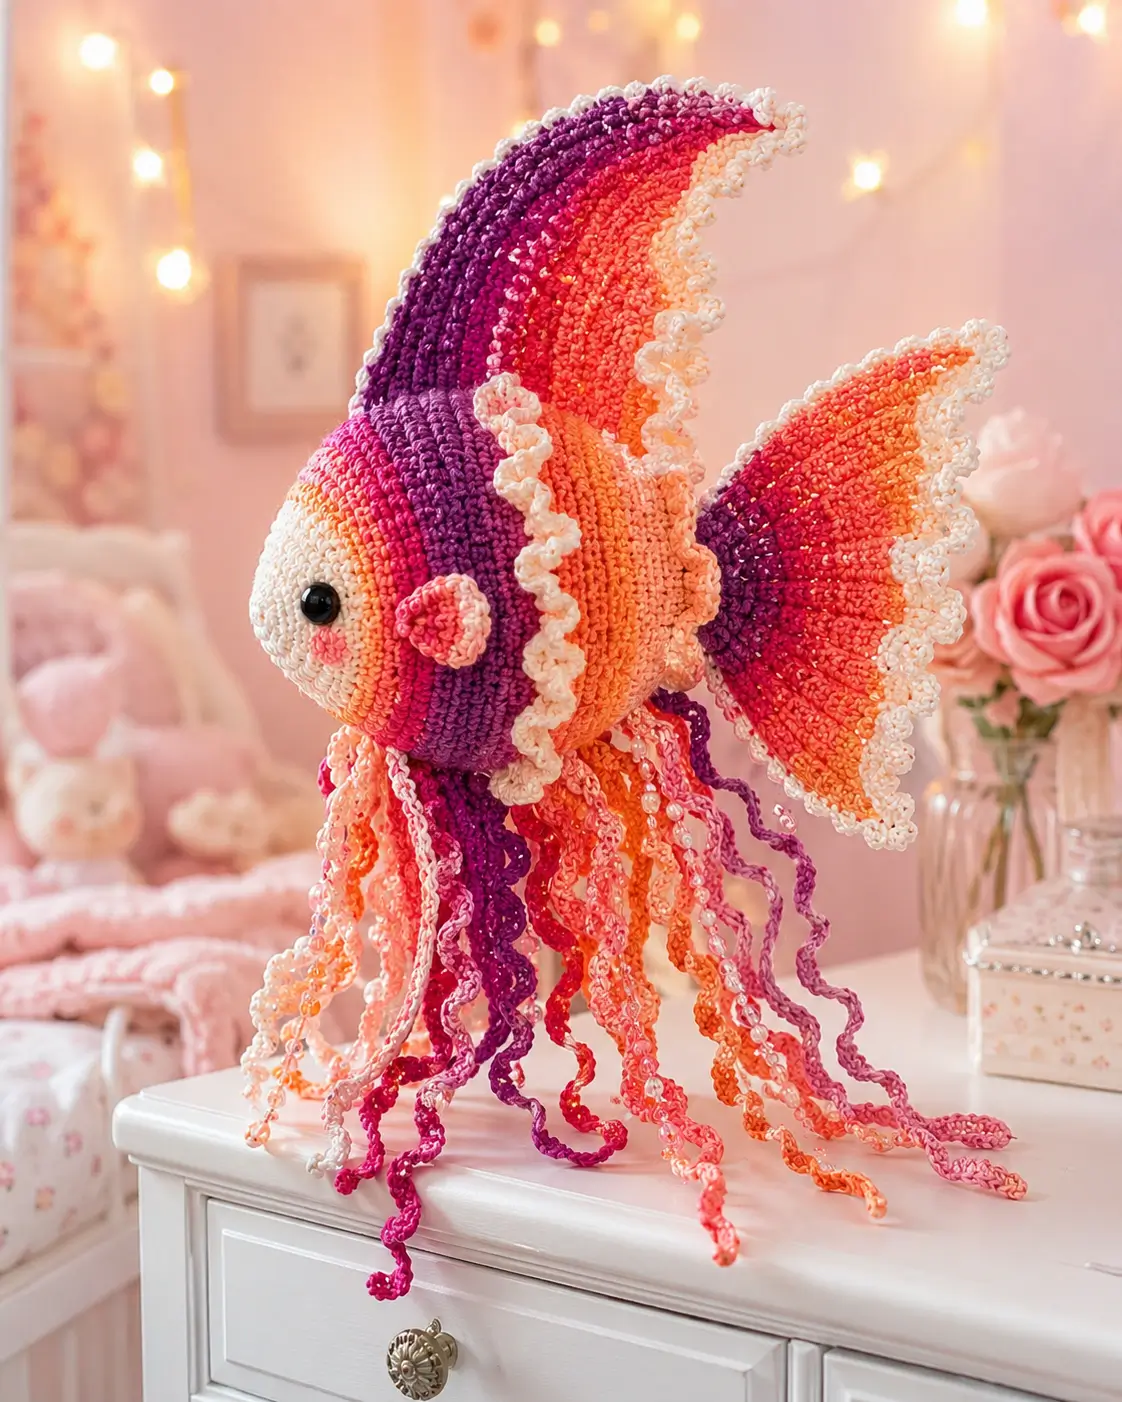
Halfmoon bettas stop reading as bettas the moment the tail drops narrower than the head. This betta fish amigurumi pattern uses worsted yarn, a 3.5 mm hook, and 12 mm eyes for a fish about 20 cm long. You will work an advanced-beginner build suited to shelf decor or aquarium-themed display. The stuffed core stays compact while the fins carry the width.
The Design: What Makes Betta Fish Different
This photo asks for three structural choices. First, the head cannot dominate the silhouette; a halfmoon betta crochet pattern works only when the rear fin span overtakes the face width. Second, the dorsal fin and tail need to be panel-built, not stubby tabs, because broad fin planes are what separate realistic betta fish crochet from generic tropical-fish plush. Third, the underside needs long streamer attachment points so the piece still reads as crochet aquarium decor when viewed from the side. A common maker mistake is attaching the tail too low on the body. That collapses the profile and turns a rounded toy fish into a fish with no breed signal. This build uses panels to match the photographed proportions.
Project Info at a Glance
| Skill Level | Time | Finished Size | Hook | Best For |
|---|---|---|---|---|
| Advanced beginner | 6–8 hours | 20 cm long | 3.5 mm | Shelf display, nursery mobile, aquarium-themed decor |
Materials and Tools
Yarn
- Sunset ombré — medium/worsted — 45–55 g — self-striping acrylic or cotton-acrylic blend
- Cream — medium/worsted — 15–20 g — matching fiber for edging and frill
- Pink blush scrap — fingering or light worsted — under 2 g — any smooth cotton for cheek patches
Tools
- Hook 3.5 mm
- 12 mm safety eyes
- Polyester stuffing
- Tapestry needle
- Stitch markers
- Optional beads for streamer accents
Abbreviations
MR / sc / inc / dec / sl st / ch / BLO / FLO / hdc / dc / tr
Use invisible decrease on all closing rounds; it removes the stepped ridge that standard sc2tog leaves beside the face and seam lines.
Pattern — Step by Step
Continuous spiral unless noted. The counts below use a medium 36-stitch plateau scaled to the photographed betta build.
Head (Make 1)
Yarn: sunset ombré starting at the lightest section
R1: 6 sc in MR (6)
R2: inc x6 (12)
R3: [sc, inc] x6 (18)
R4: [2 sc, inc] x6 (24)
R5: [3 sc, inc] x6 (30)
R6: [4 sc, inc] x6 (36)
R7: sc around (36)
R8: sc around (36)
R9: sc around (36)
R10: sc around (36)
R11: sc around (36)
R12: sc around (36)
R13: [4 sc, dec] x6 (30)
R14: [3 sc, dec] x6 (24)
R15: [2 sc, dec] x6 (18)
R16: [sc, dec] x6 (12)
R17: dec x6 (6)
Insert safety eyes between R9 and R10, 8 visible stitches apart. Stuff firmly after R12.
Fasten off. Leave 25 cm tail.
Body (Make 1)
Yarn: sunset ombré continuing from the darker section
R1: 6 sc in MR (6)
R2: inc x6 (12)
R3: [sc, inc] x6 (18)
R4: [2 sc, inc] x6 (24)
R5: [3 sc, inc] x6 (30)
R6: [4 sc, inc] x6 (36)
R7: sc around (36)
R8: sc around (36)
R9: sc around (36)
R10: sc around (36)
R11: sc around (36)
R12: [4 sc, dec] x6 (30)
R13: sc around (30)
R14: [3 sc, dec] x6 (24)
R15: sc around (24)
R16: [2 sc, dec] x6 (18)
R17: [sc, dec] x6 (12)
R18: dec x6 (6)
Stuff the front half medium-firm and the rear half firm. Keep the side walls smooth so the tail panel sits flat.
Fasten off. Leave 25 cm tail.
Pectoral Fins (Make 2)
Yarn: pink or peach accent
R1: 6 sc in MR (6)
R2: inc x6 (12)
R3: [sc, inc] x6 (18)
R4: sc around (18)
Flatten very lightly into a shallow cup. Optional cream trim: [sl st, ch 2, sl st] in every third stitch around the outer edge.
Fasten off. Leave 20 cm tail.
Side Frill Panels (Make 2)
Yarn: ombré with optional cream trim
Row 1: ch 8, starting in 2nd ch from hook, 7 sc, ch 1, turn (7)
Row 2: inc, 5 sc, inc, ch 1, turn (9)
Row 3: inc, 7 sc, inc, ch 1, turn (11)
Row 4: sc across, ch 1, turn (11)
Row 5: inc, 9 sc, inc, ch 1, turn (13)
Row 6: sc across (13)
Optional cream trim along one long edge: work [sl st, 2 hdc, sl st] in evenly spaced points to build the visible ruffle.
Fasten off. Leave 20 cm tail.
Dorsal Fin (Make 1)
Yarn: sunset ombré
Row 1: ch 4, starting in 2nd ch from hook, 3 sc, ch 1, turn (3)
Row 2: inc, sc, inc, ch 1, turn (5)
Row 3: inc, 3 sc, inc, ch 1, turn (7)
Row 4: inc, 5 sc, inc, ch 1, turn (9)
Row 5: inc, 7 sc, inc, ch 1, turn (11)
Row 6: inc, 9 sc, inc, ch 1, turn (13)
Row 7: sc across, ch 1, turn (13)
Row 8: sc across, ch 1, turn (13)
Row 9: sc across, ch 1, turn (13)
Row 10: sc across, ch 1, turn (13)
Row 11: dec, 9 sc, dec, ch 1, turn (11)
Row 12: dec, 7 sc, dec, ch 1, turn (9)
Row 13: dec, 5 sc, dec, ch 1, turn (7)
Row 14: dec, 3 sc, dec, ch 1, turn (5)
Row 15: dec, sc, dec (3)
Optional cream edge trim around the outer curve only. Do not trim the base edge.
Fasten off. Leave 30 cm tail.
Tail Fin (Make 1)
Yarn: sunset ombré
Row 1: ch 5, starting in 2nd ch from hook, 4 sc, ch 1, turn (4)
Row 2: inc, 2 sc, inc, ch 1, turn (6)
Row 3: inc, 4 sc, inc, ch 1, turn (8)
Row 4: inc, 6 sc, inc, ch 1, turn (10)
Row 5: inc, 8 sc, inc, ch 1, turn (12)
Row 6: inc, 10 sc, inc, ch 1, turn (14)
Row 7: inc, 12 sc, inc, ch 1, turn (16)
Row 8: sc across, ch 1, turn (16)
Row 9: sc across, ch 1, turn (16)
Row 10: sc across, ch 1, turn (16)
Row 11: sc across, ch 1, turn (16)
Row 12: dec, 12 sc, dec, ch 1, turn (14)
Row 13: dec, 10 sc, dec, ch 1, turn (12)
Row 14: dec, 8 sc, dec, ch 1, turn (10)
Row 15: dec, 6 sc, dec, ch 1, turn (8)
Row 16: dec, 4 sc, dec, ch 1, turn (6)
Row 17: dec, 2 sc, dec (4)
Add cream edging on the outer arc if you want the photographed scalloped frame.
Fasten off. Leave 35 cm tail.
Neck Frill Band (Make 1)
Yarn: cream
Row 1: ch 31, starting in 2nd ch from hook, 30 sc, ch 1, turn (30)
Row 2: inc in each st across, ch 1, turn (60)
Row 3: [sc, inc] x30 (90)
This strip must wave naturally. Do not block it flat.
Fasten off. Leave 40 cm tail.
Cheek Patches (Make 2)
Yarn: blush pink
R1: 6 sc in MR (6)
R2: inc x6 (12)
Flatten, then steam lightly through a cloth if the circle cups.
Fasten off. Leave 15 cm tail.
Streamers (Make 14 Total)
Yarn: mix cream, peach, coral, magenta, and plum
Short Streamers (Make 4)
Row 1: ch 26, starting in 2nd ch from hook, 3 sc in each ch across (75)
Medium Streamers (Make 6)
Row 1: ch 31, starting in 2nd ch from hook, 3 sc in each ch across (90)
Long Streamers (Make 4)
Row 1: ch 36, starting in 2nd ch from hook, 3 sc in each ch across (105)
Thread beads onto 4–6 finished strands before knotting them off if you want the same weighted drape visible in the photo.
Fasten off. Leave 15 cm tail on each.
Assembly
- Pin the head to the front third of the body, slightly high on the body centerline so the nose projects forward rather than down.
- Sew head to body with small whip stitches, rotating as needed so the eye line stays level in side view.
- Sew the cheek patches below and slightly behind the eyes. Keep each patch 1 stitch lower than eye center.
- Add a tiny stitched mouth only if needed; the photographed version reads mainly through profile, not facial embroidery.
- Attach the pectoral fins on each side of the body where head and body meet, aiming them slightly backward.
- Sew one side frill panel to each side seam behind the head, with the trimmed edge facing outward.
- Center the dorsal fin along the top line, starting at the back of the head and ending just before the tail join.
- Attach the tail fin to the rear body opening area, spreading the top and bottom edges equally so the fin arc stays wider than the head.
- Wrap and sew the neck frill band around the seam between head and body, gathering it slightly more at the sides than at the top.
- Knot the 14 streamers along the lower rear seam from mid-body to tail base, alternating lengths and colors, then weave all tails inward.
The assembled fish lands near 20 cm in length before the streamers are measured in the total drop.
7 Technical Tips
- Mark the dorsal axis before you sew anything on. If the dorsal fin shifts even 2 stitches off center, the tail will read twisted in side profile and the fish loses that halfmoon balance.
- Stuff the body firmer than the head. A soft rear body collapses under the tail seam, and the tail panel folds inward instead of fanning open.
- Use invisible decrease on every closure round. Standard decreases leave six visible corners on a 36-stitch sphere, which is especially noticeable along the light face area.
- Insert the eyes before R13 on the head. Waiting until the head is partly closed forces the eye backs too close together and can pinch the front of the face.
- Watch tension if you swap to velvet yarn. Velvet expands the panel edges and can add 1–2 cm to the tail span, which makes the ruffle trim sag unless the hook is dropped by about 0.5 mm.
- Pin the tail at three points, not one. Fix the center first, then the top corner and bottom corner, or the tail cup will drift and the body seam will show.
- Weave streamer tails back through at least 3 cm of body stitches. Short buried tails work loose under bead weight and can pull a whole streamer bundle out after handling.
Conclusion
Cut the ombré yarn so the lightest section lands on the face first, then build the fin panels before final assembly so the width can be checked against the head. Photograph the finished fish once from the side and once from below; those are the two angles that show the species line best on Pinterest and Instagram. Use #BettaFishPattern when you post. Before you call it done, compare one measurement: is the tail span still wider than the head after stuffing and sewing? That single checkpoint keeps the silhouette true and makes the final result read as a betta fish amigurumi pattern.









