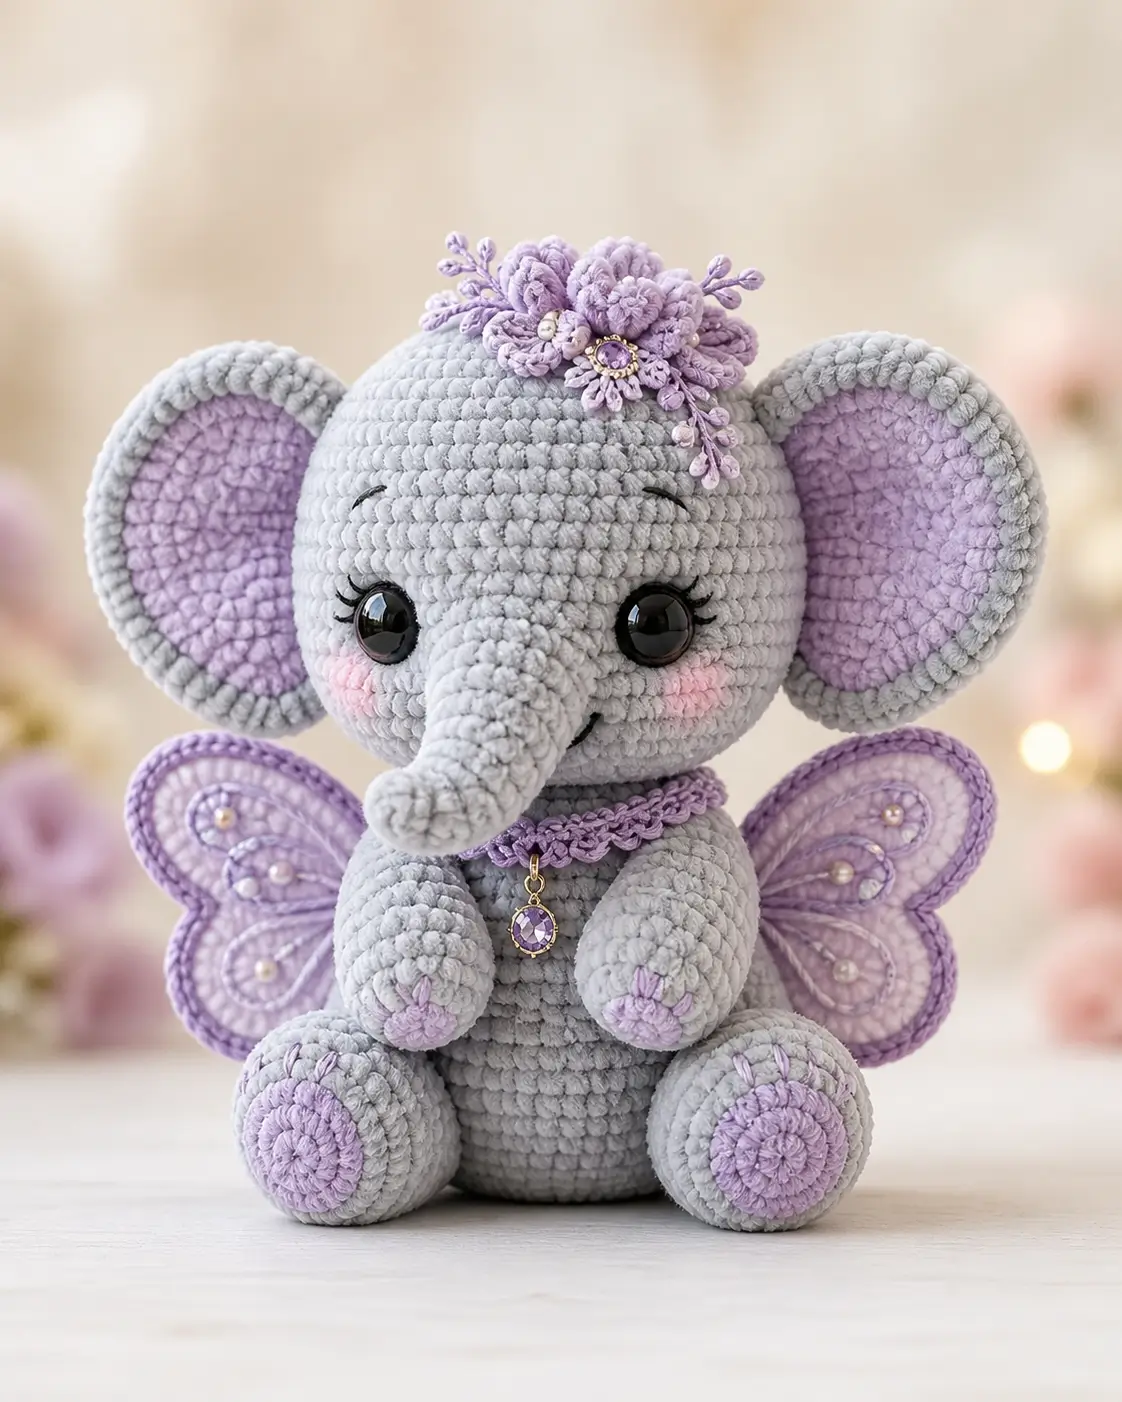
A trunk pulls the face forward, but fairy wings pull the silhouette sideways. This fairy elephant amigurumi crochet pattern builds a 23 cm seated plush with chunky velvet yarn, a 4.5 mm hook, 15 mm eyes, and intermediate assembly. You will make a stable shelf piece with large ears, a tapered trunk, lavender wings, flower crown, and necklace details that stay visible from the front.
The Design: What Makes This Fairy Elephant Different
The first structural choice is head weight. You place the largest sphere above a shorter body, so the neck seam needs a closed body top and a firm contact patch. The second choice is ear framing: grey outer discs sit behind lavender inner discs, making the face wider without adding much front weight. The third choice is wing control. Each wing is built from two flat lobes, then pinned behind the arms so the plush still sits without tipping backward. Many makers oversize the trunk base and push the eyes too far apart; the face then reads as a tube with ears, not an elephant. Use this crochet elephant pattern with safety-eye timing marked before closing the head, and treat the butterfly wing crochet pattern as a flat applique set, not a stuffed limb.
Project Info at a Glance
| Skill Level | Time | Finished Size | Hook | Best For |
|---|---|---|---|---|
| Intermediate | 6–8 hours | 23 cm seated | 4.5 mm | Decorative plush, shelf display, nursery decor with embroidered eyes |
The 23 cm size is based on chunky yarn with a 4.5 mm hook, which aligns with published chunky elephant sizing.
Materials and Tools
Yarn
- Pale grey — chunky velvet chenille — 130 g — Premier Parfait Chunky or similar.
- Lavender — chunky velvet chenille — 40 g — for inner ears, wings, paw pads, crown, and choker.
- Soft pink — chunky velvet chenille — 5 g — for cheek patches.
- Black embroidery thread — small amount — for lashes and mouth.
- Pearl white cotton thread — small amount — for bead knots or flower centers.
Tools
- Hook 4.5 mm
- 15 mm black safety eyes
- Polyester stuffing
- Yarn needle
- Stitch markers
- Pins
- Scissors
- Optional beads or pendant charm
For toys handled by children under three, use embroidered eyes rather than plastic safety eyes.
Abbreviations
- MR = magic ring
- sc = single crochet
- inc = increase, 2 sc in one stitch
- dec = invisible decrease
- sl st = slip stitch
- ch = chain
- BLO = back loop only
- hdc = half double crochet
- dc = double crochet
Invisible decrease places the hook through the front loops of the next two stitches before pulling through; it reduces bulk on head and body closures.
Pattern — Step by Step
Continuous spiral unless noted.
Head
Yarn: pale grey — Source: Standard amigurumi math; size checked against elephant head/body benchmarks.
R1: 6 sc in MR (6)
R2: inc ×6 (12)
R3: (sc, inc) ×6 (18)
R4: (2 sc, inc) ×6 (24)
R5: (3 sc, inc) ×6 (30)
R6: (4 sc, inc) ×6 (36)
R7: (5 sc, inc) ×6 (42)
R8–R16: sc around (42)
Place 15 mm safety eyes between R12 and R13, 9 stitches apart. Embroider lashes before the head opening narrows.
R17: (5 sc, dec) ×6 (36)
R18: sc around (36)
R19: (4 sc, dec) ×6 (30)
R20: (3 sc, dec) ×6 (24)
R21: (2 sc, dec) ×6 (18)
R22: (sc, dec) ×6 (12)
Stuff firmly, with extra stuffing under the forehead and around the trunk area.
R23: dec ×6 (6)
Fasten off. Leave a 20 cm tail and close the opening.
Body
Yarn: pale grey — Source: Standard amigurumi math; body scale checked against elephant body benchmarks.
R1: 6 sc in MR (6)
R2: inc ×6 (12)
R3: (sc, inc) ×6 (18)
R4: (2 sc, inc) ×6 (24)
R5: (3 sc, inc) ×6 (30)
R6: (4 sc, inc) ×6 (36)
R7–R14: sc around (36)
R15: (4 sc, dec) ×6 (30)
R16–R17: sc around (30)
R18: (3 sc, dec) ×6 (24)
R19: sc around (24)
R20: (2 sc, dec) ×6 (18)
R21: (sc, dec) ×6 (12)
Stuff the base firmly so the doll sits without rocking.
R22: dec ×6 (6)
Fasten off. Leave a 25 cm tail.
Trunk
Yarn: pale grey — Source: Standard amigurumi math; trunk need confirmed as a core elephant part.
R1: 6 sc in MR (6)
R2–R5: sc around (6)
R6: inc ×6 (12)
R7–R9: sc around (12)
R10: (sc, inc) ×6 (18)
R11–R12: sc around (18)
Stuff only the base. Leave the tip soft so it curves down naturally.
Fasten off. Leave a 30 cm tail.
Outer Ears
Yarn: pale grey — Source: Standard amigurumi math; large ear construction gap checked against elephant ear references.
R1: 6 sc in MR (6)
R2: inc ×6 (12)
R3: (sc, inc) ×6 (18)
R4: (2 sc, inc) ×6 (24)
R5: (3 sc, inc) ×6 (30)
R6: (4 sc, inc) ×6 (36)
R7: sc around (36)
Fasten off. Leave a 35 cm tail for sewing.
Inner Ear Discs
Yarn: lavender — Source: Standard amigurumi math.
R1: 6 sc in MR (6)
R2: inc ×6 (12)
R3: (sc, inc) ×6 (18)
R4: (2 sc, inc) ×6 (24)
R5: (3 sc, inc) ×6 (30)
Fasten off. Leave a 25 cm tail. Sew one lavender disc to each grey ear, centered with a 1-round grey rim visible.
Cheek Patches
Yarn: soft pink — Source: Standard amigurumi math.
R1: 6 sc in MR (6)
R2: inc ×6 (12)
Fasten off. Leave a 15 cm tail. Make two flat circles.
Arms / Front Legs
Yarn: lavender then pale grey — Source: Standard amigurumi math.
R1: lavender, 6 sc in MR (6)
R2: inc ×6 (12)
R3: (sc, inc) ×6 (18)
R4: change to grey, BLO sc around (18)
R5–R6: sc around (18)
R7: (sc, dec) ×6 (12)
R8–R11: sc around (12)
Stuff the paw only. Flatten the top before sewing.
Fasten off. Leave a 25 cm tail. Make two.
Back Legs
Yarn: lavender then pale grey — Source: Standard amigurumi math.
R1: lavender, 6 sc in MR (6)
R2: inc ×6 (12)
R3: (sc, inc) ×6 (18)
R4: (2 sc, inc) ×6 (24)
R5: change to grey, BLO sc around (24)
R6–R8: sc around (24)
R9: (2 sc, dec) ×6 (18)
R10: sc around (18)
R11: (sc, dec) ×6 (12)
R12: sc around (12)
Stuff the foot firmly and the upper leg lightly. Embroider three lavender toe lines before attaching.
Fasten off. Leave a 30 cm tail. Make two.
Fairy Wings
Yarn: light lavender with darker lavender edging — Source: Original flat applique math; elephant search data showed limited fairy-wing coverage.
Each side wing uses one upper lobe and one lower lobe.
Upper Lobes — Make 2
R1: 6 sc in MR (6)
R2: inc ×6 (12)
R3: (sc, inc) ×6 (18)
R4: (2 sc, inc) ×6 (24)
R5: (3 sc, inc) ×6 (30)
R6: sc around (30)
Fasten off. Leave a 25 cm tail.
Lower Lobes — Make 2
R1: 6 sc in MR (6)
R2: inc ×6 (12)
R3: (sc, inc) ×6 (18)
R4: (2 sc, inc) ×6 (24)
R5: sc around (24)
Fasten off. Leave a 25 cm tail.
Wing Edging
Join darker lavender at any outer stitch. Sl st around each lobe: 30 sl st around each upper lobe and 24 sl st around each lower lobe. Fasten off and weave tails. Sew one upper lobe above one lower lobe to create each wing set.
Flower Crown
Yarn: lavender — Source: Original accessory math.
Flowers — Make 5
R1: 6 sc in MR (6)
R2: (sl st, ch 2, 2 hdc, ch 2, sl st) in each stitch around (6 petals)
Fasten off. Leave 15 cm tails for sewing.
Tiny Center Knots — Make 5
Ch 2. Work 5 sc into the second ch from hook (5). Sl st to close. Fasten off.
Sew one center knot to each flower. Add pearl beads only for display pieces.
Choker and Pendant Loop
Yarn: lavender — Source: Original accessory math.
R1: ch 34 (34)
R2: starting in second ch from hook, 33 sc across (33)
Fasten off. Leave 20 cm tails at both ends.
Pendant Loop
R1: 6 sc in MR (6)
R2: sl st around (6)
Fasten off. Sew the loop to the center front of the choker. Add a charm only for display use.
Assembly
- Sew the body to the underside of the head with the body centered under the eye line.
- Pin the trunk between the eyes, with the base covering head R13–R17, then sew around the base twice.
- Sew the outer ears to the sides of the head between R8 and R16, with the inner lavender discs facing forward.
- Sew the cheek patches below the eyes and slightly outside the trunk base.
- Embroider the mouth with black thread from the trunk base down to one side.
- Sew the arms to the front of the body between body R8 and R13.
- Sew the back legs to the lower body between body R15 and R20, angled outward for a seated base.
- Sew each wing set behind the arms, with upper lobes starting near body R7 and lower lobes ending near body R16.
- Sew the five flowers across the top of the head, then add small sprigs or knots between them.
- Wrap the choker around the neck seam, sew the back join closed, and tack the pendant loop to the front.
The finished piece sits at about 23 cm with the listed yarn and hook.
7 Technical Tips
- Marker drift: a lost start point makes the ears uneven by 3–4 stitches. Move the marker after every round and count 42 stitches before closing the head.
- Stuffing hollow: a soft neck creates a forward head droop. Pack the head base and body top until a thumb press rebounds within 2 seconds.
- Visible decreases: velvet yarn shows ladder gaps at 24-to-18 and 18-to-12 rounds. Work invisible decreases through front loops only and pull the loop to hook diameter, not wider.
- Eye timing error: backs cannot be fitted after R19. Set 15 mm eyes between R12 and R13, 9 stitches apart, before R17 narrows the head.
- Velvet tension creep: chunky chenille can grow 1–2 cm after stuffing. Use a 4.5 mm hook and redo any round where fiberfill shows between two adjacent stitches.
- Pinning error: unpinned wings often tilt above one shoulder. Pin the upper lobe top at body R7 and the lower lobe bottom at body R16 before sewing.
- Tail weaving slip: velvet tails can work out of seams under handling. Weave each 15 cm tail in three directions and split the yarn ply on the final pass.
Conclusion
This pattern works because the elephant parts stay compact while the decoration stays flat. The trunk and ears carry the animal identity; the wings, crown, and pendant add the fairy layer without changing the sitting balance. Block the wing lobes overnight under pins, then photograph the doll from the front and one side so the ear depth and wing placement are clear. Save the finished fairy elephant amigurumi crochet pattern notes with your hook size and yarn brand before making a second version. Share the finished plush on Pinterest and Instagram with #FairyElephant. Which detail changes the character more on your version: the lavender inner ears, the trunk curve, or the wing outline?









