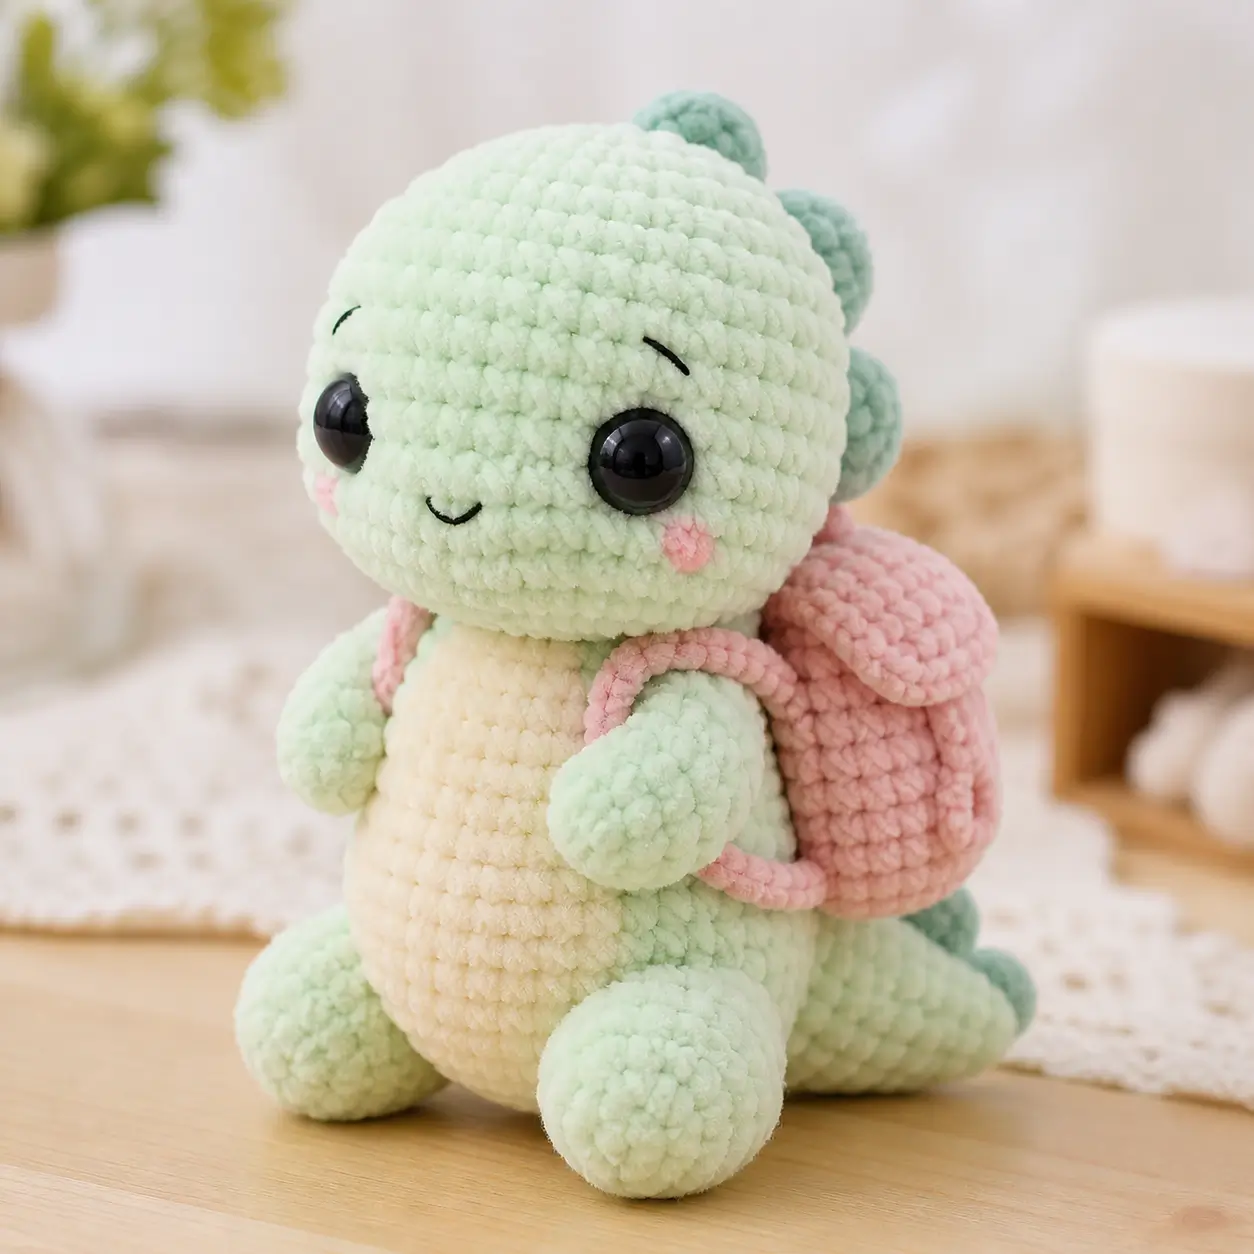
A turtle shell has to read as armor, backpack, and balance weight at the same time. This turtle amigurumi crochet pattern builds a mint plush turtle with a cream belly, pink shell, raised back bumps, cheek patches, and embroidered face details. Use chunky velvet yarn, a 4.5 mm hook, and 16 mm safety eyes for an intermediate 20 cm sitting toy. The shape sits upright for shelf display.
The Design: What Makes Minty Different
The photo asks for a plush turtle crochet shape that sits upright instead of lying flat, so the body is worked as a rounded column with a separate belly patch. That keeps the front stable while the shell adds weight to the back. The shell is not just a dome; it includes side flaps and straps, which gives this crochet turtle with shell a backpack profile.
The raised dark mint bumps are small closed spheres, not bobbles worked into the shell, because separate bumps hold their height better in velvet yarn. A maker often sews turtle shells too high. That mistake tilts the head forward and hides the cream belly. This chunky turtle amigurumi fixes the problem by placing the shell centerline below the neck.
Project Info at a Glance
| Skill Level | Time | Finished Size | Hook | Best For |
|---|---|---|---|---|
| Intermediate | 2–4 hours | About 20 cm | 4.5 mm | Upright plush turtle with separate shell |
Materials and Tools
Yarn
- Pale mint green — size 6 super bulky chenille — 45 g — Premier Parfait Chunky, Himalaya Dolphin Baby, or similar
- Soft cream — size 6 super bulky chenille — 15 g — for belly patch
- Dusty pink — size 6 super bulky chenille — 25 g — for shell, flaps, rim, straps, cheeks
- Dark mint / seafoam — size 6 super bulky chenille — 8 g — for back bumps
- Black embroidery yarn — cotton or acrylic scrap — under 1 g — for brows and smile
Tools
- Hook 4.5 mm
- Safety eyes 16 mm, or black yarn for stitched eyes
- Polyester stuffing
- Yarn needle
- Locking stitch markers
- Pins
- Scissors
Abbreviations
MR = magic ring; sc = single crochet; inc = increase; dec = decrease; sl st = slip stitch; ch = chain; BLO = back loop only; FLO = front loop only; inv dec = invisible decrease; R = round; st = stitch.
For invisible decrease, work through front loops of the next two stitches before completing one sc so the closing line stays small.
Pattern — Step by Step
Continuous spiral unless noted.
Head — Make 1
Yarn: pale mint green
R1: 6 sc in MR (6)
R2: inc ×6 (12)
R3: (sc, inc) ×6 (18)
R4: (2 sc, inc) ×6 (24)
R5: (3 sc, inc) ×6 (30)
R6: (4 sc, inc) ×6 (36)
R7: sc around (36)
R8: sc around (36)
R9: sc around (36)
R10: sc around (36)
R11: sc around (36)
R12: sc around (36)
Insert 16 mm safety eyes between R8 and R9, about 10 sts apart. Add washers before the head closes.
R13: (4 sc, dec) ×6 (30)
R14: (3 sc, dec) ×6 (24)
R15: (2 sc, dec) ×6 (18)
Stuff firmly, adding more at the lower front to support the face.
R16: (sc, dec) ×6 (12)
R17: dec ×6 (6)
Fasten off. Leave a 20 cm tail and close through front loops.
Body — Make 1
Yarn: pale mint green
R1: 6 sc in MR (6)
R2: inc ×6 (12)
R3: (sc, inc) ×6 (18)
R4: (2 sc, inc) ×6 (24)
R5: (3 sc, inc) ×6 (30)
R6: (4 sc, inc) ×6 (36)
R7: sc around (36)
R8: sc around (36)
R9: sc around (36)
R10: sc around (36)
R11: sc around (36)
R12: sc around (36)
R13: sc around (36)
R14: (4 sc, dec) ×6 (30)
R15: (3 sc, dec) ×6 (24)
Begin stuffing. Keep the base flat by pressing stuffing toward the lower sides.
R16: (2 sc, dec) ×6 (18)
R17: (sc, dec) ×6 (12)
R18: dec ×6 (6)
Fasten off. Leave a 25 cm tail and close.
Cream Belly Patch — Make 1
Yarn: soft cream
R1: 6 sc in MR (6)
R2: inc ×6 (12)
R3: (sc, inc) ×6 (18)
R4: (2 sc, inc) ×6 (24)
R5: (3 sc, inc) ×6 (30)
R6: (4 sc, inc) ×6 (36)
Sl st into next st (36)
Fasten off. Leave a 35 cm tail. Pin vertically on the body and stitch after the head is attached.
Arms / Front Legs — Make 2
Yarn: pale mint green
R1: 6 sc in MR (6)
R2: inc ×6 (12)
R3: (sc, inc) ×6 (18)
R4: sc around (18)
R5: sc around (18)
R6: (sc, dec) ×6 (12)
R7: sc around (12)
R8: sc around (12)
R9: sc around (12)
Stuff paw only. Leave the upper arm soft for easier sewing.
Fasten off. Leave a 25 cm tail.
Back Legs — Make 2
Yarn: pale mint green
R1: 6 sc in MR (6)
R2: inc ×6 (12)
R3: (sc, inc) ×6 (18)
R4: (2 sc, inc) ×6 (24)
R5: sc around (24)
R6: sc around (24)
R7: (2 sc, dec) ×6 (18)
R8: (sc, dec) ×6 (12)
R9: sc around (12)
Stuff the front half of each foot. Flatten the final round before sewing.
Fasten off. Leave a 30 cm tail.
Pink Shell — Make 1
Yarn: dusty pink
R1: 6 sc in MR (6)
R2: inc ×6 (12)
R3: (sc, inc) ×6 (18)
R4: (2 sc, inc) ×6 (24)
R5: (3 sc, inc) ×6 (30)
R6: (4 sc, inc) ×6 (36)
R7: sc around (36)
R8: sc around (36)
R9: sc around (36)
R10: sc around (36)
R11: (4 sc, dec) ×6 (30)
R12: (3 sc, dec) ×6 (24)
Stuff lightly. The shell should dome, not bulge.
Fasten off. Leave a 45 cm tail for sewing to the back.
Side Shell Flaps — Make 2
Yarn: dusty pink
R1: 6 sc in MR (6)
R2: inc ×6 (12)
R3: (sc, inc) ×6 (18)
R4: (2 sc, inc) ×6 (24)
R5: (3 sc, inc) ×6 (30)
R6: sc around (30)
Fold flat and work 15 sc through both layers (15)
Fasten off. Leave a 25 cm tail. These replace ears or wings for this turtle because the photo has shell side panels instead.
Back Bumps — Make 4
Yarn: dark mint / seafoam
R1: 6 sc in MR (6)
R2: inc ×6 (12)
R3: sc around (12)
R4: sc around (12)
R5: dec ×6 (6)
Fasten off. Leave a 20 cm tail. Stuff with a pea-sized amount before closing.
Tail — Make 1
Yarn: pale mint green
R1: 6 sc in MR (6)
R2: sc around (6)
R3: sc around (6)
R4: sc around (6)
Fasten off. Leave a 20 cm tail. Do not stuff.
Cheek Patches — Make 2
Yarn: dusty pink
R1: 6 sc in MR (6)
R2: inc ×6 (12)
Sl st into next st (12)
Fasten off. Leave a 20 cm tail. Flatten before sewing.
Shell Rim Cord — Make 1
Yarn: dusty pink
Row 1: ch 49, sc in 2nd ch from hook and across (48)
Row 2: ch 1, turn, sc across (48)
Fasten off. Leave a 40 cm tail. Pin around the shell edge before stitching.
Shell Straps — Make 2
Yarn: dusty pink
Row 1: ch 25, sc in 2nd ch from hook and across (24)
Row 2: ch 1, turn, sc across (24)
Fasten off. Leave 20 cm tails at both ends. Curve each strap from shell shoulder to lower side body.
Eyebrows and Smile Embroidery
Yarn: black embroidery yarn
Make two short brow stitches above the eyes, each about 1.5 cm long. Add a small curved smile between R11 and R12 of the head. Knot inside the head if added before final closing; otherwise bury knots under nearby stitches.
Assembly
- Pin the head to the body with the lower head touching body R7–R10.
- Sew the head in a full oval path twice so the neck does not wobble.
- Pin the cream belly patch to the body front, centered under the face.
- Stitch the belly patch down through every second outer stitch.
- Sew cheeks below the eyes, one round above the smile ends.
- Attach arms at body R9–R11, angled forward over the belly edge.
- Attach back legs at body R3–R5, spaced wide enough for sitting.
- Sew the pink shell to the back, with its top edge two rounds below the neck seam.
- Add side shell flaps, rim cord, straps, back bumps, and tail.
- Hide all yarn tails by weaving through at least three internal stitch paths.
The finished turtle measures about 20 cm tall when worked at the stated gauge.
7 Technical Tips
- Stitch marker failure mode: lost spiral start. Move the marker on every round, then add a second marker at the face center after R8 of the head.
- Stuffing failure mode: collapsing neck. Pack the head lower front with about 20% more stuffing than the crown, then sew through both head and body twice.
- Eye placement measurement: 16 mm eyes, 10 sts apart. Set them between R8 and R9 before R13, because washers cannot be moved after the head narrows.
- Velvet tension failure mode: visible stuffing gaps. If the 4.5 mm hook leaves holes larger than 2 mm, switch to 4.0 mm for the head and body.
- Invisible decrease failure mode: ridged closing line. Work dec rounds on the 36→30, 30→24, and 24→18 transitions through front loops only.
- Pinning failure mode: shell tilt. Use four pins at top, bottom, left, and right; the shell top should sit two rounds below the neck seam.
- Tail weaving failure mode: loose limbs after handling. Leave at least 20 cm tail on each limb and weave it through three separate body channels before trimming.
Conclusion
Block the shell first, then check the body from the side before final stitching. The pink shell should sit like a backpack, not a pillow, and the four back bumps need equal spacing along the upper curve. Use the next making session to crochet only the shell, straps, and flaps, then pin them to a completed body under bright light. Post the finished turtle on Pinterest and Instagram with one clear front view and one side view. Tag it with #MintShellTurtle. This turtle amigurumi crochet pattern is best judged by balance: does your turtle sit upright after the shell is attached, and which back bump spacing kept the shell centered?









