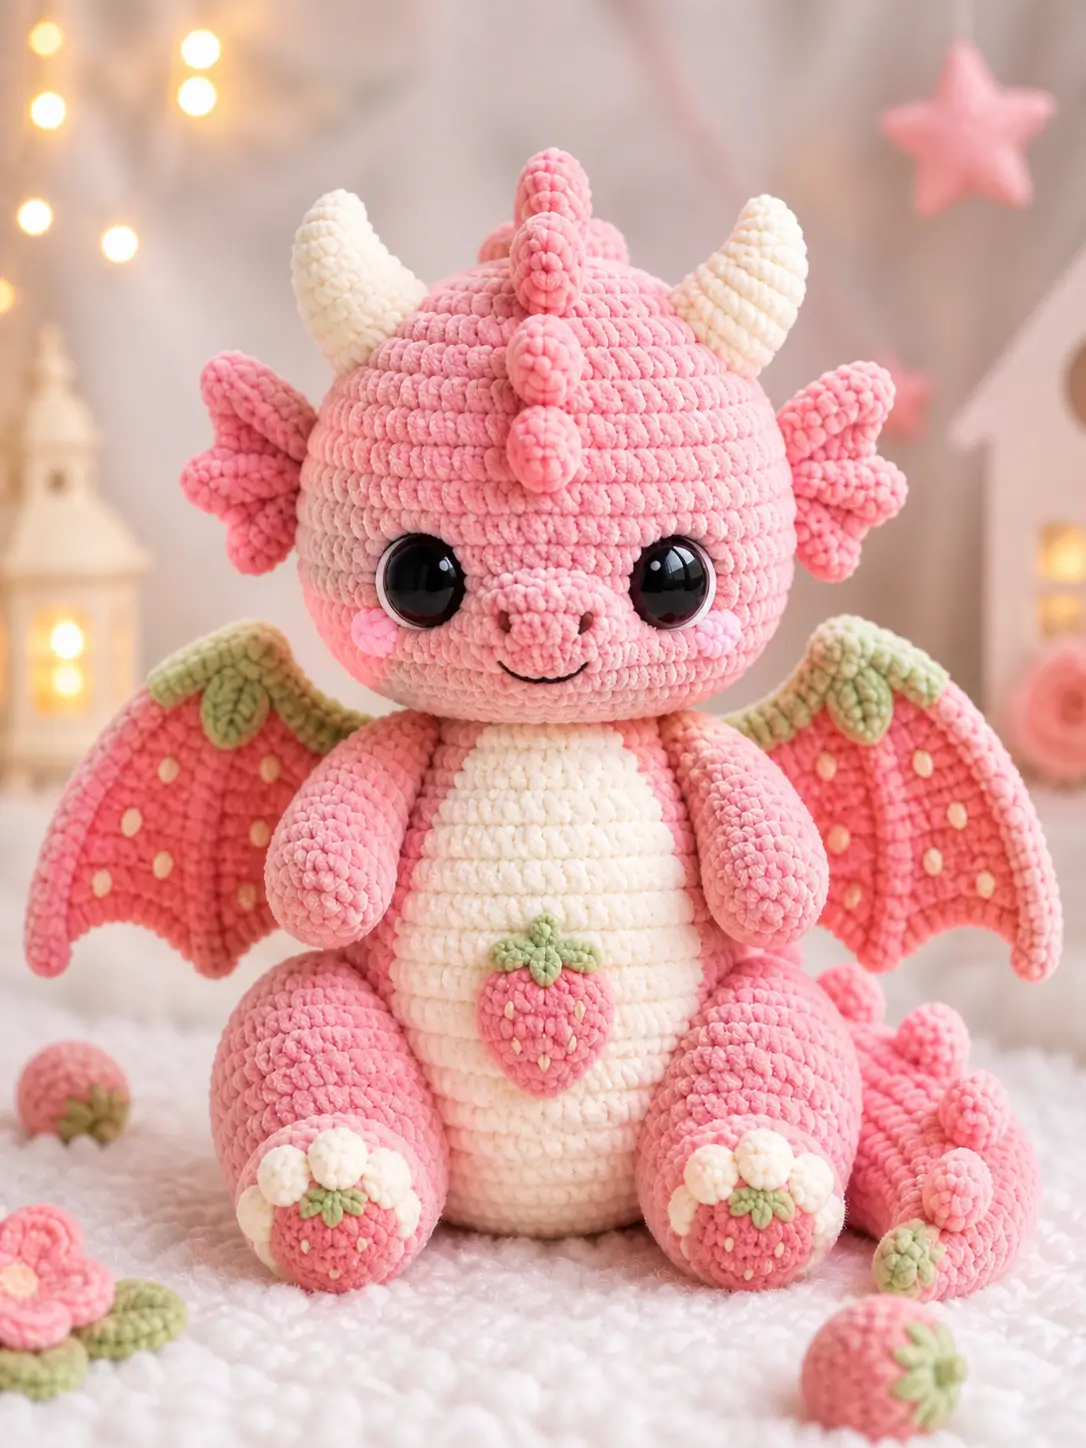
Strawberry seeds on a dragon wing are the first structural problem to solve. This strawberry dragon amigurumi crochet pattern uses plush-friendly shaping, a verified 25 cm target size, and an intermediate construction plan to build a seated display toy with wings, berry details, and a stable body that works well for shelf styling or market stock.
The Design: What Makes Strawberry Dragon Different
The body is not what makes this character read correctly. Proportion does. First, the belly needs a long cream panel instead of a small oval, because the fruit logic of the toy depends on vertical contrast through the centerline. Second, the wings need a green scalloped leading edge and seed embroidery, or the fruit dragon amigurumi becomes a standard fantasy plush with no seasonal identity. Third, the crown spikes must stay short and rounded, not horn-like, so the head keeps its near-sphere silhouette and does not look top-heavy. You place the parts by sight at first. Then the maker shifts to alignment checks and spacing. A common mistake in a pink dragon amigurumi is hanging the wings too low, which shortens the torso and makes the figure read squat rather than seated.
Project Info at a Glance
| Skill Level | Time | Finished Size | Hook | Best For |
|---|---|---|---|---|
| Intermediate | Quick market make / multi-session plush | 25 cm | 4.0 mm | Display plush, themed gifts, spring market tables |
Public strawberry-dragon listings place this type between advanced beginner and intermediate, with a 25 cm bulky-yarn version on Ravelry and a smaller chenille quick-make variant on Etsy.
Materials and Tools
The closest public technical match is a bulky/category 5 strawberry dragon with a 4.0 mm hook and 16 mm eyes. Open dragon material lists also show roughly 140 g main color and 51 g total accents on a smaller 20 cm build, so the gram figures below work as a conservative planning baseline rather than a lab-grade consumption number.
Yarn
- Pastel pink — bulky plush / chenille-style yarn — 140 g baseline — Premier Just Chenille or similar
- Cream/ivory — bulky plush / chenille-style yarn — 25 g — Premier Just Chenille or similar
- Light sage green — bulky plush / chenille-style yarn — 15 g — any matching chenille scrap
- Bubblegum pink / deeper pink — bulky plush / chenille-style yarn — 20 g — for spikes, berry accents, wing edging if desired
- Pale yellow — fine yarn scrap — small amount — for seed embroidery
- White — fine yarn scrap — small amount — for paw blossoms if crocheted as separate trim
Tools
- Hook 4.0 mm
- 16 mm safety eyes
- Polyfill stuffing
- Yarn needle
- Stitch markers
- Scissors
- Black embroidery thread for mouth and nostrils
Abbreviations
MR / sc / inc / dec / sl st / ch / BLO / FLO / hdc / dc
Use the invisible decrease on visible shaping rounds, especially the head and snout, because a standard sc2tog leaves a wider gap on plush yarn.
Pattern — Step by Step
Continuous spiral unless noted.
Head (Make 1)
Yarn: pastel pink — Source: Standard amigurumi math
R1: 6 sc in MR (6)
R2: inc x6 (12)
R3: (sc 1, inc) x6 (18)
R4: (sc 2, inc) x6 (24)
R5: (sc 3, inc) x6 (30)
R6: (sc 4, inc) x6 (36)
R7: (sc 5, inc) x6 (42)
R8: sc around (42)
R9: sc around (42)
R10: sc around (42)
R11: sc around (42)
R12: sc around (42)
R13: sc around (42)
R14: sc around (42)
R15: sc around (42)
R16: (sc 5, dec) x6 (36)
R17: (sc 4, dec) x6 (30)
R18: (sc 3, dec) x6 (24)
R19: (sc 2, dec) x6 (18)
R20: (sc 1, dec) x6 (12)
R21: dec x6 (6)
Insert safety eyes between R12 and R13, 9 stitches apart. Stuff firmly before R18 and top up again before closing.
Fasten off. Leave a 20 cm tail.
Body (Make 1)
Yarn: pastel pink — Source: Standard amigurumi math
R1: 6 sc in MR (6)
R2: inc x6 (12)
R3: (sc 1, inc) x6 (18)
R4: (sc 2, inc) x6 (24)
R5: (sc 3, inc) x6 (30)
R6: (sc 4, inc) x6 (36)
R7: sc around (36)
R8: sc around (36)
R9: sc around (36)
R10: sc around (36)
R11: sc around (36)
R12: (sc 4, dec) x6 (30)
R13: sc around (30)
R14: sc around (30)
R15: sc around (30)
R16: (sc 3, dec) x6 (24)
R17: sc around (24)
R18: sc around (24)
R19: (sc 2, dec) x6 (18)
R20: (sc 1, dec) x6 (12)
R21: dec x6 (6)
Stuff the lower half firmer than the upper half so the body keeps a seated base.
Fasten off. Leave a 25 cm tail.
Belly Panel (Make 1, worked in rows)
Yarn: cream — Source: Photo-matched adaptation using standard shaping
Ch 7.
Row 1: sc in 2nd ch from hook and across (6)
Row 2: ch 1, turn, inc, 4 sc, inc (8)
Row 3: ch 1, turn, inc, 6 sc, inc (10)
Row 4: ch 1, turn, inc, 8 sc, inc (12)
Row 5: ch 1, turn, sc across (12)
Row 6: ch 1, turn, sc across (12)
Row 7: ch 1, turn, sc across (12)
Row 8: ch 1, turn, sc across (12)
Row 9: ch 1, turn, sc across (12)
Row 10: ch 1, turn, sc across (12)
Row 11: ch 1, turn, sc across (12)
Row 12: ch 1, turn, sc across (12)
Row 13: ch 1, turn, sc across (12)
Row 14: ch 1, turn, dec, 8 sc, dec (10)
Row 15: ch 1, turn, dec, 6 sc, dec (8)
Do not overstuff or line this panel; it should lie flat on the torso.
Fasten off. Leave a 20 cm tail.
Arms / Front Legs (Make 2)
Yarn: pastel pink — Source: Standard amigurumi math
R1: 6 sc in MR (6)
R2: inc x6 (12)
R3: sc around (12)
R4: sc around (12)
R5: sc around (12)
R6: sc around (12)
R7: sc around (12)
R8: sc around (12)
R9: dec x6 (6)
R10: sc around (6)
Stuff only the lower two-thirds. Flatten the opening lightly.
Fasten off. Leave a 20 cm tail.
Back Legs (Make 2)
Yarn: pastel pink — Source: Standard amigurumi math
R1: 6 sc in MR (6)
R2: inc x6 (12)
R3: (sc 1, inc) x6 (18)
R4: sc around (18)
R5: sc around (18)
R6: (sc 1, dec) x6 (12)
R7: sc around (12)
R8: sc around (12)
R9: sc around (12)
R10: sc around (12)
Stuff the front half firmer than the heel side so the leg keeps its rounded knee shape.
Fasten off. Leave a 22 cm tail.
Horns (Make 2)
Yarn: cream — Source: Standard amigurumi math
R1: 6 sc in MR (6)
R2: inc x6 (12)
R3: (sc 1, inc) x6 (18)
R4: sc around (18)
R5: sc around (18)
R6: sc around (18)
R7: dec x6 (12)
R8: sc around (12)
Light stuffing only at the base keeps the horn curved instead of blunt.
Fasten off. Leave a 15 cm tail.
Crown Spikes (Make 4)
Yarn: deeper pink — Source: Standard amigurumi math
R1: 6 sc in MR (6)
R2: inc x6 (12)
R3: sc around (12)
R4: dec x6 (6)
Leave the tip unstuffed and add a pinch of stuffing only at the base.
Fasten off. Leave a 12 cm tail.
Wings (Make 2, worked in rows)
Yarn: pastel pink membrane with green edging — Source: Photo-matched adaptation
Ch 11.
Row 1: sc in 2nd ch from hook and across (10)
Row 2: ch 1, turn, inc, 8 sc, inc (12)
Row 3: ch 1, turn, inc, 10 sc, inc (14)
Row 4: ch 1, turn, inc, 12 sc, inc (16)
Row 5: ch 1, turn, sc across (16)
Row 6: ch 1, turn, dec, 12 sc, dec (14)
Row 7: ch 1, turn, dec, 10 sc, dec (12)
Row 8: ch 1, turn, dec, 8 sc, dec (10)
Join green yarn to the top edge. Work 3 scallops evenly across the straight wing edge as follows:
Edge scallop 1: (sl st, hdc, dc, hdc, sl st)
Edge scallop 2: (sl st, hdc, dc, hdc, sl st)
Edge scallop 3: (sl st, hdc, dc, hdc, sl st)
Embroider 4 to 5 pale yellow seed dashes on each wing after assembly so the angle matches the final pose.
Fasten off. Leave a 20 cm tail.
Snout (Make 1)
Yarn: pastel pink — Source: Standard amigurumi math
R1: 6 sc in MR (6)
R2: inc x6 (12)
R3: sc around (12)
Do not stuff heavily. A soft snout sits flatter and keeps the eyes dominant.
Fasten off. Leave a 15 cm tail.
Cheek Patches (Make 2)
Yarn: blush pink — Source: Standard amigurumi math
R1: 6 sc in MR (6)
R2: inc x6 (12)
Fasten off. Leave a 10 cm tail.
Tail (Make 1)
Yarn: pastel pink — Source: Standard amigurumi math
R1: 6 sc in MR (6)
R2: inc x6 (12)
R3: sc around (12)
R4: sc around (12)
R5: sc around (12)
R6: sc around (12)
R7: dec x6 (6)
R8: sc around (6)
R9: sc around (6)
R10: sc around (6)
R11: sc around (6)
R12: sc around (6)
Stuff the first half only. Leave the last rounds softer so the tail can curl to the side.
Fasten off. Leave a 22 cm tail.
Tail Spikes (Make 4)
Yarn: deeper pink — Source: Standard amigurumi math
R1: 6 sc in MR (6)
R2: inc x6 (12)
R3: sc around (12)
R4: dec x6 (6)
Fasten off. Leave a 10 cm tail.
Strawberry Belly Applique (Make 1)
Yarn: deeper pink with green top — Source: Standard amigurumi math
R1: 6 sc in MR (6)
R2: inc x6 (12)
R3: (sc 1, inc) x6 (18)
R4: sc around (18)
R5: (sc 1, dec) x6 (12)
R6: sc around (12)
R7: dec x6 (6)
Make a leaf top separately: ch 7, starting in 2nd ch from hook work sl st, sc, hdc, sc, sl st, sl st. Make 3 leaves.
Lightly flatten the berry. Embroider pale yellow seed dashes after sewing.
Fasten off. Leave a 15 cm tail.
Paw Blossom Appliqués (Make 2)
Yarn: white and deeper pink — Source: Photo-matched adaptation
Pink center:
R1: 6 sc in MR (6)
R2: inc x6 (12)
White petal trim: join white to any stitch of R2 and repeat 6 times around:
(sl st, ch 2, 2 dc in same st, ch 2, sl st in same st)
Embroider a tiny green star at the top center and 3 to 4 yellow seed dashes on the pink area.
Fasten off. Leave a 12 cm tail.
Assembly
- Sew the head to the body, centered, with the head tilted slightly forward rather than upright.
- Stitch the cream belly panel to the body front from upper chest to lower abdomen.
- Attach the snout centered between the eyes and two rounds below them; embroider two nostrils and a shallow smile.
- Sew the cheek patches level with the lower outer corners of the snout.
- Attach the back legs low on the body front so the knees project forward and form the seated pose.
- Sew the arms to the upper body sides, one round below the neck seam.
- Attach the horns to the crown, then place the four crown spikes in a straight centerline behind the horns.
- Sew the wings to the upper back with the top corners just below the neck and the lower corners angled outward.
- Attach the tail at the lower back, curl it to one side, and sew the four tail spikes along the upper tail line. Add the berry tip at the end.
- Sew the strawberry applique to the lower belly and place one paw blossom on each front-facing foot panel.
The finished toy should sit without external support once the lower body, legs, and tail are balanced.
7 Technical Tips
- Mark round starts on both wings. A one-stitch drift changes the wing height enough to make the seed embroidery line look uneven from the front.
- Pack the head firmer than the body. If the head is soft, the snout sinks and the 16 mm eyes start to tilt inward under their own washers.
- Use invisible decreases on face-side rounds. Standard decreases leave visible gaps in chenille and create shadow lines around R16–R20 of the head.
- Install the eyes before the head closes past 24 stitches. Waiting until the opening reaches 18 stitches or less makes washer placement harder and can stretch the eye holes.
- Drop hook size by 0.5 mm if stuffing shows between stitches. Plush yarn hides structure until it fails, then the gap appears suddenly at the dec rounds.
- Pin the wings before sewing and check both top corners against the neck seam. A wing mounted even 1 cm lower than the other makes the dragon read twisted in photos.
- Split the tail yarn tail when weaving in. Passing both plies through three stitch columns locks the curl and stops the berry tip from rotating outward over time.
Conclusion
This build works because the fruit cues are structural, not decorative. The cream centerline, seeded wings, short crown bumps, and berry tip all have to support the same read or the form slips back into generic dragon territory. Cut your yarn first, choose the eye size second, and dry-pin the wings before you commit to stitching. Then photograph the finished piece from the front and three-quarter side to confirm balance. Share the result on Pinterest and Instagram with #StrawberryDragonPattern. One question remains useful for future versions: did you keep the horns cream, or would you convert them to berry caps in this strawberry dragon amigurumi crochet pattern?









