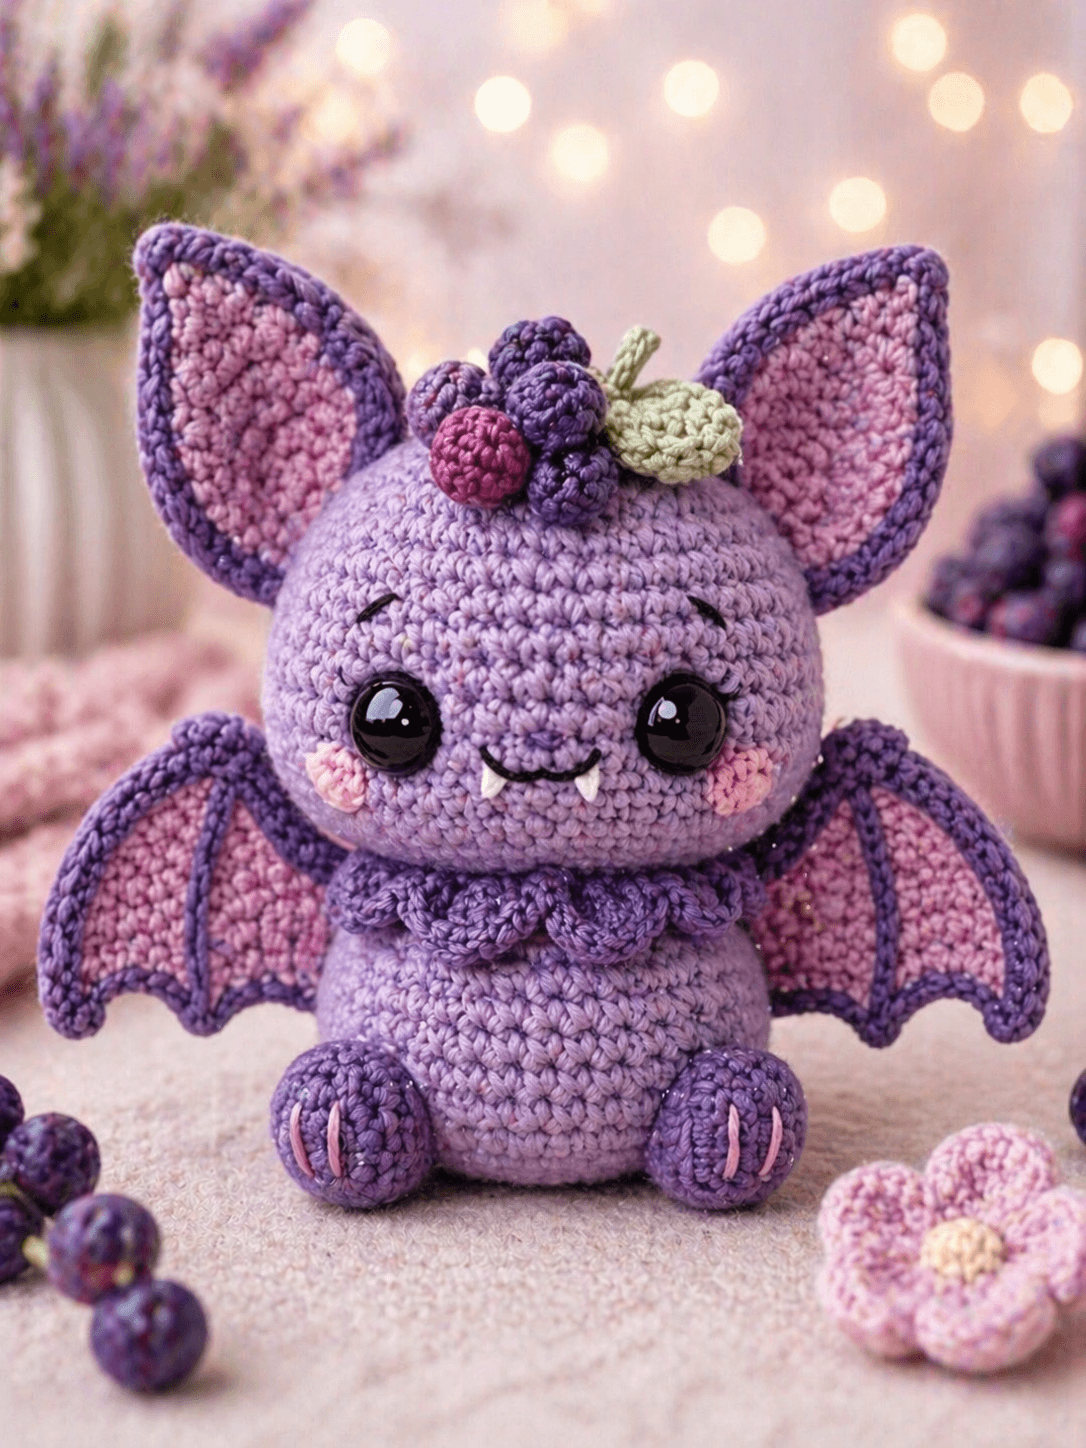
Fruit bats have fox-like ears, wing membranes, and fruit tied into the silhouette. This fruit bat amigurumi crochet pattern turns those three cues into a purple berry bat using worsted yarn, a 3.5 mm hook, 10 mm safety eyes, and a 14 cm sitting height. The skill level is intermediate because the wings, ears, cheeks, fangs, collar, and berry crown need accurate placement for a display-ready desk mascot.
The Design: What Makes Berry Bat Different
Berry Bat uses a head larger than the body because the ears and crown need a stable base, not a narrow skull. The head reaches a 42-stitch plateau; the body stops at 36 stitches so the wings can sit slightly behind the torso without pulling the toy backward. The ear panels are flat, then bordered, because a stuffed cone would look heavy on a fruit bat amigurumi crochet pattern with pastel colors. Wings are worked as membranes with an outer frame, then embroidered with struts to keep the pink panels from reading as plain leaves. A common mistake in a purple bat crochet pattern is placing the eyes too low. Here they sit before the cheeks and fangs, so the smile has room and the berry bat amigurumi still reads as a bat, not a bear with wings.
Project Info at a Glance
| Skill Level | Time | Finished Size | Hook | Best For |
|---|---|---|---|---|
| Intermediate | 4–5 hours | About 14 cm seated | 3.5 mm | Desk display, seasonal market table, fruit bat collection |
Off the Hook lists a fruit bat at about 5.5 in tall with medium yarn and 10 mm eyes; PlanetJune lists worsted yarn, a 3.5 mm hook, and 10 mm eyes for a fruit bat pattern.
Materials and Tools
Yarn
- Lavender purple — worsted / medium weight — 45 g — Paintbox Simply Aran, Stylecraft Special Aran, or similar
- Dark grape purple — worsted / medium weight — 28 g — for wing borders, feet, collar, berry cluster
- Blush pink — worsted / medium weight — 14 g — for inner ears, wing membranes, cheeks
- Raspberry pink — worsted / medium weight — 3 g — for one accent berry
- Pale green — worsted / medium weight — 5 g — for leaves and stem
- White — worsted scraps — under 1 g — for fangs
- Black embroidery floss — under 1 g — for smile and brows
Tools
- Hook 3.5 mm
- 10 mm black safety eyes
- Polyester stuffing
- Tapestry needle
- Locking stitch markers
- Sewing pins
- Scissors
- Optional white felt if you prefer cut fangs
Abbreviations
- MR = magic ring
- sc = single crochet
- inc = increase, 2 sc in one stitch
- dec = invisible decrease over 2 stitches
- sl st = slip stitch
- ch = chain
- BLO = back loop only
- dc = double crochet
An invisible decrease should be worked through the front loops only so the fabric contracts without a visible bar across the face or body.
Pattern — Step by Step
Continuous spiral unless noted. Flat parts are worked in rows. Count every round or row before moving on.
Head — Make 1
Yarn: lavender purple
R1: 6 sc in MR (6)
R2: inc ×6 (12)
R3: (sc, inc) ×6 (18)
R4: (2 sc, inc) ×6 (24)
R5: (3 sc, inc) ×6 (30)
R6: (4 sc, inc) ×6 (36)
R7: (5 sc, inc) ×6 (42)
R8–R15: sc around (42)
R16: (5 sc, dec) ×6 (36)
R17: sc around (36)
R18: (4 sc, dec) ×6 (30)
R19: (3 sc, dec) ×6 (24)
R20: (2 sc, dec) ×6 (18)
Insert 10 mm safety eyes between R12 and R13, 11 stitches apart. Start stuffing firmly at R20.
R21: (sc, dec) ×6 (12)
R22: dec ×6 (6)
Fasten off. Leave a 20 cm tail and close the final gap.
Body — Make 1
Yarn: lavender purple
R1: 6 sc in MR (6)
R2: inc ×6 (12)
R3: (sc, inc) ×6 (18)
R4: (2 sc, inc) ×6 (24)
R5: (3 sc, inc) ×6 (30)
R6: (4 sc, inc) ×6 (36)
R7–R12: sc around (36)
R13: (4 sc, dec) ×6 (30)
R14: sc around (30)
R15: (3 sc, dec) ×6 (24)
R16: sc around (24)
R17: (2 sc, dec) ×6 (18)
Stuff the base firmly and keep the neck softer so the head sits level.
R18: (sc, dec) ×6 (12)
R19: dec ×6 (6)
Fasten off. Leave a 25 cm tail for sewing to the head.
Front Arms — Make 2
Yarn: lavender purple with dark grape tip
Start with dark grape purple.
R1: 6 sc in MR (6)
R2: inc ×6 (12)
R3: sc around (12)
Change to lavender purple.
R4–R5: sc around (12)
R6: (2 sc, dec) ×3 (9)
R7–R8: sc around (9)
Stuff only the paw end. Flatten the top opening.
Fasten off. Leave a 18 cm tail.
Back Feet — Make 2
Yarn: dark grape purple
R1: 6 sc in MR (6)
R2: inc ×6 (12)
R3: (sc, inc) ×6 (18)
R4–R5: sc around (18)
R6: (sc, dec) ×6 (12)
R7: sc around (12)
Stuff lightly. The foot should stay oval, not round.
R8: dec ×6 (6)
Fasten off. Leave a 20 cm tail. Embroider three vertical toe marks on each foot with blush pink yarn.
Outer Ears — Make 2
Yarn: dark grape purple
Work flat.
Row 1: ch 2, 2 sc in second ch from hook (2)
Row 2: ch 1, turn, inc ×2 (4)
Row 3: ch 1, turn, sc, inc ×2, sc (6)
Row 4: ch 1, turn, 2 sc, inc ×2, 2 sc (8)
Row 5: ch 1, turn, 3 sc, inc ×2, 3 sc (10)
Row 6: ch 1, turn, sc across (10)
Row 7: ch 1, turn, 4 sc, inc ×2, 4 sc (12)
Border: sc evenly around the ear, placing 3 sc at the tip (34 border sc)
Fasten off. Leave a 25 cm tail.
Inner Ears — Make 2
Yarn: blush pink
Work flat.
Row 1: ch 2, 2 sc in second ch from hook (2)
Row 2: ch 1, turn, inc ×2 (4)
Row 3: ch 1, turn, sc, inc ×2, sc (6)
Row 4: ch 1, turn, 2 sc, inc ×2, 2 sc (8)
Row 5: ch 1, turn, sc across (8)
Border: sc evenly around, placing 3 sc at the tip (24 border sc)
Fasten off. Leave a 20 cm tail. Sew each inner ear to one outer ear before attaching ears to the head.
Wings — Make 2
Yarn: blush pink membrane with dark grape border
Work flat with blush pink.
Row 1: ch 8, sc in second ch from hook and across (7)
Row 2: ch 1, turn, inc, 5 sc, inc (9)
Row 3: ch 1, turn, sc across (9)
Row 4: ch 1, turn, inc, 7 sc, inc (11)
Row 5: ch 1, turn, sc across (11)
Row 6: ch 1, turn, inc, 9 sc, inc (13)
Row 7: ch 1, turn, sc across (13)
Row 8: ch 1, turn, dec, 9 sc, dec (11)
Row 9: ch 1, turn, sc across (11)
Row 10: ch 1, turn, dec, 7 sc, dec (9)
Row 11: ch 1, turn, sc across (9)
Row 12: ch 1, turn, dec, 5 sc, dec (7)
Change to dark grape purple.
Border round: sc evenly around the wing, working ch-3 picot points at three lower-edge positions (42 sc + 3 picots)
Fasten off. Leave a 30 cm tail. Embroider two dark grape struts from upper wing edge to the lower points.
Cheek Patches — Make 2
Yarn: blush pink
R1: 6 sc in MR (6)
R2: inc ×6 (12)
Sl st into next stitch.
Fasten off. Leave a 15 cm tail. Flatten without stuffing.
Fangs — Make 2
Yarn: white
Row 1: ch 3, sc in second ch from hook, hdc in next ch (2)
Fasten off. Leave a 10 cm sewing tail. Pin under the smile before sewing so both fangs angle toward the center.
Berry Cluster — Make 7
Yarn: dark grape purple for 6 berries, raspberry pink for 1 berry
R1: 6 sc in MR (6)
R2: inc ×6 (12)
R3–R4: sc around (12)
Add a pea-sized amount of stuffing.
R5: dec ×6 (6)
Fasten off. Leave a 15 cm tail. Close each berry and save the tails for joining the cluster.
Leaves and Stem — Make 2 Leaves, 1 Stem
Yarn: pale green
Leaf, make 2:
Row 1: ch 7, sl st in second ch from hook, sc, hdc, dc, hdc, sc (6)
Turn to the other side of the chain.
Row 2: sc, hdc, dc, hdc, sc, sl st at tip (6)
Fasten off. Leave a 15 cm tail.
Stem, make 1:
Row 1: ch 6, sl st in second ch from hook and across (5)
Fasten off. Leave a 10 cm tail.
Scalloped Collar — Make 1
Yarn: dark grape purple
Row 1: ch 31, sc in second ch from hook and across (30)
Row 2: sl st in first st, *skip 1 st, 5 dc in next st, skip 1 st, sl st in next st* ×7, sl st in final st (43)
Fasten off. Leave two 20 cm tails. Wrap around the neck after the head is attached.
Assembly
- Sew the body to the underside of the head, centered under the eyes, with the body’s R7–R12 section facing forward.
- Sew the outer-and-inner ear sets to the head between R6 and R10, about 13 stitches apart at the inner bases.
- Place the safety-eye face line first, then embroider a shallow black smile between the eyes.
- Sew the two fangs below the smile with a 2-stitch gap between their top corners.
- Sew cheek patches beside the mouth, one round below the eyes, with each patch angled slightly outward.
- Sew the front arms to the sides of the upper body, mostly hidden under the collar line.
- Sew back feet to the lower front body between R5 and R8, keeping the toe embroidery vertical.
- Pin wings to the back-side body seam, with upper wing corners starting at the shoulder line, then sew along the upper and inner edges only.
- Wrap the scalloped collar around the neck and sew the ends together at the back.
- Sew the berry cluster, leaves, and stem between the ears, keeping the raspberry berry at the front center.
The finished bat sits with visible fangs, cheek patches, wing membranes, feet, ears, collar, and berry crown.
7 Technical Tips
- Marker drift in the head: If the marker leans more than 3 stitches by R12, the eye line will twist. Move the marker back at the end of a plain round rather than correcting during a decrease round.
- Stuffing firmness at the neck: A soft neck makes the 42-stitch head tip forward. Pack the lower head firmly, then leave the final 12-stitch opening slightly flexible for sewing.
- Invisible decrease gaps: Standard decreases on lavender yarn can create dark holes near R18–R22. Work each decrease through front loops only and pull the working yarn tight after the second loop is drawn through.
- Eye placement timing: Install the 10 mm eyes after R15 but before R20. Waiting longer leaves too small an opening for washers and can force the eyes one round too low.
- Wing pinning error: Wings sewn flat to the center back will disappear from the front view. Pin each wing so the outer edge extends at least 2.5 cm beyond the body before sewing.
- Ear lean measurement: The inner base of each ear should sit about 13 stitches from the other inner base. A smaller gap makes the berry crown crowd the ears; a larger gap makes the head look like a cat.
- Tail weaving on berries: Berry tails can make lumps if all knots sit in the same spot. Weave each tail through a different neighboring berry, then bury the final end through the head crown.
Conclusion
This build works best when the head stays round, the wings stay flat, and the berry crown stays small enough to sit between the ears. Block the ear panels for ten minutes, pin the wings before sewing, then photograph the bat straight on so the pink membranes and fangs remain visible. Save the final stitch counts in your project notes before changing yarn weight; that makes the next version easier to resize. Share the finished fruit bat amigurumi crochet pattern project on Pinterest and Instagram with #BerryBatAmigurumi. Which berry should sit at the center of the crown on the next purple fruit bat?









