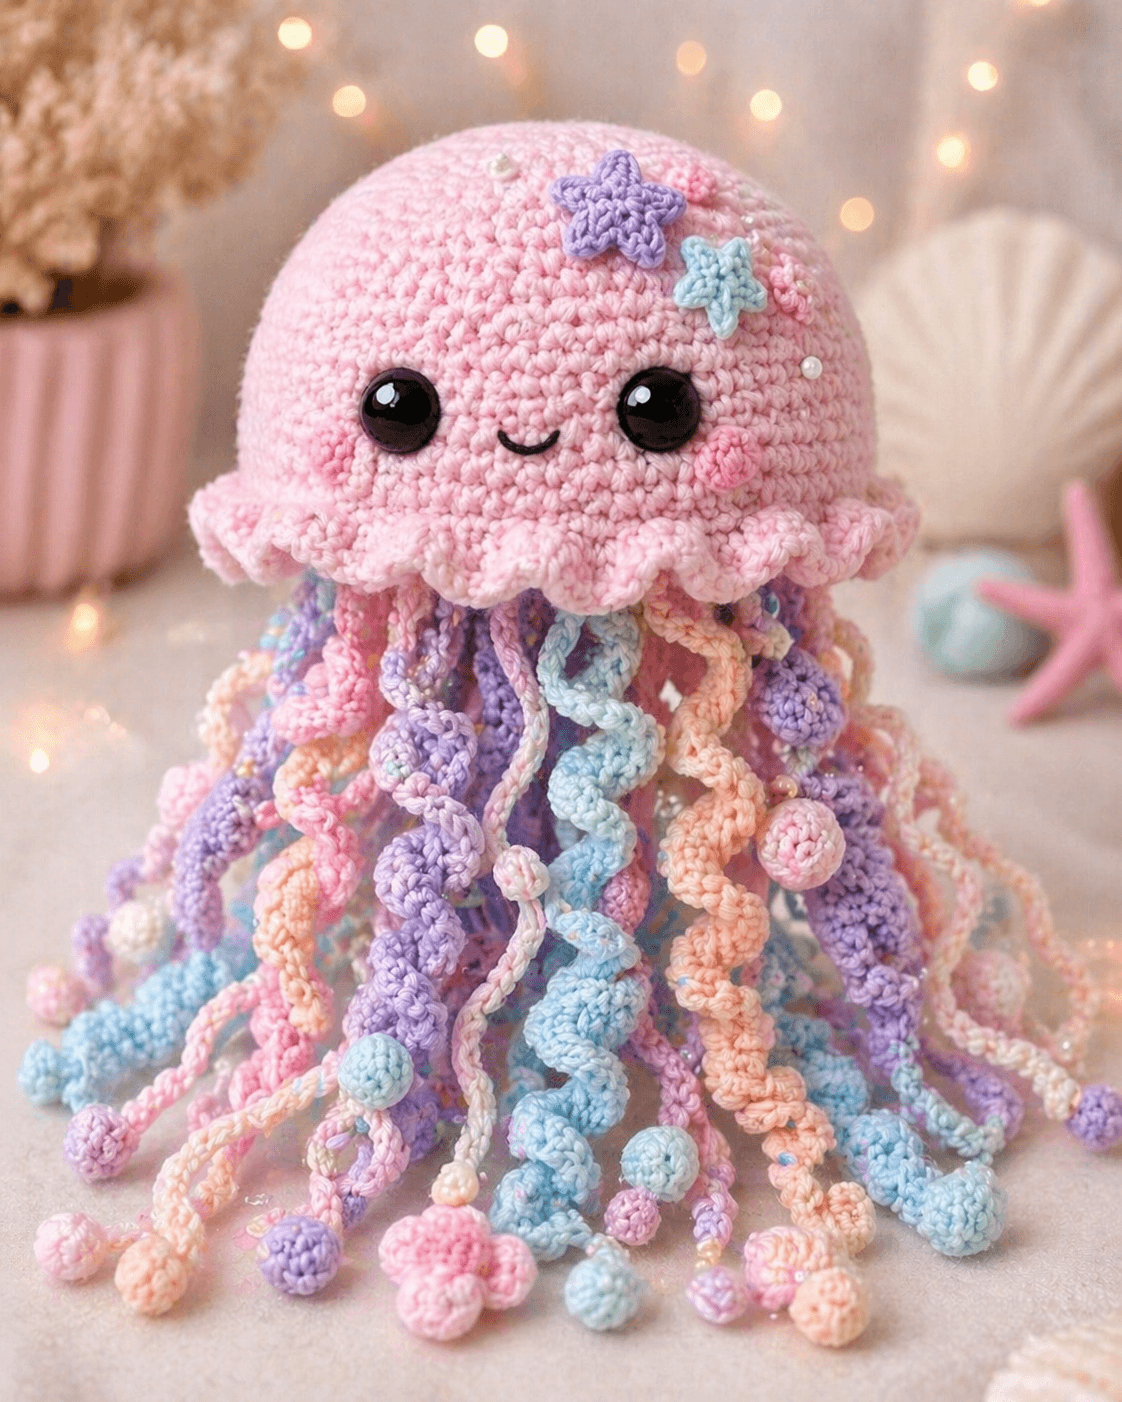
Jellyfish move by pulsing a bell, so this jellyfish amigurumi crochet pattern starts with a firm dome before any tentacle is attached. You will make a 20–24 cm pastel plush with worsted cotton/acrylic yarn, a 3.5 mm hook, 10 mm safety eyes, and advanced-beginner skills. The finished piece works as a hanging nursery display or shelf sea creature.
The Design: What Makes This Jellyfish Different
This jellyfish amigurumi crochet pattern makes the bell wide first, then narrows to a 30-stitch base so the ruffle has room to flare without pulling the face downward. The underside disk carries the long cords, not the lower stitches of the face; that keeps the expression level when the pastel crochet jellyfish hangs. You also build two heavier front oral arms and lighter rear cords, because a jellyfish reads as layered rather than evenly skirted. A common error in a free crochet jellyfish pattern is placing every tentacle at the outer rim. That makes a mop shape. Here, the curl lengths are staggered from center to edge, which leaves negative space between strands.
Project Info at a Glance
| Skill Level | Time | Finished Size | Hook | Best For |
|---|---|---|---|---|
| Advanced beginner | 3–5 hours | 20–24 cm | 3.5 mm | Hanging décor, shelf display, sea creature set |
Long tentacles and beads make this a décor item, not an unsupervised baby toy. One Dog Woof specifically warns that long curly jellyfish cords can tangle during child play. Source
Materials and Tools
Yarn
- Blush pink — worsted cotton/acrylic — 40–45 g — suggested: Hobbii Rainbow Cotton 8/8, Paintbox Cotton Aran, or Scheepjes Cahlista
- Lavender — DK/worsted scrap — 8–10 g — tentacles and one star
- Mint — DK/worsted scrap — 8–10 g — tentacles and one star
- Aqua blue — DK/worsted scrap — 6–8 g — tentacles and bobbles
- Peach — DK/worsted scrap — 6–8 g — tentacles
- Darker pink — DK scrap — 2–3 g — cheek patches
- Black embroidery floss — small length — mouth
Tools
- Hook 3.5 mm
- 10 mm safety eyes
- Polyester stuffing
- Yarn needle
- Locking stitch markers
- Straight pins
- Small white pearl beads, optional and décor-only
- Scissors
- Embroidery needle
The hook, yarn, and eye choices sit inside the verified jellyfish range: 3.0–3.5 mm hooks, worsted/DK yarn, and 9–10 mm safety eyes appear across comparable patterns. Source
Abbreviations
MR = magic ring; sc = single crochet; inc = increase; dec = decrease; sl st = slip stitch; ch = chain; BLO = back loop only; FLO = front loop only; dc = double crochet; st = stitch; sts = stitches. An invisible decrease places the hook through the front loops of the next two stitches before drawing up a loop; it removes bulk from the lower bell.
Pattern — Step by Step
Work in a continuous spiral unless a part says otherwise. Counts are given at the end of each round or row.
Head / Bell Dome
Yarn: blush pink — Source: Standard amigurumi math; 42-stitch jellyfish bell proportions cross-checked against published body shaping. Source
R1: 6 sc in MR (6)
R2: inc ×6 (12)
R3: [sc, inc] ×6 (18)
R4: [2 sc, inc] ×6 (24)
R5: [3 sc, inc] ×6 (30)
R6: [4 sc, inc] ×6 (36)
R7: [5 sc, inc] ×6 (42)
R8: sc around (42)
R9: sc around (42)
R10: sc around (42)
R11: sc around (42)
R12: sc around (42)
R13: sc around (42)
R14: sc around (42)
R15: sc around (42)
R16: [5 sc, dec] ×6 (36)
R17: sc around (36)
R18: [4 sc, dec] ×6 (30)
Insert 10 mm eyes between R11 and R12, 8 stitches apart. Embroider the mouth between the eyes before the underside is joined.
Fasten off. Leave a 70 cm tail.
Body / Underside Disk
Yarn: blush pink — Source: Standard amigurumi math; underside disk method cross-checked against baby jellyfish base construction. Source
R1: 6 sc in MR (6)
R2: inc ×6 (12)
R3: [sc, inc] ×6 (18)
R4: [2 sc, inc] ×6 (24)
R5: [3 sc, inc] ×6 (30)
This disk closes the bell and hides the tentacle knots. Do not stuff the disk separately.
Fasten off. Leave an 80 cm sewing tail.
Ruffled Bell Edge
Yarn: blush pink — Source: Standard amigurumi shell-edge math; comparable jellyfish patterns use shell edging around the bell. Source
Join yarn to any stitch around the R18 opening after the underside disk is sewn in place.
R1: [sl st in next st, 5 dc in next st, sl st in next st] ×10 (10 scallops)
Keep the scallops loose enough to sit outward, not upward.
Fasten off. Weave in the tail behind the ruffle.
Front Oral Arms
Yarn: mint and lavender — Source: Standard chained curl math; published jellyfish tentacles use chained lengths with multiple stitches per chain for curl. Source
Make 2.
Row 1: ch 26 (26 ch)
Row 2: starting in 2nd ch from hook, 2 sc in each ch across (50)
Make one mint and one lavender. These two arms sit at the front center under the smile.
Fasten off. Leave a 25 cm tail.
Back Trailing Arms
Yarn: peach and aqua — Source: Standard chained cord math.
Make 2.
Row 1: ch 34 (34 ch)
Row 2: starting in 2nd ch from hook, sl st in each ch across (33)
Attach these behind the center curls so they hang lower than the front pair.
Fasten off. Leave a 25 cm tail.
Long Curled Tentacles
Yarn: lavender, mint, peach, aqua, pale blue, blush — Source: Chained curl method cross-checked against published jellyfish tentacle instructions. Source
Make 6.
Row 1: ch 31 (31 ch)
Row 2: starting in 2nd ch from hook, 2 sc in each ch across (60)
Vary the colors. Twist the curl gently with your fingers before attachment, but do not steam it flat.
Fasten off. Leave a 20 cm tail.
Fine Hanging Cords
Yarn: blush, mint, peach, lavender — Source: Standard slip-stitch cord math.
Make 6.
Row 1: ch 29 (29 ch)
Row 2: starting in 2nd ch from hook, sl st in each ch across (28)
These cords create the thin strands visible between the spiral tentacles.
Fasten off. Leave a 20 cm tail.
Bobble Tips
Yarn: mixed pastel scraps — Source: Standard amigurumi sphere math.
Make 8.
R1: 6 sc in MR (6)
R2: inc ×6 (12)
R3: sc around (12)
R4: dec ×6 (6)
Add a pea-sized amount of stuffing before R4 closes. Sew one bobble to selected cord or curl ends.
Fasten off. Leave a 15 cm tail.
Cheek Patches
Yarn: darker pink — Source: Standard flat circle math.
Make 2.
R1: 6 sc in MR (6)
R2: inc ×6 (12)
Flatten the circle. Place each cheek one round below the lower edge of its eye.
Fasten off. Leave a 15 cm tail.
Star Appliqués
Yarn: lavender and mint — Source: Standard chain-ring appliqué math.
Make 2.
R1: ch 4, sl st into first ch to form a ring (4 ch ring)
R2: [ch 3, sl st in 2nd ch from hook, sc in next ch, sl st into ring] ×5 (5 points)
Make one larger lavender star and one smaller mint star by changing hook tension, not stitch count.
Fasten off. Leave a 20 cm tail.
Pearl Bead Accents
Material: small white pearl beads — Source: photo-specific accessory choice.
No crochet rounds are required. Thread one bead at a time with sewing thread or split embroidery floss, then stitch through the bell fabric twice at the same point.
Use pearl beads only for display pieces. For a child-safe version, replace every bead with a French knot.
Knot inside the bell before closing the underside.
Assembly
- Pin the underside disk to the 30-stitch opening of the bell, matching R5 disk stitches to R18 bell stitches.
- Add stuffing to the bell until the dome holds its curve without stretching the eye washers.
- Sew the disk to the bell through both loops, stopping with 5 stitches open for final stuffing adjustment.
- Place the safety eyes, tighten their washers, and finish the embroidered smile before closing the last gap.
- Sew the cheek patches below the eyes, keeping each patch centered under the eye curve.
- Attach the two front oral arms at the center front of the underside disk.
- Attach the back trailing arms at the rear center, then add the six long curled tentacles around them.
- Add the six fine hanging cords between the curled tentacles so the colors alternate.
- Sew bobble tips to selected strand ends, then attach the lavender and mint stars to the upper right bell.
- Add pearl beads last, knotting each one inside the fabric or replacing beads with stitched knots for child-safe décor.
The jellyfish is complete when the bell sits upright and the tentacles hang in layered lengths.
7 Technical Tips
- Stitch marker drift: If the marker slides diagonally by R15, the face can shift 2–3 stitches off center. Place a second marker on the R7 increase line and align the eyes against that fixed column.
- Stuffing firmness: A collapsed dome comes from loose fill between R11 and R15. Add stuffing until the bell measures about 9–10 cm across and springs back under light finger pressure.
- Invisible decrease ridges: A lumpy lower bell appears when the decrease grabs both loops. Work R16 and R18 decreases through front loops only, then pull the working yarn tight after each completed dec.
- Eye placement timing: Washer failure happens when eyes are added after the underside is sewn shut. Set 10 mm eyes between R11 and R12, 8 stitches apart, before the disk is fully closed.
- Velvet tension: If you substitute velvet yarn, the 42-stitch plateau can hide stitches. Add a marker every 7 stitches on R7 and use those markers as count checkpoints through R15.
- Pinning: Uneven tentacle spread happens when the front curls are sewn down before the rear positions are marked. Pin at 12, 3, 6, and 9 o’clock on the underside disk before tying any strand.
- Tail weaving: Bobble tips loosen when the tail is woven through only one pass. Weave through the six closing loops twice, then bury at least 4 cm of yarn inside the bobble.
Conclusion
This pattern is built around proportion control: a 42-stitch bell, a 30-stitch underside, a scalloped rim, and tentacles placed in layers rather than one crowded ring. Work the bell first, check the face before closing, then add the strands from center to outer edge. That order keeps the pastel jellyfish readable from the front and stable when hung. Save the finished jellyfish amigurumi crochet pattern to Pinterest, then post the completed piece on Instagram with #PastelJellyfishAmigurumi. For the next version, will you place both star appliqués above the right eye again, or split one star onto the left side of the bell?









