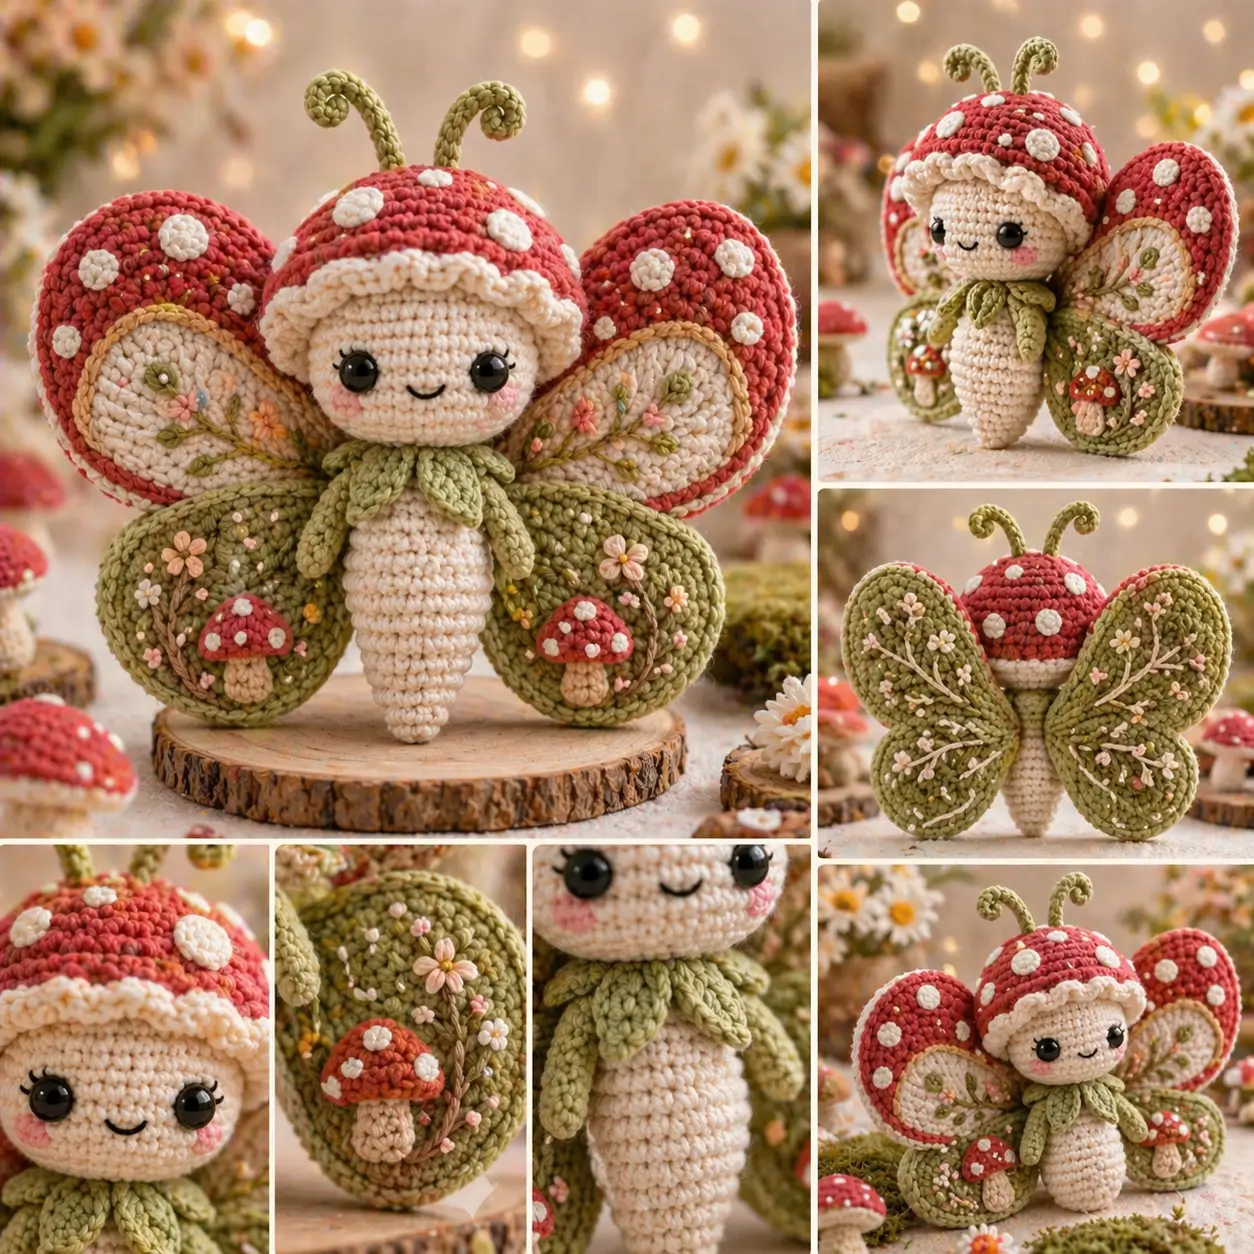
Fly agaric spots only work here because the cap outruns the wings. This mushroom fairy amigurumi crochet pattern uses DK cotton, a 2.75 mm hook, and a medium 23 cm target size for an intermediate build that holds its shape on a shelf. The wide wing spread also braces the narrow body, which makes the piece useful as woodland decor or a photographed display doll.
The Design: What Makes This Mushroom Fairy Different
You are not building a standard doll with decorations added later. The cap, upper wings, and lower wings carry the silhouette, while the body stays narrow so the figure still reads as a butterfly-fairy hybrid instead of a child doll in costume. A second structural choice is the cream inner panel on each upper wing. That quieter center gives the red spotted edge room to read clearly, and it creates a field for floral embroidery without crowding the face. The third decision is the leaf collar. It hides the neck seam and visually bridges the cream body to the green lower wings. The common failure mode in a mushroom butterfly fairy is overbuilding the torso. Once the middle grows too wide, the embroidered amigurumi wings stop looking layered and start looking pinned on.
Project Info at a Glance
| Skill Level | Time | Finished Size | Hook | Best For |
|---|---|---|---|---|
| Intermediate | 8–10 hours | 23 cm | 2.75 mm | Display doll, gift, styled product photo |
Materials and Tools
Yarn
- Cream — DK cotton — approx. 50 g — Krea Deluxe Organic Cotton or similar
- Mushroom red — DK cotton — approx. 35 g — Schachenmayr Catania or similar
- Sage green — DK cotton — approx. 35 g — any firm mercerized cotton
- White — DK cotton — approx. 10 g — for cap spots and wing dots
- Blush pink — DK cotton — approx. 5 g — for cheek patches and flower centers
- Mustard or light brown — DK cotton — approx. 5 g — for branch embroidery
Tools
- Hook 2.75 mm
- Safety eyes 10 mm
- Polyfill stuffing
- Tapestry needle
- Embroidery needle
- Stitch markers
- Pins
- Optional thin craft wire for firmer antennae
Abbreviations
MR / sc / inc / dec / sl st / ch / BLO / hdc / dc / FO = fasten off
Use invisible decrease through the front loops only; it closes shaping lines with fewer gaps around the face and neck.
Pattern — Step by Step
Continuous spiral unless noted. The reconstruction below is original and photo-based, using standard amigurumi math rather than reproducing any published pattern.
Head (Make 1)
Yarn: cream
- R1: 6 sc in MR (6)
- R2: inc ×6 (12)
- R3: (1 sc, inc) ×6 (18)
- R4: (2 sc, inc) ×6 (24)
- R5: (3 sc, inc) ×6 (30)
- R6: (4 sc, inc) ×6 (36)
- R7–12: sc around (36)
Place 10 mm eyes between R9 and R10, 8 sts apart. Embroider the smile centered one round below.
- R13: (4 sc, dec) ×6 (30)
- R14: (3 sc, dec) ×6 (24)
- R15: (2 sc, dec) ×6 (18)
Stuff firmly but do not stretch the face.
- R16: (1 sc, dec) ×6 (12)
- R17: dec ×6 (6)
Fasten off. Leave 20 cm tail.
Body (Make 1)
Yarn: cream
- R1: 6 sc in MR (6)
- R2: inc ×6 (12)
- R3: sc around (12)
- R4: (1 sc, inc) ×6 (18)
- R5: sc around (18)
- R6: (2 sc, inc) ×6 (24)
- R7–9: sc around (24)
- R10: (3 sc, inc) ×6 (30)
- R11–13: sc around (30)
- R14: (4 sc, inc) ×6 (36)
- R15–16: sc around (36)
- R17: (4 sc, dec) ×6 (30)
- R18–19: sc around (30)
- R20: (3 sc, dec) ×6 (24)
- R21–22: sc around (24)
- R23: (2 sc, dec) ×6 (18)
- R24–25: sc around (18)
- R26: (1 sc, dec) ×6 (12)
- R27: sc around (12)
Stuff the lower half firmly and keep the top third lighter.
- R28: dec ×6 (6)
Fasten off. Leave 20 cm tail.
Arms / Front Legs (Make 2)
Yarn: sage green
- R1: 6 sc in MR (6)
- R2: sc around (6)
- R3: (1 sc, inc) ×3 (9)
- R4–5: sc around (9)
- R6: (1 sc, dec) ×3 (6)
- R7–9: sc around (6)
Light stuffing only in the upper half.
Flatten. Fasten off. Leave 18 cm tail.
Upper Wings (Make 2)
Yarn: mushroom red
- R1: 6 sc in MR (6)
- R2: inc ×6 (12)
- R3: (1 sc, inc) ×6 (18)
- R4: (2 sc, inc) ×6 (24)
- R5: (3 sc, inc) ×6 (30)
- R6: sc around (30)
Fasten off. Leave 22 cm tail.
Upper Wing Insets (Make 2)
Yarn: cream
- R1: 6 sc in MR (6)
- R2: inc ×6 (12)
- R3: (1 sc, inc) ×6 (18)
- R4: (2 sc, inc) ×6 (24)
- Sl st to close (24)
Fasten off. Leave 15 cm tail.
Lower Wings (Make 2)
Yarn: sage green
- R1: 6 sc in MR (6)
- R2: inc ×6 (12)
- R3: (1 sc, inc) ×6 (18)
- R4: (2 sc, inc) ×6 (24)
- R5: (3 sc, inc) ×6 (30)
- R6: (4 sc, inc) ×6 (36)
- R7: sc around (36)
Fasten off. Leave 25 cm tail.
Mushroom Cap (Make 1)
Yarn: mushroom red then cream
- R1: 6 sc in MR (6)
- R2: inc ×6 (12)
- R3: (1 sc, inc) ×6 (18)
- R4: (2 sc, inc) ×6 (24)
- R5: (3 sc, inc) ×6 (30)
- R6: (4 sc, inc) ×6 (36)
- R7: (5 sc, inc) ×6 (42)
- R8: (6 sc, inc) ×6 (48)
- R9–10: sc around (48)
Change to cream.
- R11: BLO sc around (48)
- R12: (7 sc, inc) ×6 (54)
- R13: sc around (54)
- R14: sl st around (54)
The BLO plus slip-stitch edge gives a restrained ruffle instead of a deep flounce.
Fasten off. Leave 35 cm tail.
White Spots (Make 8 small, 2 large)
Yarn: white
Small spots
- R1: 6 sc in MR (6)
- Sl st to close (6)
Fasten off. Leave 10 cm tail.
Large spots
- R1: 6 sc in MR (6)
- R2: inc ×6 (12)
- Sl st to close (12)
Fasten off. Leave 12 cm tail.
Antennae (Make 2)
Yarn: sage green
- Ch 8
- Row 1: starting in 2nd ch from hook, 2 sc in each ch across (14)
The doubled stitches curl the strip automatically.
Fasten off. Leave 15 cm tail.
Leaf Collar (Make 6)
Yarn: sage green
- Ch 6
- Row 1: starting in 2nd ch from hook, sl st, sc, hdc, sc, sl st (5 worked sts)
Fasten off. Leave 12 cm tail.
Cheek Patches (Make 2)
Yarn: blush pink
- R1: 6 sc in MR (6)
- R2: inc ×6 (12)
- Sl st to close (12)
Fasten off. Leave 10 cm tail.
Mushroom Appliqués (Make 2 caps, 2 stems)
Yarn: red, cream, white
Cap
- R1: 6 sc in MR (6)
- R2: inc ×6 (12)
- Sl st to close (12)
Fasten off. Leave 12 cm tail.
Stem
- Row 1: ch 4, starting in 2nd ch from hook sc 3 (3)
- Row 2: ch 1, turn, inc, sc, inc (5)
- Row 3: sc across (5)
Fasten off. Leave 10 cm tail.
Add one or two tiny white knots to each cap after assembly.
Assembly
- Sew the head to the body with the face centered over the narrow end of the body.
- Tack the mushroom cap over the head so the cream brim sits just above the eyes and does not hide the cheeks.
- Stitch the cheek patches slightly below and outside each eye.
- Sew the six leaf pieces around the neck, overlapping them to form a collar.
- Join each cream upper-wing inset to the center of one red upper wing.
- Embroider simple branches and small flowers on the lower wings, then attach one mushroom appliqué to each lower wing.
- Sew the upper wings to the back first, with the top edge starting roughly level with head round 8.
- Sew the lower wings 6–8 mm below the upper wings so the pair overlaps rather than sitting flat.
- Attach the arms under the collar line and angle them slightly forward.
- Sew the antennae to the top center of the cap and curve them outward.
The completed figure balances because the layered wings act as a rear brace against the tapered body.
7 Technical Tips
- Use one stitch marker per wing piece. Miss a single increase on one upper wing and you lose 6 stitches of diameter by round 5, which is enough to show in the final silhouette.
- Do not pack the neck zone as hard as the lower body. Dense stuffing above body round 23 pushes the head forward and makes the cap brim sit too high.
- Work every decrease on the head invisibly. Standard decreases leave tiny holes that become obvious beside 10 mm eyes on a cream face.
- Insert the eyes before the head drops below 24 stitches. After that point, the opening tightens and the washers can distort the face fabric.
- Pin all four wings before sewing any of them. If both wing pairs begin on the same horizontal line, the doll reads as flat and poster-like instead of layered.
- Drop down one hook size if you remake this in velvet. Loose velvet tension blurs the white spots and weakens the outline of the cream inset wings.
- Weave every structural tail at least 4 cm in two directions. Short straight tails tend to slip free where the upper and lower wings overlap and carry the most drag.
Conclusion
This build works because every large element carries a separate job: the cap sets the theme, the upper wings hold contrast, and the lower wings carry texture. For your next step, crochet one test upper wing and one lower wing first, pin them to the body, and check the spread before committing to embroidery. When you post the finished piece, use one front shot for Pinterest and one close crop of the wing stitching for Instagram. This mushroom fairy amigurumi crochet pattern will read best in thumbnails when the red cap, cream face, and green lower wings stay visually distinct. #MushroomButterflyFairyPattern What would you change first on this character: the cap spot layout or the flower density on the lower wings?









