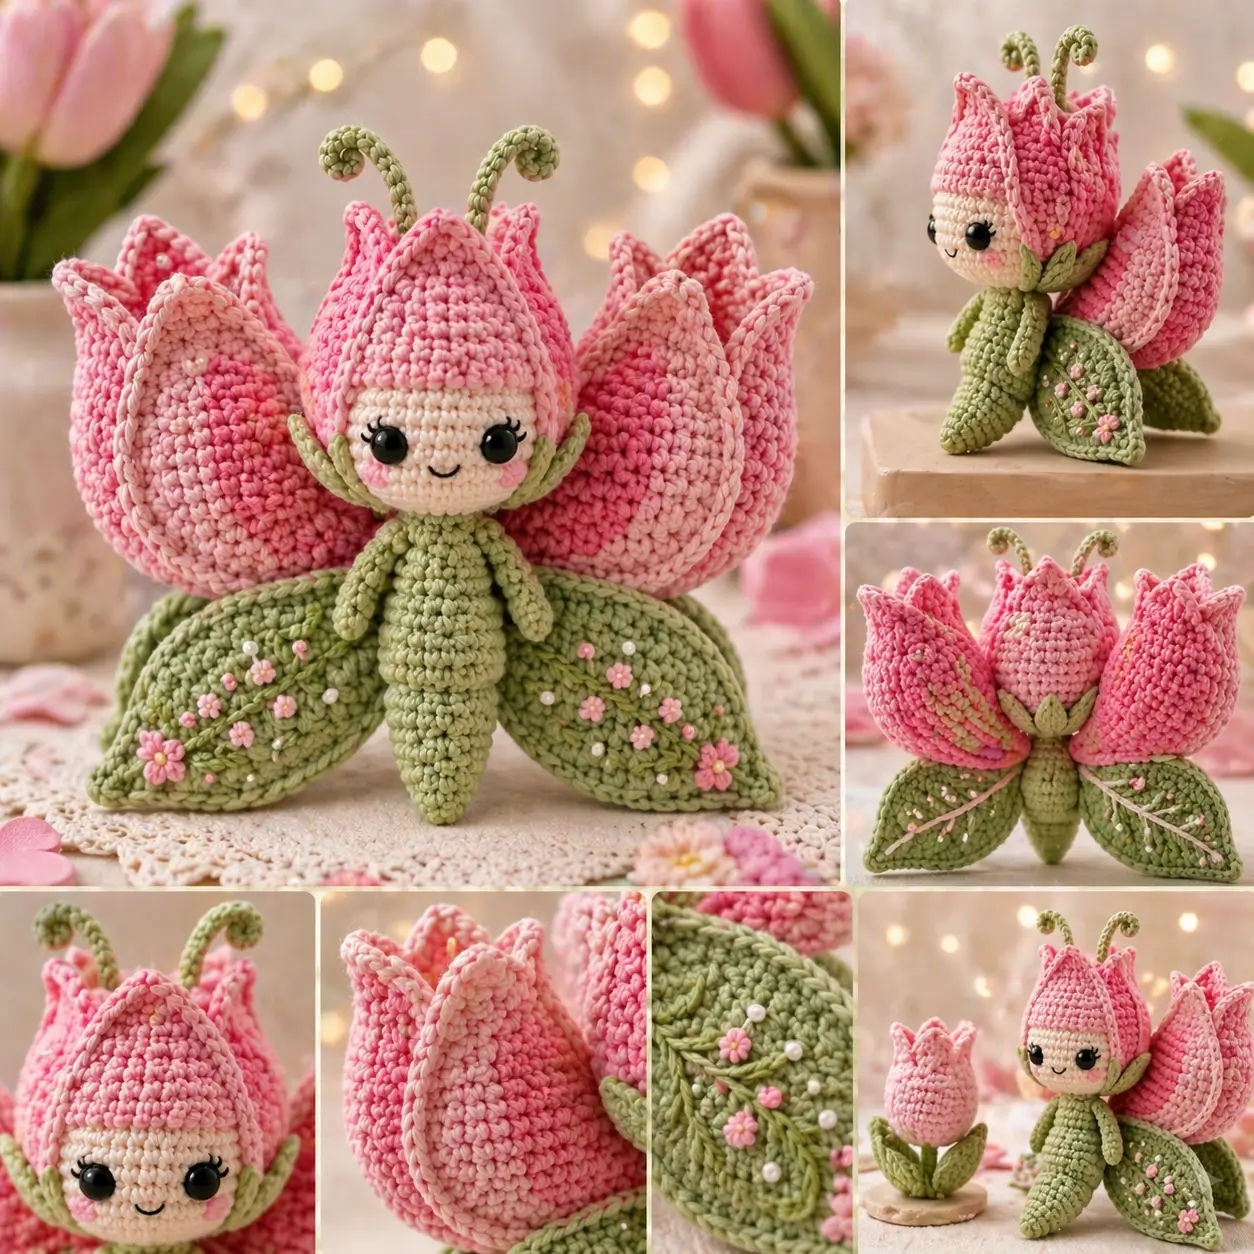
Tulips close in deep outer petals before they ever look like dolls. That geometry drives this tulip fairy crochet pattern. You will work sport-weight cotton, a 2.5 mm hook, and 12 mm eyes into a medium-scale figure that lands near the common 15.5 cm flower-fairy range. The build suits an intermediate maker and fills a specific job: spring decor that stands on a shelf without needing a vase.
The Design: What Makes This Tulip Fairy Different
A tulip doll fails when the petals read like a crown instead of a flower cup. Here, the head stays compact and the petals do the width work, which keeps the face visible without flattening the bloom silhouette. The second structural choice is the low, tapered body. That matters because a flower fairy amigurumi with a round torso tends to look like a generic doll in costume; this one needs a sepal-like profile. The third choice is flat leaf wings rather than stuffed wings. Less bulk. Better back view. A common mistake in a tulip doll crochet pattern is placing the side petals too low, which pulls the eyes into shadow and makes the face disappear in photos. Market examples also lean toward reversible builds, jar displays, or plain stem tulips, so a fixed-body, photo-matched version remains under-served.
Benchmarks for size, yarn, hook, and eye scale across comparable tulip and flower-fairy patterns point to sport or 4-ply cotton, a 2.0-2.5 mm hook range, and eyes from 10 mm to 14 mm, with 12 mm sitting in the middle for a medium doll.
Project Info at a Glance
| Skill Level | Time | Finished Size | Hook | Best For |
|---|---|---|---|---|
| Intermediate | Weekend build | 15.5 cm benchmark | 2.5 mm | Spring shelf decor, desk display, gift topper |
Materials and Tools
Yarn
Working allowance for this photo-matched build: start with small cotton balls rather than one exact kit. Comparable tulip and flower-fairy patterns consistently use cotton or cotton-blend yarn in sport or 4-ply weights.
- Pink — sport / 4-ply cotton — 30 g — Schachenmayr Catania or similar
- Light pink — sport / 4-ply cotton — 20 g — Schachenmayr Catania or similar
- Sage green — sport / 4-ply cotton — 35 g — Alize Cotton Gold or similar
- Cream — sport / 4-ply cotton — 15 g — any matte cotton for the face
- Blush pink — small amount — cheek patches and embroidery accents
- Black and white embroidery thread — small amount — lashes and highlights
Tools
- Hook 2.5 mm
- 12 mm safety eyes
- Polyfill stuffing
- Tapestry needle
- Stitch markers
- Pins
- Optional thin floral wire for firmer curled feelers
Abbreviations
MR = magic ring; sc = single crochet; inc = increase; dec = decrease; sl st = slip stitch; ch = chain; BLO = back loop only; hdc = half double crochet; dc = double crochet; FO = fasten off.
Use invisible decrease on visible shaping rounds, especially the face and body taper, because a standard front decrease leaves a ridge that reads as a seam.
Pattern — Step by Step
Continuous spiral unless noted.
Head (Make 1)
Yarn: cream
R1: 6 sc in MR (6)
R2: inc x6 (12)
R3: (1 sc, inc) x6 (18)
R4: (2 sc, inc) x6 (24)
R5: (3 sc, inc) x6 (30)
R6: (4 sc, inc) x6 (36)
R7-R11: sc around (36)
Insert 12 mm eyes between R9 and R10, 8 sts apart.
R12: (4 sc, dec) x6 (30)
R13: (3 sc, dec) x6 (24)
R14: (2 sc, dec) x6 (18)
Stuff firmly, keeping the lower edge flatter than the cheeks.
R15: (1 sc, dec) x6 (12)
R16: dec x6 (6)
Fasten off. Leave a 20 cm tail.
Body (Make 1)
Yarn: sage green
R1: 6 sc in MR (6)
R2: inc x6 (12)
R3: (1 sc, inc) x6 (18)
R4: (2 sc, inc) x6 (24)
R5: (3 sc, inc) x6 (30)
R6-R8: sc around (30)
R9: (3 sc, dec) x6 (24)
R10-R12: sc around (24)
R13: (2 sc, dec) x6 (18)
R14-R16: sc around (18)
R17: (1 sc, dec) x6 (12)
R18-R20: sc around (12)
Stuff the lower half firmly. Keep the top third lighter so the head sits closer to the body.
R21: dec x6 (6)
Fasten off. Leave a 20 cm tail.
Arms (Make 2)
Yarn: sage green
R1: 6 sc in MR (6)
R2: sc around (6)
R3: (1 sc, inc) x3 (9)
R4-R12: sc around (9)
Stuff only the lower 4 rounds.
Flatten. Crochet 4 sc through both layers.
Fasten off. Leave a 15 cm tail.
Large Leaf Wings (Make 2)
Yarn: sage green
Ch 15.
R1: starting in 2nd ch from hook, sc 14 (14)
R2: ch 1, turn, inc, sc 12, inc (16)
R3: ch 1, turn, inc, sc 14, inc (18)
R4: ch 1, turn, inc, sc 16, inc (20)
R5: ch 1, turn, inc, sc 18, inc (22)
R6-R8: ch 1, turn, sc across (22)
R9: ch 1, turn, dec, sc 18, dec (20)
R10: ch 1, turn, dec, sc 16, dec (18)
R11: ch 1, turn, dec, sc 14, dec (16)
R12: ch 1, turn, dec, sc 12, dec (14)
R13: ch 1, turn, dec, sc 10, dec (12)
R14: ch 1, turn, dec, sc 8, dec (10)
R15: ch 1, turn, dec, sc 6, dec (8)
R16: ch 1, turn, dec, sc 4, dec (6)
Fasten off. Leave a 25 cm tail.
Surface-sl-st a center vein after assembly. Add tiny embroidered flowers only after both wings are pinned in place.
Small Rear Leaves (Make 2)
Yarn: sage green
Ch 10.
R1: starting in 2nd ch from hook, sc 9 (9)
R2: ch 1, turn, inc, sc 7, inc (11)
R3: ch 1, turn, inc, sc 9, inc (13)
R4-R5: ch 1, turn, sc across (13)
R6: ch 1, turn, dec, sc 9, dec (11)
R7: ch 1, turn, dec, sc 7, dec (9)
R8: ch 1, turn, dec, sc 5, dec (7)
Fasten off. Leave a 20 cm tail.
Face Leaves (Make 2)
Yarn: sage green
Ch 7.
R1: starting in 2nd ch from hook, sc 6 (6)
R2: ch 1, turn, inc, sc 4, inc (8)
R3: ch 1, turn, sc across (8)
R4: ch 1, turn, dec, sc 4, dec (6)
Fasten off. Leave a 12 cm tail.
Cheek Patches (Make 2)
Yarn: blush pink
R1: 6 sc in MR (6)
R2: inc x6 (12)
Fasten off. Leave a 10 cm tail.
Front Crown Petals (Make 3)
Yarn: pink
Ch 8.
R1: starting in 2nd ch from hook, sc 7 (7)
R2: ch 1, turn, inc, sc 5, inc (9)
R3: ch 1, turn, inc, sc 7, inc (11)
R4: ch 1, turn, inc, sc 9, inc (13)
R5-R7: ch 1, turn, sc across (13)
R8: ch 1, turn, dec, sc 9, dec (11)
R9: ch 1, turn, dec, sc 7, dec (9)
R10: ch 1, turn, dec, sc 5, dec (7)
R11: ch 1, turn, dec, sc 3, dec (5)
R12: ch 1, turn, sc 5 (5)
R13: ch 1, turn, sc3tog over first 3 sts, sc 2 together over last 2 sts (2)
R14: ch 1, turn, sc2tog (1)
Fasten off. Leave a 20 cm tail.
Back Petals (Make 2)
Yarn: light pink
Ch 11.
R1: starting in 2nd ch from hook, sc 10 (10)
R2: ch 1, turn, inc, sc 8, inc (12)
R3: ch 1, turn, inc, sc 10, inc (14)
R4: ch 1, turn, inc, sc 12, inc (16)
R5: ch 1, turn, inc, sc 14, inc (18)
R6-R8: ch 1, turn, sc across (18)
R9: ch 1, turn, dec, sc 14, dec (16)
R10: ch 1, turn, dec, sc 12, dec (14)
R11: ch 1, turn, dec, sc 10, dec (12)
R12: ch 1, turn, dec, sc 8, dec (10)
R13: ch 1, turn, dec, sc 6, dec (8)
R14: ch 1, turn, dec, sc 4, dec (6)
R15: ch 1, turn, dec, sc 2, dec (4)
R16: ch 1, turn, dec x2 (2)
R17: ch 1, turn, sc2tog (1)
Fasten off. Leave a 22 cm tail.
Feelers (Make 2)
Yarn: sage green
Ch 16.
R1: starting in 2nd ch from hook, sl st in each ch back down the chain (15)
Fasten off. Leave a 12 cm tail.
For a firmer curl, stitch the chain around thin floral wire before attaching.
Mini Tulip Accessory (Make 1 bud, 1 stem, 2 leaves)
Yarn: pink and sage green
Bud
R1: 6 sc in MR (6)
R2: inc x6 (12)
R3: (1 sc, inc) x6 (18)
R4-R5: sc around (18)
R6: (1 sc, dec) x6 (12)
Stuff lightly.
R7: dec x6 (6)
Fasten off. Leave a 15 cm tail.
Stem
Ch 8.
R1: starting in 2nd ch from hook, sl st 7 (7)
Fasten off. Leave a 10 cm tail.
Leaves (Make 2)
Ch 5.
R1: starting in 2nd ch from hook, sc 4 (4)
R2: ch 1, turn, inc, sc 2, inc (6)
R3: ch 1, turn, dec, sc 2, dec (4)
Fasten off. Leave a 10 cm tail.
Assembly
- Sew the head to the narrow top of the body, centering the face over the body point.
- Attach the cheek patches low on the face, one stitch outside each eye line.
- Sew the two face leaves so they angle upward from the lower cheeks into the petal area.
- Pin the three front crown petals around the forehead and top center, then sew them in place.
- Add the two larger back petals behind the head so the bloom opens wider at shoulder level.
- Stitch the feelers between the top petal joins, curving them inward.
- Sew the arms at the upper body sides, slightly below the head join.
- Attach the large leaf wings low on the back so their tips sit wider than the body point.
- Sew the small rear leaves behind the large wings to create the layered back view.
- Assemble the mini tulip bud, stem, and leaves, then place it as a separate prop or tack it lightly beside one wing.
Embroider lashes, leaf veins, and the small blossom motifs last. The finished figure should read as a closed tulip from the back and a fairy face framed by petals from the front.
7 Technical Tips
- Stitch marker drift: The body taper will twist if you move the marker after the first stitch instead of before it. Keep the marker in the first completed stitch of every round so the decrease columns stay centered.
- Stuffing firmness: Pack the lower half of the body to about 8/10 firmness and the upper third to about 4/10. Too much fill at the top pushes the head outward and opens gaps at the neck seam.
- Invisible decrease: A standard dec on the face side leaves a horizontal bump that catches light under the cheek patches. Work invisible dec for R12-R15 of the head so the cream face stays smooth.
- Eye placement timing: Insert the eyes before the head closes past 24 stitches. Waiting until after R14 risks stretching the opening and pulling the cheeks off-center.
- Petal pinning: Pin the center petal first, then the two side petals, then the back petals. Sewing freehand without pinning usually shifts the forehead opening one or two stitches to the left.
- Leaf embroidery spacing: Keep flower knots and beads at least 6 mm from the wing edge. Decorations placed on the seam line distort the leaf shape when the wing is stitched down.
- Tail weaving: Do not bury tails straight through stuffed sections. Split the tail, weave each half in opposite directions across two dry seam paths, and trim only after the piece is under light tension.
Conclusion
This build solves a specific visual problem: how to make a tulip read as a flower first and a doll second. Keep the head compact, let the petal spread create the silhouette, and treat the leaf wings as framing elements rather than a second character feature. Next step: crochet one sample in the exact photo palette, then make a second by swapping only the petal shades to test contrast on the face opening. Save the finished tulip fairy crochet pattern to Pinterest, post your version on Instagram, and tag it with #TulipFairy. One question remains useful for makers comparing results: did your side petals sit above or below the eye line after assembly?









