Introduction
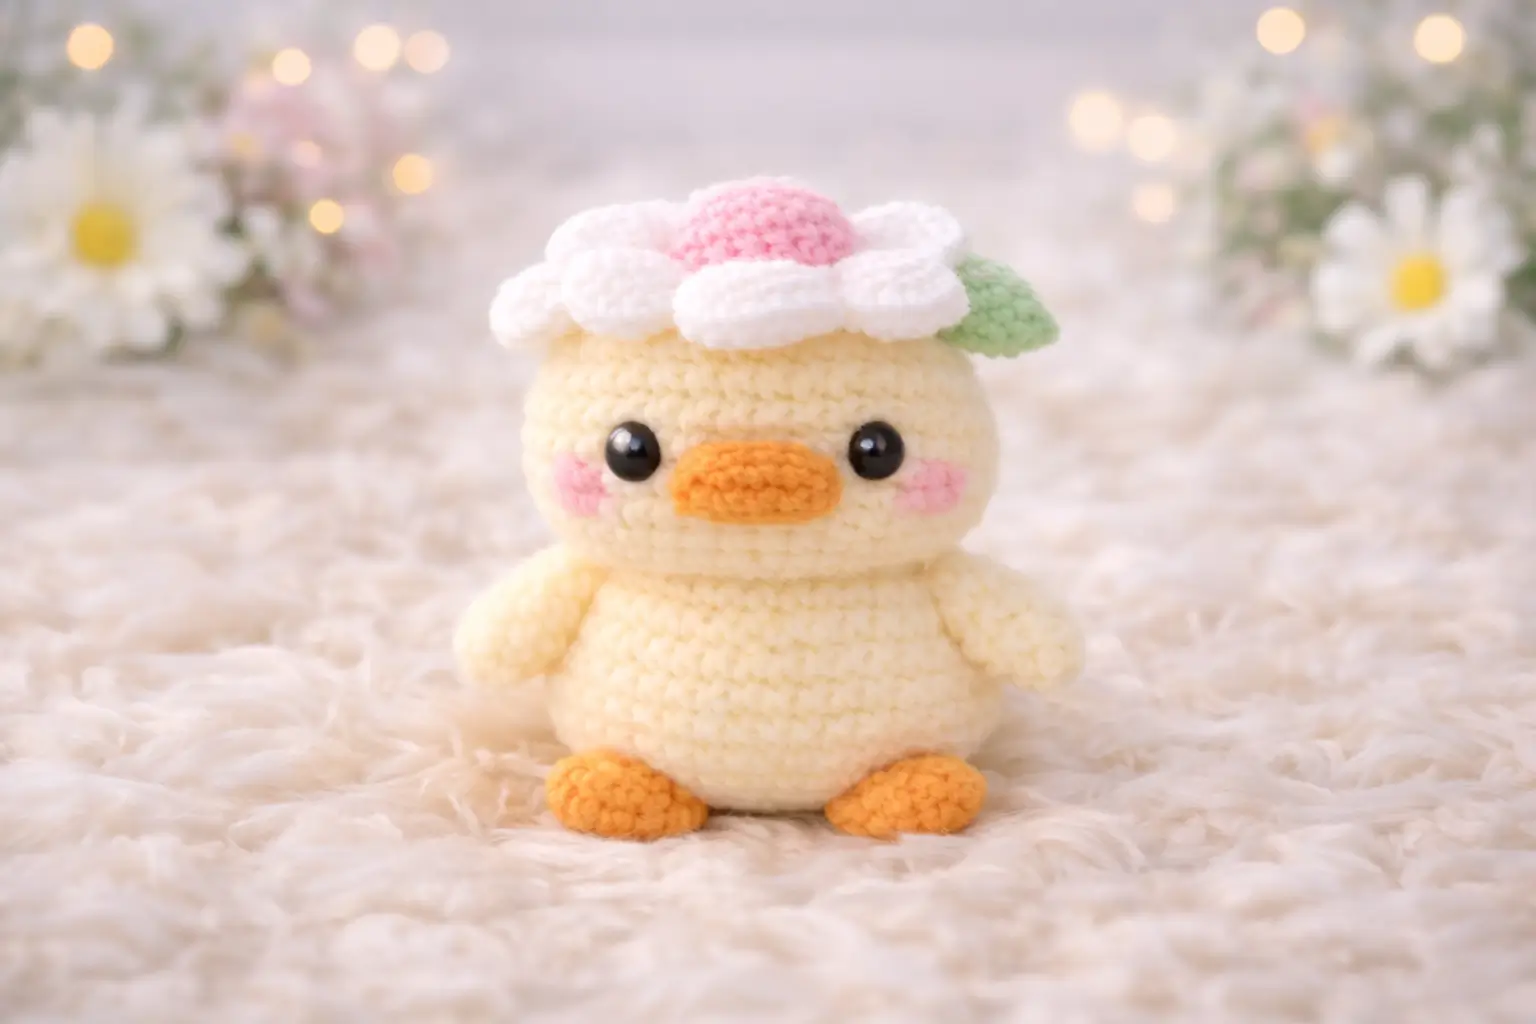
A duck bill has to sit low and wide, or the whole face reads wrong. This duck amigurumi crochet pattern builds that shape first, then balances it with a medium 36-stitch head, compact body, worsted yarn, and a flower cap sized for a small sitting toy. Use it for spring display, nursery shelf decor, or a quick photo prop. The closest verified duck references use sport cotton with a 2.5 mm hook for 6 cm toys and worsted with 3.5 mm for larger versions.
The Design: What Makes Duck Different
Duck shaping depends on three structural decisions. First, the beak has to sit flatter than a bear snout or cat muzzle. A folded oval works better than a stuffed ball because it spreads width across the face instead of adding depth. Second, the body needs a low center of gravity. That is why this version keeps the belly broad and the feet angled forward. The toy stands visually even when it is meant to sit. Third, the wing size stays small. Oversized wings push the silhouette toward chick or bird-general rather than duckling.
One common mistake is placing the eyes too high above the beak. On duck patterns, that gap hardens the expression and shortens the bill. In this duckling crochet pattern, the face is compressed on purpose. The result is closer to a baby duck amigurumi than a generic round bird. You see it in the photo. The proportions do most of the work.
Project Info at a Glance
| Skill Level | Time | Finished Size | Hook | Best For |
|---|---|---|---|---|
| Easy–Intermediate | 3–5 hours | approx. 12 cm from crown to feet | 3.25 mm | shelf decor, gift topper, spring display |
Scale note: verified duck references range from 6 cm with sport cotton to 27 cm in super bulky yarn; this photo-matched version lands between those sizes when worked in worsted yarn.
Materials and Tools
Yarn
- Pale yellow — worsted — approx. 35 g — Stylecraft Special DK held single or any smooth #4 substitute
- Orange — worsted — approx. 8 g — for beak and feet
- White — worsted — approx. 12 g — for petals
- Pink — worsted — approx. 8 g — for flower center and blush
- Light green — worsted — approx. 4 g — for leaf
Tools
- Hook 3.25 mm
- Safety eyes 10 mm
- Polyester stuffing
- Tapestry needle
- Stitch markers
- Blush powder or pink yarn scrap for cheeks
Hook and eye choices are scaled between verified duck references that use 2.5 mm with 7 mm eyes on a small duck and 3.5 mm with 15 mm eyes on a large duck.
Abbreviations
MR / sc / inc / dec / sl st / ch / BLO / FLO / hdc
Use invisible decrease for the visible closing rounds. It keeps the head and body smoother than a standard two-stitch decrease.
Pattern — Step by Step
Continuous spiral unless noted.
Head (Make 1)
Yarn: pale yellow — Source: Standard amigurumi math informed by verified duck head sizing
R1: 6 sc in MR (6)
R2: inc x6 (12)
R3: (sc, inc) x6 (18)
R4: (2 sc, inc) x6 (24)
R5: (3 sc, inc) x6 (30)
R6: (4 sc, inc) x6 (36)
R7-11: sc around (36)
Insert 10 mm eyes between R8 and R9, 6 sts apart. This is a photo match choice scaled between verified 7 mm and 15 mm references.
R12: (4 sc, dec) x6 (30)
R13: (3 sc, dec) x6 (24)
R14: sc around (24)
R15: (2 sc, dec) x6 (18)
Stuff firmly. Keep the lower front slightly flatter for the beak.
R16: (sc, dec) x6 (12)
R17: dec x6 (6)
Fasten off. Leave a 20 cm tail.
Body (Make 1)
Yarn: pale yellow — Source: Standard amigurumi math, medium 36-stitch plateau for compact stability
R1: 6 sc in MR (6)
R2: inc x6 (12)
R3: (sc, inc) x6 (18)
R4: (2 sc, inc) x6 (24)
R5: (3 sc, inc) x6 (30)
R6: (4 sc, inc) x6 (36)
R7-10: sc around (36)
R11: (4 sc, dec) x6 (30)
R12: sc around (30)
R13: (3 sc, dec) x6 (24)
R14: sc around (24)
R15: (2 sc, dec) x6 (18)
Stuff heavily at the base. The toy should sit without a hollow belly.
R16: sc around (18)
R17: (sc, dec) x6 (12)
R18: dec x6 (6)
Fasten off. Leave a 20 cm tail.
Wings / Arms (Make 2)
Yarn: pale yellow — Source: Standard amigurumi math; scaled down from common duck wing references
R1: 6 sc in MR (6)
R2: inc x6 (12)
R3-4: sc around (12)
R5: (2 sc, dec) x3 (9)
R6: sc around (9)
Flatten lightly.
Fasten off. Leave a 15 cm tail.
Feet / Back Legs (Make 2)
Yarn: orange — Source: Standard amigurumi math, photo-matched flat feet
Ch 5.
R1: starting in 2nd ch from hook, sc 3, 3 sc in last ch, working on opposite side sc 2, inc in last st (10)
R2: inc, sc 2, inc x3, sc 2, inc x2 (16)
R3: sc around (16)
Fasten off. Leave a 15 cm tail.
Do not stuff. Pinch the heel slightly before sewing.
Beak (Make 1)
Yarn: orange — Source: Standard amigurumi math; flat oval chosen to match duck anatomy
Ch 7.
R1: starting in 2nd ch from hook, sc 5, 3 sc in last ch, working on opposite side sc 4, inc in last st (14)
R2: inc, sc 4, inc x3, sc 4, inc x2 (20)
R3: sc around (20)
Fasten off. Fold in half. Leave a 20 cm tail.
Do not stuff. Sew through both layers only at the side edges so the center stays broad.
Cheek Patches (Make 2)
Yarn: pink — Source: Standard amigurumi math
R1: 6 sc in MR (6)
R2: inc x6 (12)
Sl st to first st.
Fasten off. Leave a 12 cm tail.
Daisy Center (Make 1)
Yarn: pink — Source: Standard amigurumi math, accessory scaled from common duck hat references
R1: 6 sc in MR (6)
R2: inc x6 (12)
R3: (sc, inc) x6 (18)
R4: (2 sc, inc) x6 (24)
R5-6: sc around (24)
R7: (2 sc, dec) x6 (18)
Stuff lightly for a dome.
R8: (sc, dec) x6 (12)
Fasten off. Leave a 20 cm tail.
Daisy Petals (Make 6)
Yarn: white — Source: Standard amigurumi math
Ch 6.
R1: starting in 2nd ch from hook, sc 1, hdc 2, sc 1, 3 sc in last ch; working on opposite side sc 1, hdc 2, sc 1 (12)
R2: sc around (12)
Fasten off. Leave a 12 cm tail.
Leaf (Make 1)
Yarn: light green — Source: Standard amigurumi math
Ch 7.
R1: starting in 2nd ch from hook, sl st 1, sc 1, hdc 2, sc 1, 3 sc in last ch; working on opposite side sc 1, hdc 2, sc 1, sl st 1 (14)
Fasten off. Leave a 12 cm tail.
Optional Tail Nub (Make 1)
Yarn: pale yellow — Source: Standard amigurumi math
R1: 6 sc in MR (6)
R2: sc around (6)
R3: (sc, dec) x2 (4)
Fasten off. Leave a 10 cm tail.
Assembly
- Sew the head to the body, centering the lower face slightly forward of the body midpoint.
- Check the seam from front view before locking the final stitches; a duck head that tilts back loses the low-bill look.
- Attach the beak across the lower center of the head between R9 and R12, keeping it flat and wide.
- Sew the cheek patches one round below the eyes and one to two stitches outside the beak edges.
- Add the wings to the body sides, about one round below the neck seam.
- Sew the feet to the front base of the body so they project outward rather than downward.
- Attach the tail nub at the lower back if you want a finished rear view.
- Stitch the six petals around the base of the daisy center, overlapping them slightly.
- Sew the leaf behind one side of the flower, then attach the full daisy hat to the top of the head.
- Weave in every tail through at least three direction changes inside the stuffing. The piece is complete once the toy sits flat without hand support.
7 Technical Tips
- Mark the first stitch of every round. Lose that marker once on a 36-stitch head and the eye line will drift by one to two stitches.
- Stuff the body base harder than the head. A soft lower half collapses inward and makes the duck pitch forward.
- Use invisible decreases on the last three closing rounds. Standard decreases leave ridges that show on pale yellow yarn.
- Install eyes before the head drops below 24 stitches. Safety eye washers become difficult to lock once the opening narrows.
- Flatten the beak before sewing. A rounded stuffed beak projects too far and turns the profile into a chick-like cone.
- Pin both feet before sewing either one down. On a 12 cm toy, even a 3 mm mismatch is obvious from the front.
- Weave hat and petal tails away from the crown center. Too many knots in one spot create a visible bump under the flower cap.
Conclusion
This duck amigurumi crochet pattern works because the face stays compressed, the beak stays flat, and the body carries more width than height. Follow the stitch counts as written, pin the beak before sewing, and keep the flower cap centered over the eye line. Then photograph the finished duck from straight on and from a slight side angle before posting. Share it to Pinterest and Instagram with #DuckDaisyHat, and note your yarn and hook size in the caption. One detail is worth comparing across versions: did you keep the beak wide enough to sit past both cheek patches?









