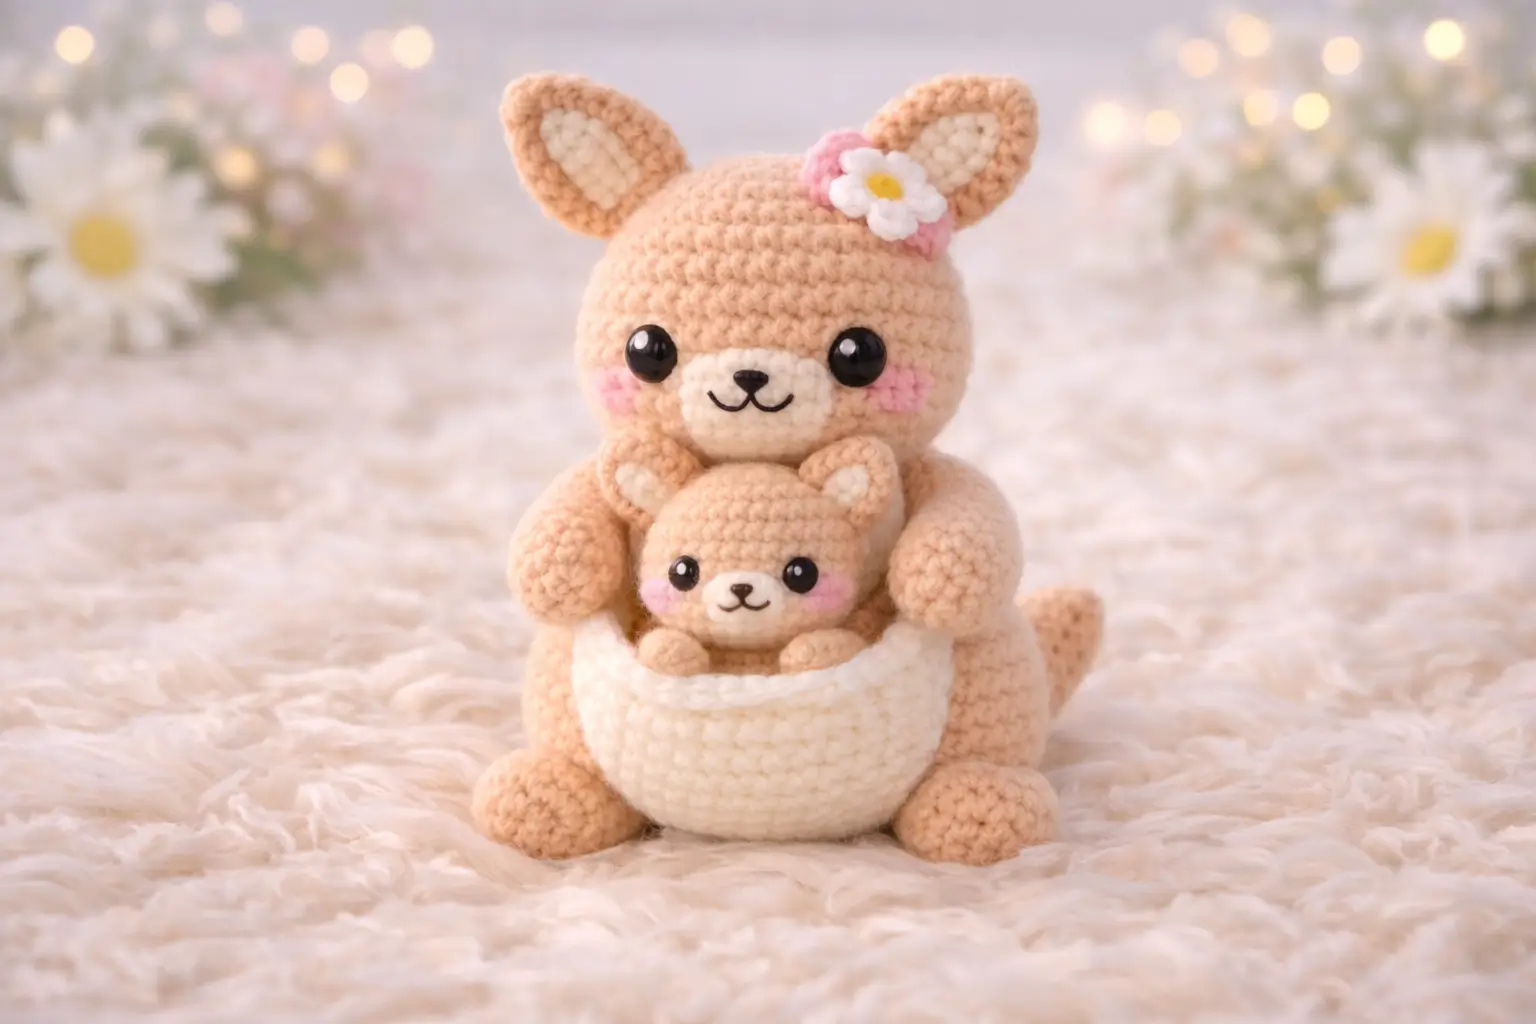
A kangaroo only reads correctly when the tail works as a third leg. This kangaroo amigurumi crochet pattern builds that balance first, then adds the pouch, joey, and flower detail. Use medium-weight yarn, a 3 mm hook, and 8 mm plus 6 mm safety eyes for an approximately 18 cm seated piece suited to an advanced beginner or intermediate maker. It works well as nursery decor because the joey is fixed in a stable front pouch.
The Design: What Makes This Kangaroo Different
This design is not a generic animal body with ears added later. The pouch changes the front silhouette, so the belly must stay broad and the neck narrow. The tail also matters more than on most plush animals because a seated kangaroo relies on rear support to keep the body from tipping forward. That is why many commercial and free references either widen the body heavily or stiffen the tail profile.
The image adds another structural demand. The joey sits high in the pouch, with only the head and forepaws visible, so the pouch edge has to frame the face instead of collapsing flat. Many makers miss that and attach a shallow oval pocket that reads more like an apron. In this version, the kangaroo with baby crochet pattern approach uses a deeper row-built pouch and a larger round head to match the photo. The joey pouch crochet pattern detail is what separates it from a standard crochet kangaroo plush.
Project Info at a Glance
| Skill Level | Time | Finished Size | Hook | Best For |
|---|---|---|---|---|
| Advanced beginner to intermediate | 6–8 hours | 18 cm | 3 mm | Nursery decor, shelf plush, themed gift |
Size and hook verified from a current kangaroo pattern reference; shaping below is image-adapted.
Materials and Tools
Yarn
- Pale peach-beige — medium weight — about 110–125 g — Paintbox Cotton Aran, YarnArt Jeans plus held adaptation, or similar smooth amigurumi yarn
- Cream/white — medium weight — about 35–45 g — for muzzle, pouch, ear inserts, joey muzzle
- Soft pink — medium weight — under 10 g — cheeks and flower base
- Yellow — medium weight — under 5 g — flower center
- Black embroidery thread — small amount — nose and mouth
Tools
- Hook 3 mm
- 8 mm safety eyes for mother
- 6 mm safety eyes for joey
- Stuffing
- Tapestry needle
- Stitch markers
- Pins
- Scissors
Abbreviations
MR / sc / inc / dec / sl st / ch / BLO / hdc
Use invisible decrease for all shaping rounds on visible surfaces because the standard front-loop collapse is less visible on tightly worked amigurumi.
Pattern — Step by Step
Continuous spiral unless noted. Stitch math is image-adapted using standard amigurumi progression, checked against current kangaroo references for size and part structure.
Head (Make 1)
Yarn: pale peach-beige with cream muzzle area — Source: image adaptation + standard amigurumi math; size profile checked against YarnGems head peak of 42 sts.
R1: 6 sc in MR (6)
R2: inc x6 (12)
R3: (sc, inc) x6 (18)
R4: (2 sc, inc) x6 (24)
R5: (3 sc, inc) x6 (30)
R6: (4 sc, inc) x6 (36)
R7: (5 sc, inc) x6 (42)
R8–14: sc around (42)
R15: (5 sc, dec) x6 (36)
R16: (4 sc, dec) x6 (30)
Insert 8 mm eyes between R10 and R11, 7 sts apart. Add muzzle before closing.
R17: (3 sc, dec) x6 (24)
Stuff firmly.
R18: (2 sc, dec) x6 (18)
R19: (sc, dec) x6 (12)
R20: dec x6 (6)
Fasten off. Leave 20 cm tail.
Muzzle (Make 1)
Yarn: cream — Standard amigurumi oval adaptation.
Ch 5.
R1: starting in 2nd ch from hook, 3 sc, 3 sc in last ch, working on opposite side 2 sc, inc (10)
R2: inc, 2 sc, inc x3, 2 sc, inc x2 (16)
R3: sc around (16)
Embroider nose and mouth after sewing in place.
Fasten off. Leave 18 cm tail.
Ears (Make 2)
Yarn: outer pale peach-beige, inner cream — ear form checked against current kangaroo ear references.
Outer ear
R1: 6 sc in MR (6)
R2: (sc, inc) x3 (9)
R3: sc around (9)
R4: (2 sc, inc) x3 (12)
R5–6: sc around (12)
R7: (2 sc, dec) x3 (9)
R8: sc around (9)
Inner ear
R1: 6 sc in MR (6)
R2: (sc, inc) x3 (9)
R3: sc around (9)
R4: (2 sc, inc) x3 (12)
R5: sc around (12)
Flatten inner ear onto outer ear and sew edges lightly.
Fasten off. Leave 15 cm tails.
Arms / Front Legs (Make 2)
Yarn: pale peach-beige — structure based on compact arm references.
R1: 6 sc in MR (6)
R2: (sc, inc) x3 (9)
R3–9: sc around (9)
Lightly stuff lower half only. Flatten top edge.
Fasten off. Leave 20 cm tail.
Thighs / Upper Legs (Make 2)
Yarn: pale peach-beige — adapted from kangaroo thigh structure.
R1: 6 sc in MR (6)
R2: inc x6 (12)
R3: (sc, inc) x6 (18)
R4: (2 sc, inc) x6 (24)
R5: (3 sc, inc) x6 (30)
R6–7: sc around (30)
Stuff moderately. These form the side body bulge seen in the photo.
Fasten off. Leave 25 cm tail.
Hind Feet (Make 2)
Yarn: pale peach-beige — simplified seated-foot version.
R1: 6 sc in MR (6)
R2: (sc, inc) x3 (9)
R3: sc around (9)
R4: (2 sc, inc) x3 (12)
R5–8: sc around (12)
Stuff lightly. Flatten opening.
Fasten off. Leave 20 cm tail.
Body (Make 1)
Yarn: pale peach-beige — image-adapted seated body. Verified reference body profiles for kangaroo patterns peak at 48 sts; this version is intentionally reduced to 42 for a rounder front under the pouch.
R1: 6 sc in MR (6)
R2: inc x6 (12)
R3: (sc, inc) x6 (18)
R4: (2 sc, inc) x6 (24)
R5: (3 sc, inc) x6 (30)
R6: (4 sc, inc) x6 (36)
R7: (5 sc, inc) x6 (42)
R8–13: sc around (42)
R14: (5 sc, dec) x6 (36)
R15: (4 sc, dec) x6 (30)
R16: (3 sc, dec) x6 (24)
Stuff body firmly.
R17: (2 sc, dec) x6 (18)
R18–20: sc around (18)
Optional neck rise: work 12 sc only, then sl st to even edge.
Fasten off. Leave 25 cm tail.
Tail (Make 1)
Yarn: pale peach-beige — tail shaping checked against YarnGems tail reference.
R1: 6 sc in MR (6)
R2: (sc, inc) x3 (9)
R3: sc around (9)
R4: (2 sc, inc) x3 (12)
R5–9: sc around (12)
R10: (3 sc, inc) x3 (15)
R11–13: sc around (15)
Stuff firmly. The tail must resist collapse at the base.
Fasten off. Leave 22 cm tail.
Pouch (Make 1)
Yarn: cream/white — row-built pouch based on current kangaroo pouch references.
Ch 2.
Row 1: 3 sc in 2nd ch from hook (3), ch 1, turn
Row 2: sc, inc, sc (4), ch 1, turn
Row 3: sc, inc x2, sc (6), ch 1, turn
Row 4: 2 sc, inc x2, 2 sc (8), ch 1, turn
Row 5: 2 sc, inc, 2 sc, inc, 2 sc (10), ch 1, turn
Row 6: 3 sc, inc, 2 sc, inc, 3 sc (12), ch 1, turn
Row 7–8: sc across (12), ch 1, turn
Row 9: 4 sc, inc, 2 sc, inc, 4 sc (14)
Work a clean sc edging down both sides and along the top rim.
Fasten off. Leave 30 cm tail.
Joey Head and Upper Body (Make 1)
Yarn: pale peach-beige with cream muzzle — simplified baby unit based on joey size references with 6 mm eyes.
R1: 6 sc in MR (6)
R2: inc x6 (12)
R3: (sc, inc) x6 (18)
R4–6: sc around (18)
R7: sc 7, ch 4, beginning in 2nd ch from hook 3 sc back down chain, sl st in same base st, sc 2, ch 4, beginning in 2nd ch from hook 3 sc back down chain, sl st in same base st, sc 9 (18)
R8: sc around, skipping sl sts (18)
Insert 6 mm eyes between R4 and R5, 2 sts apart. Add tiny cream muzzle patch.
R9: (sc, dec) x6 (12)
Stuff lightly.
R10: dec x6 (6)
Fasten off. Leave 25 cm tail.
Joey Forepaws (Make 2)
Yarn: pale peach-beige — image-specific small forepaws.
R1: 6 sc in MR (6)
R2–3: sc around (6)
Flatten.
Fasten off. Leave 10 cm tail.
Cheek Patches (Make 4)
Yarn: soft pink — flat circle reference inspired by cheek treatment in kangaroo photo references.
R1: 6 hdc in MR (6)
Sl st to close.
Make 2 for mother and 2 tiny ones for joey if desired.
Fasten off. Leave 8 cm tail.
Flower Base (Make 1)
Yarn: soft pink — image-specific accessory.
R1: 6 sc in MR (6)
R2: inc x6 (12)
Fasten off. Leave 12 cm tail.
Flower Petals (Make 1 piece)
Yarn: white — image-specific accessory.
R1: 5 sc in MR (5)
Sl st to first sc.
[Ch 3, 2 dc in same st, ch 3, sl st in next st] x5
Fasten off. Leave 12 cm tail.
Flower Center (Make 1)
Yarn: yellow — image-specific accessory.
R1: 6 sc in MR (6)
Fasten off. Leave 8 cm tail.
Assembly
- Sew the muzzle centered on the lower front of the head, then embroider the nose and smiling mouth.
- Attach the mother ears to the top sides of the head, slightly angled outward rather than vertical.
- Sew the head to the neck opening so the face tilts slightly forward.
- Attach the thighs to the lower sides of the body to create the rounded seated silhouette.
- Sew the hind feet in front of the thighs, turned outward a little.
- Attach the tail low on the back center. Test balance before final tightening; the toy should sit on thighs and tail together.
- Sew the arms high on the front sides, curving inward toward the pouch rim.
- Stitch the joey forepaws to the lower front of the joey head unit.
- Position the joey at the center belly, then sew the pouch around it so only the joey’s head and paws remain visible above the rim.
- Add pink cheek patches to both figures and sew the flower to one ear using pink base, white petals, and yellow center.
The finished piece should sit upright without additional support.
7 Technical Tips
- Mark Round 7 on the head. That is the 42-stitch plateau in this version, and losing count there changes the eye spacing later.
- Do not overstuff the upper body. A hard chest pushes the pouch forward and makes the joey angle outward instead of upward.
- Use invisible decreases from the first shaping round. Standard decreases leave a dotted ridge that shows on pale yarn around the head and thighs.
- Install the mother’s eyes before Round 17. After that point, the opening narrows enough that washer placement becomes awkward and distorts the face.
- Stuff the tail firmer than the arms. The tail acts as a support point, so a soft fill there causes rear collapse.
- Pin the pouch in three spots first: left edge, center bottom, right edge. This keeps the rim level and stops the joey from looking offset.
- Weave all limb tails back through a second path at least 3 cm long. Short tail weaving often loosens at the thigh seam because that area carries the sitting load.
Conclusion
This kangaroo amigurumi crochet pattern works because the structure stays faithful to the animal: broad thighs, narrow neck, forward pouch, and a tail that functions as support instead of decoration. The next step is practical. Crochet the pouch first as a swatch, pin it against the body, and confirm the joey head height before joining anything permanently. When finished, photograph the piece from the front and side, then share it to Pinterest and Instagram with #KangarooJoeyPattern. One detail matters most in the final look: did you angle the ears outward enough to keep the mother kangaroo from reading like a bear?









