Introduction
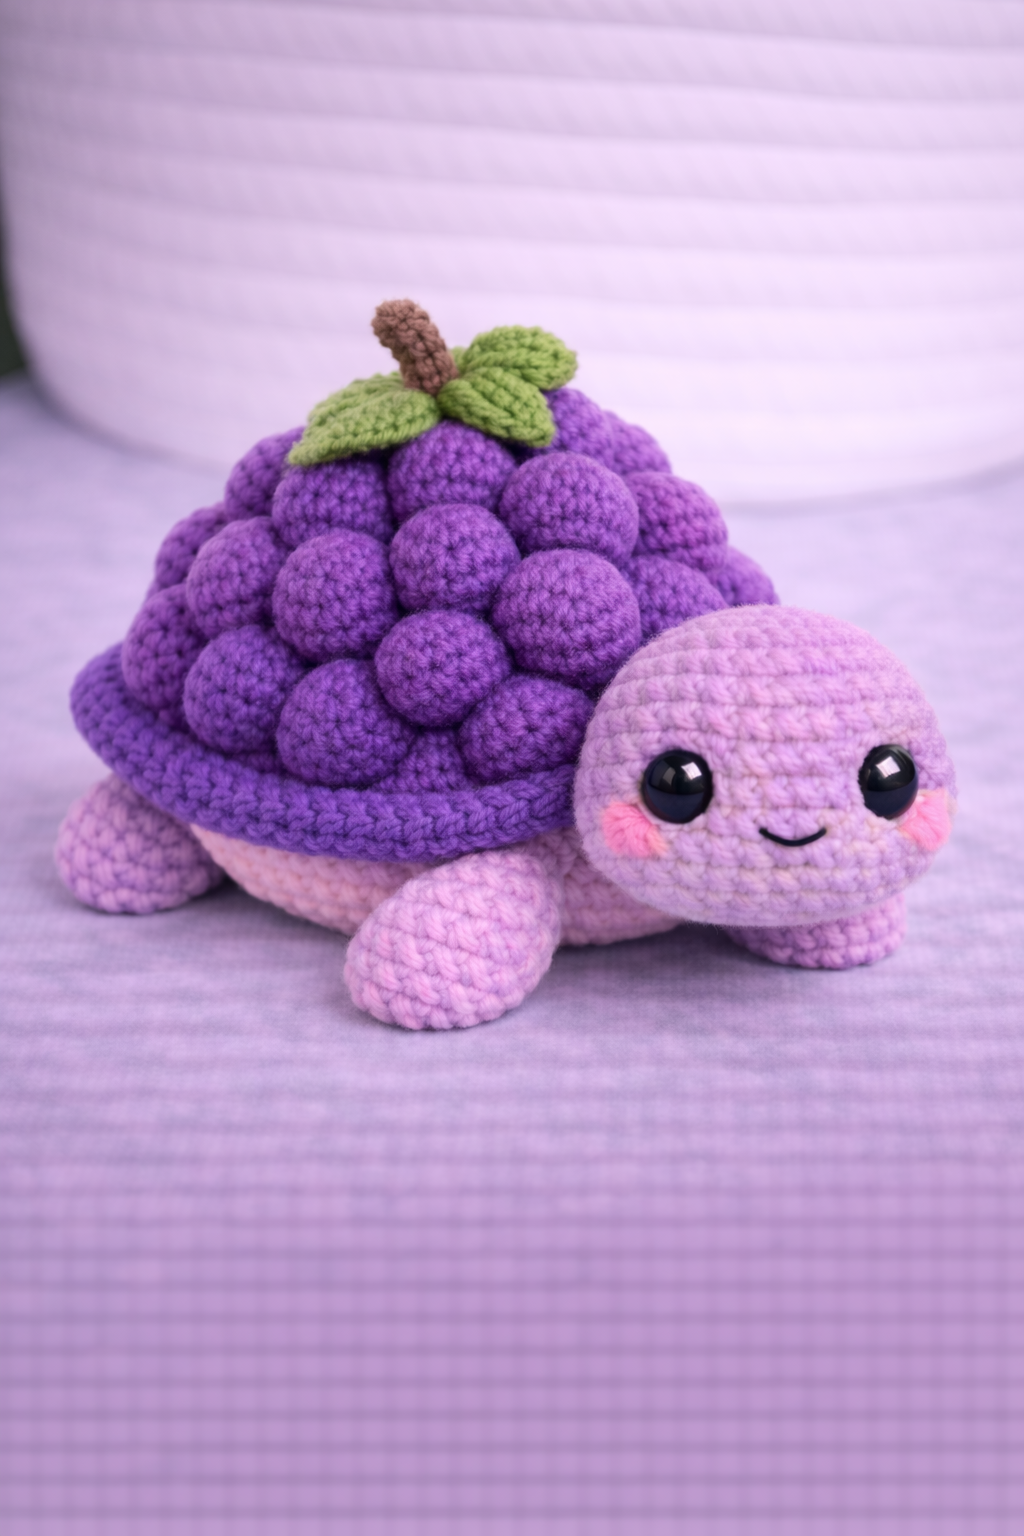
Grapes cluster outward, not flat, and that changes the shell geometry before the first stitch of a grape turtle amigurumi pattern is even made. This version uses super bulky yarn, a 6.5 mm hook, 12 mm eyes, and a low oval turtle base that finishes around 18 cm long in the sample proportions. It suits an advanced beginner. The shape also works well for market tables because the fruit shell reads clearly from a distance.
The Design: What Makes Grape Turtle Different
A grape turtle is not a standard shell swap. The first structural choice is a low body, because a tall body plus raised bobbles tips the plush backward. The second is a cluster shell made from separate spheres rather than a flat hexagon shell; that preserves the grape silhouette visible in the photo. Third comes the top garnish: two leaves and a short stem. Those pieces break the dome line and make the fruit-turtle concept legible at a glance. Many fruit turtle crochet pattern results sell the idea on color alone, but the stronger builds depend on shell volume and topper placement. One common mistake is spacing the shell bobbles too evenly. Real grape cluster reading comes from staggered sizes and a denser center line, which is why this grape turtle crochet pattern uses mixed shell-ball sizes and a raised front row.
Project Info at a Glance
| Skill Level | Time | Finished Size | Hook | Best For |
|---|---|---|---|---|
| Advanced beginner | Quick plush project; basic turtle bases are often described as roughly an hour, but this fruit shell adds extra assembly | About 18 cm long in this draft; verified grape-turtle range 15.2–27.9 cm depending on yarn | 6.5 mm | Market plush, gift plush, fruit-animal display |
Materials and Tools
Yarn
- Purple — super bulky / size 6 — about 50 g — Bernat Blanket or similar plush yarn is a practical match for the verified grape turtle examples.
- Lavender — super bulky / size 6 — about 20 g — same yarn family for the head, body, and legs.
- Green — super bulky or lighter accent yarn — about 5 g — for leaves.
- Brown — small scrap amount — about 2 g — for stem.
- Pink — small scrap amount — for cheek patches.
- Black embroidery floss or yarn — small scrap amount — for smile.
Tools
- Hook 6.5 mm
- 12 mm safety eyes
- Polyester stuffing
- Yarn needle
- Stitch markers
Abbreviations
MR = magic ring
sc = single crochet
inc = increase
dec = invisible decrease
sl st = slip stitch
ch = chain
BLO = back loop only
Invisible decrease keeps the face and shell cleaner because the front loops stay flatter than a standard two-loop decrease.
Pattern — Step by Step
Continuous spiral unless noted. This draft follows standard amigurumi count math and photo-based proportions rather than a copied commercial pattern.
Head (Make 1)
Yarn: lavender — original draft from standard amigurumi math
R1: 6 sc in MR (6)
R2: inc x6 (12)
R3: (sc, inc) x6 (18)
R4: (2 sc, inc) x6 (24)
R5: (3 sc, inc) x6 (30)
R6-R8: sc around (30)
R9: (3 sc, dec) x6 (24)
R10: (2 sc, dec) x6 (18)
Insert 12 mm eyes between R6 and R7, about 7 sts apart. Add light stuffing.
R11: (sc, dec) x6 (12)
Fasten off. Leave a 25 cm tail.
Body (Make 1)
Yarn: lavender — original draft, oval turtle body
Ch 8.
R1: Starting in 2nd ch from hook: 6 sc, 3 sc in last ch, working on opposite side 5 sc, inc (16)
R2: inc, 5 sc, inc x3, 5 sc, inc x2 (22)
R3: sc, inc, 5 sc, (sc, inc) x3, 5 sc, (sc, inc) x2 (28)
R4: 2 sc, inc, 5 sc, (2 sc, inc) x3, 5 sc, (2 sc, inc) x2 (34)
R5: sc around, add one inc at each curve end to square the oval lightly (36)
R6-R8: sc around (36)
R9: BLO sc around (36)
R10: sc around (36)
Stuff firmly at center but keep side walls low.
Fasten off. Leave a 30 cm tail.
Front Legs (Make 2)
Yarn: lavender — original draft
R1: 6 sc in MR (6)
R2: inc x6 (12)
R3-R4: sc around (12)
R5: (4 sc, dec) x2 (10)
R6: sc around (10)
Flatten lightly.
Fasten off. Leave a 20 cm tail.
Back Legs (Make 2)
Yarn: lavender — original draft
R1: 6 sc in MR (6)
R2: inc x6 (12)
R3: sc around (12)
R4: (4 sc, dec) x2 (10)
R5: sc around (10)
Flatten lightly.
Fasten off. Leave a 20 cm tail.
Grape Shell Balls — Large (Make 8)
Yarn: purple — original draft based on photo cluster
R1: 6 sc in MR (6)
R2: inc x6 (12)
R3: (sc, inc) x6 (18)
R4-R5: sc around (18)
R6: (sc, dec) x6 (12)
Stuff firmly.
R7: dec x6 (6)
Fasten off. Close opening.
Grape Shell Balls — Medium (Make 7)
Yarn: purple — original draft based on photo cluster
R1: 6 sc in MR (6)
R2: inc x6 (12)
R3-R4: sc around (12)
R5: dec x6 (6)
Stuff before closing.
Fasten off.
Grape Shell Balls — Small (Make 4)
Yarn: purple — original draft based on photo cluster
R1: 6 sc in MR (6)
R2: (sc, inc) x3 (9)
R3: sc around (9)
R4: (sc, dec) x3 (6)
Stuff lightly.
Fasten off.
Shell Rim (Make 1)
Yarn: purple — original draft
Ch 26.
R1: Starting in 2nd ch from hook, 25 sc (25)
R2: ch 1, turn, sc across (25)
R3: ch 1, turn, sc across (25)
Fasten off. Leave a 35 cm tail.
Leaves (Make 2)
Yarn: green — original draft
Ch 7.
R1: Starting in 2nd ch from hook: sl st, sc, hdc, dc, hdc, sc. Working on opposite side of chain: sc, hdc, dc, hdc, sc, sl st.
Fasten off. Leave a 15 cm tail.
Stem (Make 1)
Yarn: brown — original draft
Ch 5.
R1: Starting in 2nd ch from hook, 4 sl st.
Fasten off. Leave a 10 cm tail.
Cheek Patches (Make 2)
Yarn: pink — original draft flat circles
R1: 6 sc in MR (6)
R2: inc x6 (12)
Sl st to join.
Fasten off. Leave a 12 cm tail.
Smile Embroidery
Yarn: black — original draft
Embroider a shallow curved smile centered one round below the eyes, about 3 sts wide.
Assembly
- Sew the head to the front third of the body oval, keeping the chin slightly lifted above the floor line.
- Attach the front legs beside the head seam, angled forward rather than straight down.
- Attach the back legs near the rear curve of the body, set wider than the front pair for stability.
- Add the 12 mm eyes if not already inserted, then knot and back the posts securely inside the head.
- Sew the cheek patches one stitch below and slightly outside each eye.
- Stitch the smile between the cheeks, centered under the eye line.
- Sew the shell rim around the upper body edge, covering the BLO transition round.
- Arrange the grape shell balls in staggered rows: largest on the base row, mixed medium across the center, then small and medium near the crown. Pin first, then sew.
- Sew the two leaves near the shell top center, crossing them slightly, then attach the stem between their bases.
- Check the plush on a flat surface and rebalance stuffing through any seam gap before weaving in all tails.
The sample is complete when the shell cluster sits centered and the turtle rests without rolling backward.
7 Technical Tips
- Mark the center front of the body before attaching the head. A drift of even 2 stitches will make the grape shell look off-axis from the face.
- Keep stuffing firmer in the head than the body. A soft head collapses under the visual weight of the raised shell cluster.
- Use invisible decreases on all visible shaping rounds. Standard decreases leave sharper notches that show under plush yarn, especially on the head sides.
- Insert the eyes before the head closes past 18 stitches. Trying to force 12 mm eyes through later rounds can stretch the face fabric.
- If your yarn is velvet or chenille, reduce pull force on the MR tail. Aggressive tightening can snap the core or strip fuzz at the center.
- Pin every grape ball before sewing. The shell only reads as grapes when the spheres overlap slightly instead of sitting in a neat grid.
- Weave each tail through at least 3 directional changes inside the shell. Short straight tail paths can loosen because the bobbles are handled more than the body.
Conclusion
The main challenge in a grape turtle amigurumi pattern is not the turtle body. It is the shell mass, the topper placement, and the way the fruit cluster has to stay centered while the plush remains stable on four short legs. Start with the oval body, then build the shell as a staggered set of spheres rather than a flat cap. After finishing, photograph the turtle from the front and the top, then post it to Pinterest and Instagram with #GrapeTurtlePattern. One specific test remains useful: did your top leaf sit between the first two crown grapes, or did the stem crowd the center line?









