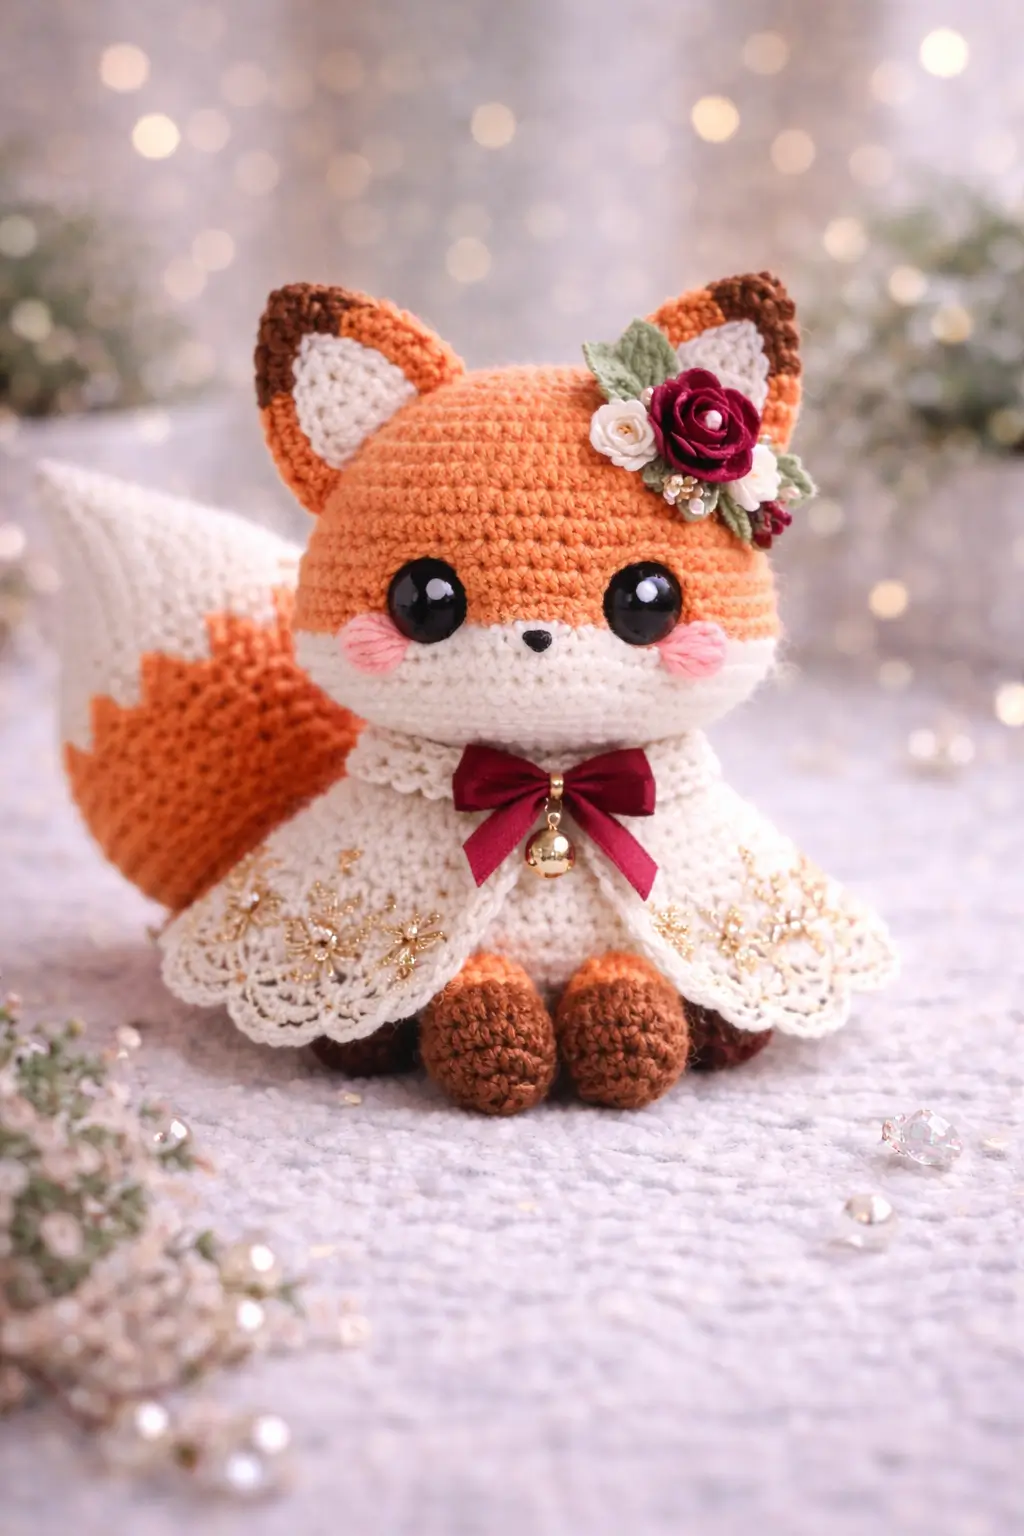
A fox tail is longer than the body looks from the front. That is the first proportion problem this fox amigurumi crochet pattern has to solve. You are making a small sitting fox in fine cotton with a 2.0 mm hook, about 10 cm tall in the verified benchmark size, at an intermediate level because the accessories and color placement matter as much as the shaping. It works well as a shelf mascot or gift topper.
The Design: What Makes This Fox Different
The head carries most of the character. That means the muzzle line cannot sit too low, or the fox starts reading as a bear. You need a broad white face band, compact triangular ears, and a tail that widens fast before tapering. Those three decisions control recognition more than extra ornament does. A fox amigurumi free pattern often simplifies the lower face into a small oval snout. Here, the better choice is a wider mask that runs cheek to cheek, because the photo shows a flattened facial plane under the eyes rather than a projecting muzzle.
Stability matters too. The model sits because the feet are set forward and the body drops straight down behind them. Many makers place the tail too low on a crochet fox plush, which pushes the piece forward. On this character, the tail should brace the back line but not act as a third leg. The flower cluster and cape then sit on top of a stable body instead of compensating for it.
Project Info at a Glance
| Skill Level | Time | Finished Size | Hook | Best For |
|---|---|---|---|---|
| Intermediate | 6–8 hours | 10 cm benchmark | 2.0 mm | Decor, gift topper, display plush |
The verified benchmark size, hook, yarn class, and eye size come from small cotton fox patterns, with floral-part structure cross-checked against a recent flower fox tutorial.
Materials and Tools
Yarn
- Orange — fine / 4-ply or #2 cotton — small ball or partial skein — YarnArt Jeans, Catania, or similar
- White/Cream — fine / 4-ply or #2 cotton — small ball — same yarn family
- Brown — fine / 4-ply or #2 cotton — small amount — for paws and ear edging
- Black — fine cotton or embroidery thread — very small amount — for nose
- Pink — fine cotton or embroidery floss — very small amount — for cheek blush
- Burgundy/Red — fine cotton, ribbon, or crochet thread — small amount — flower or bow
- Green — fine cotton — small amount — leaves
Tools
- Hook 2.0 mm
- 8 mm safety eyes for the verified small benchmark, or size up visually if you want the oversized-eye photo look
- Polyfill stuffing
- Tapestry needle
- Stitch markers
- Sharp scissors
- Optional glue for floral trims or ready-made ribbon bow
Small fox references consistently use fine cotton or similar light yarn with a 2.0–2.5 mm hook, while several floral fox builds add red and green accents for the flower section.
Abbreviations
MR = magic ring
sc = single crochet
inc = increase
dec = decrease
sl st = slip stitch
ch = chain
BLO = back loop only
FLO = front loop only
tr = treble crochet
hdc = half double crochet
Use invisible decrease where possible so the head and body shaping stay compact and the white face band does not break into visible diagonal gaps.
Pattern — Step by Step
This pattern is a photo-based reconstruction built with standard amigurumi math. It is not a transcription of any published pattern.
Continuous spiral unless noted.
Head (Make 1)
Yarn: orange, then white band — Source benchmark: floral fox head structure and small fox size references
R1: 6 sc in MR (6)
R2: inc ×6 (12)
R3: (1 sc, inc) ×6 (18)
R4: (2 sc, inc) ×6 (24)
R5: (3 sc, inc) ×6 (30)
R6: (4 sc, inc) ×6 (36)
R7–12: 36 sc (36)
R13: (4 sc, dec) ×6 (30)
R14: 30 sc. Change to white across the front 14–16 stitches to form the lower face mask. (30)
R15: (3 sc, dec) ×6 (24)
R16: 24 sc. Insert eyes between R10 and R11, about 8 stitches apart for the small benchmark or wider for the photo look. (24)
R17: (2 sc, dec) ×6 (18)
R18: (1 sc, dec) ×6 (12)
Stuff firmly, especially the forehead and cheek line.
R19: dec ×6 (6)
Fasten off. Leave 18 cm tail.
Body (Make 1)
Yarn: white/cream body with orange upper back if desired — Source benchmark: flower fox body peak and sitting fox conventions
R1: 6 sc in MR (6)
R2: inc ×6 (12)
R3: (1 sc, inc) ×6 (18)
R4: (2 sc, inc) ×6 (24)
R5: (3 sc, inc) ×6 (30)
R6–9: 30 sc (30)
R10: (3 sc, dec) ×6 (24)
R11–12: 24 sc (24)
R13: (2 sc, dec) ×6 (18)
R14–15: 18 sc (18)
R16: (1 sc, dec) ×6 (12)
Stuff the lower half more firmly than the neck area so the fox keeps a seated line.
R17–18: 12 sc (12)
R19: dec ×6 (6)
Fasten off. Leave 18 cm tail.
Front Legs (Make 2)
Yarn: brown paws, then white/cream
R1: 6 sc in MR (6)
R2: inc ×6 (12)
R3: BLO 12 sc (12)
R4: 12 sc (12)
R5: (2 sc, dec) ×3 (9)
Change to white/cream.
R6–10: 9 sc (9)
Light stuffing in paw only.
Flatten and sc through both sides 4 stitches.
Fasten off. Leave 20 cm tail.
Back Legs (Make 2)
Yarn: brown paws, then white/cream
R1: 6 sc in MR (6)
R2: inc ×6 (12)
R3–4: 12 sc (12)
R5: (2 sc, dec) ×3 (9)
Change to white/cream.
R6–8: 9 sc (9)
Stuff only the foot and heel edge.
Flatten and close with 4 sc through both sides.
Fasten off. Leave 20 cm tail.
Ears (Make 2)
Yarn: brown edge, orange outer ear, white inner ear panel
R1: 6 sc in MR (6)
R2: (1 sc, inc) ×3 (9)
R3: (2 sc, inc) ×3 (12)
R4: (3 sc, inc) ×3 (15)
R5: (4 sc, inc) ×3 (18)
Flatten.
Fasten off. Leave 18 cm tail.
Inner Ear Panels (Make 2)
Yarn: white
R1: 6 sc in MR (6)
R2: (1 sc, inc) ×3 (9)
R3: (2 sc, inc) ×3 (12)
Flatten lightly.
Fasten off. Leave 12 cm tail.
Tail (Make 1)
Yarn: white tip, then orange — Source: fox tail references from YarnGems and Supergurumi
R1: 6 sc in MR (6)
R2: (1 sc, inc) ×3 (9)
R3: 9 sc (9)
R4: (2 sc, inc) ×3 (12)
Change to orange.
R5: (3 sc, inc) ×3 (15)
R6–9: 15 sc (15)
R10: (3 sc, dec) ×3 (12)
R11: 12 sc (12)
R12: (2 sc, dec) ×3 (9)
R13: 9 sc (9)
Stuff lightly. Bend the tail before closing if you want a side-swept pose.
Flatten and close with 4 sc through both sides.
Fasten off. Leave 20 cm tail.
Snout Patch (Make 1)
Yarn: white
Ch 6.
R1: Starting in 2nd ch from hook, 4 sc, 3 sc in last ch; work on opposite side, 3 sc, inc in last st (12)
R2: inc, 3 sc, 3 inc, 3 sc, 2 inc (18)
R3: 18 sc (18)
Fasten off. Leave 18 cm tail.
Cheek Patches (Make 2)
Yarn: pink
R1: 6 sc in MR (6)
R2: inc ×6 (12)
Sl st to join.
Fasten off. Leave 10 cm tail.
Floral Crown Rose (Make 1)
Yarn: burgundy or deep red
Row 1: ch 26
Row 2: Starting in 2nd ch from hook, (2 hdc, 1 ch, sl st) in next ch across
Roll strip tightly from one end to form a rose.
Fasten off. Leave 20 cm tail.
Small Accent Flowers (Make 2)
Yarn: cream or white
R1: 5 sc in MR (5)
R2: (ch 2, 2 dc in next st, sl st in next st) around to form petals
Fasten off. Leave 10 cm tail.
Leaves (Make 2)
Yarn: green
Ch 6
Working back along chain: sl st, sc, hdc, sc, sl st
Fasten off. Leave 10 cm tail.
Lace Cape Base (Make 1)
Yarn: cream or off-white. This part is worked in rows, not spiral.
Ch 26
Row 1: sc in 2nd ch from hook and across (25)
Row 2: ch 1, turn, inc, 23 sc, inc (27)
Row 3: ch 1, turn, inc, 25 sc, inc (29)
Row 4: ch 1, turn, inc, 27 sc, inc (31)
Row 5: ch 1, turn, inc, 29 sc, inc (33)
Edging: (sl st, ch 3, 3 dc in next st, ch 3, sl st in next st) around lower curved edge for a lace effect.
Fasten off. Leave 25 cm tail.
Neck Tie / Bow (Make 1)
Yarn: burgundy or use ribbon
Ch 12
Row 1: sc in 2nd ch from hook and across (11)
Rows 2–4: ch 1, turn, 11 sc (11)
Wrap a strand around the center to pinch into a bow.
Fasten off. Leave 20 cm tail.
Bell Loop (Make 1, optional)
Yarn: gold thread or burgundy thread
Ch 8, sl st to first ch to form a loop.
Attach decorative bell if using one.
Fasten off.
Assembly
- Sew the head to the body with the face centered over the seated base.
- Attach the snout patch low on the face so its top edge sits under the eye line.
- Sew or embroider the nose at the center of the snout patch.
- Add the cheek patches slightly below and outward from each eye.
- Stitch the inner ear panels to the ear fronts, then sew the ears to the head with a slight outward tilt.
- Sew the front legs to the lower front body so the feet project forward in a seated pose.
- Sew the back legs lower and slightly wider than the front pair to widen the base.
- Attach the tail high enough to support the silhouette but not so low that it props the fox forward.
- Build the floral crown by joining the rose, small flowers, and leaves, then sew that cluster near one ear.
- Wrap on the lace cape, secure the bow at center front, and add the bell loop below the knot.
The fox should sit upright with the tail angled behind the side seam and the cape resting above the front paws.
7 Technical Tips
- Mark the first stitch of every round. Losing the round start by even one stitch will shift the white face mask off center, and the nose will then read crooked against the eye line.
- Pack the forehead firmer than the chin. Too much stuffing in the lower face pushes the snout patch outward and rounds the fox into a bear-like profile.
- Use invisible decreases on all visible shaping rounds. Standard decreases leave a laddered ridge that shows fastest on orange cotton under direct light.
- Install the eyes before the last two head decrease rounds. Waiting longer narrows the opening too much and forces the posts through at an angle.
- Keep paw stuffing below the ankle line. Stuffing the full leg makes the limbs point outward and lifts the feet off the floor plane.
- Pin the tail before sewing. A tail set more than about 1 cm below the body midpoint can tip the whole fox backward or force the body to lean.
- Weave accessory tails away from the flower cluster center. Thick yarn tails under the crown create a visible hump on one side of the head.
Conclusion
The useful part of this fox amigurumi crochet pattern is the balance between structure and ornament. The fox shape has to read clearly before the rose, cape, and bow go on, or the accessories start doing corrective work instead of decorative work. Start with the head placement, set the tail high, then add the floral cluster last. That order keeps the silhouette stable and the face centered. Save the finished piece to Pinterest, post your version on Instagram with #FlowerFoxCapePattern, and compare one detail closely: did you place the ears high enough for the fox to keep its sharp forehead line?









