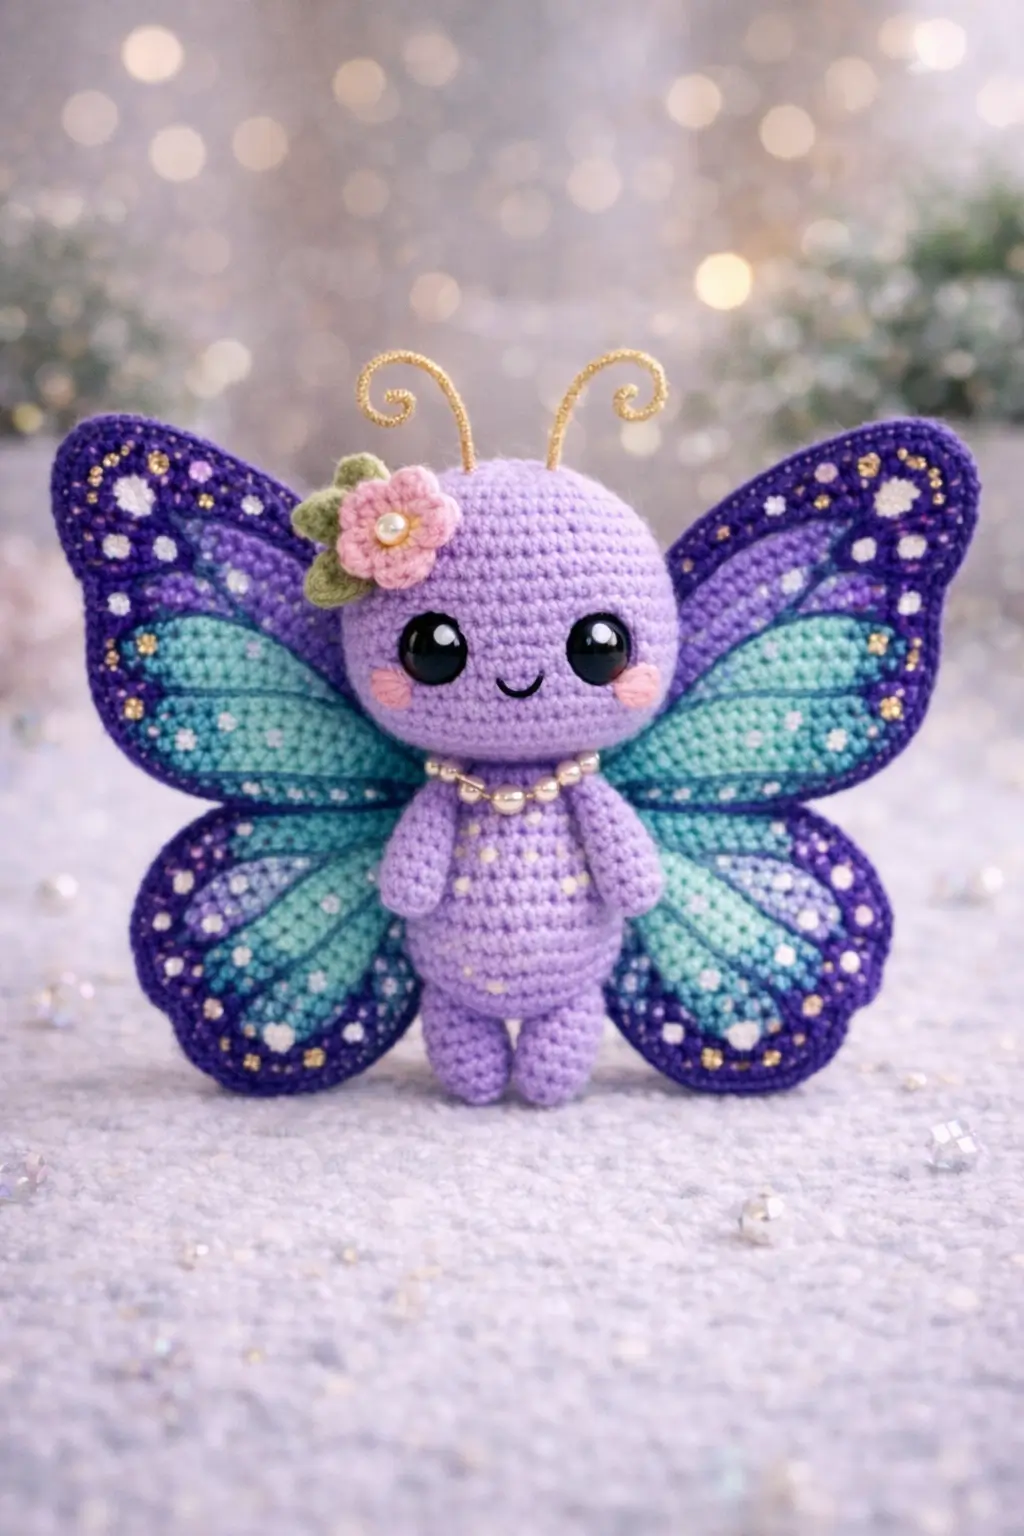
Butterflies have two wing lobes on each side, not one flat silhouette. That is the first geometry problem in a butterfly amigurumi crochet pattern. This photo-based version uses DK yarn, a 3.0 mm hook, 12 mm eyes, and layered construction for a display plush around 17 cm tall. Skill level is intermediate. The result works well as nursery decor or a gift topper for a spring basket.
The Design: What Makes This Butterfly Different
This butterfly is built around proportion first. The head is oversized, the torso is narrow, and the wings carry most of the visual weight. That choice keeps the plush readable from a distance and stops the body from competing with the wing pattern. A second decision is the split-wing structure: upper and lower wings are made separately, then stacked. That matters because a true butterfly outline needs a shoulder lobe and a lower lobe rather than one oval panel. A third choice is the short limb set. Longer legs would pull attention down and weaken the doll look.
A common mistake in a crochet butterfly doll is attaching the wings too low. The plush then reads like a bug costume instead of a butterfly body. Another miss is using one thick wing panel; the edge looks heavy and the profile goes blunt. For a cleaner amigurumi butterfly wings shape, keep the body compact and the wings broad.
Project Info at a Glance
| Skill Level | Time | Finished Size | Hook | Best For |
|---|---|---|---|---|
| Intermediate | 6–8 hours | Approx. 17 cm tall | 3.0 mm | Decor, gift topper, shelf display |
Materials and Tools
Yarn
- Lavender — DK — approx. 45 g — Ricorumi DK or similar cotton/acrylic blend
- Deep violet — DK — approx. 20 g — same base yarn
- Aqua — DK — approx. 18 g — same base yarn
- Pale pink — DK — approx. 8 g — same base yarn
- Olive green — DK — approx. 4 g — same base yarn
- Gold embroidery thread or fine metallic yarn — small amount
- Cream or pearl bead string — about 18–20 cm for necklace
Tools
- Hook 3.0 mm
- Safety eyes 12 mm for the photo-sized look
- Polyester stuffing
- Yarn needle
- Stitch markers
- Black embroidery floss for smile
- Fabric glue or sewing thread for beads, optional
Abbreviations
MR / sc / inc / dec / sl st / ch / BLO / FLO
Invisible decrease means working through the front loops of two stitches before finishing one decrease; it reduces bulk on visible shaping lines.
Pattern — Step by Step
Continuous spiral unless noted. Stitch counts are original for this photo-based design and follow standard amigurumi count progression.
Head (Make 1)
Yarn: lavender
R1: 6 sc in MR (6)
R2: inc x6 (12)
R3: (sc, inc) x6 (18)
R4: (2 sc, inc) x6 (24)
R5: (3 sc, inc) x6 (30)
R6: (4 sc, inc) x6 (36)
R7: (5 sc, inc) x6 (42)
R8-R14: sc around (42)
R15: (5 sc, dec) x6 (36)
R16: (4 sc, dec) x6 (30)
Insert 12 mm eyes between R11 and R12, 8 stitches apart. Embroider the smile one round below. Add stuffing firmly, especially low in the head.
R17: (3 sc, dec) x6 (24)
R18: (2 sc, dec) x6 (18)
R19: (sc, dec) x6 (12)
Fasten off. Leave a 20 cm tail.
Body (Make 1)
Yarn: lavender
R1: 6 sc in MR (6)
R2: inc x6 (12)
R3: (sc, inc) x6 (18)
R4: (2 sc, inc) x6 (24)
R5: (3 sc, inc) x6 (30)
R6-R10: sc around (30)
R11: (3 sc, dec) x6 (24)
R12-R13: sc around (24)
R14: (2 sc, dec) x6 (18)
R15-R16: sc around (18)
Stuff the lower body firmly and keep the neck area dense enough to support the head.
Fasten off. Leave a 25 cm tail.
Arms (Make 2)
Yarn: lavender
R1: 6 sc in MR (6)
R2: (sc, inc) x3 (9)
R3-R7: sc around (9)
R8: flatten and sc through both sides across 4 stitches (4)
Fasten off. Leave a 15 cm tail.
Legs (Make 2)
Yarn: lavender
R1: 6 sc in MR (6)
R2: inc x6 (12)
R3-R4: sc around (12)
R5: (sc, dec) x4 (8)
R6-R8: sc around (8)
Stuff lightly at the foot only. A soft upper leg helps the doll sit flush under the body.
Fasten off. Leave a 18 cm tail.
Upper Wings (Make 2)
Yarn: aqua inner, violet edging
With aqua:
R1: 6 sc in MR (6)
R2: inc x6 (12)
R3: (sc, inc) x6 (18)
R4: (2 sc, inc) x6 (24)
R5: (3 sc, inc) x6 (30)
R6-R7: sc around (30)
R8: (3 sc, dec) x6 (24)
R9: (2 sc, dec) x6 (18)
R10: sc around (18)
Change to violet.
R11: sc around (18)
R12: (sc, dec) x6 (12)
R13: sc around (12)
Flatten slightly into a teardrop shape. Do not overstuff. Fasten off. Leave a 25 cm tail.
Lower Wings (Make 2)
Yarn: aqua inner, violet edging
With aqua:
R1: 6 sc in MR (6)
R2: inc x6 (12)
R3: (sc, inc) x6 (18)
R4: (2 sc, inc) x6 (24)
R5-R6: sc around (24)
R7: (2 sc, dec) x6 (18)
R8-R9: sc around (18)
Change to violet.
R10: sc around (18)
R11: (sc, dec) x6 (12)
R12: sc around (12)
Fasten off. Leave a 25 cm tail.
Antennae (Make 2)
Yarn: gold thread over floral wire or surface-wrapped pipe cleaner
Ch 16. Sl st back down the chain. Curl the tip around a skewer.
Leave a straight base tail of 3 cm for anchoring.
Cheek Patches (Make 2)
Yarn: pale pink
R1: 6 sc in MR (6)
Sl st to first stitch.
Fasten off. Leave a 10 cm tail.
Flower (Make 1)
Yarn: pale pink
In MR: (ch 2, 2 dc, ch 2, sl st) x5.
Pull closed.
Fasten off. Leave a 15 cm tail.
Leaves (Make 2)
Yarn: olive green
Ch 6. Starting in second ch from hook: sl st, sc, hdc, sc, sl st.
Fasten off. Leave a 10 cm tail.
Necklace
Thread 10–12 pearl-style beads on sewing thread or use a premade bead string. Fit to the neck circumference before securing.
Wing Dots and Highlights
Use white and gold French knots, duplicate stitch dots, or tiny felt circles across the violet wing border and aqua panels. Keep the upper wings denser than the lower wings so the visual weight stays near the head.
Assembly
- Sew the head to the body with the neck centered and packed firm from the inside.
- Attach the legs to the underside of the body between R4 and R6.
- Sew the arms to the sides of the upper body just below the neck seam.
- Position the cheek patches one stitch below the outer edge of each eye and sew lightly.
- Stack one upper wing over one lower wing on each side, overlapping by about 1.5 cm at the inner edge.
- Pin both finished wing sets to the back of the body so the top wing starts near the neck line.
- Sew the wings on with several passes through the overlap and then into the back body rounds.
- Attach the antennae on top of the head, slightly forward of center, and curve outward.
- Sew the flower and leaves at the left side of the head, just in front of the wing line.
- Add the bead necklace last and secure it at the back of the neck.
The piece is complete when it stands with the wings balanced and the head upright without tilt.
7 Technical Tips
- Mark the first stitch of every round. Losing the round start on a 42-stitch head shifts eye placement and makes the face read off-center.
- Keep stuffing firm in the lower third of the head. A soft neck zone causes forward droop once the wings are attached.
- Use invisible decreases on visible outer shaping rounds. Standard decreases leave ridges that show on smooth DK fabric.
- Insert eyes before the final head decreases. On this pattern, late insertion through dense fabric can stretch the eye holes and distort the smile line.
- Do not overstuff the wings. Flat wings need only a trace of filling or none at all; thick wings twist backward under their own seam tension.
- Pin all four wing pieces before sewing. A difference as small as 5 mm between left and right upper-wing height is obvious from the front.
- Weave tails back through at least 3 direction changes. Short straight weaves slip free fastest at the wing joints and flower attachment point.
Conclusion
A butterfly needs more than color to read correctly in yarn. The stacked wing silhouette, compact body, short limbs, and high wing placement do most of the structural work. That is why this butterfly amigurumi crochet pattern is built around separate upper and lower wings instead of one flat panel. Start with the head and body first, dry-fit the wings before sewing, and keep the neck densely stuffed. Then photograph the finished piece from the front and side, share it to Pinterest and Instagram, and tag it with #LayeredWingButterfly. One practical question remains: did you angle the upper wings high enough to create that lifted butterfly profile?









