Introduction
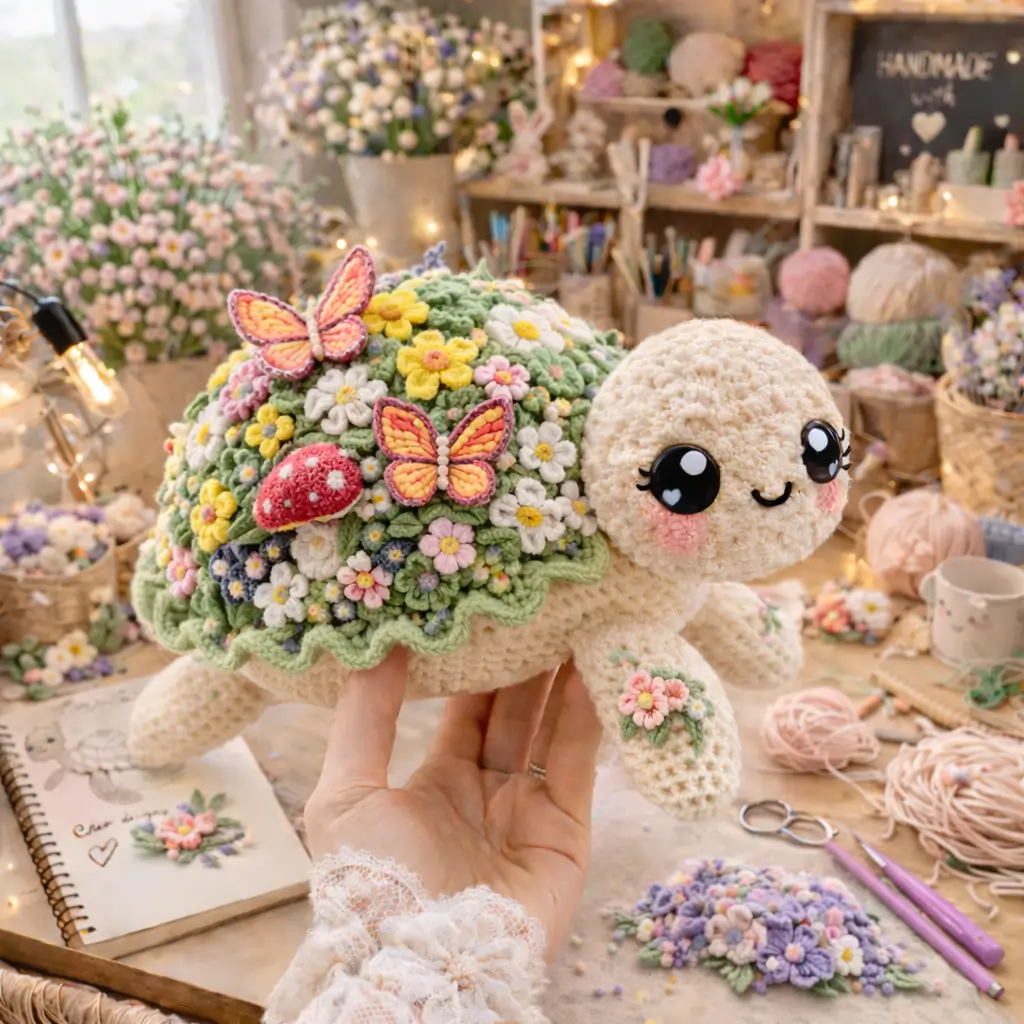
A turtle fails on sight when the shell does not overhang the legs. This floral turtle amigurumi fixes that first, then builds the garden shell on top with chunky yarn, a 4 mm hook, and layered appliqués. The target size is a medium plush turtle. Skill level sits at intermediate because the shaping is simple but the shell dressing takes time. It works well as nursery decor or a display sample for spring markets.
The Design: What Makes Floral Turtle Different
The head is oversized on purpose. That choice shifts the design away from a realistic sea turtle and toward a display plush with a clear face plane for large eyes and blush patches. The shell also sits wider than the body rather than flush to it. That extra spread makes the floral turtle amigurumi read correctly from the side, because the shell lip frames the legs instead of exposing too much torso. The third decision is decorative density. A flower turtle crochet pattern can look flat when appliqués are spaced too evenly, so this version groups large daisies first, then fills gaps with smaller blossoms and leaf clusters. One common mistake is attaching flowers before checking shell balance. Then the front-left or rear-right quadrant collapses visually, and the turtle looks twisted. Current floral and no-sew turtle patterns rarely solve that layout problem in detail.
Project Info at a Glance
| Skill Level | Time | Finished Size | Hook | Best For |
|---|---|---|---|---|
| Intermediate | 8–12 hours | about 28 cm long in this photo-led version | 4.0 mm | decor plush, gift piece, market display |
Materials and Tools
Yarn
- Cream — super bulky chenille/velvet — about 120 g — Parfait Chunky style yarn
- Sage green — super bulky chenille/velvet — about 80 g — Parfait Chunky style yarn
- Light green — DK or worsted for edge and leaves — about 25 g
- White — DK or worsted for daisies — about 20 g
- Yellow — DK or worsted for flower centers — about 12 g
- Pink — DK or worsted for blush and blossoms — about 12 g
- Lilac — DK or worsted — about 10 g
- Blue — DK or worsted — about 8 g
- Red — DK or worsted for mushroom cap — about 8 g
- Peach/orange/purple — small scraps for butterflies
Tools
- Hook 4.0 mm
- Safety eyes 24 mm for the photo-sized version
- Stuffing
- Tapestry needle
- Stitch markers
- Pins
- Black embroidery thread for the smile
Abbreviations
- MR = magic ring
- sc = single crochet
- inc = increase
- dec = decrease
- sl st = slip stitch
- ch = chain
- BLO = back loop only
- FLO = front loop only
- hdc = half double crochet
- dc = double crochet
Invisible decrease keeps the face and shell underside cleaner because the front loops do not stack into a visible ridge.
Pattern — Step by Step
Continuous spiral unless noted.
Head (Make 1)
Yarn: cream — Source: photo adaptation using standard amigurumi math and plush turtle proportions
R1: 6 sc in MR (6)
R2: inc x6 (12)
R3: (sc, inc) x6 (18)
R4: (2 sc, inc) x6 (24)
R5: (3 sc, inc) x6 (30)
R6: (4 sc, inc) x6 (36)
R7-R10: sc around (36)
R11: (4 sc, dec) x6 (30)
R12: (3 sc, dec) x6 (24)
Insert 24 mm eyes between R8 and R9, 9 stitches apart. Add light stuffing.
R13: (2 sc, dec) x6 (18)
R14: (sc, dec) x6 (12)
Stuff firmly but keep the neck edge flat.
Fasten off. Leave a 30 cm tail.
Body (Make 1)
Yarn: cream — Source: standard amigurumi math; 36-stitch medium plateau matches plush turtle references
R1: 6 sc in MR (6)
R2: inc x6 (12)
R3: (sc, inc) x6 (18)
R4: (2 sc, inc) x6 (24)
R5: (3 sc, inc) x6 (30)
R6: (4 sc, inc) x6 (36)
R7-R10: sc around (36)
R11: (4 sc, dec) x6 (30)
R12: (3 sc, dec) x6 (24)
R13: (2 sc, dec) x6 (18)
Stuff the body with a flatter top and fuller belly.
R14: (sc, dec) x6 (12)
R15: dec x6 (6)
Fasten off. Close hole. Leave a 25 cm tail.
Front Legs (Make 2)
Yarn: cream — Source: standard amigurumi math
R1: 6 sc in MR (6)
R2: inc x6 (12)
R3: (sc, inc) x6 (18)
R4-R5: sc around (18)
R6: flatten and sc through both sides 9
Fasten off. Leave a 20 cm tail.
Back Legs (Make 2)
Yarn: cream — Source: standard amigurumi math
R1: 6 sc in MR (6)
R2: inc x6 (12)
R3: (sc, inc) x6 (18)
R4: sc around (18)
R5: flatten and sc through both sides 9
Fasten off. Leave a 20 cm tail.
Tail (Make 1)
Yarn: cream — Source: standard amigurumi math
R1: 4 sc in MR (4)
R2: sc around (4)
R3: flatten and sc through both sides 2
Fasten off. Leave a 12 cm tail.
Shell Base (Top) (Make 1)
Yarn: sage green — Source: photo adaptation; shell must overhang body
R1: 6 sc in MR (6)
R2: inc x6 (12)
R3: (sc, inc) x6 (18)
R4: (2 sc, inc) x6 (24)
R5: (3 sc, inc) x6 (30)
R6: (4 sc, inc) x6 (36)
R7: (5 sc, inc) x6 (42)
R8: (6 sc, inc) x6 (48)
R9: (7 sc, inc) x6 (54)
R10: BLO sc around (54)
R11-R12: sc around (54)
Fasten off. Leave a 35 cm tail.
Shell Underside Panel (Make 1)
Yarn: cream — Source: standard fit to body and shell
R1: 6 sc in MR (6)
R2: inc x6 (12)
R3: (sc, inc) x6 (18)
R4: (2 sc, inc) x6 (24)
R5: (3 sc, inc) x6 (30)
R6: (4 sc, inc) x6 (36)
R7: (5 sc, inc) x6 (42)
Fasten off. Leave a 35 cm tail.
Scalloped Shell Edge (Make 1, worked into front loops of Shell Top R10)
Yarn: light green — Source: photo-led edge treatment
Join yarn in any FLO of R10.
Round: (sl st in next st, sc in next st, hdc in next st, 2 dc in next st, hdc in next st, sc in next st) repeat around for 9 scallops total.
Fasten off. Weave in.
Daisies, Large (Make 5)
Yarn: white petals, yellow center — Source: photo adaptation
Center:
R1: 6 sc in MR (6)
Sl st to first st.
Petals:
(ch 3, 2 dc in next st, ch 3, sl st in same st) repeat 6 times.
Fasten off. Leave a 15 cm tail.
Daisies, Small (Make 8)
Yarn: white or pastel petals, yellow or pink center — Source: photo adaptation
Center:
R1: 6 sc in MR (6)
Sl st to first st.
Petals:
(ch 2, 2 hdc in next st, ch 2, sl st in same st) repeat 6 times.
Fasten off. Leave a 12 cm tail.
Five-Petal Blossoms (Make 10)
Yarn: pink, yellow, lilac, blue — Source: photo adaptation
R1: 5 sc in MR (5)
Sl st to first st.
Petals: (ch 2, 2 dc in next st, ch 2, sl st in same st) repeat 5 times.
Fasten off. Leave a 12 cm tail.
Leaf Sprigs (Make 12)
Yarn: sage or light green — Source: photo adaptation
Ch 7.
Work back: sl st in 2nd ch, sc in next, hdc in next 2, sc in next, sl st in last.
Fasten off. Leave a 10 cm tail.
Cheek Patches (Make 2)
Yarn: pale pink — Source: photo adaptation
R1: 6 sc in MR (6)
R2: inc x6 (12)
Fasten off. Leave a 12 cm tail.
Mushroom (Make 1 cap, 1 stem)
Yarn: red cap, cream stem — Source: photo adaptation
Cap
R1: 6 sc in MR (6)
R2: inc x6 (12)
R3: (sc, inc) x6 (18)
R4: BLO sc around (18)
R5: sc around (18)
Fasten off. Lightly stuff.
Stem
R1: 6 sc in MR (6)
R2-R3: sc around (6)
Fasten off. Leave tail for sewing.
Add 4 or 5 tiny white French knots or embroidered dots to the cap.
Butterflies (Make 2)
Yarn: peach/orange center, pink and purple outlines — Source: photo adaptation
Body
Ch 5.
Sl st in 2nd ch from hook and each remaining ch.
Fasten off.
Upper wings x2 per butterfly
In MR: (ch 3, 3 dc, ch 3, sl st) twice.
Fasten off.
Lower wings x2 per butterfly
In MR: (ch 2, 2 hdc, ch 2, sl st) twice.
Fasten off.
Layer upper and lower wings, then stitch to body. Outline with contrasting yarn using surface slip stitches if desired.
Front Leg Flower Patch (Make 1 cluster)
Yarn: pink, white, yellow, green — Source: photo adaptation
Make 1 small daisy, 2 leaf sprigs, and 1 five-petal blossom.
Sew as a compact cluster onto one front leg.
Assembly
- Sew the head to the front of the body, centering it slightly high so the chin sits proud of the belly.
- Sew the front legs level with the lower third of the body.
- Sew the back legs one round farther back than the front pair for a longer turtle stance.
- Attach the tail at the rear center.
- Sew the shell underside panel to the top shell only halfway, creating a shallow dome.
- Stuff the shell dome lightly, then finish joining it closed.
- Sew the shell onto the body so the edge overhangs evenly on all sides.
- Attach the cheek patches below the eyes and embroider the smile between them.
- Pin the large daisies first, then fill gaps with small daisies, blossoms, and leaf sprigs.
- Sew the mushroom and butterflies last, then attach the small floral cluster to one front leg.
The turtle is complete when the shell weight sits centered and all four legs touch the surface without twisting.
7 Technical Tips
- Mark the shell at front, back, left, and right before adding flowers. A shell this busy drifts fast, and even a 1 cm offset shows immediately.
- Stuff the head firmer than the body. Soft heads collapse around 24 mm eyes and push the cheeks too low.
- Use invisible decreases on the face rounds only. Standard decreases there create a ridge that catches light under oversized plastic eyes.
- Install the eyes before the final two decrease rounds. On plush yarn, late insertion distorts the head opening and shifts the eye angle.
- Keep the shell dome lightly stuffed. Overfilling lifts the shell center and makes the scalloped edge curl upward instead of outward.
- Pin every butterfly in two places before sewing. A single anchor point lets the wing tilt and read like a loose flower petal.
- Weave tails through at least 4 directional changes inside the shell. Dense appliqué adds weight, and short tail finishes can work loose under handling.
Conclusion
This floral turtle amigurumi works because the proportions stay disciplined while the shell carries the decoration load. The next step is simple: build the plain turtle first, set the shell on the body, then photograph the bare structure before placing any flowers. That one check catches most balance errors. After finishing, post one side view to Pinterest and one top view to Instagram so the shell layout reads clearly. Use #FloralTurtleAmigurumi. For this turtle shape, which shell detail worked better in your version: the mushroom near the rear curve, or the butterfly placed above the shoulder?









