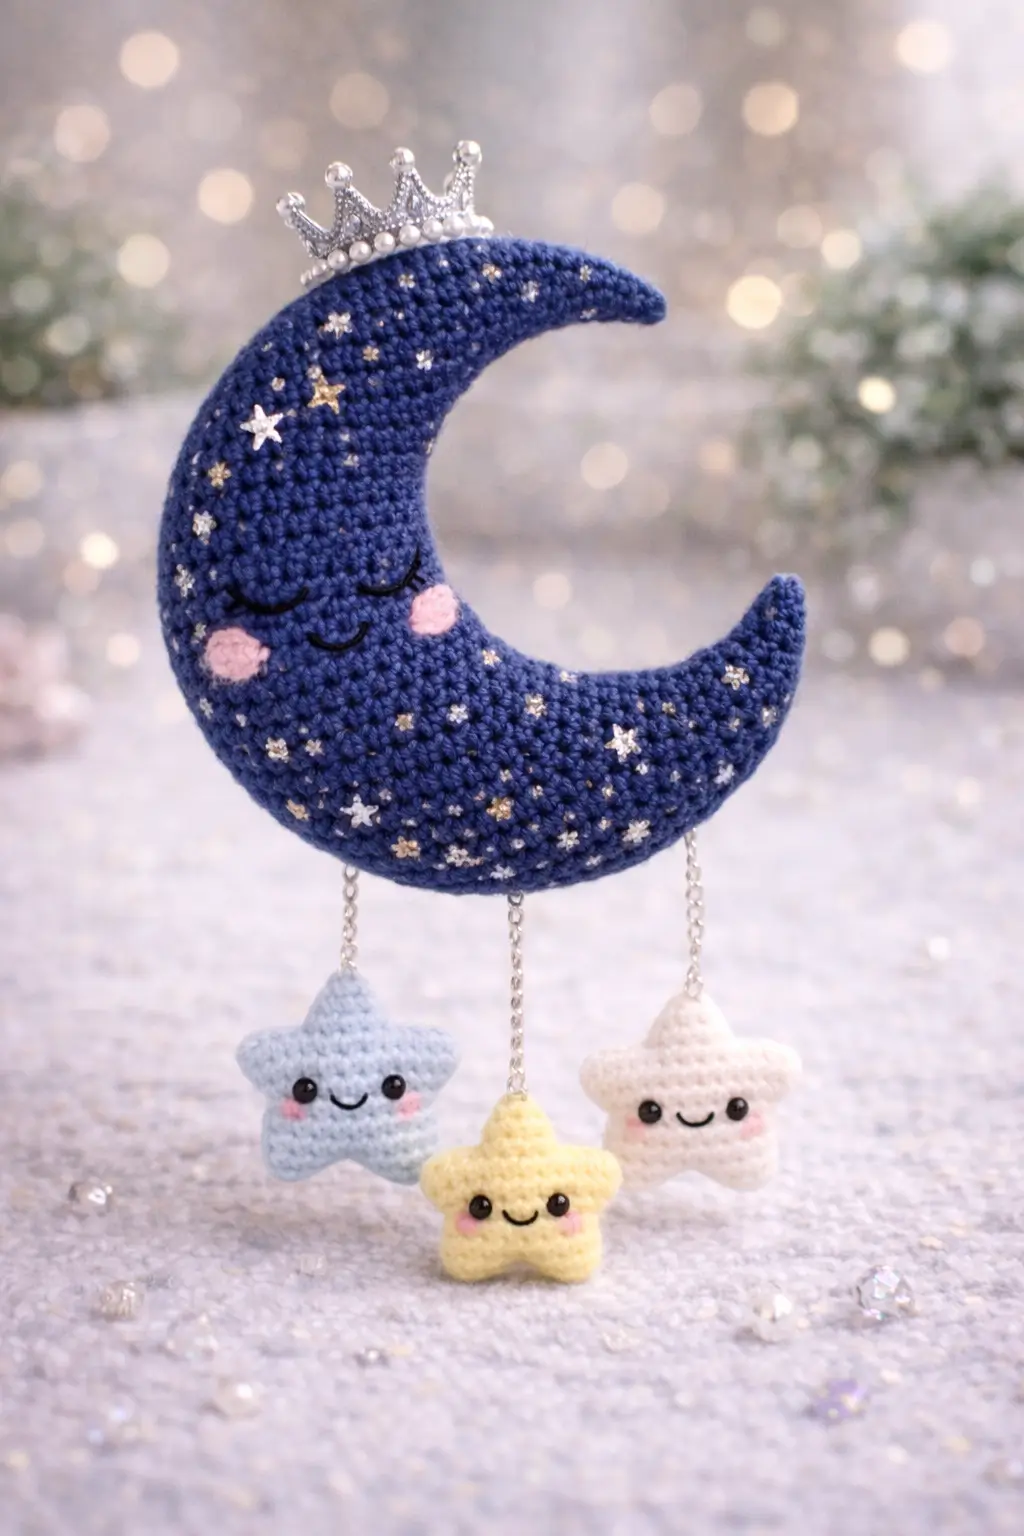
A crescent moon fails fast at the inner curve. That is the first engineering problem in this crescent moon amigurumi crochet pattern. This version uses worsted yarn, a 4 mm hook, embroidered details, and three mini stars to build a decorative mobile-style piece about 20 cm wide. Skill level sits at confident beginner to intermediate. The practical use is obvious: nursery décor that reads clearly from a distance without a hoop frame.
The Design: What Makes This Moon Different
You are not shaping a circle and calling it done. A good crescent needs a narrow upper tip, a heavier lower belly, and enough internal stuffing to keep the inner arc from collapsing. That is why this design uses two matched crescent panels instead of a folded disc. The seam lands on the edge. The silhouette stays cleaner.
The second decision is scale. Many online moon patterns are tiny keychain or ornament builds in sport yarn, often around 6 to 7 cm. This photographed version reads as a display piece, closer to plush sizing in medium yarn. That shift changes everything: hook choice, stuffing pressure, and stitch visibility.
The third decision is weight placement. The hanging stars are not clipped to the tips. They are suspended from the lower curve, which keeps the crochet moon mobile visually centered. A common mistake with a sleepy moon crochet pattern is stuffing the points too firmly and the belly too softly. The result looks blunt at the ends and dented at the base.
Project Info at a Glance
| Skill Level | Time | Finished Size | Hook | Best For |
|---|---|---|---|---|
| Confident beginner / intermediate | 5–7 hours | about 20 × 18 cm moon, stars extra | 4.0 mm | nursery décor, wall hanging, mobile accent |
Materials and Tools
Yarn
- Deep navy worsted yarn — medium 4 — about 70 g — any smooth acrylic or cotton-acrylic blend
- Pastel blue worsted yarn — medium 4 — about 12 g — mini star
- Pastel yellow worsted yarn — medium 4 — about 12 g — mini star
- Cream or ivory worsted yarn — medium 4 — about 12 g — mini star
- Soft pink worsted yarn — medium 4 — less than 5 g — cheek patches
- Metallic embroidery thread — silver and gold — surface stars
- Black embroidery floss — small amount — lashes and smile
Tools
- Hook 4.0 mm
- 6 mm safety eyes for each star
- Stuffing
- Yarn needle
- Stitch markers
- Sewing pins
- Small length of silver chain or cord for three drops
- Mini decorative crown or crocheted crown substitute
Verified public patterns for comparable moon builds commonly use medium 4 yarn with 4 to 5 mm hooks for plush versions, while mini moons often shift down to sport yarn and 1.75 mm hooks. Tiny star add-ons often use 6 mm eyes.
Abbreviations
MR = magic ring
sc = single crochet
inc = increase
dec = decrease
sl st = slip stitch
ch = chain
BLO = back loop only
FO = fasten off
Invisible decrease keeps the inner curve smoother because the front loops do not stack into a ridge.
Pattern — Step by Step
Continuous spiral unless noted.
Head Section / Upper Crescent Panel (Make 1)
Yarn: deep navy — Standard amigurumi math inspired by established crescent constructions that expand from MR and shape into a longer arc.
R1: 6 sc in MR (6)
R2: inc around (12)
R3: (sc, inc) around (18)
R4: (2 sc, inc) around (24)
R5: (3 sc, inc) around (30)
R6: sc around (30)
R7: (4 sc, inc) around (36)
R8: sc around (36)
R9: sc around (36)
R10: (5 sc, inc) around (42)
R11: sc around (42)
R12: sc around (42)
R13: (5 sc, dec) around (36)
R14: sc around (36)
R15: (4 sc, dec) around (30)
R16: sc around (30)
R17: (3 sc, dec) around (24)
R18: sc around (24)
R19: (2 sc, dec) around (18)
R20: sc around (18)
R21: (sc, dec) around (12)
R22: sc around (12)
R23: dec around (6)
Do not close with a dome. Flatten this piece lightly and steam-block with fingers only. The narrow point becomes the upper horn of the crescent.
Fasten off. Leave a 40 cm tail.
Body Section / Lower Crescent Panel (Make 1)
Yarn: deep navy — Standard amigurumi math, matched to the upper panel for a seam-clean shell.
R1: 6 sc in MR (6)
R2: inc around (12)
R3: (sc, inc) around (18)
R4: (2 sc, inc) around (24)
R5: (3 sc, inc) around (30)
R6: sc around (30)
R7: (4 sc, inc) around (36)
R8: sc around (36)
R9: sc around (36)
R10: (5 sc, inc) around (42)
R11: sc around (42)
R12: sc around (42)
R13: sc around (42)
R14: (5 sc, dec) around (36)
R15: sc around (36)
R16: (4 sc, dec) around (30)
R17: sc around (30)
R18: (3 sc, dec) around (24)
R19: sc around (24)
R20: (2 sc, dec) around (18)
R21: sc around (18)
R22: (sc, dec) around (12)
R23: sc around (12)
R24: dec around (6)
This panel carries the fuller belly. Keep stuffing lighter near both tips and firmer through the lower third during assembly.
Fasten off. Leave a 40 cm tail.
Arms / Hanging Loops (Make 3)
Yarn: silver thread or use chain — inspired by hanging moon-and-star amigurumi constructions used for mobiles.
Option A, crocheted:
R1: ch 16
R2: sl st in 2nd ch from hook and each ch across (15)
Make one at 10 cm, one at 12 cm, one at 10 cm finished hanging length.
Fasten off. Leave 10 cm tails.
Back Legs / Not Applicable
This photo model has no lower limbs. The functional equivalent is the three hanging star drops, already covered above.
Star Charms (Make 3)
Yarn: pastel blue, pastel yellow, cream — construction adapted from the common 5-point amigurumi star method.
For each star:
R1: 5 sc in MR (5)
R2: inc around (10)
R3: [sc in next st, sc 2 times in next st, hdc in same st, ch 1, hdc in same st, sc 2 times in same st] repeat 5 times, sl st to next st
Make 2 identical stars for each finished charm if you want a stuffed front/back sandwich. For the photographed result, that gives a fuller ornament.
Insert 6 mm safety eyes between R1 and R2 on the front star piece, about 2 stitches apart. Embroider a small smile one row below.
Join two stars wrong sides together with sc evenly around the outline, placing 1 sc at each valley and 3 sc at each tip. Stuff lightly before closing.
Fasten off. Leave a 20 cm tail.
Ears or Wings (Make 0)
Not used in this design.
Special Feature — Cheek Patches (Make 2 for moon, 6 tiny optional for stars)
Yarn: soft pink — Standard flat circle math.
R1: 6 sc in MR (6)
R2: inc around (12)
Fasten off. Leave a 12 cm tail.
Special Feature — Surface Star Embroidery
Yarn: metallic silver and gold — decorative surface work based on the photographed finish.
Embroider scattered five-point stars and French-knot style dots across the moon front only. Concentrate more motifs on the outer curve and lower belly. Keep the inner arc cleaner so the face remains readable.
Accessory — Crown Base (Make 1, optional crochet substitute)
Yarn: silver or pale gray if replacing the metal crown in the photo.
R1: ch 16
R2: sc in 2nd ch from hook and across (15)
R3: [sl st, ch 3, sl st in same st, sl st in next 2 sts] repeat to end
Fasten off. Leave 15 cm tails.
Moon Face Embroidery
Use black floss. Stitch two curved closed eyes with 3 lashes each. Place the eyes on the lower-left quadrant of the moon front, centered away from the tips. Add a shallow curved smile below.
Moon Assembly Seam
Place both crescent panels together, right side out. Sc or whipstitch evenly around the entire edge. Stop before the final 8 cm.
Stuff the lower belly firmly, the center moderately, and both points lightly. The inner arc must stay crisp, not ballooned.
Close remaining seam. Fasten off. Weave in ends.
Assembly
- Pin the two moon panels together and check that the upper tip is narrower than the lower tip before sewing.
- Seam the moon around the edge, leaving an opening at the base of the lower curve.
- Stuff the belly first, then the center, then the two tips with smaller pinches of filling.
- Close the seam and massage the shape so the inner curve stays hollow and the outer curve stays rounded.
- Embroider the sleeping lashes and smile on the front of the moon.
- Sew the two pink cheek patches below the eyes, one on each side of the smile.
- Attach the three hanging loops to the lower curve, spacing them so the center drop sits lowest.
- Sew one stuffed star to the end of each hanging loop, checking front-face orientation before the final knot.
- Add metallic embroidered stars across the moon front, then attach the crown at the top center.
- Weave in every tail on the back side and trim thread ends after the hanging balance is correct.
The finished piece should hang with the lower belly visually centered over the middle star.
7 Technical Tips
- Mark the center of the inner curve before assembly. If that mark shifts more than 1 cm during seaming, the crescent will twist.
- Stuff the lower belly harder than the points. Overfilling the tips makes them look clubbed instead of tapered.
- Use invisible decreases on the narrowing rounds only. A standard decrease on the inner arc leaves a stacked ridge that catches light.
- Install star eyes before joining the two star faces. Pushing 6 mm posts through both layers later can distort the top point.
- Pin all three hanging drops before sewing. A side drop that is even 5 mm longer than its mate reads crooked immediately.
- Keep metallic embroidery shallow. Long floats on the back can snag stuffing and pull the moon face inward.
- Weave the moon seam tail through at least 4 cm of edge stitches. Shorter tail burial often works loose on curved pieces under hanging weight.
Conclusion
This crescent moon amigurumi crochet pattern works because the silhouette comes first. The inner curve stays open, the lower belly carries the weight, and the hanging stars add movement without hiding the face. Next step: make the moon shell, pin the three drops, and test the balance before adding embroidery. Save the finished project to Pinterest, post the result on Instagram, and tag it with #CrescentMoonMobile so the structure is visible from different angles. One question matters on this character more than on most plush builds: did your upper point stay sharp after stuffing, or did it round off?









