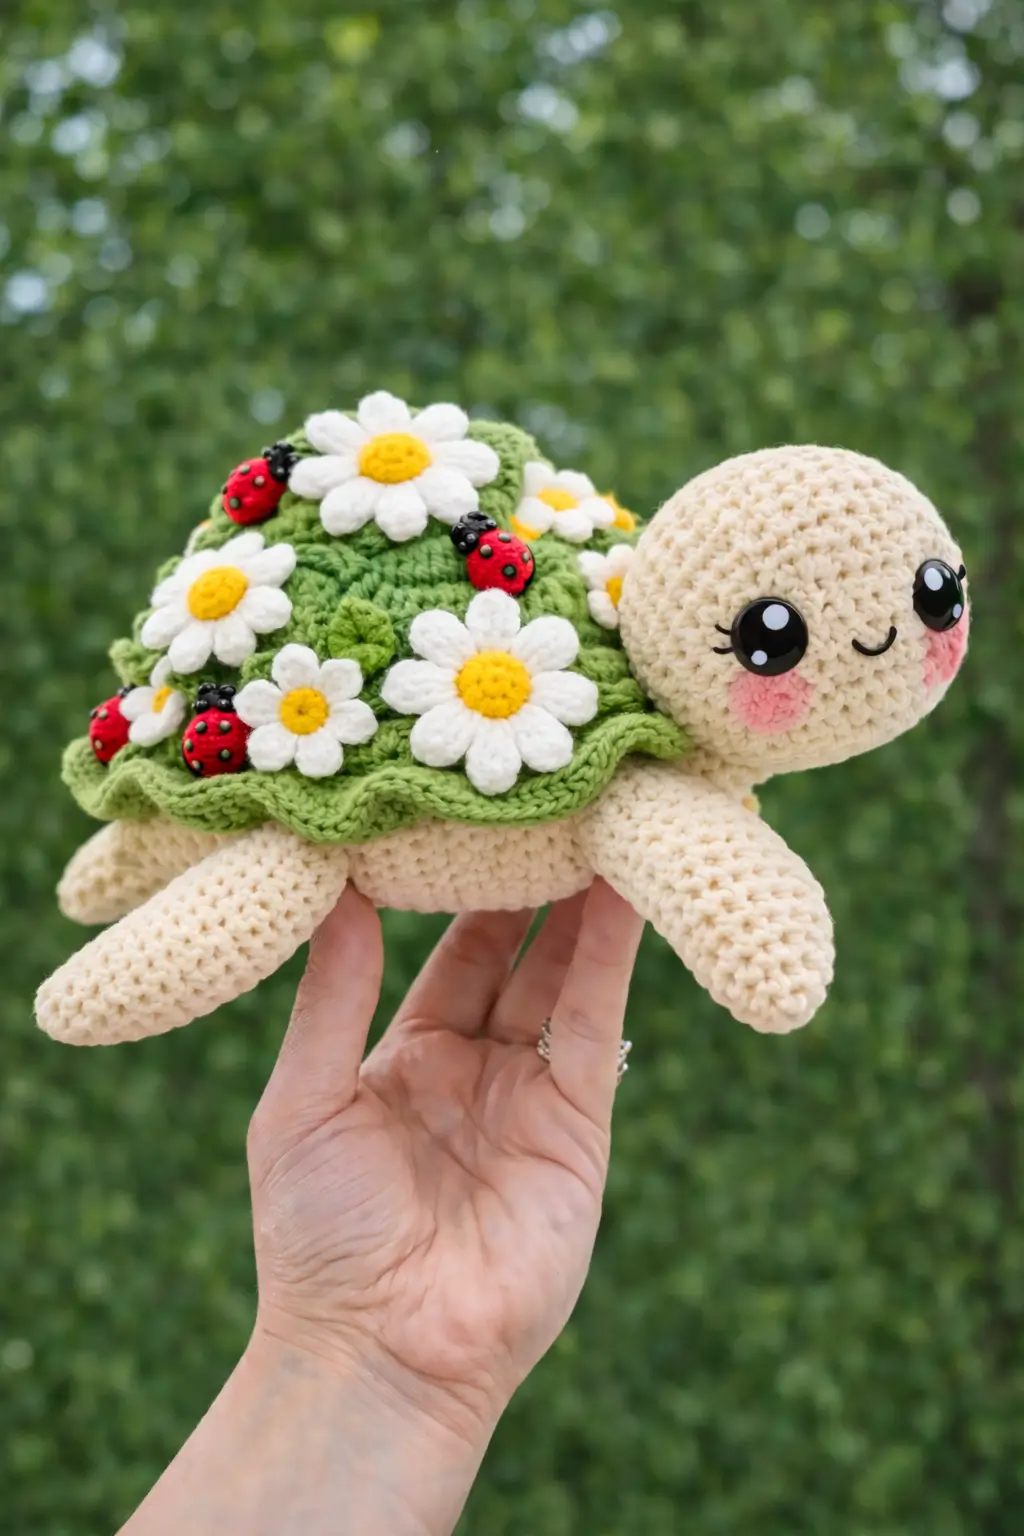
A turtle shell has to rise before the neck can look right. This daisy turtle amigurumi crochet pattern builds that lift with a separate domed shell cover, a cream body, and layered floral appliqués. The sample is sized for a medium plush at roughly 22 cm, uses standard amigurumi tools, and suits an intermediate maker. It also works well as a shelf piece because the shell decoration carries the whole design.
The Design: What Makes This Turtle Different
The first structural choice is the shell. Instead of flattening the top into a simple oval, this version uses a rounded cap with a worked-on ruffle so the daisies sit on a mound rather than a plate. That matters because turtles read as turtles from silhouette before color does. The second choice is a longer neck transition. A short join makes the head look pasted on; a short cylindrical neck keeps the face forward and lets the smile stay visible in side view. Third, the flowers are appliqués, not shell-color changes. That keeps petal edges crisp and stops the floral surface from collapsing into the shell.
A common mistake in flower turtle builds is placing embellishments too close to the shell edge. Then the ruffle folds under and the turtle loses width. In a flower turtle crochet pattern or a crochet turtle plush meant for display, the outer edge needs visual breathing room.
Project Info at a Glance
| Skill Level | Time | Finished Size | Hook | Best For |
|---|---|---|---|---|
| Intermediate | 5–7 hours | 22 cm | 4.0–5.0 mm verified range | Decorative plush, spring market stock, nursery shelf |
Materials and Tools
Yarn
- Cream — worsted cotton or cotton blend — about 70 g — paintbox cotton or similar
- Leaf green — worsted cotton or cotton blend — about 45 g — for shell cover and ruffle
- White — worsted cotton or cotton blend — about 20 g — for daisy petals
- Yellow — worsted cotton or cotton blend — about 10 g — for daisy centers
- Pink — worsted cotton or cotton blend — about 5 g — for cheek patches
- Red — small amount — for ladybugs
- Black — small amount — for embroidery and ladybug dots
The verified floral turtle market data most often uses super bulky plush yarn with 4.0–5.0 mm hooks, but the photographed turtle reads more like a smooth cotton version with firmer stitch definition. This pattern is drafted to match that photo look rather than the plush trend.
Tools
- Hook 3.5 mm
- Safety eyes 14 mm or embroidered eyes
- stuffing
- tapestry needle
- stitch markers
- sewing pins
- small fabric glue optional for ladybug spots
A 14 mm eye falls within the common daisy turtle range found in current listings, though published patterns vary from 12 mm to 14 mm and larger plush versions go far beyond that.
Abbreviations
MR / sc / inc / dec / sl st / ch / BLO / FLO / hdc / dc
Invisible decrease joins the front loops of two stitches first, which reduces bulk at the face and shell edge.
Pattern — Step by Step
Continuous spiral unless noted.
Head (Make 1)
Yarn: cream — Standard amigurumi math inspired by the photo scale
R1: 6 sc in MR (6)
R2: inc x6 (12)
R3: (sc, inc) x6 (18)
R4: (2 sc, inc) x6 (24)
R5: (3 sc, inc) x6 (30)
R6: (4 sc, inc) x6 (36)
R7–R12: sc around (36)
R13: (4 sc, dec) x6 (30)
R14: (3 sc, dec) x6 (24)
Insert eyes between R10 and R11, 8 stitches apart. Embroider smile one round below eye line. Add light stuffing as you go.
R15: (2 sc, dec) x6 (18)
R16: (sc, dec) x6 (12)
R17: dec x6 (6)
Fasten off. Close opening. Leave 25 cm tail.
Neck (Make 1)
Yarn: cream — Standard amigurumi math
R1: 6 sc in MR (6)
R2: (sc, inc) x3 (9)
R3–R6: sc around (9)
Stuff lightly. Keep this piece cylindrical, not firm.
Fasten off. Leave 20 cm tail.
Body Belly (Make 1)
Yarn: cream — Standard amigurumi math
R1: 6 sc in MR (6)
R2: inc x6 (12)
R3: (sc, inc) x6 (18)
R4: (2 sc, inc) x6 (24)
R5: (3 sc, inc) x6 (30)
R6: (4 sc, inc) x6 (36)
R7–R10: sc around (36)
R11: (4 sc, dec) x6 (30)
R12: (3 sc, dec) x6 (24)
Stuff the front half more firmly than the rear so the body does not dip under the shell.
Fasten off. Leave 30 cm tail.
Shell Dome (Make 1)
Yarn: leaf green — Standard amigurumi math adapted to photo silhouette
R1: 6 sc in MR (6)
R2: inc x6 (12)
R3: (sc, inc) x6 (18)
R4: (2 sc, inc) x6 (24)
R5: (3 sc, inc) x6 (30)
R6: (4 sc, inc) x6 (36)
R7: (5 sc, inc) x6 (42)
R8–R12: sc around (42)
Do not stuff. Fasten off. Leave 35 cm tail.
Shell Ruffle Edge (Work onto Shell Dome)
Yarn: leaf green — Standard decorative edging
Join yarn in any stitch of R12.
R1: BLO only, *(sl st, hdc, dc) in next st, (dc, hdc, sl st) in next st* repeat around.
Fasten off. Weave in ends.
Front Flippers (Make 2)
Yarn: cream — Standard amigurumi math
R1: 6 sc in MR (6)
R2: inc x6 (12)
R3–R4: sc around (12)
R5: (4 sc, dec) x2 (10)
R6–R10: sc around (10)
R11: flatten and sc through both layers 5 times (5)
Stuff only the top half. Keep the tips flat.
Fasten off. Leave 20 cm tail.
Back Flippers (Make 2)
Yarn: cream — Standard amigurumi math
R1: 6 sc in MR (6)
R2: inc x6 (12)
R3: sc around (12)
R4: (4 sc, dec) x2 (10)
R5–R8: sc around (10)
R9: flatten and sc through both layers 5 times (5)
Fasten off. Leave 20 cm tail.
Tail (Make 1)
Yarn: cream — Standard amigurumi math
R1: 4 sc in MR (4)
R2: sc around (4)
R3: (sc, inc) x2 (6)
R4: sc around (6)
Fasten off. Leave 12 cm tail.
Daisy Flowers (Make 5)
Yarn: white + yellow — Standard applique construction based on photo, with separate petals
Center
R1: 6 sc in MR (6)
R2: inc x6 (12)
Change to white.
Petal round
R3: *(sl st in next st, ch 4, work 3 dc in 2nd ch from hook traveling back, sl st in next 2 ch, sl st in next base st)* repeat 6 times total for 6 petals.
Fasten off. Leave 15 cm tail for sewing.
Small Daisy Flowers (Make 2)
Yarn: white + yellow — Standard applique math
Center
R1: 6 sc in MR (6)
Change to white.
Petal round
R2: *(sl st in next st, ch 3, 2 dc in 2nd ch from hook traveling back, sl st in next ch, sl st in next base st)* repeat 6 times.
Fasten off. Leave 12 cm tail.
Cheek Patches (Make 2)
Yarn: pink — Standard flat circle
R1: 6 sc in MR (6)
R2: inc x6 (12)
Fasten off. Leave 10 cm tail.
Ladybugs (Make 4)
Yarn: red + black — Standard miniature applique
With black:
R1: 4 sc in MR (4)
Change to red.
R2: inc x4 (8)
R3: sc around (8)
Flatten slightly. Embroider a black center split and 4–6 tiny black dots.
Fasten off. Leave 12 cm tail.
Eye Shine Option (Optional, Make 2)
Yarn: white embroidery floss
French knot or satin stitch on safety eye edge.
Fasten off neatly on inside of head.
Assembly
- Sew the neck to the lower front of the head, centered under the face.
- Sew the neck to the front third of the body belly, angling the head slightly upward.
- Attach the front flippers on each side of the body at rounds 5–8 area, with the flattened ends pointing slightly forward.
- Attach the back flippers lower and farther apart than the front pair so the body reads longer than it is tall.
- Sew the tail to the rear center of the body.
- Place the shell dome over the body and pin it before sewing. The ruffle should extend just past the seam line all the way around.
- Sew the shell dome onto the body using the shell tail, catching only inner edge stitches so the ruffle stays free.
- Sew the large daisies onto the upper shell first, then fill side gaps with the two small daisies. Keep at least 1 cm from the ruffle edge.
- Sew the cheek patches below and slightly outside the eyes. Add faint blush with yarn brushing only after they are fixed in place.
- Sew the ladybugs onto open green spaces between flowers, then knot all tails inside the shell and close any remaining seam gaps.
The completed turtle should sit low, with the shell covering the body seam and the face projecting beyond the shell front.
7 Technical Tips
- Mark the shell center before adding flowers. If the top daisy drifts even 8–10 mm off center, the whole turtle reads crooked from the front.
- Do not pack the head as firmly as the body. Overstuffing forces the safety eyes outward and makes the embroidered smile curve too high.
- Use invisible decreases on the head from 36 to 24 stitches. Standard decreases leave ridges that show beside large eyes in light yarn.
- Insert the eyes before the last two decrease rounds. On a 36-stitch head, waiting until after round 14 reduces access and can distort spacing.
- Keep front flippers softer than back flippers. A firm front pair lifts the chest and the turtle loses the relaxed, grounded profile seen in the photo.
- Pin every daisy before sewing any of them down. Petal overlap changes shell spacing fast, and one misplaced flower can crowd out the ladybugs.
- Weave shell and applique tails inward for at least 4 cm. Short tail burying slips out on curved pieces, especially under a raised shell cover.
Conclusion
This daisy turtle amigurumi crochet pattern works because the structure does not compete with the decoration. The shell stays domed, the neck pushes the face forward, and the appliqués sit on top instead of replacing the form. That is the next step to focus on: build the turtle first, then place the flowers only after the silhouette looks right. Save your finished version to Pinterest, post it on Instagram, and tag it with #DaisyLadybugTurtle. One detail is worth comparing across makes: did you place your top daisy on the shell crown, or slightly behind it for a longer back profile?









