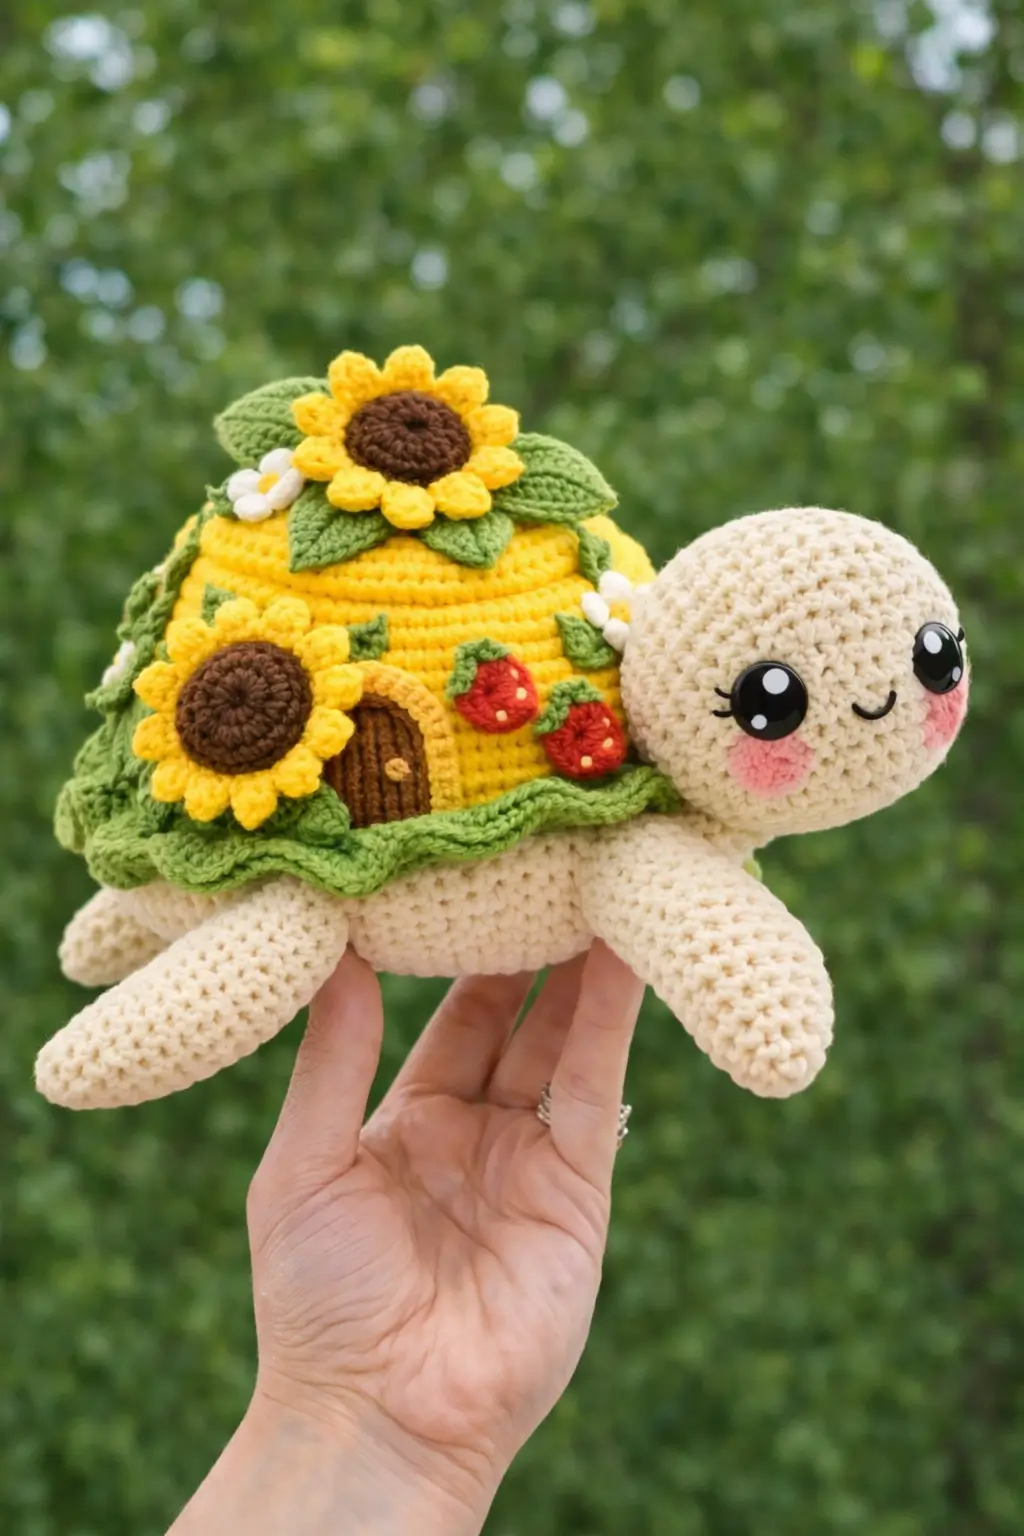
A turtle shell should not need a front door, which is exactly why this sunflower turtle amigurumi crochet pattern works. This version combines a cream body, cottage-style yellow shell, layered floral appliqués, and a compact 16–18 cm finish based on current sunflower turtle listings. It suits an intermediate maker using a small hook and firm stuffing, and it solves one practical job well: display décor that still reads clearly at plush scale.
The Design: What Makes Sunflower Turtle Different
This turtle is not built like a standard sea turtle plush. The shell has to read as architecture first and anatomy second. That means a taller dome, a flatter lower edge, and enough front clearance for a stitched door. A plain oval body would sag under that shell, so the underside needs a wider plateau and firmer stuffing to keep the line level.
The second structural choice is appliqué layering. The sunflower topper, side sunflower, leaf ruffle, strawberries, and small blossoms all compete for space. Scale matters. Oversized embellishments hide the turtle silhouette; undersized ones vanish into the yellow shell. Many sunflower turtle crochet pattern results keep decoration flat and central. This photographed version spreads detail across the shell, closer to a turtle cottage amigurumi than a simple floral turtle plush.
A common mistake shows up fast: makers curve the head upward too sharply. Then the face sits above the shell line instead of projecting from it. On this character, the neck seam must stay low and slightly forward.
Project Info at a Glance
| Skill Level | Time | Finished Size | Hook | Best For |
|---|---|---|---|---|
| Intermediate | 8–12 hours | 18 × 16 cm target | 3.5–4.5 mm range | Shelf décor, nursery prop, gift make |
Materials and Tools
Yarn
- Cream/Beige — worsted cotton or cotton blend — about 60–80 g — Drops Safran, YarnArt Jeans, or similar
- Yellow — worsted cotton — about 45–60 g — same line
- Leaf Green — worsted cotton — about 30–40 g — same line
- Brown — worsted cotton — about 20–25 g — same line
- Red — worsted cotton — about 10–15 g — same line
- White — worsted cotton — about 5–10 g — same line
- Pink — small amount for cheeks
Tools
- Hook 3.25 to 3.5 mm for a firm worsted finish
- Safety eyes 12 mm for a face proportion close to the photo
- Polyester stuffing
- Yarn needle
- Stitch markers
- Pins
- Black embroidery thread for smile and lashes
Abbreviations
MR / sc / inc / dec / sl st / ch / BLO / FLO / hdc / dc
Use invisible decrease for all shaping rounds on visible pieces. It keeps the cream head and limbs from showing stacked notches.
Pattern — Step by Step
Continuous spiral unless noted. This is an original draft pattern based on the photographed proportions and standard amigurumi math.
Head (Make 1)
Yarn: cream — Standard amigurumi math
R1: 6 sc in MR (6)
R2: inc x6 (12)
R3: (sc, inc) x6 (18)
R4: (2 sc, inc) x6 (24)
R5: (3 sc, inc) x6 (30)
R6: (4 sc, inc) x6 (36)
R7–11: sc around (36)
Insert 12 mm eyes between R8 and R9, 8 sts apart. Embroider lashes before backing washers if preferred.
R12: (4 sc, dec) x6 (30)
R13: (3 sc, dec) x6 (24)
R14: (2 sc, dec) x6 (18)
Stuff firmly, keeping the muzzle round but not hard.
R15: (sc, dec) x6 (12)
R16: dec x6 (6)
Fasten off. Leave a 25 cm tail.
Body Base / Belly (Make 1)
Yarn: cream — Standard amigurumi math
R1: 6 sc in MR (6)
R2: inc x6 (12)
R3: (sc, inc) x6 (18)
R4: (2 sc, inc) x6 (24)
R5: (3 sc, inc) x6 (30)
R6: (4 sc, inc) x6 (36)
R7: (5 sc, inc) x6 (42)
R8–12: sc around (42)
Fasten off. Leave a 35 cm tail for sewing the shell to the body. Do not stuff this piece yet.
Upper Shell Dome (Make 1)
Yarn: yellow — Standard amigurumi math
R1: 6 sc in MR (6)
R2: inc x6 (12)
R3: (sc, inc) x6 (18)
R4: (2 sc, inc) x6 (24)
R5: (3 sc, inc) x6 (30)
R6: (4 sc, inc) x6 (36)
R7: (5 sc, inc) x6 (42)
R8: (6 sc, inc) x6 (48)
R9–15: sc around (48)
R16: BLO sc around (48)
Fasten off. Leave a 40 cm tail.
Front Legs / Flippers (Make 2)
Yarn: cream — Standard amigurumi math
R1: 6 sc in MR (6)
R2: inc x6 (12)
R3: (sc, inc) x6 (18)
R4–9: sc around (18)
R10: (sc, dec) x6 (12)
R11–15: sc around (12)
Flatten lightly. Fasten off. Leave a 20 cm tail.
Back Legs / Flippers (Make 2)
Yarn: cream — Standard amigurumi math
R1: 6 sc in MR (6)
R2: inc x6 (12)
R3: (sc, inc) x6 (18)
R4–7: sc around (18)
R8: (sc, dec) x6 (12)
R9–12: sc around (12)
Flatten lightly. Fasten off. Leave a 20 cm tail.
Tail (Make 1)
Yarn: cream — Standard amigurumi math
R1: 4 sc in MR (4)
R2: sc around (4)
R3: (sc, inc) x2 (6)
R4: sc around (6)
Fasten off. Leave a 12 cm tail.
Leaf Border / Shell Skirt (Make 1)
Yarn: green — Original decorative edging
Ch 46.
Row 1: Starting in 2nd ch from hook, sc across, ch 1, turn (45)
Row 2: (sc, hdc, dc, hdc, sc) in next 5 sts, sl st in next 2 sts; repeat to end for a waved edge.
Fasten off. Leave a 30 cm tail.
Large Sunflower Center (Make 2)
Yarn: brown — Flat circle
R1: 6 sc in MR (6)
R2: inc x6 (12)
R3: (sc, inc) x6 (18)
R4: (2 sc, inc) x6 (24)
Fasten off. Leave a 20 cm tail.
Large Sunflower Petals (Make 2 rings)
Yarn: yellow
Ch 30 and join, or work directly around the finished brown center.
Round: sl st in next st, ch 3, dc in same st, ch 3, sl st in next st repeat around to form 12 petals.
Fasten off. Leave a 20 cm tail.
Top Roof Leaves (Make 4)
Yarn: green
Ch 8.
Work along chain: sl st, sc, hdc, dc, hdc, sc, 3 sc in last ch; continue on opposite side: sc, hdc, dc, hdc, sc, sl st.
Fasten off. Leave a 15 cm tail.
Side Accent Leaves (Make 6)
Yarn: green
Ch 6.
Work: sl st, sc, hdc, sc, 2 sc in end, sc opposite side, hdc, sc, sl st.
Fasten off. Leave tails for sewing.
Small White Blossoms (Make 3)
Yarn: white
R1: 5 sc in MR (5)
R2: (sl st, ch 2, 2 dc, ch 2, sl st) in one st repeat around for 5 petals.
Fasten off. Leave a 10 cm tail. Add a tiny yellow knot or French knot center.
Strawberry Appliqués (Make 2)
Yarn: red
R1: 4 sc in MR (4)
R2: inc x4 (8)
R3: (sc, inc) x4 (12)
R4: sc around (12)
R5: (sc, dec) x4 (8)
Fasten off. Flatten slightly. Embroider seed dots in cream or yellow.
Strawberry Tops (Make 2)
Yarn: green
In MR: (ch 3, sl st back into ring) x5.
Fasten off. Sew onto berry tops.
Door Arch (Make 1)
Yarn: brown
Ch 9.
Row 1: Starting in 2nd ch, sc 7, ch 1, turn (7)
Rows 2–8: sc across (7)
Row 9: dec, sc 3, dec (5)
Row 10: dec, sc, dec (3)
Fasten off. Leave a 20 cm tail. Embroider vertical plank lines in darker brown.
Door Frame (Make 1)
Yarn: yellow
Ch 13.
Work around with sc evenly, placing 3 sc in top corners to form an arch.
Fasten off. Leave tail for sewing.
Cheek Patches (Make 2)
Yarn: pink — Flat circle
R1: 6 sc in MR (6)
R2: inc x6 (12)
Fasten off. Leave a short tail, or felt and blush instead.
Assembly
- Sew the head low on the front edge of the cream body base, not above the shell line.
- Attach the front flippers slightly forward and angled down, about 2 rounds behind the head seam.
- Sew the back flippers near the rear third of the body, matching the front-leg spread.
- Add the tail at the center back between the back flippers.
- Stuff the yellow shell dome firmly, with extra filling across the top center so the roof flower sits level.
- Pin the shell dome over the body base and sew around, catching the cream body edge evenly.
- Attach the green leaf border around the lower shell seam so it hides the join and creates the soft cottage-skirt line.
- Sew one large sunflower to the shell roof and one to the side; add roof leaves under the top flower and side leaves under the side flower.
- Sew the door frame and door to the front shell, then place strawberries and white blossoms to balance the composition.
- Add cheek patches, embroider the smile, and adjust the face so both eyes sit on the same horizontal line.
The piece is complete when the shell reads as a miniature house while the body still keeps a stable turtle profile.
7 Technical Tips
- A shell front marked before assembly prevents a door placement error. A door even 1 cm off center makes the cottage shell read crooked from the front.
- Stuff the head more firmly than the body base. Softer fill causes eye tilt and can pull the embroidered smile into a downward curve.
- Use invisible decreases on cream pieces. Standard decreases leave visible bars that show clearly on pale yarn.
- Install eyes before the final third of stuffing. Dense fill makes washers sit at an angle and shifts the pupil direction.
- Pin the shell in four points first. Front, back, and both sides stop the dome from rotating during sewing.
- Keep the leaf border lightly tensioned at the seam. A heavy seam or overfilled edge pushes the green skirt outward instead of letting it ruffle.
- Weave appliqué tails through at least three stitch paths. Small parts such as berry tops and petal loops loosen quickly with a single pass.
Conclusion
This sunflower turtle amigurumi crochet pattern works because the shell is treated as a built structure, not just a color change. The front door, side strawberries, leaf skirt, and layered flowers all need spacing that protects the turtle silhouette. Start with the head and body first, test the shell line before final sewing, then add the appliqués in clusters rather than at random. Share the finished make on Pinterest and Instagram with one front view and one overhead view so the cottage details read clearly. Hashtag: #SunflowerTurtleCottage. One practical question remains: did you place the roof sunflower centered, or slightly back to keep the turtle’s forehead clear?









