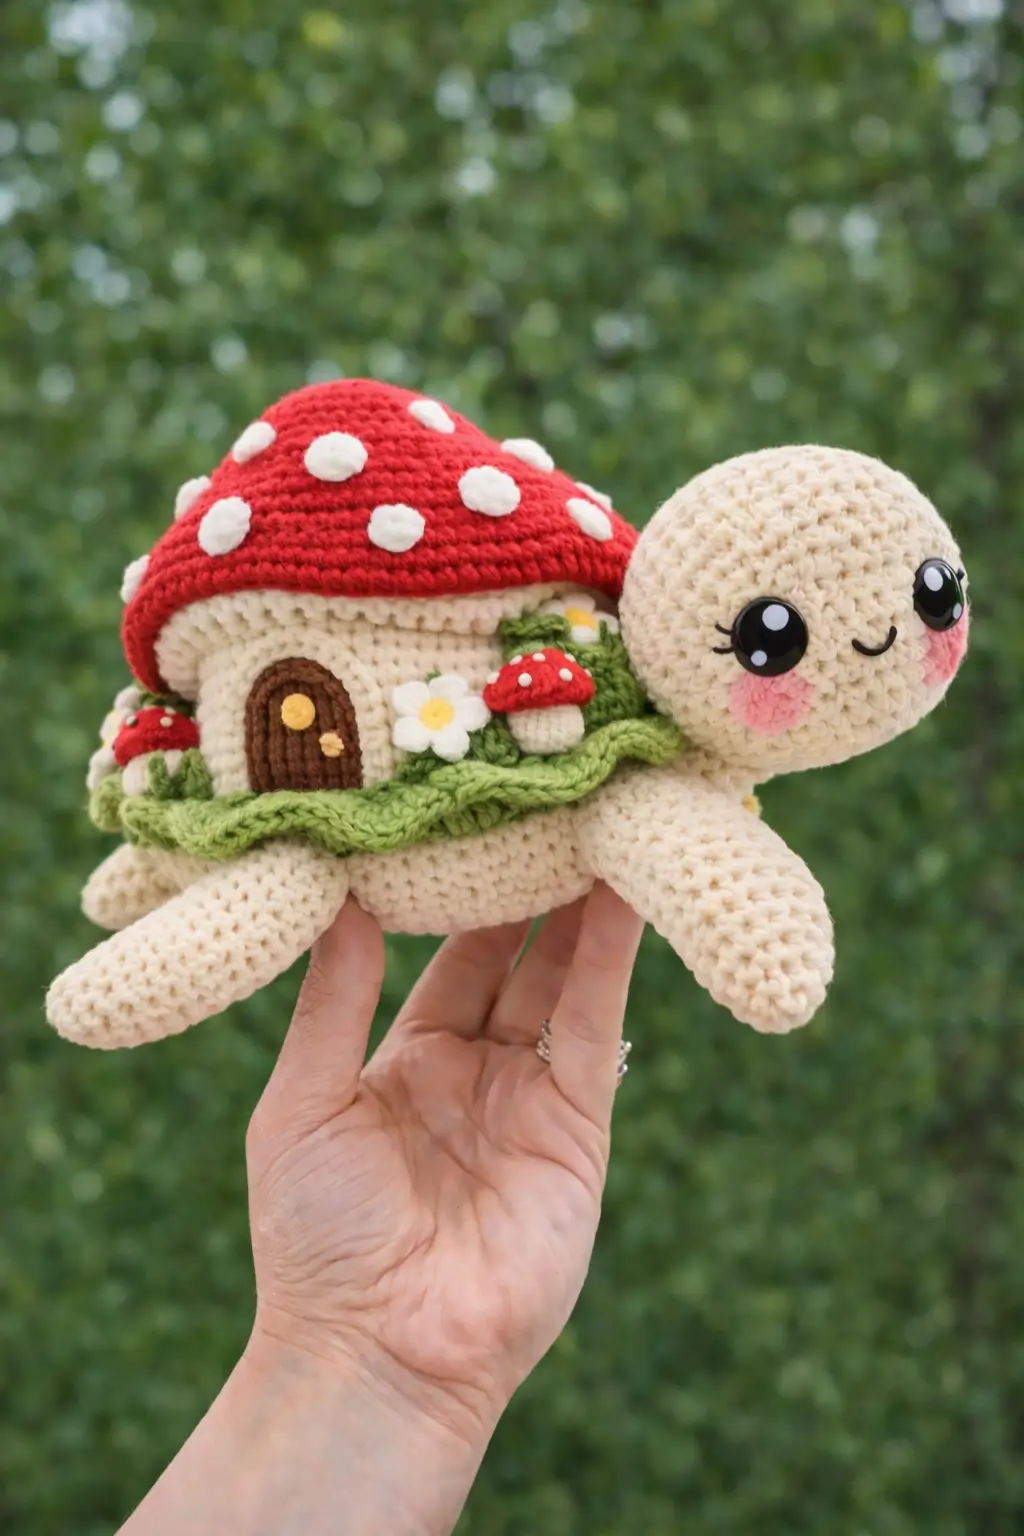
A turtle carrying a fly agaric cottage needs a shell wide enough for a door, not just a dome. This mushroom turtle amigurumi is built for that profile: DK-weight yarn, a 3.5 mm hook, intermediate shaping, and a finished length close to 15 cm. It suits desk decor, gift-market stock, or a photo prop that reads clearly from the front.
The Design: What Makes This Mushroom Turtle Different
The shell is the first structural change. A standard turtle dome hides the side wall, but this version needs a vertical cream band so the brown door can sit flat and stay visible in photos. That extra wall also keeps the red cap from collapsing into the body line.
The head is intentionally oversized. On a mushroom turtle crochet pattern, a large head shifts the visual weight forward and keeps the cottage shell from looking like a separate toy strapped to the back. Cheek patches help the face read from a distance, which is common in current mushroom turtle plush listings.
Another design choice is the leaf border. It covers the join between shell wall and body while creating a garden edge for flowers and mini mushrooms. Many current competitors stop at a plain cap shell or a pop-it shell variation. They do not explain how to build a turtle cottage amigurumi with a door, trim, and planted details in one sequence.
Project Info at a Glance
| Skill Level | Time | Finished Size | Hook | Best For |
|---|---|---|---|---|
| Intermediate | 6–8 hours | 14–15 cm | 3.5 mm | Display plush, market prep, shelf decor |
Finished-size benchmarks in live mushroom turtle patterns cluster around 14–15 cm, though the photo-based reconstruction below is written for DK/light worsted yarn to match the visible stitch definition rather than current super bulky plush-market listings.
Materials and Tools
Yarn
- Cream — DK/light worsted — 55 g — cotton or cotton-blend suggestion
- Red — DK/light worsted — 30 g — smooth cotton suggestion
- White — DK/light worsted — 10 g — for spots, flowers, shell edge
- Leaf green — DK/light worsted — 20 g — for border and stems
- Brown — DK/light worsted — 8 g — for door
- Yellow — DK/light worsted — 3 g — for flower centers
- Pink — DK/light worsted — 3 g — for cheek patches
Tools
- Hook 3.5 mm
- Safety eyes 10–12 mm for the photo-based build; live market patterns range from 6 mm to 14 mm depending on yarn scale
- Stuffing
- Tapestry needle
- Stitch markers
- Black embroidery thread for smile and lashes
Abbreviations
MR / sc / inc / dec / sl st / ch / BLO / FLO / hdc
Invisible decrease is worked through the front loops of the next two stitches so the closing rounds stay flatter and less gapped.
Pattern — Step by Step
Continuous spiral unless noted. This is a photo-based reconstruction drafted with standard amigurumi stitch math and sized to match the visible proportions in the image.
Head (Make 1)
Yarn: cream — Source: Standard amigurumi math
R1: 6 sc in MR (6)
R2: inc x6 (12)
R3: (sc, inc) x6 (18)
R4: (2 sc, inc) x6 (24)
R5: (3 sc, inc) x6 (30)
R6: (4 sc, inc) x6 (36)
R7–12: sc around (36)
R13: (4 sc, dec) x6 (30)
R14: (3 sc, dec) x6 (24)
Insert safety eyes between R9 and R10, about 8 sts apart. Add smile before stuffing if preferred.
R15: (2 sc, dec) x6 (18)
Stuff firmly, but do not overpack the lower neck edge.
R16: (sc, dec) x6 (12)
R17: dec x6 (6)
Fasten off. Leave 20 cm tail.
Body Base (Make 1)
Yarn: cream — Source: Standard amigurumi math
R1: 6 sc in MR (6)
R2: inc x6 (12)
R3: (sc, inc) x6 (18)
R4: (2 sc, inc) x6 (24)
R5: (3 sc, inc) x6 (30)
R6: (4 sc, inc) x6 (36)
R7–10: sc around (36)
R11: (4 sc, dec) x6 (30)
R12: sc around (30)
Light stuffing only. The back needs some flatness so the shell wall sits level.
Fasten off. Leave 25 cm tail.
Front Legs (Make 2)
Yarn: cream — Source: Standard amigurumi math
R1: 6 sc in MR (6)
R2: inc x6 (12)
R3–7: sc around (12)
R8: (4 sc, dec) x2 (10)
R9–10: sc around (10)
Stuff the front half only to keep a soft bend.
Fasten off. Leave 18 cm tail.
Back Legs (Make 2)
Yarn: cream — Source: Standard amigurumi math
R1: 6 sc in MR (6)
R2: inc x6 (12)
R3–6: sc around (12)
R7: (4 sc, dec) x2 (10)
R8–9: sc around (10)
Stuff lightly.
Fasten off. Leave 18 cm tail.
Neck Join Pad (Make 1)
Yarn: cream — Source: Standard amigurumi math
R1: 6 sc in MR (6)
R2: inc x6 (12)
R3: sc around (12)
Fasten off. Leave 12 cm tail.
Shell Wall / Cottage Base (Make 1)
Yarn: cream — Source: Standard amigurumi math + live shell benchmarks reaching 30–36 sts in mushroom-turtle variants
R1: 6 sc in MR (6)
R2: inc x6 (12)
R3: (sc, inc) x6 (18)
R4: (2 sc, inc) x6 (24)
R5: (3 sc, inc) x6 (30)
R6: (4 sc, inc) x6 (36)
R7: BLO sc around (36)
R8–11: sc around (36)
Fasten off. Leave 30 cm tail.
Mushroom Cap Roof (Make 1)
Yarn: red, then white trim — Source: Standard amigurumi math
R1: 6 sc in MR (6)
R2: inc x6 (12)
R3: (sc, inc) x6 (18)
R4: (2 sc, inc) x6 (24)
R5: (3 sc, inc) x6 (30)
R6: (4 sc, inc) x6 (36)
R7: (5 sc, inc) x6 (42)
R8–10: sc around (42)
R11: FLO sc around in white (42)
R12: in white, sl st loosely around (42)
Fasten off. Leave 25 cm tail.
Cheek Patches (Make 2)
Yarn: pink — Source: Standard amigurumi math
R1: 6 sc in MR (6)
R2: inc x6 (12)
Sl st, fasten off. Leave 10 cm tail.
Door (Make 1)
Yarn: dark brown, light brown, yellow — Source: Standard amigurumi math
With dark brown:
R1: ch 6, sc in 2nd ch from hook and across, turn (5)
R2–6: ch 1, sc across (5)
R7: dec, sc, dec (3)
R8: sc across (3)
Border with light brown: sc evenly around, placing 3 sc at top curve.
Do not stuff. Fasten off. Sew a small yellow French-knot or flat circle for the knob.
Leaf Border / Garden Trim (Make 1)
Yarn: leaf green — Source: Standard decorative edging math
Ch 36.
Row 1: sl st in 2nd ch from hook, (ch 3, sl st in next ch) repeat across.
Leave long tail at both ends.
Flower (Make 2)
Yarn: white and yellow — Source: Standard motif math
With yellow:
R1: 6 sc in MR (6)
Change to white.
R2: (ch 2, 2 dc in same st, ch 2, sl st in next st) x3 to form 3 petals, then repeat between remaining sts for 6 petals total.
Fasten off. Leave 10 cm tail.
Mini Mushroom Stem (Make 2)
Yarn: cream — Source: Standard amigurumi math
R1: 6 sc in MR (6)
R2: sc around (6)
R3: BLO, inc x6 (12)
R4: sc around (12)
Fasten off. Leave 12 cm tail.
Mini Mushroom Cap (Make 2)
Yarn: red and white — Source: Standard amigurumi math
R1: 6 sc in MR (6)
R2: inc x6 (12)
R3: (sc, inc) x6 (18)
R4: FLO sc around in white (18)
Fasten off. Leave 12 cm tail.
Cap Spots (Make 9–11 large, 4–6 small)
Yarn: white — Source: Standard amigurumi math
Large spot:
R1: 6 sc in MR (6)
R2: inc x6 (12)
Fasten off.
Small spot:
R1: 6 sc in MR (6)
Fasten off.
Tail (Make 1)
Yarn: cream — Source: Standard amigurumi math
R1: 4 sc in MR (4)
R2: sc around (4)
Fasten off. Leave 10 cm tail.
Assembly
- Sew the head to the front of the body, using the neck join pad between them for a cleaner angle.
- Attach the front legs slightly below the head line, angled forward.
- Attach the back legs near the rear third of the body, angled outward.
- Sew the tail at the center back.
- Sew the shell wall centered on the body back. Keep the front third clear so the head remains dominant in profile.
- Attach the door to the front of the shell wall. Position it slightly off-center for a cottage look.
- Sew the mushroom cap roof onto the top edge of the shell wall so it overhangs by one stitch round.
- Attach the leaf border around the shell base seam. Tuck the ends under one flower cluster.
- Sew the cheek patches under the eyes, then embroider the smile and lashes.
- Assemble and attach the mini mushrooms and flowers along the garden trim, then sew the white spots to the red cap.
The piece is complete once the shell sits level and the head still clears the cap overhang in side view.
7 Technical Tips
- Mark the first stitch of every round on the head and shell wall. Losing one stitch on a 36-stitch plateau shifts the door off center by the end of the wall section.
- Stuff the head firmly at the crown and lightly at the neck edge. A hard lower neck pushes the face upward and makes the turtle look startled.
- Work invisible decreases on the last three closing rounds of the head. Standard decreases leave a six-point ridge that shows clearly in smooth cotton yarn.
- Insert the eyes before the head drops below 24 stitches. On a small face, late eye placement can distort the fabric around the washers.
- Keep the shell wall flatter than the head. Overstuffed shell walls force the door to bow outward instead of sitting like an applied panel.
- Pin the leaf border in four anchor points before sewing flowers. Without those quarter marks, the trim drifts and one side of the garden line rides higher.
- Weave tails back through at least 3 cm of neighboring stitches. The mini mushroom caps and large white spots are small parts, so short tail locks loosen first during handling.
Conclusion
Most live mushroom turtle patterns focus on plush shortcuts, pop-it shells, or simple cap swaps. This mushroom turtle amigurumi goes further by treating the shell as a cottage build with a wall, roof, door, trim, and planted details. That gives the design a stronger front view and a cleaner selling angle in product photos. The next step is practical: make the head and shell wall first, pin them together, and check the profile before finishing the garden details. Share the result on Pinterest and Instagram with one side-view photo and one front-view photo. Use #MushroomTurtleCottage. Which detail matters more on this character: a wider cap overhang or a taller cottage door?









