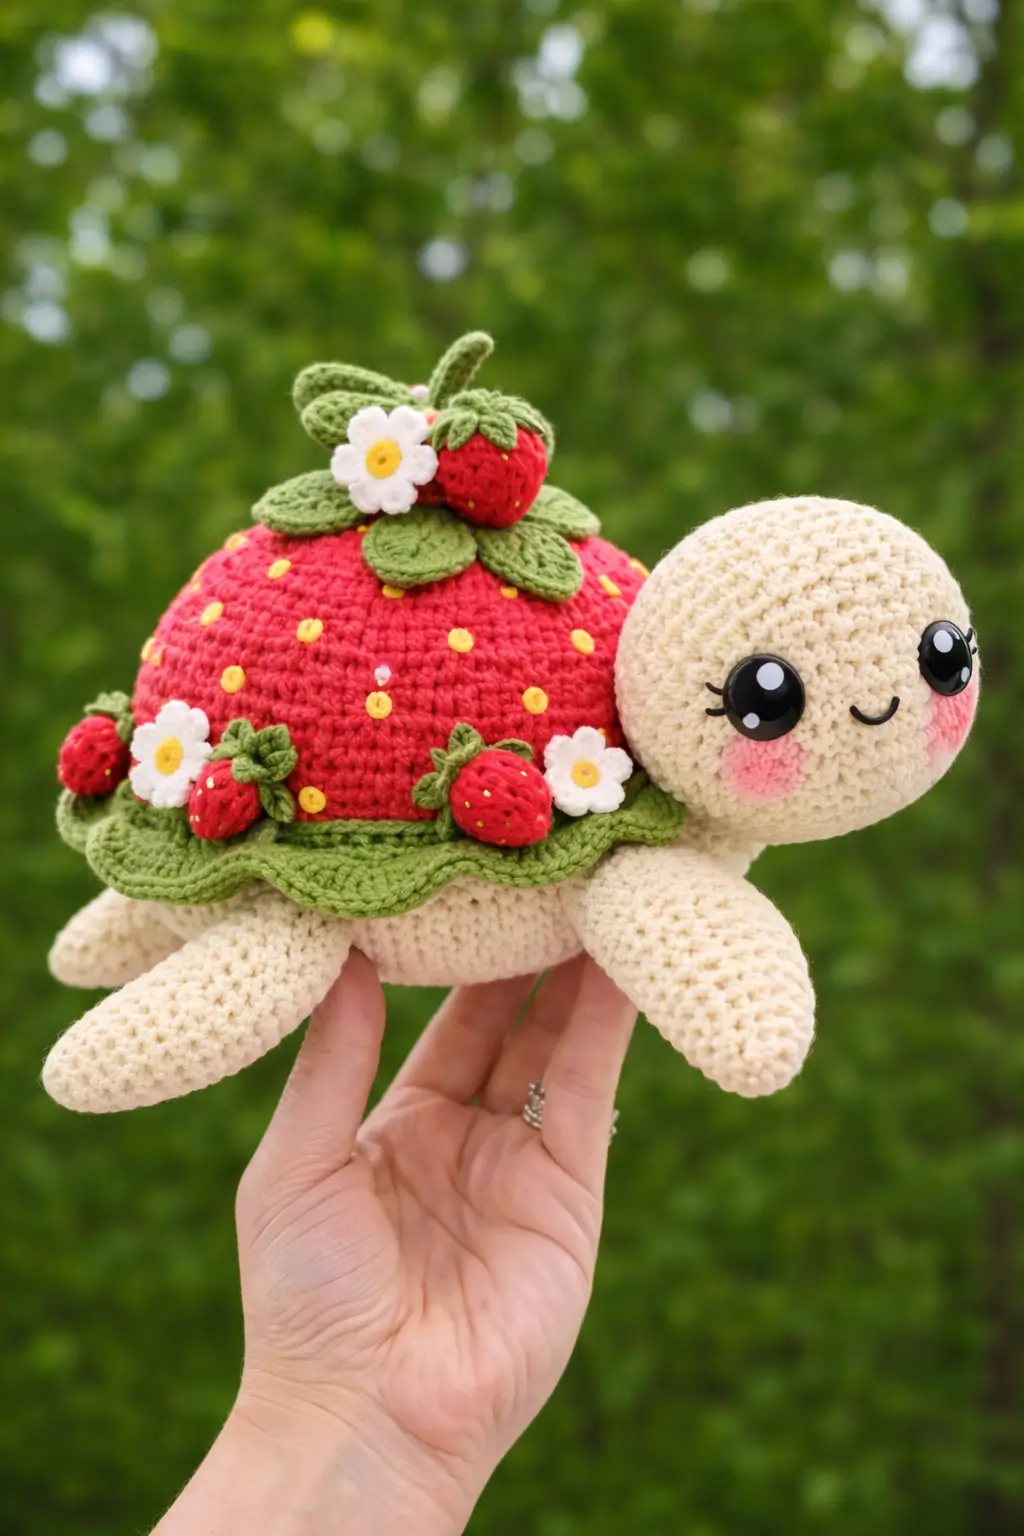
A strawberry shell shifts a turtle’s balance point before the first round is finished. This strawberry turtle amigurumi uses plush yarn, a 5 mm hook reference, and a medium-size body plan to produce a toy around the larger end of current market examples, suited to advanced beginner or intermediate makers. The practical payoff is display value: it reads as a turtle from a distance and as a strawberry on close inspection.
The Design: What Makes Strawberry Turtle Different
The shell cannot behave like a normal turtle shell here. It has to read as fruit, so the dome needs more visual width, brighter contrast, and visible seed placement. That is why the shell is treated as a higher-volume cap with a separate leafy edge rather than a flat color swap. The head also runs larger than a realistic sea turtle proportion. In this type of crochet strawberry turtle, the oversized face keeps the plush from looking like produce with legs.
Another structural decision sits at the shell line. A green ruffle or calyx band breaks the transition between cream body and red shell, which hides seam shift and adds the strawberry cue at eye level. Many makers miss the placement issue and sew the shell too low. The result is a squat turtle plushie with a buried neck and flattened silhouette. A strawberry turtle crochet pattern works better when the shell sits high enough to leave the face fully visible and the front flippers angled forward, not downward.
Project Info at a Glance
| Skill Level | Time | Finished Size | Hook | Best For |
|---|---|---|---|---|
| Advanced beginner / intermediate | 6–9 hours | about 24 cm long in plush yarn; smaller if worked in lighter yarn | 5.0 mm reference | Display plush, gift make, market table focal piece |
Size and hook reference align with indexed plush strawberry turtle listings; exact outcome still depends on yarn and tension.
Materials and Tools
Yarn
- Cream — Size 6 plush yarn — about 120–150 g — Bernat Blanket or similar
- Red — Size 6 plush yarn — about 100–120 g — Bernat Blanket or similar
- Green — Size 6 plush yarn — about 40–60 g — Bernat Blanket or similar
- White — lighter accent yarn or plush scrap — about 15–20 g — any smooth contrast yarn
- Yellow — light accent yarn — 5–10 g — any smooth contrast yarn
- Pink — blush scrap — 5 g — any smooth contrast yarn
- Black — embroidery scrap — small amount
Tools
- Hook 5.0 mm
- 12 mm safety eyes
- Polyester stuffing
- Yarn needle
- Stitch markers
- Pins
- Fabric glue optional for appliqués
The 5.0 mm hook, size-6 yarn, and 12 mm eyes are taken from an indexed plush pattern listing; yardage in public snippets is incomplete, so gram estimates above are practical working estimates for the photographed scale.
Abbreviations
MR = magic ring
sc = single crochet
inc = increase
dec = invisible decrease
sl st = slip stitch
ch = chain
BLO = back loop only
hdc = half double crochet
Invisible decrease reduces bulk across plush yarn joins and keeps the face and shell edge from forming blunt dents.
Pattern — Step by Step
Continuous spiral unless noted. Counts verified by standard amigurumi math. This pattern is written to match the photographed proportions rather than a single gated commercial PDF.
Head (Make 1)
Yarn: Cream — Standard amigurumi math
R1: 6 sc in MR (6)
R2: inc x6 (12)
R3: (sc, inc) x6 (18)
R4: (2 sc, inc) x6 (24)
R5: (3 sc, inc) x6 (30)
R6: (4 sc, inc) x6 (36)
R7–R12: sc around (36)
Place 12 mm eyes between R8 and R9, about 8 stitches apart. Embroider smile centered below eyes. Add blush after assembly.
R13: (4 sc, dec) x6 (30)
R14: (3 sc, dec) x6 (24)
R15: (2 sc, dec) x6 (18)
Stuff firmly, especially lower face.
R16: (sc, dec) x6 (12)
R17: dec x6 (6)
Fasten off. Leave 25 cm tail.
Body (Make 1)
Yarn: Cream — Standard amigurumi math
R1: 6 sc in MR (6)
R2: inc x6 (12)
R3: (sc, inc) x6 (18)
R4: (2 sc, inc) x6 (24)
R5: (3 sc, inc) x6 (30)
R6: (4 sc, inc) x6 (36)
R7–R10: sc around (36)
R11: (4 sc, dec) x6 (30)
R12: (3 sc, dec) x6 (24)
R13: (2 sc, dec) x6 (18)
Stuff the belly but keep the back slightly flatter so the shell can sit securely.
R14: (sc, dec) x6 (12)
R15: dec x6 (6)
Fasten off. Leave 20 cm tail.
Front Flippers (Make 2)
Yarn: Cream — Standard amigurumi math
R1: 6 sc in MR (6)
R2: inc x6 (12)
R3: (sc, inc) x6 (18)
R4–R7: sc around (18)
R8: (sc, dec) x6 (12)
R9–R11: sc around (12)
Flatten lightly.
Fasten off. Leave 20 cm tail.
Back Flippers (Make 2)
Yarn: Cream — Standard amigurumi math
R1: 6 sc in MR (6)
R2: inc x6 (12)
R3–R5: sc around (12)
R6: (sc, dec) x4 (8)
R7–R8: sc around (8)
Flatten lightly.
Fasten off. Leave 18 cm tail.
Tail (Make 1)
Yarn: Cream — Standard amigurumi math
R1: 4 sc in MR (4)
R2: sc around (4)
R3: (sc, inc) x2 (6)
R4: sc around (6)
Fasten off. Leave 12 cm tail.
Shell Dome (Make 1)
Yarn: Red — Standard amigurumi math, expanded for the strawberry cap shape
R1: 6 sc in MR (6)
R2: inc x6 (12)
R3: (sc, inc) x6 (18)
R4: (2 sc, inc) x6 (24)
R5: (3 sc, inc) x6 (30)
R6: (4 sc, inc) x6 (36)
R7: (5 sc, inc) x6 (42)
R8: BLO sc around (42)
R9–R14: sc around (42)
Fasten off. Leave 35 cm tail.
Embroider yellow seed dots after stuffing and before final shell attachment. Space them irregularly, not in grids.
Shell Ruffle / Lower Calyx Edge (Make 1)
Yarn: Green — Standard shaping based on shell circumference
Ch 43.
Row 1: Starting in 2nd ch from hook, sc across (42)
Row 2: (sl st, hdc, 2 dc in next st, hdc, sl st) repeat 8 times, adjust final stitches evenly
Fasten off. Leave 30 cm tail.
This strip wraps the lower shell edge and creates the leafy strawberry transition visible in the photo.
Top Leaves (Make 5)
Yarn: Green — Standard leaf formula
Ch 7.
Row 1: Starting in 2nd ch from hook: sc, hdc, dc, hdc, sc, sl st in last ch. Rotate to underside of chain and work sc, hdc, dc, hdc, sc.
Fasten off. Leave 12 cm tail.
Top Stem (Make 1)
Yarn: Green — Standard leaf-stem shaping
Ch 6.
Row 1: Starting in 2nd ch from hook, sl st in each ch back (5)
Fasten off. Leave 12 cm tail.
Mini Strawberry (Top Accent) (Make 1)
Yarn: Red, green
R1: 6 sc in MR (6)
R2: inc x6 (12)
R3–R4: sc around (12)
R5: (sc, dec) x4 (8)
Stuff lightly.
R6: dec x4 (4)
Fasten off.
For leaf cap:
Ch 2, work 5 sl st into first ch to form tiny star cap.
Fasten off and sew to berry top.
Side Mini Strawberries (Make 3)
Yarn: Red, green — Same formula as top berry, slightly looser stuffing
R1: 6 sc in MR (6)
R2: inc x6 (12)
R3: sc around (12)
R4: (sc, dec) x4 (8)
R5: dec x4 (4)
Fasten off. Add tiny green cap.
Daisy Flowers (Make 3)
Yarn: White, yellow
With yellow:
R1: 6 sc in MR (6), sl st to join. Change to white.
Petals:
(ch 3, 2 dc in 2nd ch from hook, sl st in next center stitch) repeat 6 times.
Fasten off. Leave 12 cm tail.
Cheek Patches (Make 2)
Yarn: Pink
R1: 6 sc in MR (6)
R2: inc x6 (12)
Sl st to join.
Fasten off. Leave short tail.
Assembly
- Sew the head to the front third of the body, keeping the chin slightly lifted.
- Attach the front flippers at the body sides, one round below the head seam, angled forward.
- Sew the back flippers lower and slightly wider apart than the front pair.
- Attach the tail centered at the rear.
- Stuff the shell dome so the top stays rounded but the base remains flexible.
- Sew the green ruffle around the shell base edge.
- Pin the shell onto the body first; then sew it high on the back so the side profile still shows neck and shoulder line.
- Attach the five top leaves in a star layout and sew the stem at center.
- Add the top mini strawberry, then distribute the side strawberries and daisy flowers asymmetrically across the shell edge.
- Sew or glue the cheek patches below the eyes and embroider seed dots across the red shell.
The finished piece should sit flat on all four flippers with the shell centered over the body.
7 Technical Tips
- Mark the first stitch of every round on the head and shell. Losing one stitch on a 42-stitch shell throws off leaf placement by several centimeters at the edge.
- Stuff the head firmer than the body. A soft head collapses around 12 mm eyes and makes the embroidered smile buckle inward.
- Use invisible decrease on cream sections only through the front loops. Plush yarn builds visible knots fast when standard decreases stack across the muzzle.
- Insert the eyes before the final third of head closure. Waiting past the 18-stitch stage makes the washer placement awkward and can distort round alignment.
- Keep red shell tension one step tighter than body tension. A loose red dome exposes stuffing between yellow seed stitches.
- Pin the shell to the body in at least four points: front, back, and both sides. Off-center placement by even 1 cm makes the turtle read lopsided from the front.
- Weave every tail back through at least 4–5 cm of internal stuffing path. Short buried ends work loose faster on flippers because those seams take handling stress.
Conclusion
The main construction challenge in a strawberry turtle amigurumi is proportion control, not stitch difficulty. Keep the head round, the shell elevated, and the green transition line wide enough to separate fruit from body. From here, the next step is simple: choose the yarn scale first, then match the shell diameter to the body before sewing any appliqués in place. Post the result to Pinterest and Instagram with a top-view shot and a side-profile shot so the strawberry shaping reads clearly. Hashtag: #StrawberryTurtleAmigurumi. One useful test question remains: did your top leaves frame the mini strawberry, or cover it?









