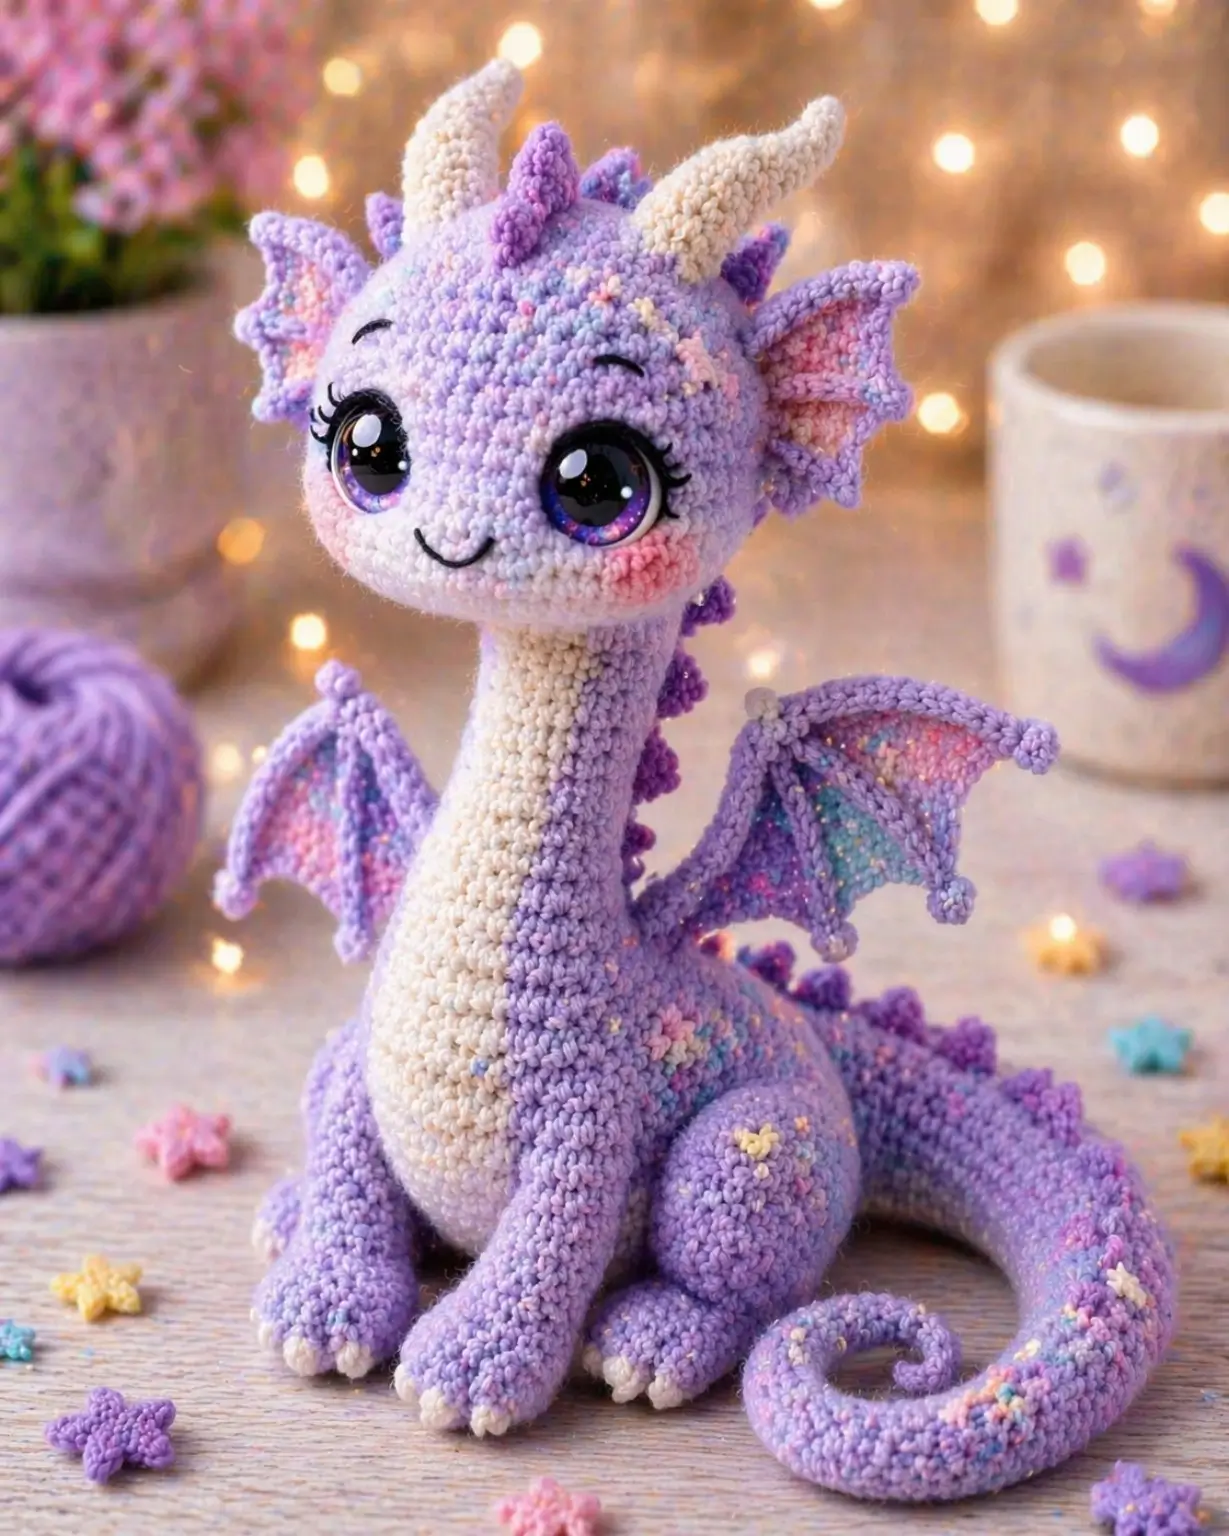
Dragon balance fails at the neck long before it fails at the wings. This dragon amigurumi crochet pattern uses DK yarn, a 2.5–3.0 mm hook, and a 24 cm target height to build a seated pastel dragon with wings, horns, and a curled tail. Skill level is intermediate because the body carries a long narrow neck. It is a useful format for practicing stable head placement on fantasy amigurumi.
The Design: What Makes This Dragon Different
The photo points to three structural decisions. First, the head has to sit on a slimmer neck than the jaw opening, otherwise the face reads squat and the dragon loses its young proportion. Second, the wings belong lower on the back, not on the shoulder line, because the neck already carries most of the vertical emphasis. Third, the tail needs a broader base and a sewn curve so the body gets a third rear support point. You want an upright silhouette. Many current fairy dragon amigurumi listings lean toward longer horizontal bodies, while some baby dragon crochet pattern tutorials favor low-sew one-piece construction with shorter necks. Here the dragon stays seated, open-faced, and front-heavy on purpose. The common mistake is matching neck diameter to cheek width. That makes the piece pitch forward and hides the cream front panel.
Project Info at a Glance
| Skill Level | Time | Finished Size | Hook | Best For |
|---|---|---|---|---|
| Intermediate | 5–7 hours | 24 cm | 2.5–3.0 mm | Shelf display / handmade gift |
Materials and Tools
Current dragon references cluster around sport-to-DK cotton with small hooks for 20–24 cm figures, then scale upward with heavier yarn and larger eyes in market patterns. The palette below keeps the verified DK range but shifts it into the lilac-and-cream photo style.
Yarn
- Lilac — DK cotton — 85 g — DROPS Muskat or similar
- Purple — DK cotton — 22 g — for spikes, wing edging, and shading
- Cream — DK cotton — 8 g — for horns, claws, chest panel
- Pastel scrap colors — DK cotton — 5–10 g total — for wing membrane accents and surface speckles
- Pink scrap — DK cotton — small amount — for cheek patches
Tools
- Hook 2.5–3.0 mm
- 12 mm safety eyes
- Polyester stuffing
- Yarn needle
- Stitch markers
- Embroidery thread or yarn for smile, brows, and claws
Abbreviations
MR / sc / inc / dec / sl st / ch / BLO / hdc / dc / picot
Work invisible decreases through the front loops only so the cheeks, neck, and haunches keep a cleaner line.
Pattern — Step by Step
Continuous spiral unless noted.
Head
Yarn: lilac
R1: 6 sc in MR [6]
R2: inc x6 [12]
R3: (sc 1, inc) x6 [18]
R4: (sc 2, inc) x6 [24]
R5: (sc 3, inc) x6 [30]
R6: (sc 4, inc) x6 [36]
R7: (sc 5, inc) x6 [42]
R8: sc around [42]
R9: sc around [42]
R10: sc around [42]
R11: sc around [42]
R12: sc around [42]
R13: sc around [42]
R14: (sc 5, dec) x6 [36]
R15: (sc 4, dec) x6 [30]
R16: (sc 3, dec) x6 [24]
Insert 12 mm eyes between R10 and R11, spaced 8 visible stitches apart.
R17: (sc 2, dec) x6 [18]
Stuff firmly, especially across the forehead and lower cheeks.
Fasten off. Leave a 35 cm tail.
Body
Yarn: lilac
R1: 6 sc in MR [6]
R2: inc x6 [12]
R3: (sc 1, inc) x6 [18]
R4: (sc 2, inc) x6 [24]
R5: (sc 3, inc) x6 [30]
R6: (sc 4, inc) x6 [36]
R7: sc around [36]
R8: sc around [36]
R9: sc around [36]
R10: sc around [36]
R11: sc around [36]
R12: (sc 4, dec) x6 [30]
R13: sc around [30]
R14: sc around [30]
R15: (sc 3, dec) x6 [24]
R16: sc around [24]
R17: sc around [24]
R18: (sc 2, dec) x6 [18]
R19: sc around [18]
R20: sc around [18]
R21: sc around [18]
R22: sc around [18]
R23: sc around [18]
R24: sc around [18]
R25: sc around [18]
R26: sc around [18]
R27: sc around [18]
R28: sc around [18]
Stuff the body firmly. Pack the neck only medium-firm so it can be centered under the head instead of bowing outward.
Fasten off. Leave a 40 cm tail.
Chest and Belly Panel
Yarn: cream
Row 1: ch 6, starting in 2nd ch from hook, sc 5 [5]
Row 2: ch 1, turn, inc, sc 3, inc [7]
Row 3: ch 1, turn, sc 7 [7]
Row 4: ch 1, turn, sc 7 [7]
Row 5: ch 1, turn, inc, sc 5, inc [9]
Row 6: ch 1, turn, sc 9 [9]
Row 7: ch 1, turn, sc 9 [9]
Row 8: ch 1, turn, sc 9 [9]
Row 9: ch 1, turn, sc 9 [9]
Row 10: ch 1, turn, sc 9 [9]
Row 11: ch 1, turn, sc 9 [9]
Row 12: ch 1, turn, sc 9 [9]
Row 13: ch 1, turn, dec, sc 5, dec [7]
Row 14: ch 1, turn, sc 7 [7]
Row 15: ch 1, turn, sc 7 [7]
Row 16: ch 1, turn, dec, sc 3, dec [5]
Row 17: ch 1, turn, sc 5 [5]
Fasten off. Leave a 35 cm tail.
Front Legs (Make 2)
Yarn: cream to lilac
R1: 6 sc in MR with cream [6]
R2: inc x6 [12]
R3: sc around [12]
R4: sc around [12]
Change to lilac.
R5: dec x6 [6]
R6: sc around [6]
R7: sc around [6]
R8: sc around [6]
R9: sc around [6]
R10: sc around [6]
R11: sc around [6]
R12: sc around [6]
Stuff the paw firmly and the upper leg lightly.
Fasten off. Leave a 22 cm tail.
Back Legs (Make 2)
Yarn: cream to lilac
R1: 6 sc in MR with cream [6]
R2: inc x6 [12]
R3: (sc 1, inc) x6 [18]
R4: sc around [18]
R5: sc around [18]
Change to lilac.
R6: dec x6 [12]
R7: sc around [12]
R8: sc around [12]
R9: sc around [12]
R10: dec x6 [6]
R11: sc around [6]
R12: sc around [6]
Stuff the foot and haunch firmly. Keep the top of the leg softer for easier pinning.
Fasten off. Leave a 24 cm tail.
Ear Fins (Make 2)
Yarn: lilac
Row 1: ch 5, starting in 2nd ch from hook, sc 4 [4]
Row 2: ch 1, turn, inc, sc 2, inc [6]
Row 3: ch 1, turn, sc 6 [6]
Row 4: ch 1, turn, inc, sc 4, inc [8]
Row 5: ch 1, turn, sc 8 [8]
Border: ch 1, sc evenly around, work 1 picot at the outer tip
Do not stuff. Add a line of pink or pale blue surface embroidery inside each fin if you want the photo’s stained-membrane effect.
Fasten off. Leave a 20 cm tail.
Wings (Make 2)
Yarn: lilac edge with pastel membrane accents
Row 1: ch 2, starting in 2nd ch from hook, inc [2]
Row 2: ch 1, turn, inc x2 [4]
Row 3: ch 1, turn, inc, sc 2, inc [6]
Row 4: ch 1, turn, inc, sc 4, inc [8]
Row 5: ch 1, turn, inc, sc 6, inc [10]
Row 6: ch 1, turn, inc, sc 8, inc [12]
Row 7: ch 1, turn, inc, sc 10, inc [14]
Border Row: do not turn; sc evenly around the wing. Along the lower edge, work (hdc, dc, hdc) in next stitch, sl st in next 2 stitches three times to form three shallow scallops.
Do not stuff. Embroider two membrane ribs from the top corner down toward the lower scallops.
Fasten off. Leave a 25 cm tail.
Horns (Make 2)
Yarn: cream
R1: 6 sc in MR [6]
R2: sc around [6]
R3: sc around [6]
R4: sc around [6]
R5: inc x6 [12]
R6: sc around [12]
R7: sc around [12]
Light stuffing only. Pinch the base into an oval when sewing so the horn reads narrower at the tip.
Fasten off. Leave a 20 cm tail.
Dorsal Spikes (Make 9)
Yarn: purple
R1: 6 sc in MR [6]
R2: sc around [6]
sl st in next stitch [6]
Flatten each spike lightly. You will place 3 on the forehead, 2 down the neck, and 4 along the tail.
Fasten off. Leave a 12 cm tail.
Tail
Yarn: lilac
R1: 6 sc in MR [6]
R2: sc around [6]
R3: sc around [6]
R4: sc around [6]
R5: sc around [6]
R6: inc x6 [12]
R7: sc around [12]
R8: sc around [12]
R9: sc around [12]
R10: sc around [12]
R11: inc x6 [18]
R12: sc around [18]
R13: sc around [18]
R14: sc around [18]
R15: sc around [18]
R16: sc around [18]
R17: sc around [18]
R18: sc around [18]
R19: inc x6 [24]
R20: sc around [24]
R21: sc around [24]
R22: sc around [24]
Stuff lightly through R12, then more firmly from R19 onward. Shape the curl with your hands before attachment.
Fasten off. Leave a 30 cm tail.
Cheek Patches (Make 2)
Yarn: pink
R1: 6 sc in MR [6]
R2: inc x6 [12]
sl st in next stitch [12]
Do not stuff. Finger-press flat.
Fasten off. Leave a 15 cm tail.
Assembly
- Sew the head to the neck opening with the eyes centered above the cream front line. Add a little extra stuffing into the top of the neck before closing the last quarter.
- Pin the chest and belly panel from the underside of the chin down to the front base of the body. Sew both long edges flat so the cream strip stays centered.
- Attach the cheek patches one round below the eyes and slightly outward from the smile line. Keep both circles level with each other.
- Embroider the smile, two short brows, and two tiny nostrils. Add three cream claw stitches to each foot and paw.
- Sew the front legs to the lower front body, roughly where the belly starts to widen. Angle the paws slightly inward.
- Sew the back legs to the side body so the dragon can sit without rolling. Lower them a few millimeters if the head pulls the body forward.
- Attach the tail to the back base of the body, then curve it around to the front-right or front-left side. Tack the inner curl with one hidden stitch if you want the spiral to hold.
- Sew the ear fins to the sides of the head, then place the horns above them. Keep the horn bases about four stitches apart.
- Sew the wings to the upper back, two to three rounds below the head join. Tilt them outward instead of straight up.
- Add the forehead, neck, and tail spikes in a single center line. Weave in all ends on the inside of the body or under attached parts.
The finished dragon should sit with the tail acting as a rear balance point.
7 Technical Tips
- Mark the neck rounds from the start. A twist of even one stitch over ten neck rounds will pull the cream panel off center and make the head look rotated.
- Stop stuffing the head at about 80–85% fullness before the last shaping round. Overpacked cheeks force the eyes outward and flatten the smile line.
- Use invisible decrease on every visible decrease round. Standard decreases leave small ledges that show fastest on lilac yarn around the jaw and haunches.
- Install the eyes before the head closes below 24 stitches. Waiting later turns washer placement into a compression job and can distort the face.
- Pin the back legs before sewing a single stitch. On a seated dragon, a height difference of 4–6 mm is enough to make the body rock.
- Keep the tail tip lightly stuffed and the base firm. Equal density from tip to base fights the curl and makes the rear support point harder to place.
- Sew the wings after the dragon can already sit alone. Wing placement that is too high adds visual weight to the shoulders and makes the neck look shorter than it is.
Conclusion
Start with the head, test the eye spacing, then commit to the long-neck body. That sequence exposes the most failure-prone proportion first and saves rework later. Keep the back legs low, the wings slightly behind the neck join, and the tail broad enough at the base to support the seated pose. Once finished, post one front view and one side view on Pinterest and Instagram so the neck angle, cheek circles, and wing pitch are visible. Use #PastelDragonPattern when you share the build. For your next step, make a second version in a darker palette and compare the same dragon amigurumi crochet pattern with smaller eyes. Are you keeping the forehead spikes short, or running them farther down the neck?









