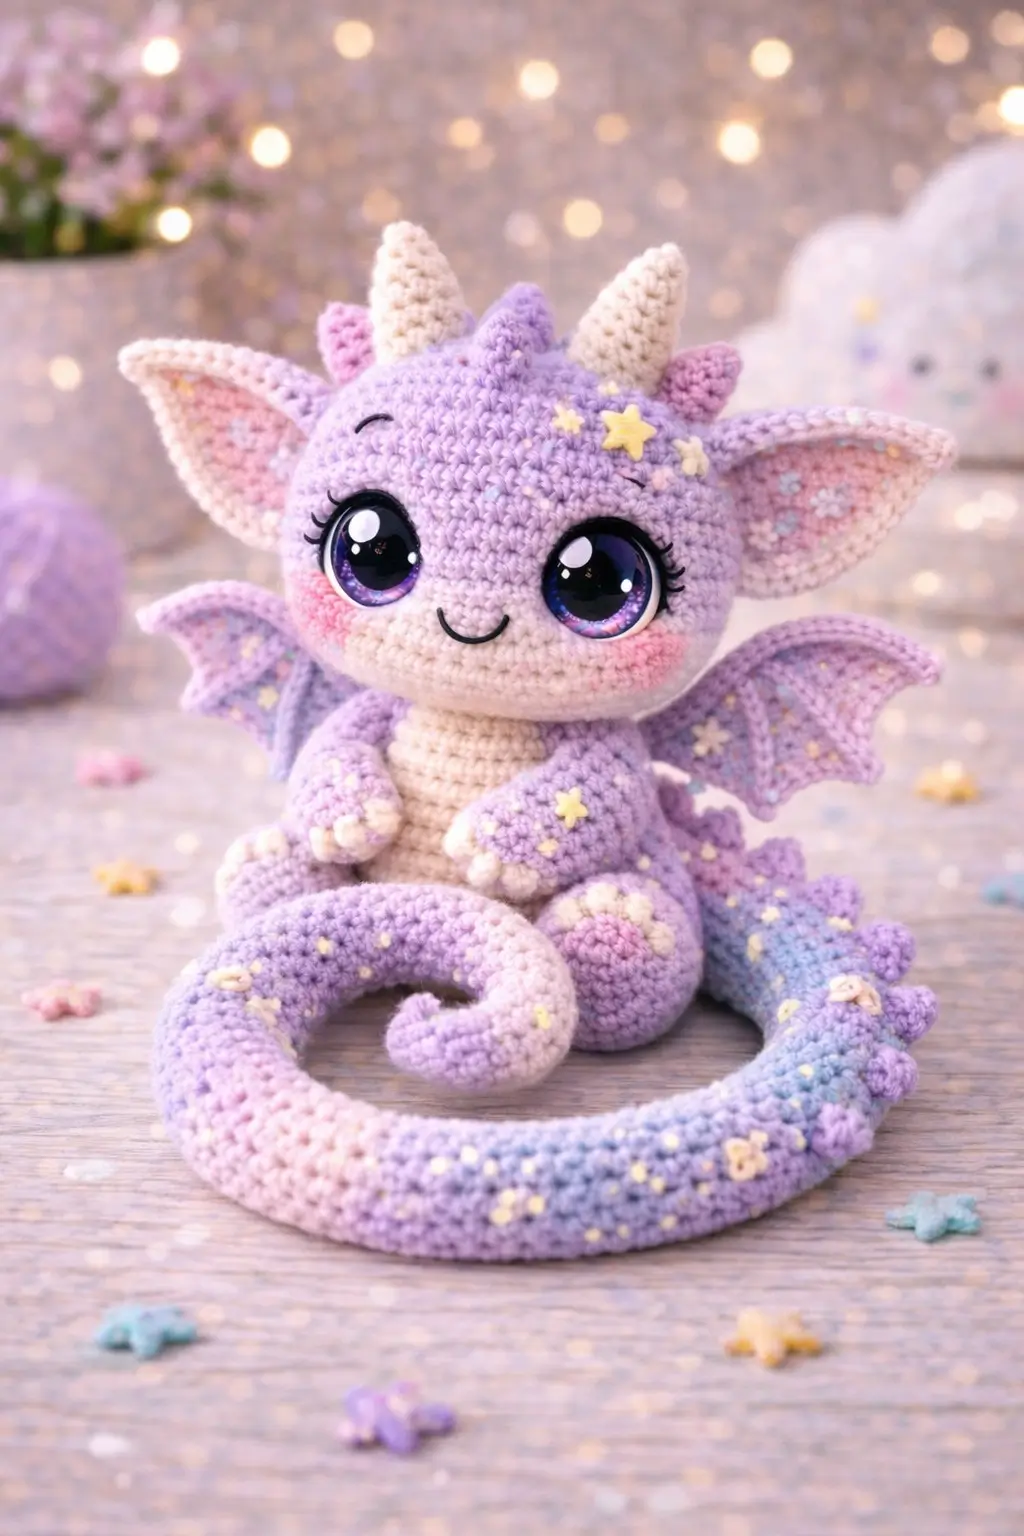
A dragon with twin horns, bat ears, and a counterweight tail loses its shape fast when the head sphere is too shallow. This dragon amigurumi crochet pattern uses worsted yarn, a 4 mm hook, oversized decorative eyes, and medium-level shaping to build a seated pastel dragon for shelf display or product photography. You place the structure first, then the surface details.
The Design: What Makes This Dragon Different
You need three proportions working at once: a wide face plane for large eyes, a neck that does not vanish under the head, and a tail thick enough to brace the seated pose. The first choice is the separate snout patch, which keeps the lower face broad without inflating the whole head. Next comes the oversized ear span; that width makes a baby dragon crochet pattern read younger, while also stopping the horns from crowding the brow. The third choice is the long curled tail, used here as a third ground contact so the wings can stay light and decorative. A common mistake in a pastel dragon amigurumi is dropping the wings too low on the back. That shortens the neck line and makes the head look detached.
Current dragon references split into two workable lanes: about 16 cm seated in worsted or aran cotton with a 4 mm hook, or about 20 cm in sport cotton with a 2.5 mm hook. Published eye sizes often sit around 8–12 mm, while decorative dragon-eye inserts sold for amigurumi run much larger, which is closer to the reference photo.
Project Info at a Glance
| Skill Level | Time | Finished Size | Hook | Best For |
|---|---|---|---|---|
| Intermediate | 5–7 hours | 16 cm seated | 4 mm | Room décor / gift |
Materials and Tools
Benchmark yarn usage in current dragon patterns ranges from 56 g main plus small accents in worsted cotton to 140 g main in sport cotton, so the list below keeps the seated worsted build efficient while leaving room for extra appliqués.
Yarn
- Lavender / lilac — worsted/aran — about 56 g — Rico Design Creative Cotton Aran or similar
- Cream — worsted/aran — about 12 g — same yarn line
- Blush pink — worsted/aran — about 12 g — same yarn line
- Pale yellow — small scrap — star appliqués
- Periwinkle — small scrap — optional tail fade and extra spikes
Tools
- Hook 4 mm
- 20 mm decorative safety eyes or embroidered eyes
- Stuffing
- Tapestry needle
- Stitch markers
- Pins
Abbreviations
MR / sc / inc / dec / sl st / ch / BLO / hdc / dc
Work invisible decrease through the front loops of the next 2 stitches when shaping the head and body so the fabric stays cleaner across the face and belly.
Pattern — Step by Step
Continuous spiral unless noted.
Head (Make 1)
Yarn: Lavender
R1: 6 sc in MR (6)
R2: inc x6 (12)
R3: (sc 1, inc) x6 (18)
R4: (sc 2, inc) x6 (24)
R5: (sc 3, inc) x6 (30)
R6: (sc 4, inc) x6 (36)
R7: sc around (36)
R8: sc around (36)
R9: sc around (36)
R10: sc around (36)
R11: sc around (36)
R12: sc around (36)
R13: sc around (36)
R14: sc around (36)
R15: (sc 4, dec) x6 (30)
R16: (sc 3, dec) x6 (24)
R17: (sc 2, dec) x6 (18)
R18: (sc 1, dec) x6 (12)
R19: dec x6 (6)
Insert eyes between R10 and R11, 10 sts apart. Stuff firmly after R15.
Fasten off. Leave 20 cm tail.
Snout (Make 1)
Yarn: Cream
Ch 6.
R1: starting in 2nd ch from hook, inc, sc 3, 4 sc in last ch, working on opposite side sc 3, inc (12)
R2: inc, sc 3, inc x3, sc 3, inc x2 (18)
R3: sc around (18)
R4: sc around (18)
Stuff lightly before sewing. Embroider the smile after attachment.
Fasten off. Leave 25 cm tail.
Body (Make 1)
Yarn: Lavender
R1: 6 sc in MR (6)
R2: inc x6 (12)
R3: (sc 1, inc) x6 (18)
R4: (sc 2, inc) x6 (24)
R5: (sc 3, inc) x6 (30)
R6: sc around (30)
R7: sc around (30)
R8: sc around (30)
R9: sc around (30)
R10: sc around (30)
R11: (sc 3, dec) x6 (24)
R12: sc around (24)
R13: sc around (24)
R14: sc around (24)
R15: (sc 2, dec) x6 (18)
R16: sc around (18)
R17: (sc 1, dec) x6 (12)
R18: dec x6 (6)
Stuff firmly, but keep the lower half slightly flatter than the chest.
Fasten off. Leave 30 cm tail.
Belly Patch (Make 1)
Yarn: Cream
Ch 7.
R1: starting in 2nd ch from hook, inc, sc 4, 3 sc in last ch, working opposite side sc 4, inc (15)
R2: inc, sc 4, inc x3, sc 4, inc x2 (20)
R3: sc around (20)
This patch should cover the front chest and belly only, not the whole underside.
Fasten off. Leave 30 cm tail.
Arms / Front Legs (Make 2)
Yarn: Cream + Lavender
R1: 6 sc in MR with cream (6)
R2: inc x6 (12)
R3: BLO sc around (12)
R4: switch to lavender, sc around (12)
R5: sc around (12)
R6: (sc 4, dec) x2 (10)
R7: sc around (10)
R8: sc around (10)
R9: sc around (10)
R10: sc around (10)
Stuff the paw and lower arm only. Flatten the top before sewing.
Fasten off. Leave 20 cm tail.
Back Legs (Make 2)
Yarn: Cream + Lavender
R1: 6 sc in MR with cream (6)
R2: inc x6 (12)
R3: (sc 1, inc) x6 (18)
R4: BLO sc around, switch to lavender (18)
R5: sc around (18)
R6: sc around (18)
R7: (sc 4, dec) x3 (15)
R8: sc around (15)
R9: (sc 3, dec) x3 (12)
R10: sc around (12)
R11: sc around (12)
Stuff the foot firmly and the upper leg lightly so the seated angle stays soft.
Fasten off. Leave 25 cm tail.
Horns (Make 2)
Yarn: Cream
R1: 6 sc in MR (6)
R2: sc around (6)
R3: sc around (6)
R4: inc x6 (12)
R5: sc around (12)
R6: sc around (12)
Add only a pinch of stuffing. The horns should stay narrow at the tip.
Fasten off. Leave 20 cm tail.
Ears (Make 2 outer, 2 inner)
Yarn: Lavender outer / Blush pink inner
Outer Ear
Row 1: ch 2, 1 sc in 2nd ch from hook, ch 1, turn (1)
Row 2: inc, ch 1, turn (2)
Row 3: inc, sc 1, inc, ch 1, turn (4)
Row 4: inc, sc 2, inc, ch 1, turn (6)
Row 5: inc, sc 4, inc, ch 1, turn (8)
Row 6: inc, sc 6, inc, ch 1, turn (10)
Row 7: inc, sc 8, inc, ch 1, turn (12)
Row 8: inc, sc 10, inc, ch 1, turn (14)
Row 9: sc across (14)
Row 10: sc across (14)
Inner Ear
Row 1: ch 2, 1 sc in 2nd ch from hook, ch 1, turn (1)
Row 2: inc, ch 1, turn (2)
Row 3: inc, sc 1, inc, ch 1, turn (4)
Row 4: inc, sc 2, inc, ch 1, turn (6)
Row 5: inc, sc 4, inc, ch 1, turn (8)
Row 6: inc, sc 6, inc, ch 1, turn (10)
Row 7: sc across (10)
Sew inner ear to outer ear, then pinch the base with 2–3 whip stitches before attachment.
Fasten off. Leave 25 cm tail on the outer ear.
Wings (Make 2)
Yarn: Lavender, optional blush edging
Ch 8.
Row 1: starting in 2nd ch from hook, sc 7, ch 1, turn (7)
Row 2: inc, sc 5, inc, ch 1, turn (9)
Row 3: inc, sc 7, inc, ch 1, turn (11)
Row 4: sc across, ch 1, turn (11)
Row 5: dec, sc 7, dec, ch 1, turn (9)
Row 6: dec, sc 5, dec, ch 1, turn (7)
Row 7: dec, sc 3, dec, ch 1, turn (5)
Edging: rotate work. Sc evenly down the first side. Along the lower edge, work (ch 4, sl st into the next edge point) 3 times to create the bat-wing membranes. Sc evenly up the opposite side and across the top edge.
Work the edging in blush pink if you want the inner-wing contrast seen in the photo.
Fasten off. Leave 25 cm tail.
Tail (Make 1)
Yarn: Blush, Lavender, Periwinkle optional fade
R1: 6 sc in MR (6)
R2: sc around (6)
R3: inc x6 (12)
R4: sc around (12)
R5: sc around (12)
R6: sc around (12)
R7: (sc 1, inc) x6 (18)
R8: sc around (18)
R9: sc around (18)
R10: sc around (18)
R11: sc around (18)
R12: sc around (18)
R13: (sc 2, inc) x6 (24)
R14: sc around (24)
R15: sc around (24)
R16: sc around (24)
R17: sc around (24)
R18: sc around (24)
R19: sc around (24)
R20: (sc 3, inc) x6 (30)
R21: sc around (30)
R22: sc around (30)
R23: sc around (30)
R24: sc around (30)
R25: sc around (30)
R26: (sc 4, inc) x6 (36)
R27: sc around (36)
R28: sc around (36)
R29: sc around (36)
Stuff the tip lightly and the final third firmly. Curve the tail while stuffing so it holds the front loop shape.
Fasten off. Leave 35 cm tail.
Spikes (Make 9)
Yarn: Lavender or Periwinkle
R1: 6 sc in MR (6)
R2: sc around (6)
R3: inc x6 (12)
R4: sc around (12)
Do not stuff. Use 4 spikes on the crown and 5 along the tail ridge, reducing overlap near the curl.
Fasten off. Leave 15 cm tail.
Cheek Patches (Make 2)
Yarn: Blush pink
R1: 6 sc in MR (6)
R2: inc x6 (12)
R3: sc around (12)
These sit slightly below the eye line, not centered under the eyes.
Fasten off. Leave 15 cm tail.
Mini Stars (Make 3)
Yarn: Pale yellow
Ch 5 and join with sl st to form a ring.
Point 1: ch 3, sl st in 2nd ch from hook, sl st in next ch, sl st in ring.
Point 2: ch 3, sl st in 2nd ch from hook, sl st in next ch, sl st in ring.
Point 3: ch 3, sl st in 2nd ch from hook, sl st in next ch, sl st in ring.
Point 4: ch 3, sl st in 2nd ch from hook, sl st in next ch, sl st in ring.
Point 5: ch 3, sl st in 2nd ch from hook, sl st in next ch, sl st in ring.
Sew one star near the brow and the others on the wing or tail for balance.
Fasten off. Leave 12 cm tail.
Assembly
- Sew the snout to the lower front of the head and add a small amount of stuffing before closing the seam.
- Embroider the smile at the center of the snout and add short curved brow lines above the eyes.
- Stitch the cheek patches low on the face so the lower edge aligns roughly with the snout corners.
- Sew the horns to the crown, leaving one spike-width between them.
- Attach the four crown spikes in a line from the forehead toward the back of the head.
- Sew the inner ears to the outer ears, pinch the bases, then attach the ears high and wide on the head sides.
- Sew the body to the head with the belly centered under the snout, then attach the belly patch to the front body.
- Attach the arms at the upper front body and the back legs at the lower sides in a seated angle.
- Sew the wings to the upper back, then attach the tail at the rear base and curve it forward before the final stitches are tightened.
- Add the tail spikes and mini stars, then weave all ends deep into the body core.
The finished dragon should sit on both back legs and the tail curve, with the head balanced above the belly patch.
7 Technical Tips
- Marker drift on the head: Move the stitch marker every 2 rounds once you reach 36 stitches. A drifting marker pulls the face off-center and shifts the horn line.
- Stuffing firmness: Fill the head to about 80% of maximum volume and the tail tip to about 50%. Overfilled tails will not curl; underfilled heads collapse around large eyes.
- Invisible decreases on visible zones: Use invisible dec on the front half of the head and the chest. Standard decreases create short horizontal dents that show up under bright photo lighting.
- Eye placement timing: Test the eye posts before locking washers, even if the count says R10–R11 and 10 stitches apart. A one-stitch shift outward can make the snout look narrow instead of broad.
- Velvet substitution: If you switch from worsted cotton to velvet, drop the hook from 4 mm to 3.5 mm. Otherwise the wing edges and horn bases open up and the stuffing flashes through.
- Pinning before sewing: Pin both ears first, then both wings, and compare left-right height from the front. A 3 mm mismatch is enough to make the head tilt look accidental.
- Tail end security: Weave the tail yarn end at least 5 cm back into the body core after sewing. A short buried tail can work loose because the curled tail carries more weight than the wings.
Conclusion
Start with the head, dry-fit the ears, and lock the horn spacing before you sew anything to the body. That order keeps the face width, ear span, and tail balance under control, which is the main engineering issue in this dragon amigurumi crochet pattern. Next, photograph the side view and front view before final weaving so you can check the wing height and tail curve. Pin your finished version to Pinterest, post one clean front shot on Instagram, and tag it with #PastelBabyDragon. Record the eye size and horn gap you used for the next build. Did you keep the crown spikes short, or did you extend the tail ridge farther into the front curl?









