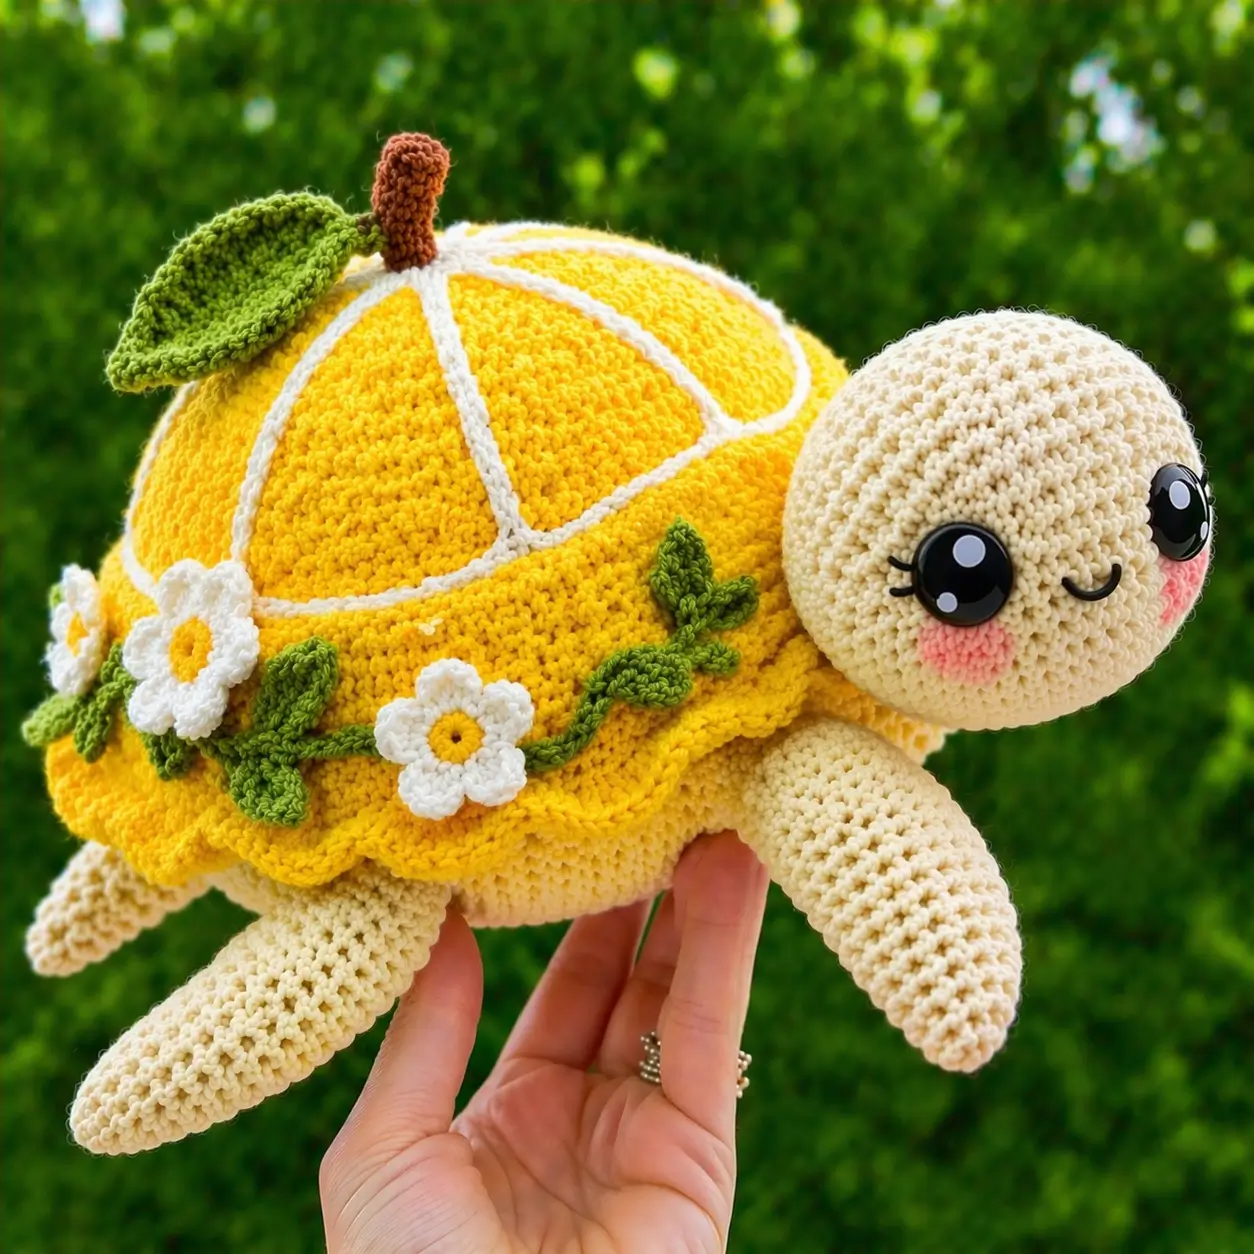
A turtle shell does not come with lemon wedges, so the citrus geometry has to be built after the dome is stable. This lemon turtle amigurumi crochet pattern uses a cream body, yellow shell, white segment ridges, floral trim, and a medium-size head for an intermediate build that finishes around 23 to 25 cm. It works well for summer market stock because the silhouette reads clearly from a distance.
The Design: What Makes Lemon Turtle Different
The shell is the whole project. A standard sea turtle dome is not enough here, because lemon wedges need visible separation lines that start near the stem and run cleanly to the lower shell edge. That is why this version uses a plain yellow dome first, then adds white surface ridges on top instead of forcing color changes into every round. The second structural choice is the oversized cream head. You need that larger face plane to hold big safety eyes, blush circles, and a short embroidered smile without crowding. The third choice is the shell ruffle. It breaks the hard citrus outline and gives the floral vine a place to sit.
A common mistake with citrus turtle amigurumi is flattening the shell too early. The maker tries to attach stripes before the dome is stuffed and the wedge spacing drifts. In finished work, that reads less like a lemon slice and more like random paneling. That problem appears often in fruit turtle crochet adaptations, especially when the shell edge has no anchor row for trim.
Project Info at a Glance
| Skill Level | Time | Finished Size | Hook | Best For |
|---|---|---|---|---|
| Intermediate | 4–6 hours | 23–25 cm | 5.0 mm | summer market makes, shelf decor, themed gifts |
Time is an editor estimate based on visible part count in the uploaded photo.
Materials and Tools
Yarn
The public lemon turtle listings do not agree on one exact fiber system. A practical match for the uploaded photo is a smooth DK-to-worsted yarn with firm stitch definition rather than velvet.
- Cream — DK/Worsted look — about 60 g — Paintbox Cotton Aran or similar
- Lemon yellow — DK/Worsted look — about 70 g — Paintbox Cotton Aran or similar
- White — DK/Worsted look — about 25 g — for segment ridges and flowers
- Olive green — DK/Worsted look — about 15 g — for leaves and vine
- Brown — DK/Worsted look — about 5 g — for stem
- Blush pink — DK/Worsted look — scraps — for cheek patches
Tools
- Hook 4.0 mm or 4.5 mm for a photo-like cotton finish; use 5.0 mm if you want the larger plush scale
- Safety eyes 10 mm for a moderate face, or size up visually if using heavier yarn
- Stuffing
- Tapestry needle
- Stitch markers
- Pins
- Black embroidery thread
Abbreviations
MR / sc / inc / dec / sl st / ch / BLO / FLO / hdc / dc
Use invisible decrease wherever a dec appears on visible outer surfaces. It keeps the cream head and yellow shell cleaner than a standard two-stitch decrease.
Pattern — Step by Step
Continuous spiral unless noted. Counts are shown in brackets.
Head (Make 1)
Yarn: cream
R1: 6 sc in MR (6)
R2: inc x6 (12)
R3: (sc, inc) x6 (18)
R4: (2 sc, inc) x6 (24)
R5: (3 sc, inc) x6 (30)
R6: (4 sc, inc) x6 (36)
R7–11: sc around (36)
Place safety eyes between R8 and R9, 8 stitches apart. Add embroidered smile after eye placement.
R12: (4 sc, dec) x6 (30)
R13: (3 sc, dec) x6 (24)
R14: (2 sc, dec) x6 (18)
Stuff firmly but keep the neck opening soft enough for sewing.
R15: (sc, dec) x6 (12)
R16: dec x6 (6)
Fasten off. Leave a 25 cm tail.
Body Base / Belly (Make 1)
Yarn: cream
R1: 6 sc in MR (6)
R2: inc x6 (12)
R3: (sc, inc) x6 (18)
R4: (2 sc, inc) x6 (24)
R5: (3 sc, inc) x6 (30)
R6: (4 sc, inc) x6 (36)
R7: (5 sc, inc) x6 (42)
R8–10: sc around (42)
R11: BLO sc around (42)
Fasten off. Leave a 30 cm tail.
Shell Top (Make 1)
Yarn: lemon yellow
R1: 6 sc in MR (6)
R2: inc x6 (12)
R3: (sc, inc) x6 (18)
R4: (2 sc, inc) x6 (24)
R5: (3 sc, inc) x6 (30)
R6: (4 sc, inc) x6 (36)
R7: (5 sc, inc) x6 (42)
R8–10: sc around (42)
Fasten off. Leave a 30 cm tail.
Front Flippers (Make 2)
Yarn: cream
R1: 6 sc in MR (6)
R2: inc x6 (12)
R3: (sc, inc) x6 (18)
R4: (2 sc, inc) x6 (24)
R5–8: sc around (24)
Flatten lightly.
R9: sc through both sides across (12)
Fasten off. Leave a 20 cm tail.
Back Flippers (Make 2)
Yarn: cream
R1: 6 sc in MR (6)
R2: inc x6 (12)
R3: (sc, inc) x6 (18)
R4–6: sc around (18)
Flatten lightly.
R7: sc through both sides across (9)
Fasten off. Leave a 20 cm tail.
Tail (Make 1)
Yarn: cream
R1: 6 sc in MR (6)
R2: inc x6 (12)
R3–4: sc around (12)
R5: dec x6 (6)
Fasten off. Leave a 15 cm tail.
Cheek Patches (Make 2)
Yarn: blush pink
R1: 6 sc in MR (6)
R2: inc x6 (12)
Sl st to close.
Fasten off. Leave a 12 cm tail.
Segment Ridges (Make 6)
Yarn: white
Ch 18.
Starting in second ch from hook: sl st in each ch across.
Fasten off. Leave a 20 cm tail at both ends.
Shell Ruffle (Make 1)
Yarn: lemon yellow
Join yarn to the front loop left from Body Base R11.
Round 1: (sl st, hdc, 3 dc in next st, hdc, sl st) over 5 stitches, repeat around.
Fasten off. Weave in ends.
Flowers (Make 3)
Yarn: yellow center, white petals
Center:
R1: 6 sc in MR (6)
R2: inc x6 (12)
Fasten off yellow.
Petals in white, working into the 12 stitches:
(sl st, ch 2, 2 dc in next st, ch 2, sl st in next st) x6
Fasten off. Leave a 20 cm tail.
Vine (Make 1)
Yarn: olive green
Ch 36.
Starting in second ch from hook: sl st in each ch across.
Fasten off. Leave a 25 cm tail.
Small Leaves on Vine (Make 4)
Yarn: olive green
Ch 7.
Starting in second ch from hook: sl st, sc, hdc, dc, hdc, sc.
Work on the opposite side of the chain: sc, hdc, dc, hdc, sc.
Fasten off. Leave a 12 cm tail.
Top Leaf (Make 1)
Yarn: olive green
Ch 10.
Starting in second ch from hook: sl st, sc, hdc, dc, dc, hdc, sc, sl st.
Work opposite side: sl st, sc, hdc, dc, dc, hdc, sc, sl st.
Fasten off. Leave a 18 cm tail.
Stem (Make 1)
Yarn: brown
R1: 6 sc in MR (6)
R2–4: sc around (6)
Fasten off. Leave a 15 cm tail.
White Rim Cord (Optional, Make 1)
Yarn: white
Ch 48.
Starting in second ch from hook: sl st in each ch across.
Fasten off.
Assembly
- Sew the head to the front of the body base, centered and slightly angled upward.
- Sew the front flippers to the left and right of the head, aligned with the widest part of the body base.
- Sew the back flippers near the rear third of the body base.
- Sew the tail between the back flippers.
- Place the shell top over the body base, stuff the shell area evenly, then sew shell and base together all the way around.
- Position the six segment ridges so they radiate from the future stem point to the shell edge; pin first, then sew.
- Sew the stem at the top center where the ridges meet, then attach the top leaf at one side of the stem.
- Attach the vine around the lower shell circumference, then sew the small leaves at varied angles along it.
- Sew the three flowers over the vine, spacing them with one centered at front and two offset toward the sides.
- Stitch on the cheek patches just below and slightly outward from the eyes, then embroider the smile.
The piece is complete once the shell wedge lines stay evenly spaced when viewed from above.
7 Technical Tips
- Marker drift on the shell: Put a marker at the top center before sewing the ridges. If the first white ridge misses center by even 3 to 4 mm, the full lemon slice layout will lean.
- Overstuffed head failure: A hard-packed head pushes the eye washers outward and rounds off the cheek area too much. Stop stuffing when the head feels full but still compresses slightly under thumb pressure.
- Invisible decrease placement: Use invisible dec on the face-side rounds only. A standard decrease there leaves a visible notch that catches light around the cream muzzle.
- Eye placement timing: Insert the eyes before the final third of head closure. Waiting until after R14 makes washer placement awkward and can distort the round between R8 and R9.
- Ruffle collapse: If the ruffle folds under the shell, the edge stitches are too tight. Go up by 0.5 mm for the ruffle round only or add one extra dc in every second shell repeat.
- Pinning the vine: Pin the vine in at least six places before sewing. Fewer anchor points let it creep upward and hide the yellow shell edge.
- Tail weaving: Do not trim the tail yarn short after sewing. Run it through at least 4 cm of interior stitches, because the rear join takes stress when the plush is picked up by the shell.
Conclusion
This lemon turtle amigurumi crochet pattern works because the shell is treated as two layers: a stable yellow dome first, then citrus mapping, then trim. That order keeps the wedge lines readable and gives the flowers a defined band to sit on. Next, draft your color plan on paper and mark the six ridge paths before sewing anything to the shell. Share the finished turtle on Pinterest and Instagram with the tag #LemonTurtlePattern. One detail matters most here: did you angle the top leaf toward the stem or away from it?









