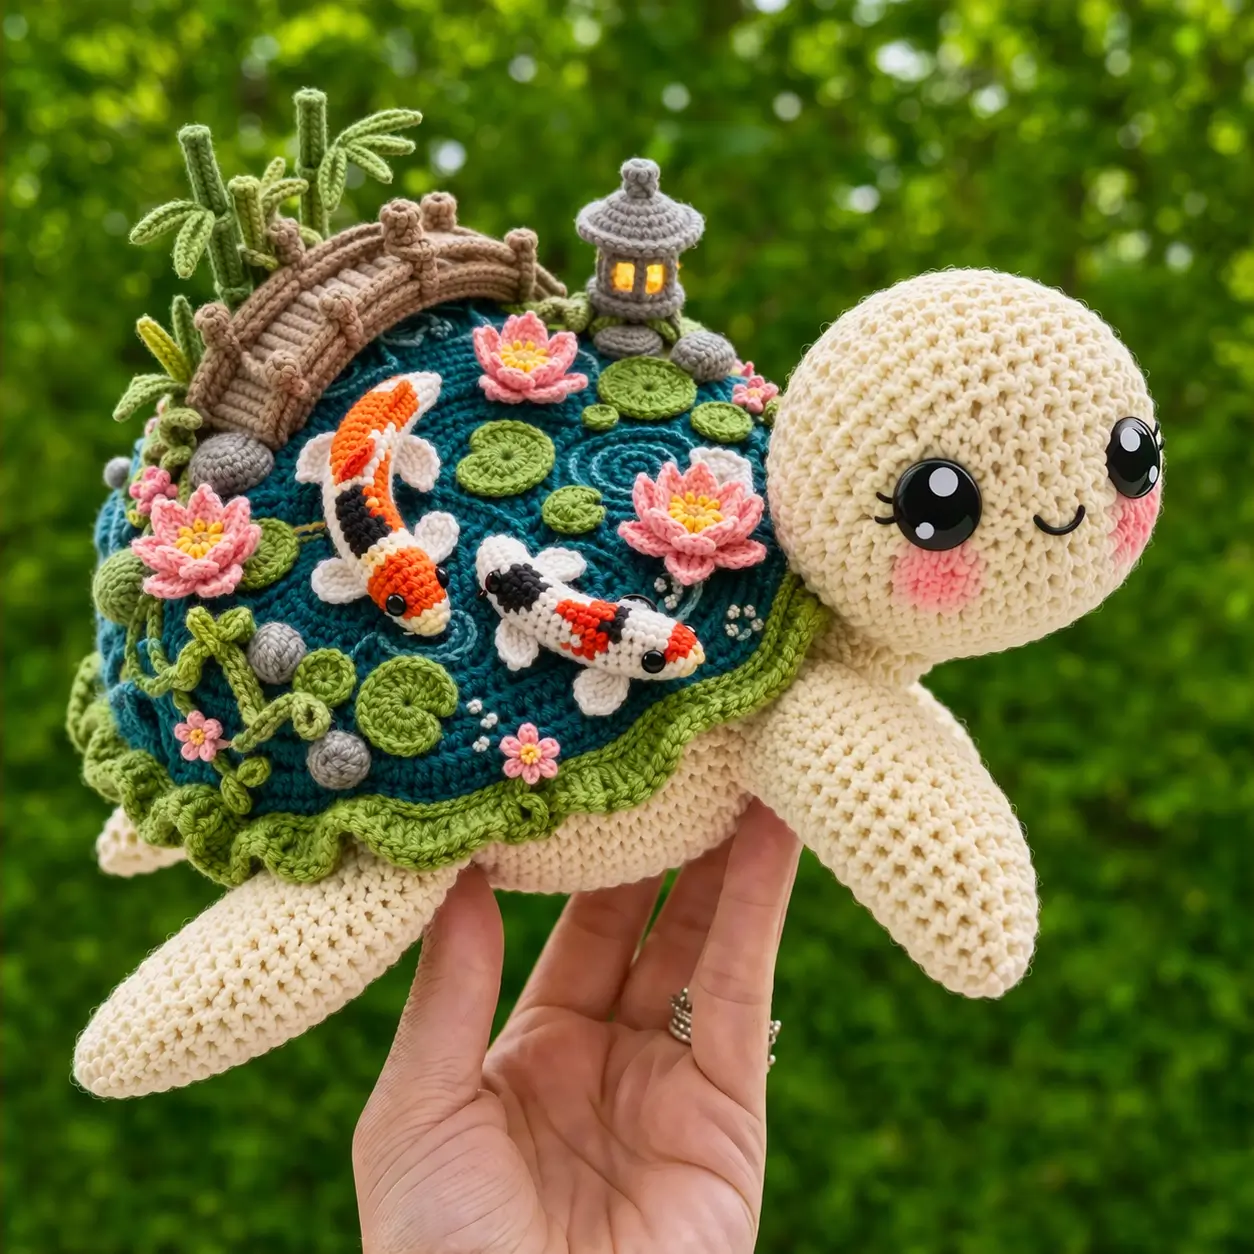
A turtle shell is already a dome; turning it into a koi pond means every added piece has to sit on that curve without dragging the toy sideways. This turtle amigurumi crochet pattern uses worsted yarn, a 3.75 mm hook, and medium shaping to build a display piece around a 15 cm class turtle. Intermediate skill fits best. The project works well as shelf decor because the shell carries the full scene without needing a separate stand.
The Design: What Makes This Turtle Different
Most turtle builds treat the shell as a color block. This one treats it as architecture. The first structural decision is a broad, low body so the finished turtle can carry the raised pond panel without rolling. The second is a large rounded head with short neck transition; that keeps the face readable even when the shell is visually busy. Third comes the shell layering itself: a flat-edged pond base, then appliqués, then upright accessories stitched into fixed anchor points.
One common mistake with a sea turtle amigurumi pattern is making all four flippers identical and attaching them at the same angle. Real support comes from offset placement. Front flippers need projection. Back flippers need bracing. That matters even more in a crochet turtle plush with shell embellishment, where a heavy top can twist the silhouette within a few days on display.
Project Info at a Glance
| Skill Level | Time | Finished Size | Hook | Best For |
|---|---|---|---|---|
| Intermediate | 8–10 hours | 15.24 cm class turtle | 3.75 mm | Display decor, themed gifts, photo props |
Materials and Tools
Yarn
- Cream — worsted — 75 g main allowance — cotton or cotton-blend such as Drops Muskat/Lion Brand 24/7 Cotton style weight
- Deep teal — worsted — 20 g — pond top
- Leaf green — worsted — 15 g — pads, vines, shell ruffle
- Brown — worsted — 10 g — bridge
- Gray — worsted — 10 g — lantern and stones
- Pink — worsted — 10 g — lotus flowers and mini blossoms
- Yellow — worsted — 3 g — flower centers
- Orange — worsted — 8 g — koi markings
- Black — worsted — 3 g — koi patches, mouth detail
- White — worsted — 8 g — koi body areas
Tools
- Hook 3.75 mm
- 12 mm safety eyes
- Polyester stuffing
- Tapestry needle
- Stitch markers
- Pins
- Small amount of pink blush or brushed yarn fuzz for cheeks
- Optional battery tea light if the lantern will be posed around one rather than stitched shut
Abbreviations
MR / sc / inc / dec / sl st / ch / BLO / FLO / hdc / dc
Use invisible decrease on all visible shaping rounds so the cream body stays smooth and the head does not develop diagonal collapse lines.
Pattern — Step by Step
Continuous spiral unless noted.
Head (Make 1)
Yarn: cream — Source: Standard amigurumi math adapted to verified medium turtle sizing.
R1: 6 sc in MR (6)
R2: inc x6 (12)
R3: (sc, inc) x6 (18)
R4: (2 sc, inc) x6 (24)
R5: (3 sc, inc) x6 (30)
R6: (4 sc, inc) x6 (36)
R7: (5 sc, inc) x6 (42)
R8–13: sc around (42)
R14: (5 sc, dec) x6 (36)
R15: sc around (36)
R16: (4 sc, dec) x6 (30)
Insert 12 mm eyes between R11 and R12, about 10 sts apart. Embroider smile before final closing.
R17: (3 sc, dec) x6 (24)
R18: (2 sc, dec) x6 (18)
Stuff firmly, with extra fill at the snout side.
R19: (sc, dec) x6 (12)
R20: dec x6 (6)
Fasten off. Leave 20 cm tail.
Body (Make 1)
Yarn: cream — Source: Standard amigurumi math with small plateau for weight control.
R1: 6 sc in MR (6)
R2: inc x6 (12)
R3: (sc, inc) x6 (18)
R4: (2 sc, inc) x6 (24)
R5: (3 sc, inc) x6 (30)
R6–11: sc around (30)
R12: (3 sc, dec) x6 (24)
R13–14: sc around (24)
R15: (2 sc, dec) x6 (18)
Stuff low and firm. Keep the top slightly flatter than the belly.
R16: (sc, dec) x6 (12)
R17: dec x6 (6)
Fasten off. Leave 20 cm tail.
Front Flippers (Make 2)
Yarn: cream — Source: Standard amigurumi math, flattened for paddle shape.
R1: 6 sc in MR (6)
R2: inc x6 (12)
R3: (sc, inc) x6 (18)
R4: (2 sc, inc) x6 (24)
R5: sc around (24)
R6: (2 sc, dec) x6 (18)
R7: sc around (18)
Flatten. Sc through both sides for 8 sts to close the base.
Fasten off. Leave 18 cm tail.
Back Flippers (Make 2)
Yarn: cream — Source: Standard amigurumi math, shorter than front pair.
R1: 6 sc in MR (6)
R2: inc x6 (12)
R3: (sc, inc) x6 (18)
R4: sc around (18)
R5: (sc, dec) x6 (12)
Flatten. Sc through both sides for 5 sts.
Fasten off. Leave 15 cm tail.
Tail (Make 1)
Yarn: cream — Source: Standard amigurumi math.
R1: 4 sc in MR (4)
R2: sc around (4)
R3: (sc, inc) x2 (6)
R4: sc around (6)
Do not stuff. Flatten lightly.
Fasten off. Leave 12 cm tail.
Shell Base: Pond Top (Make 1)
Yarn: deep teal — Source: Standard circular increase math.
R1: 6 sc in MR (6)
R2: inc x6 (12)
R3: (sc, inc) x6 (18)
R4: (2 sc, inc) x6 (24)
R5: (3 sc, inc) x6 (30)
R6: (4 sc, inc) x6 (36)
R7: (5 sc, inc) x6 (42)
R8–10: sc around (42)
Fasten off. Leave 25 cm tail.
Shell Underside Support (Make 1)
Yarn: cream — Source: Standard circular increase math.
R1: 6 sc in MR (6)
R2: inc x6 (12)
R3: (sc, inc) x6 (18)
R4: (2 sc, inc) x6 (24)
R5: (3 sc, inc) x6 (30)
R6: (4 sc, inc) x6 (36)
R7: (5 sc, inc) x6 (42)
Fasten off. Leave 25 cm tail.
Shell Ruffle Edge (Make 1)
Yarn: leaf green — Source: Decorative edging worked into shell perimeter.
Join to any front loop of R10 on shell top.
Rnd 1: hdc around in FLO (42)
Rnd 2: *(sl st, hdc, 2 dc, hdc, sl st) in next 3 sts, sl st in next 3 sts* repeat around.
Fasten off. Weave end to underside.
Cheek Patches (Make 2)
Yarn: pink — Source: Standard flat circle.
R1: 6 sc in MR (6)
R2: inc x6 (12)
Fasten off.
Steam or finger-flatten before stitching under eyes.
Koi Fish Large (Make 1)
Yarn: white with orange and black patches — Source: Standard fish shaping.
R1: 6 sc in MR (6)
R2: inc x6 (12)
R3: (sc, inc) x6 (18)
R4–6: sc around (18)
R7: (sc, dec) x6 (12)
R8–9: sc around (12)
Color-change for patching as desired.
R10: dec x6 (6)
Fasten off head end after stuffing lightly.
Tail:
Ch 5. Starting in 2nd ch from hook: sl st, sc, hdc, sl st. Work opposite side of chain: hdc, sc, sl st.
Sew to back.
Side fins x2: ch 3, 2 hdc in 2nd ch from hook, sl st in next.
Top fin: same as side fin.
Add 6 mm black beads or embroidered eyes if desired.
Koi Fish Small (Make 1)
Yarn: white with orange and black patches — Source: Reduced fish build.
R1: 6 sc in MR (6)
R2: inc x6 (12)
R3–4: sc around (12)
R5: (sc, dec) x4 (8)
R6: sc around (8)
Fasten off after light stuffing.
Tail:
Ch 4. Starting in 2nd ch from hook: sc, hdc, sl st. Opposite side: hdc, sc.
Sew to body.
Small side fins x2: ch 2, 2 hdc in 2nd ch from hook.
Top fin: same.
Lily Pads (Make 7 assorted)
Yarn: leaf green — Source: Flat circle method.
Small pad:
R1: 6 sc in MR (6)
R2: inc x6 (12)
R3: (sc, inc) x6 (18)
Fasten off.
Medium pad:
R1: 6 sc in MR (6)
R2: inc x6 (12)
R3: (sc, inc) x6 (18)
R4: (2 sc, inc) x6 (24)
Fasten off.
Large pad:
R1: 6 sc in MR (6)
R2: inc x6 (12)
R3: (sc, inc) x6 (18)
R4: (2 sc, inc) x6 (24)
R5: (3 sc, inc) x6 (30)
Fasten off.
For each pad, fold a shallow notch and tack one edge over the other with one stitch.
Lotus Flowers (Make 3 large, 2 small)
Yarn: pink and yellow — Source: Layered petal appliqué.
Center:
R1: 6 sc in MR (6)
R2: inc x6 (12) in yellow
Fasten off.
Petal layer 1: join pink to any st
*(ch 3, dc in same st, ch 3, sl st in next st)* x6
Fasten off.
Petal layer 2 for large flowers only: join behind first layer
*(ch 4, 2 dc in same anchor, ch 4, sl st in next anchor)* x6
Fasten off.
Mini Blossoms (Make 4)
Yarn: pink with yellow center — Source: Simple chain petals.
Center: 5 sc in MR (5)
Petals: *(ch 2, sl st in next st)* x5
Fasten off.
Stones (Make 6 assorted)
Yarn: gray — Source: Mini oval stuffing units.
Small stone:
R1: 6 sc in MR (6)
R2: sc around (6)
R3: dec x3 (3)
Stuff lightly. Fasten off.
Medium stone:
R1: 6 sc in MR (6)
R2: inc x6 (12)
R3: sc around (12)
R4: dec x6 (6)
Stuff lightly. Fasten off.
Vines (Make 2)
Yarn: leaf green — Source: Freeform chain curl.
Ch 26.
Starting in 2nd ch from hook: 2 sc in each ch across for a natural spiral.
Fasten off. Leave tails for stitching.
Bamboo Stalks (Make 3)
Yarn: sage/green — Source: Narrow tube.
R1: 4 sc in MR (4)
R2–12: sc around (4)
Stuff very lightly or insert floral wire only if the piece is decorative and not for children.
Fasten off. Leave long tail.
Bamboo Leaves (Make 6)
Yarn: light green — Source: Chain leaf.
Ch 7.
Starting in 2nd ch from hook: sl st, sc, hdc, dc, hdc, sl st.
Work one sl st along the opposite side if a firmer edge is needed.
Fasten off.
Bridge (Make 1)
Yarn: brown — Source: Worked in rows with side rails.
Base:
Ch 13.
Row 1: sc in 2nd ch from hook and across (12)
Row 2–6: ch 1, turn, sc across (12)
Fasten off.
Arch shaping: lightly steam and curve over a rolled towel before assembly.
Rails (make 2):
Ch 14.
Row 1: sl st in 2nd ch from hook and across.
Fasten off.
Posts (make 6):
Ch 4, sl st back down chain.
Fasten off.
Lantern (Make 1)
Yarn: gray — Source: Stacked cylinders.
Bottom:
R1: 6 sc in MR (6)
R2: inc x6 (12)
R3: BLO sc around (12)
R4–5: sc around (12)
R6: dec x6 (6)
Fasten off.
Top cap:
R1: 6 sc in MR (6)
R2: inc x6 (12)
R3: (sc, inc) x6 (18)
R4: BLO sc around (18)
R5: (sc, dec) x6 (12)
R6: dec x6 (6)
Fasten off.
Knob:
R1: 4 sc in MR (4)
R2: sc around (4)
Fasten off.
Window panel: embroider vertical yellow bars or insert a fixed felt panel.
Assembly
- Sew the head to the front third of the body, slightly angled upward.
- Attach the front flippers just below the shell line, one round behind the head seam.
- Sew the back flippers farther apart than the front pair so they act as rear stabilizers.
- Add the tail centered at the back body seam.
- Join the shell top to the shell underside support around the edge, stuff lightly only at center, then stitch the completed shell to the body.
- Sew the cheek patches under the eyes and brush lightly for the blush effect.
- Position the large lily pads first, then place the koi fish so they create a diagonal flow across the shell.
- Add lotus flowers, mini blossoms, stones, and vines in the remaining open spaces without covering the shell edge.
- Stitch the bridge through the shell and into the body-facing shell layer so it does not lift. Add bamboo and leaves behind the bridge, then sew the lantern to a flat pad area.
- Check balance on a table, tighten any loose accessory seams, and weave in all tails through the shell interior.
The completed turtle should rest flat, with the shell scene centered over the body rather than tilting toward the head.
7 Technical Tips
- Mark the shell center before adding appliqués. A pond scene drifts fast on a dome, and even a 5 mm offset becomes visible once the bridge goes on.
- Pack the body more firmly than the head. A soft body collapses under accessory weight and makes the shell sag at the sides.
- Use invisible decreases on cream rounds only. Standard decreases leave small bars that show most clearly around the jaw and neck curve.
- Insert safety eyes before the final two decrease rounds. On this head size, late placement can crack surrounding stitches and distort the cheek line.
- Keep front flippers about 1 cm longer in visual reach than back flippers. Equal lengths make the turtle read as flat rather than forward-moving.
- Pin the bridge at three points before sewing. One seam at each end is not enough on a curved shell, and the center will float.
- Work lily pads flat, then tack only one edge. Fully stitched pads lose the lifted-water look and make the shell surface appear pasted over.
- Limit stuffing inside koi fish to a trace amount. Overfilled fish sit like sausages and pull the shell décor upward.
- Weave tails into the shell interior, not into the appliqué itself. Thin decorative pieces can buckle when multiple tails are buried in the same spot.
- For worsted cotton, keep flower centers tight and outer petals looser. That contrast stops the lotus layers from collapsing inward.
- Place the lantern on a stitched pad or stone cluster. Hanging it alone from the pond top can stretch the teal rounds over time.
- Check display balance after each upright accessory. A shell scene with bamboo, bridge, and lantern can gain weight asymmetrically within minutes.
- Use two stitch markers on the head: one for round start, one for true center front. The face goes crooked when the smile is aligned to the round marker instead of the nose axis.
- Leave at least 2 cm clear around the shell rim. Crowd the edge, and the ruffle disappears under the décor instead of framing it.
Conclusion
The hard part in a turtle amigurumi crochet pattern like this is not the body. It is the shell planning. Build the turtle first, then treat the pond layer as a mapped composition with fixed anchor zones for fish, flowers, bridge, and lantern. That order keeps the structure stable and the silhouette readable from all sides. Save this version to Pinterest before you start assembly, then post your finished piece on Instagram with #KoiPondTurtlePattern so the shell layout is easy to compare. For the next step, test your appliqué placement on paper circles before sewing. Which detail matters more on your turtle: the arched bridge or the koi path?









