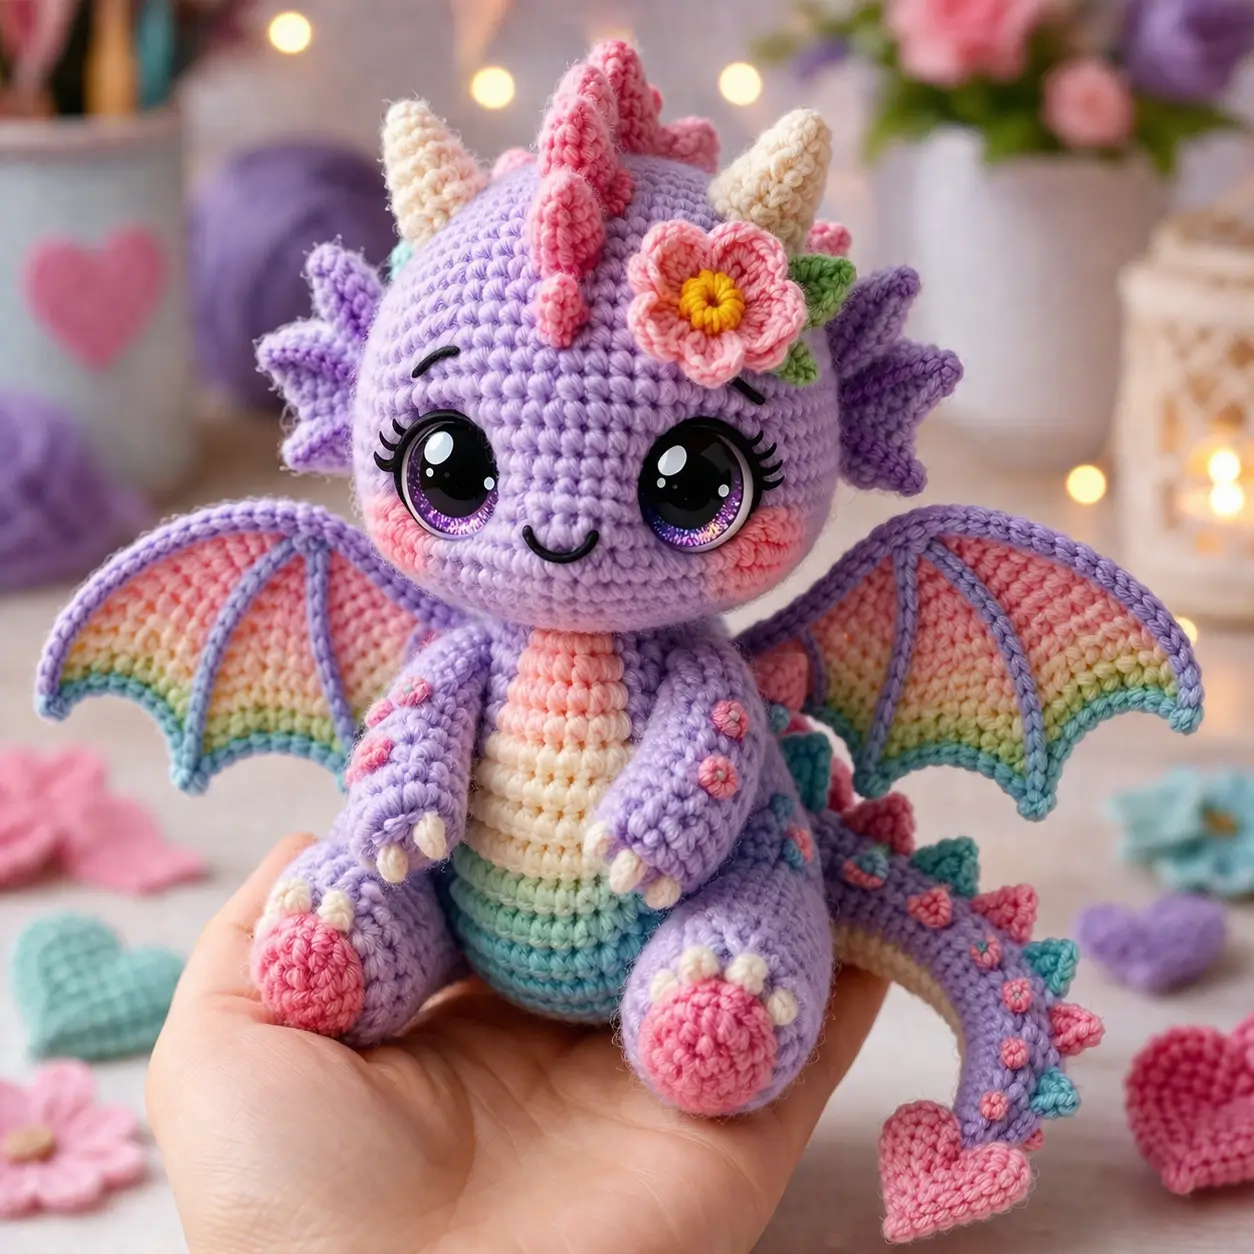
A dragon with both horns and bat wings fails fast if the forehead ridge is too short. This dragon amigurumi crochet pattern is built for a seated pastel dragon with a 4 mm hook, medium-weight yarn, and large 18 mm eyes, finishing at about 14 cm tall. The project sits in the intermediate range because of assembly and color placement. It works well as shelf decor because the compact body keeps the wings visible from the front.
The Design: What Makes This Dragon Different
This version is not a long-bodied western dragon. The body is shortened on purpose so the head reads first, the wings stay outside the silhouette, and the tail can curve forward without pulling the figure backward. A second structural choice is the broad face with a medium 36-stitch head plateau. That width leaves room for oversized eyes and cheek patches without crushing the muzzle line. Third, the wing membrane is handled as a flat row-built insert rather than a stuffed piece. That keeps the edge crisp and the rainbow color bands readable.
One common maker mistake with a pastel dragon amigurumi is placing the wings too low on the back. The result is a figure that looks shoulderless and unstable. In most current dragon patterns, wings, spikes, and horns are present, but flower applique and blush circles are usually absent. That is where this sitting dragon crochet pattern separates itself from the generic fantasy build.
Project Info at a Glance
| Skill Level | Time | Finished Size | Hook | Best For |
|---|---|---|---|---|
| Intermediate | 6–8 hours | 14 cm seated | 4 mm | display gift, nursery shelf, fantasy decor |
Materials and Tools
Yarn
- Lavender — medium / worsted — 200 g total main allocation benchmark — Yarn and Colors Epic or similar cotton blend
- Pink — medium / worsted — 40 g accent allocation benchmark — same brand family
- Cream — medium / worsted — small amount
- Mint — medium / worsted — small amount
- Aqua — medium / worsted — small amount
- Yellow — medium / worsted — very small amount
- Green — medium / worsted — very small amount
Tools
- Hook 4 mm
- 18 mm safety eyes for the oversized look shown in the photo build reference set
- Polyfill stuffing
- Tapestry needle
- Stitch markers
- Pins
- Black embroidery thread for brows and smile
Abbreviations
MR = magic ring
sc = single crochet
inc = increase
dec = invisible decrease
sl st = slip stitch
ch = chain
BLO = back loop only
FLO = front loop only
hdc = half double crochet
dc = double crochet
Invisible decrease matters here because a standard decrease leaves ridges on the forehead and muzzle taper.
Pattern — Step by Step
Continuous spiral unless noted.
Head (Make 1)
Yarn: lavender — Standard amigurumi math based on current dragon head ranges.
R1: 6 sc in MR (6)
R2: inc x6 (12)
R3: (sc 1, inc) x6 (18)
R4: (sc 2, inc) x6 (24)
R5: (sc 3, inc) x6 (30)
R6: (sc 4, inc) x6 (36)
R7: sc around (36)
R8: sc around (36)
R9: sc around (36)
R10: sc around (36)
R11: sc around (36)
R12: sc around (36)
R13: (sc 4, dec) x6 (30)
R14: (sc 3, dec) x6 (24)
Insert 18 mm eyes between R9 and R10, about 14 stitches apart. Add brows before closing.
R15: (sc 2, dec) x6 (18)
R16: (sc 1, dec) x6 (12)
Stuff firmly at the cheeks and crown.
R17: dec x6 (6)
Fasten off. Leave a 25 cm tail.
Body (Make 1)
Yarn: lavender — Standard amigurumi math for a seated lower body.
R1: 6 sc in MR (6)
R2: inc x6 (12)
R3: (sc 1, inc) x6 (18)
R4: (sc 2, inc) x6 (24)
R5: (sc 3, inc) x6 (30)
R6: (sc 4, inc) x6 (36)
R7: sc around (36)
R8: sc around (36)
R9: sc around (36)
R10: sc around (36)
R11: (sc 4, dec) x6 (30)
R12: sc around (30)
R13: (sc 3, dec) x6 (24)
R14: sc around (24)
R15: (sc 2, dec) x6 (18)
Stuff the lower half hard enough to keep a seated base.
R16: sc around (18)
R17: (sc 1, dec) x6 (12)
R18: dec x6 (6)
Fasten off. Leave a 25 cm tail.
Belly Panel (Make 1)
Yarn: cream, pink, cream, mint, aqua by rows — Original applique.
R1: ch 8, starting in 2nd ch from hook: sc 6, 3 sc in last ch, sc 5 on opposite side, inc in last st (16)
R2: inc, sc 5, inc x3, sc 5, inc x2 (22)
R3: sc 1, inc, sc 5, (sc 1, inc) x3, sc 5, (sc 1, inc) x2 (28)
R4: sc around (28)
R5: sc around (28)
Change color each round to create visible pastel stripes.
Fasten off. Leave a 30 cm tail.
Arms / Front Legs (Make 2)
Yarn: lavender; claws in cream by embroidery or small color-tip change.
R1: 6 sc in MR (6)
R2: (sc 1, inc) x3 (9)
R3: sc around (9)
R4: sc around (9)
R5: sc around (9)
R6: (sc 1, dec) x3 (6)
R7: sc around (6)
R8: sc around (6)
R9: sc around (6)
R10: sc around (6)
Light stuffing only at the paw end.
Fasten off. Leave a 20 cm tail.
Back Legs (Make 2)
Yarn: sole pink, leg lavender.
R1: 6 sc in MR (6)
R2: inc x6 (12)
R3: (sc 1, inc) x6 (18)
R4: BLO sc around (18)
Change to lavender.
R5: sc around (18)
R6: sc around (18)
R7: (sc 1, dec) x6 (12)
R8: sc around (12)
R9: sc around (12)
R10: sc around (12)
Stuff the foot heavily and the upper leg lightly. Add three cream claws.
Fasten off. Leave a 25 cm tail.
Wings (Make 2)
Yarn: wing bones lavender; membrane in pink, cream, yellow, mint, aqua — row construction follows the common flat-membrane method used in many dragon builds.
Foundation: ch 12
Row 1: sc in 2nd ch from hook and across (11)
Row 2: ch 1, turn, dec, sc 7, dec (9)
Row 3: ch 1, turn, dec, sc 5, dec (7)
Row 4: ch 1, turn, dec, sc 3, dec (5)
Row 5: ch 1, turn, dec, sc 1, dec (3)
Border: sc evenly around the wing.
Work surface sl st lines from top edge to lower scallops for the wing bones. Change membrane color by row to get the rainbow spread visible in the photo.
Fasten off. Leave a 30 cm tail.
Horns (Make 2)
Yarn: cream — Standard cone shaping.
R1: 6 sc in MR (6)
R2: sc around (6)
R3: (sc 2, inc) x2 (8)
R4: sc around (8)
R5: (sc 3, inc) x2 (10)
R6: sc around (10)
Fasten off. Leave a 20 cm tail.
Forehead Spikes (Make 5)
Yarn: pink — Standard cone shaping.
R1: 4 sc in MR (4)
R2: sc around (4)
R3: inc x4 (8)
R4: sc around (8)
Fasten off. Leave a 12 cm tail.
Side Head Frills (Make 2)
Yarn: lavender — original fan piece.
Row 1: ch 10
Row 2: in 2nd ch from hook work: sl st, sc, hdc, dc, hdc, sc, sl st, sl st, sl st (9 working points)
Make 3 pieces for each side and sew them together at the base.
Fasten off. Leave a 15 cm tail per cluster.
Tail (Make 1)
Yarn: lavender.
R1: 6 sc in MR (6)
R2: sc around (6)
R3: (sc 1, inc) x3 (9)
R4: sc around (9)
R5: (sc 2, inc) x3 (12)
R6: sc around (12)
R7: (sc 3, inc) x3 (15)
R8: sc around (15)
R9: (sc 4, inc) x3 (18)
R10: sc around (18)
R11: sc around (18)
R12: sc around (18)
R13: sc around (18)
R14: sc around (18)
R15: sc around (18)
R16: sc around (18)
R17: (sc 4, dec) x3 (15)
R18: sc around (15)
R19: (sc 3, dec) x3 (12)
R20: sc around (12)
Stuff lightly so the tail can curve. Add pink and aqua spikes after assembly.
Fasten off. Leave a 30 cm tail.
Tail Spikes (Make 8)
Yarn: alternate pink and aqua.
R1: 4 sc in MR (4)
R2: sc around (4)
R3: inc x4 (8)
Fasten off. Leave a 10 cm tail.
Heart Tail Tip (Make 1)
Yarn: pink — accessory detail from the photo.
Ch 4. In first ch work: 3 dc, ch 1, 3 dc, ch 1, sl st.
Fasten off. Leave a 15 cm tail.
Cheek Patches (Make 2)
Yarn: blush pink — flat circle.
R1: 6 sc in MR (6)
R2: inc x6 (12)
R3: sc around (12)
Fasten off. Leave a 15 cm tail.
Flower Accessory (Make 1)
Yarn: yellow center, pink petals, green leaves.
Center
R1: 6 sc in MR (6)
Join pink. In each stitch work: (sl st, ch 2, 2 dc, ch 2, sl st) x6 petals
Fasten off.
Leaves (Make 2)
Ch 5, starting in 2nd ch from hook: sl st, sc, hdc, sl st (4)
Fasten off. Leave tails for sewing.
Assembly
- Sew the head to the body with the face centered over the seated base.
- Stitch the belly panel to the front body, keeping the top edge just below the neck join.
- Add the cheek patches under the eyes, one stitch below the lower eye line.
- Embroider the smile and nostrils, then add brows with short curved stitches.
- Sew the back legs at the lower front sides so the dragon sits without rocking.
- Attach the arms slightly below the neck, angled inward toward the belly panel.
- Sew the horns on top of the head and place the five forehead spikes between them and the brow line.
- Attach the side head frill clusters just behind the eye line.
- Sew the wings high on the upper back with the top edge close to the head seam.
- Attach the tail at the back center, then add tail spikes, the heart tip, and the flower with leaves on one side of the head.
The piece is complete when it stands in a seated pose without wing twist and the tail curve does not pull the body off center.
7 Technical Tips
- Mark the first stitch of every round. Losing the round start by even one stitch will shift the forehead spikes off center and the wings will not match when viewed from the front.
- Pack the lower body firmer than the head. A seated dragon that measures about 14 cm needs a dense base, or the head weight will rotate the body backward.
- Use invisible decreases on the face rounds only. Standard decreases leave small bars that show under large eyes and beside cheek appliques.
- Install the eyes before the last two decrease rounds. Large 18 mm eyes need room for washers; waiting too long can crack the stitch path or distort the forehead.
- Pin the wings before sewing and check the top seam height. If one wing starts more than 2 rounds lower than the other, the dragon will read slumped from the front.
- Do not overstuff the arms. Overfilled front legs stop the paws from resting against the belly panel and create a stiff toy-like pose instead of the compact chibi posture.
- Weave spike and flower tails back through at least 3 direction changes. Single-pass tail hiding tends to loosen first on narrow cones such as horns, spikes, and petal joins.
Conclusion
The build works because the proportions stay controlled: a 36-stitch head, compact seated body, high wing placement, and small surface accessories that do not crowd the eyes. That combination gives the figure a clear front-facing silhouette and keeps the rainbow membranes visible in display photos. For the next step, swatch one wing first and confirm the membrane colors before committing to the pair. Then finish the dragon amigurumi crochet pattern, photograph it from the front and three-quarter view, and post it to Pinterest and Instagram with #PastelDragonPattern. One question remains useful during testing: should this dragon keep the flower, or would a second horn ridge read cleaner?









