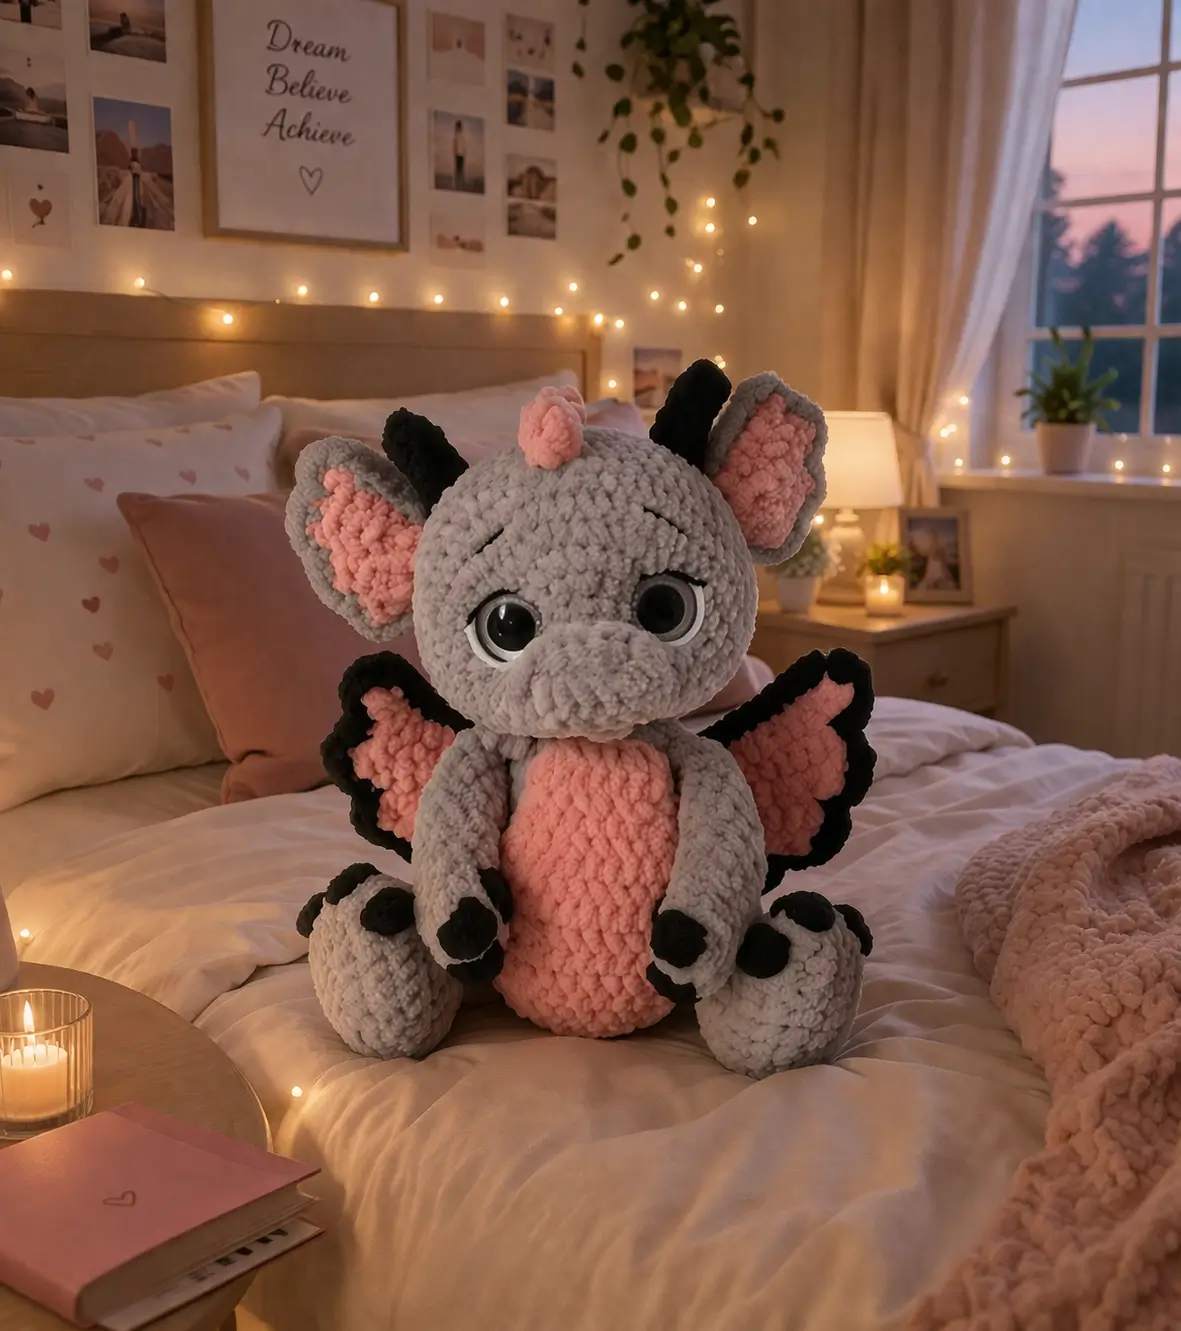
A dragon needs a snout that projects past the eye line; flatten it and the whole toy turns into a bat. This dragon amigurumi crochet pattern uses plush yarn, 12 mm eyes, a medium sitting body, and an intermediate construction sequence with separate wings, ears, and horns. The result is a shelf-stable plush around 23 cm tall in a seated format, useful for nursery decor or photo-ready handmade gift stock.
The Design: What Makes This Dragon Different
This dragon relies on three structural choices. First, the snout is made as a separate oval piece and attached low on the head, which keeps the face from reading as a cat or bat. Second, the ears are larger than the horns, so the silhouette stays readable from the front even when the wings sit behind the body. Third, the legs are oversized and slightly flattened at the base; that gives the sitting dragon amigurumi a wider contact area and stops forward tipping.
A common mistake in a crochet dragon plush pattern is placing the wings too low. That pulls visual weight backward and makes the neck look short. Another one is undersizing the snout. In plush yarn, small shaping disappears fast, so the face needs stronger geometry than a cotton sample does. This is where a velvet dragon amigurumi has different drafting needs from a standard worsted sample.
Project Info at a Glance
| Skill Level | Time | Finished Size | Hook | Best For |
|---|---|---|---|---|
| Intermediate | 6–8 hrs | 23 cm seated reference size | 3.5 mm worsted reference; bulky velvet adjusted to your label and one size down | display plush, nursery shelf, handmade gift stock |
Materials and Tools
Yarn
- Light gray plush yarn — bulky velvet style — 100 g — Himalaya Dolphin Baby or similar reference weight
- Soft pink plush yarn — bulky velvet style — 50 g — same line for belly, ears, inner wings, center horn
- Black plush yarn — bulky velvet style — 50 g — same line for side horns, wing edging, paw pads
- White smooth yarn — small amount — for embroidered eye whites
Tools
- Hook — choose one size smaller than the yarn label recommendation; reference dragon guides list 2.5 mm for sport, 3 mm for DK, 3.5 mm for worsted, while plush yarn is also a valid option
- 12 mm safety eyes
- Polyfill stuffing
- Tapestry needle
- Stitch markers
- Pins
- Black embroidery thread
Abbreviations
MR = magic ring, sc = single crochet, inc = increase, dec = decrease, sl st = slip stitch, ch = chain, BLO = back loop only, FO = fasten off.
Invisible decrease joins the front loops of the next two stitches first, reducing bulk at the decrease line and producing a cleaner plush surface.
Pattern — Step by Step
Continuous spiral unless noted.
Head (Make 1)
Yarn: light gray — Source: standard amigurumi math, plateau sized for a medium plush inspired by the photo
R1: 6 sc in MR (6)
R2: inc x6 (12)
R3: (sc, inc) x6 (18)
R4: (2 sc, inc) x6 (24)
R5: (3 sc, inc) x6 (30)
R6: (4 sc, inc) x6 (36)
R7-R11: sc around (36)
R12: (5 sc, inc) x6 (42)
R13-R15: sc around (42)
R16: (5 sc, dec) x6 (36)
R17: (4 sc, dec) x6 (30)
R18: sc around (30)
Insert safety eyes between R11 and R12, about 8 stitches apart. Stuff firmly before closing around the snout attachment zone.
FO. Leave a 30 cm tail.
Snout (Make 1)
Yarn: light gray — Source: photo-based adaptation
Ch 6.
R1: starting in 2nd ch from hook, 4 sc, 3 sc in last ch, working on opposite side 3 sc, inc (12)
R2: inc, 3 sc, inc x3, 3 sc, inc x2 (18)
R3: sc around (18)
R4: sc around (18)
Lightly stuff after sewing. Embroider two nostrils centered on the front edge.
FO. Leave a 25 cm tail.
Body (Make 1)
Yarn: light gray — Source: standard amigurumi math, medium 36-st plateau
R1: 6 sc in MR (6)
R2: inc x6 (12)
R3: (sc, inc) x6 (18)
R4: (2 sc, inc) x6 (24)
R5: (3 sc, inc) x6 (30)
R6: (4 sc, inc) x6 (36)
R7-R10: sc around (36)
R11: (4 sc, dec) x6 (30)
R12-R14: sc around (30)
R15: (3 sc, dec) x6 (24)
R16: sc around (24)
Stuff the lower body hard. Keep the neck zone slightly softer so the head seats cleanly.
FO. Leave a 30 cm tail.
Belly Patch (Make 1)
Yarn: soft pink — Source: photo-based adaptation
Ch 8.
Row 1: starting in 2nd ch, 7 sc, ch 1, turn (7)
Rows 2-9: sc across, ch 1, turn (7)
Row 10: dec, 3 sc, dec (5)
FO. Leave a 25 cm tail.
Arms / Front Legs (Make 2)
Yarn: light gray, black paw pads — Source: standard amigurumi math
R1: 6 sc in MR (6)
R2: inc x6 (12)
R3: (sc, inc) x6 (18)
R4-R5: sc around (18)
R6: (4 sc, dec) x3 (15)
R7-R10: sc around (15)
R11: flatten opening and sc through both sides 7 times (7)
Add black paw pads as three small satin stitches after assembly, or switch to black for the first 3 stitches of R4 on the front curve only.
FO. Leave a 25 cm tail.
Back Legs (Make 2)
Yarn: light gray, black paw pads — Source: standard amigurumi math
R1: 6 sc in MR (6)
R2: inc x6 (12)
R3: (sc, inc) x6 (18)
R4: (2 sc, inc) x6 (24)
R5-R6: sc around (24)
R7: (2 sc, dec) x6 (18)
R8-R10: sc around (18)
R11: flatten opening and sc through both sides 8 times (8)
Stuff the foot section only. Leave the top half softer so the leg angles forward in a seated pose.
FO. Leave a 30 cm tail.
Ears (Make 2 outer + 2 inner)
Yarn: outer light gray, inner soft pink — Source: ear construction adapted from separate ear method used in detailed dragon tutorials
For each inner ear:
R1: 6 sc in MR (6)
R2: inc x6 (12)
R3: (sc, inc) x6 (18)
R4: sc around (18)
FO.
For each outer ear:
R1: 6 sc in MR (6)
R2: inc x6 (12)
R3: (sc, inc) x6 (18)
R4: (2 sc, inc) x6 (24)
Do not FO.
Place inner ear on outer ear. Crochet both layers together with 18 sc across the top curve only, then fold the base slightly and tack closed.
Leave a 20 cm tail.
Wings (Make 2)
Yarn: soft pink inner wing, black edging — Source: photo-based adaptation with separate wing edging concept supported by detailed dragon wing tutorials
With pink:
Ch 7.
Row 1: starting in 2nd ch, 6 sc, ch 1, turn (6)
Row 2: dec, 2 sc, inc, ch 1, turn (6)
Row 3: 6 sc, ch 1, turn (6)
Row 4: dec, 2 sc, inc, ch 1, turn (6)
Row 5: 6 sc, ch 1, turn (6)
Now edge in black around the whole wing: 2 sc in tip, 1 sc evenly down side, 3 sc in bottom point, 1 sc evenly up second side, sl st to join.
FO. Leave a 25 cm tail.
Horns (Make 3)
Yarn: 1 soft pink center horn, 2 black side horns — Source: simple tapered horn logic informed by dragon horn tutorials
R1: 4 sc in MR (4)
R2: (sc, inc) x2 (6)
R3-R4: sc around (6)
Do not stuff. FO with 15 cm tail.
Cheek Patches (Make 2)
Yarn: light gray or pale pink — Source: flat circle standard
R1: 6 sc in MR (6)
R2: inc x6 (12)
FO. Leave a 12 cm tail.
These are optional for a softer face. Skip them if you want the cleaner photo look.
Eye Whites (Make 2, embroidered)
Yarn: white smooth yarn — Source: eye detail placement inspired by Storyland’s embroidered lower eye highlight
Make one straight stitch under each eye, about 3 stitches wide.
Paw Pads / Claws
Yarn: black — Source: photo-based adaptation
Embroider 3 front pads on each foot and 3 smaller pads on each hand.
Assembly
- Sew the snout centered on the lower front of the head, spanning roughly R10-R15. Add a pinch of stuffing before closing the last edge.
- Insert and secure the eyes if you have not done that already, then embroider the white lower eye lines and angled brows.
- Sew the head to the body with the head tilted slightly forward, not straight vertical.
- Attach the belly patch to the front body center from neck base to lower abdomen.
- Pin the back legs first. Set them low and wide so the plush sits on both feet and the base of the body.
- Attach the arms at the upper front body, angled inward so the hands rest near the belly patch.
- Sew the ears to the upper side head. Place the larger curve outward and the folded base slightly behind the eye line.
- Add the three horns across the crown, with the pink horn centered and the black horns offset behind it.
- Sew the wings to the upper back, high enough that their lower points do not drag below the seated body line.
- Add cheek patches only if used, then embroider all paw pads, weave in tails, and level the stuffing by hand.
The completed dragon should sit without extra support on a flat surface.
7 Technical Tips
- Mark every increase round. Plush yarn hides stitch tops fast, and a missed increase on R5 or R6 can skew the whole head by 6 stitches.
- Stuff the snout lightly, not hard. Overstuffing pushes the muzzle upward and narrows the eye spacing visually.
- Place eyes before full closure. On this face shape, moving even 1 stitch outward changes the expression from soft to startled.
- Use invisible decreases on visible curves. Standard decreases leave a raised seam that shows on the forehead and outer leg.
- Pin wings above the body midpoint. If the lower wing tip drops below the arm join, the dragon reads back-heavy from the side.
- Keep leg stuffing firmer in the foot than the thigh. A hard upper leg forces the feet to point outward and spoils the sitting angle.
- Weave each tail through at least 4 cm of internal path. Plush fibers slip more than cotton, so short tail burying can work loose after handling.
Conclusion
This version of a dragon amigurumi crochet pattern works because the silhouette is handled first: broad snout, oversized ears, short seated body, then high-set wings. Build those proportions before worrying about color swaps. Next, swatch one six-stitch circle in your chosen velvet yarn and confirm that the fabric closes without gaps before starting the full head. When you finish, post one front view and one side view to Pinterest and Instagram so the snout depth and wing placement are visible. Use #VelvetSittingDragon. For this dragon shape, did you keep the center horn soft and rounded, or would you rather make it taller and more pointed in the next dragon amigurumi crochet pattern?









