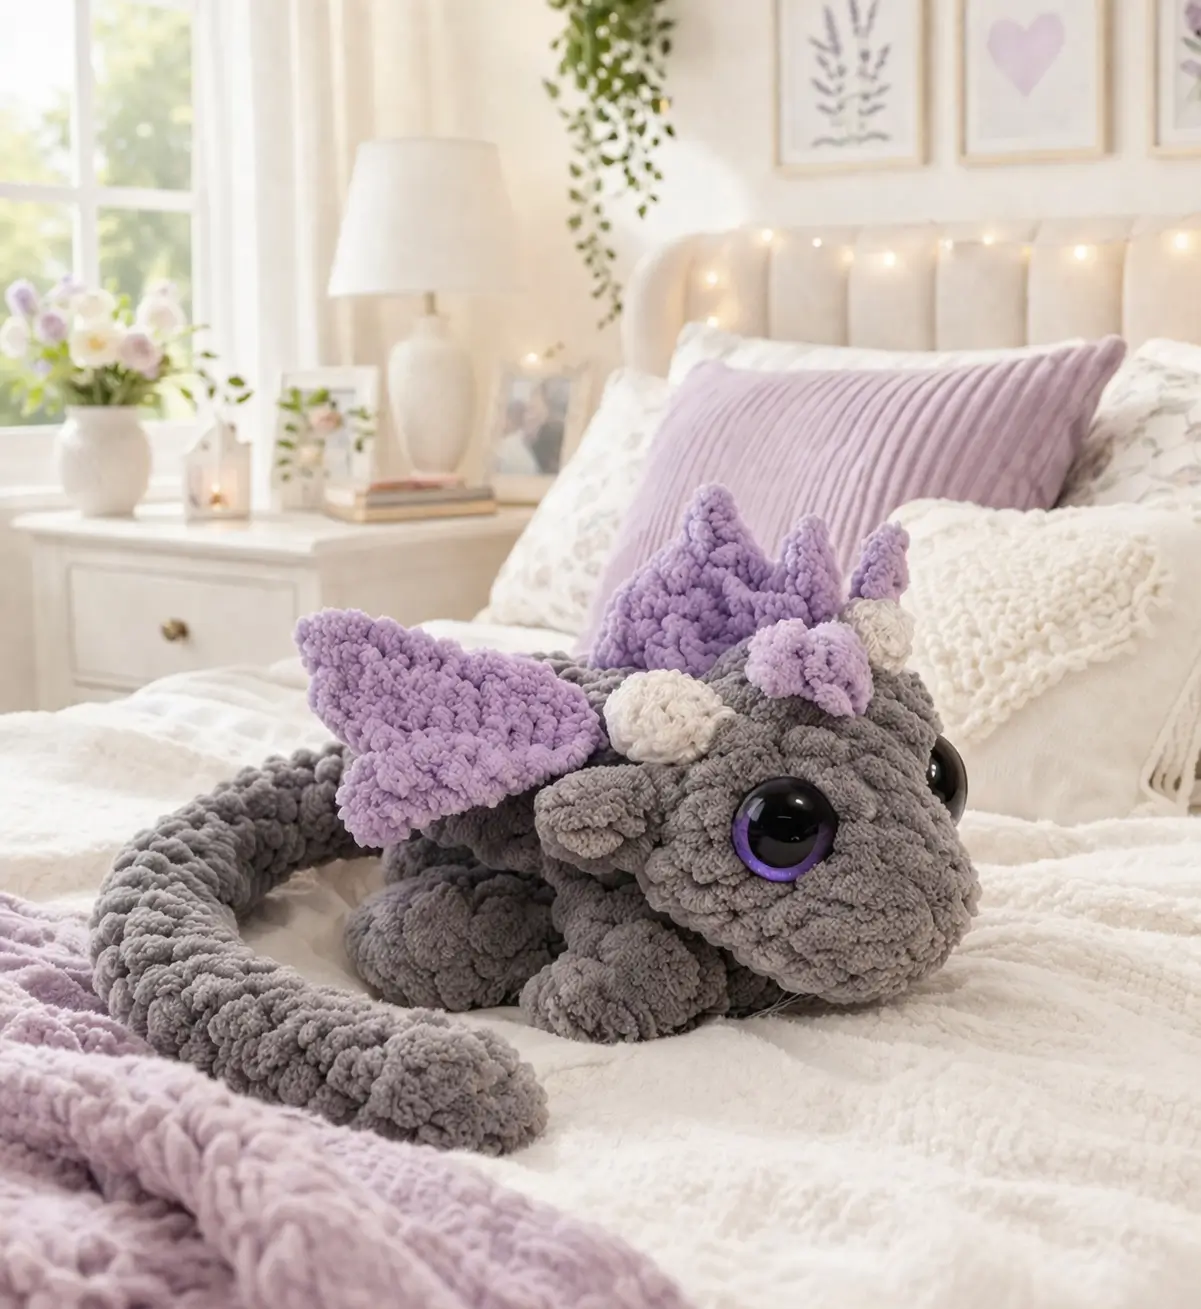
A dragon like this fails in one place first: the body curve. That is the entire structure. This gray plush dragon amigurumi crochet pattern is shaped for the exact low-profile plush style in the photo, with a broad head, tucked legs, lilac wings, curled tail, tiny horns, and oversized glossy eyes that do most of the character work.
Why This Sleepy Dragon Design Works
This plush reads as calm and baby-like because the silhouette stays close to the surface. The body is not upright. The neck is short. The head sits low between the forelegs instead of being lifted on a long chest. Good decision. A taller neck or stiffer torso would turn the dragon from sleepy companion into display guardian immediately.
The yarn texture matters too. This is clearly chenille or velvet-style yarn, not smooth cotton. That changes the pattern logic. Small facial shaping disappears faster in plush yarn, so the design leans on bigger signals: large eyes, compact snout, rounded limbs, and soft crest pieces. That is why the lilac wings work. They are simple, thick, and easy to read even in fuzzy texture.
The tail is doing structural work as well. It wraps around the body and closes the silhouette. Without that curve, the dragon would look stretched and unfinished from the side view.
Project Snapshot
| Item | Pattern Target |
|---|---|
| Character type | Sleepy baby dragon plush |
| Skill level | Advanced beginner to intermediate |
| Yarn | Chunky chenille / velvet yarn |
| Hook size | 4.5 mm to 5.5 mm |
| Safety eyes | 18 mm to 22 mm |
| Finished size | Approx. 28–34 cm long when curled |
Materials and Tools
- Main yarn: charcoal gray chunky chenille yarn
- Accent yarn: lilac chenille for wings and crest spikes
- Horn yarn: white or soft cream chenille
- Hook: 4.5 mm for firmer shaping or 5.5 mm for softer plush fabric
- Safety eyes: 20 mm works well for the oversized look in the photo
- Stuffing: polyester fiberfill
- Tapestry needle
- Stitch markers
- Straight pins
- Black embroidery thread if you want optional nostril definition
Abbreviations
MR = magic ring
sc = single crochet
inc = increase
dec = invisible decrease
sl st = slip stitch
ch = chain
hdc = half double crochet
dc = double crochet
st = stitch
Use invisible decrease throughout. Regular decreases create thick dents in chenille yarn, especially around the muzzle and tail curve.
Character Breakdown From the Photo
- rounded dragon head
- short snout
- oversized glossy safety eyes
- small white horns
- lilac head crest pieces
- side cheek or jaw frill detail
- two lilac wings
- low compact body
- tucked front legs
- rounded back legs
- curled tail
- soft dorsal tail bumps
Step-by-Step Gray Plush Dragon Pattern
This custom pattern is written to match the photographed plush and uses standard amigurumi shaping adapted for chunky chenille yarn and a low resting pose.
Head (Make 1)
Yarn: Gray
Source: Standard amigurumi math
R1: 6 sc in MR (6)
R2: inc x6 (12)
R3: (sc 1, inc) x6 (18)
R4: (sc 2, inc) x6 (24)
R5: (sc 3, inc) x6 (30)
R6: (sc 4, inc) x6 (36)
R7-R11: sc around (36)
R12: (sc 4, dec) x6 (30)
Insert eyes between R8 and R9, spaced 7 stitches apart.
R13: sc around (30)
R14: (sc 3, dec) x6 (24)
Stuff firmly, keeping the lower face broad.
R15: (sc 2, dec) x6 (18)
R16: (sc 1, dec) x6 (12)
R17: dec x6 (6)
Fasten off. Leave 25 cm tail.
Snout (Make 1)
Yarn: Gray
Source: Standard amigurumi math
R1: 6 sc in MR (6)
R2: inc x6 (12)
R3-R5: sc around (12)
R6: (sc 1, dec) x4 (8)
Lightly stuff.
Fasten off. Leave 18 cm tail.
Sew low on the head, centered. Keep the snout compact so the eyes remain dominant.
Body (Make 1)
Yarn: Gray
Source: Standard amigurumi math
R1: 6 sc in MR (6)
R2: inc x6 (12)
R3: (sc 1, inc) x6 (18)
R4: (sc 2, inc) x6 (24)
R5: (sc 3, inc) x6 (30)
R6-R10: sc around (30)
R11: (sc 3, dec) x6 (24)
R12-R15: sc around (24)
Stuff firmly through the center but keep the top line softer so the head can settle naturally.
Fasten off. Leave 28 cm tail.
Front Legs (Make 2)
Yarn: Gray
Source: Standard amigurumi math
R1: 6 sc in MR (6)
R2: inc x6 (12)
R3-R4: sc around (12)
R5: (sc 1, dec) x4 (8)
R6-R9: sc around (8)
Stuff the paw area only. Keep the upper section soft so it tucks under the head.
Flatten and fasten off. Leave 18 cm tail.
Back Legs (Make 2)
Yarn: Gray
Source: Standard amigurumi math
R1: 6 sc in MR (6)
R2: inc x6 (12)
R3: (sc 1, inc) x6 (18)
R4-R5: sc around (18)
R6: (sc 1, dec) x6 (12)
R7-R10: sc around (12)
Stuff firmly and shape into rounded haunches.
Fasten off. Leave 18 cm tail.
Tail (Make 1)
Yarn: Gray
Source: Standard amigurumi math
R1: 4 sc in MR (4)
R2: inc x4 (8)
R3-R7: sc around (8)
R8: (sc 3, inc) x2 (10)
R9-R24: sc around (10)
Stuff firmly at the base and lightly through the outer curve so it can wrap around the body.
Fasten off. Leave 25 cm tail.
Wings (Make 2)
Yarn: Lilac
Source: Standard amigurumi math
R1: ch 2, 2 sc in 2nd ch from hook (2)
R2: inc x2, ch 1, turn (4)
R3: inc, sc 2, inc, ch 1, turn (6)
R4: inc, sc 4, inc, ch 1, turn (8)
R5: sc across, ch 1, turn (8)
R6: sl st 1, sc 2, hdc 2, dc 2, sc 1 (8)
Fasten off. Leave 15 cm tail.
Keep the wings thick and slightly curved. Thin flat wings disappear visually in chenille yarn.
Horns (Make 2)
Yarn: White or cream
Source: Standard amigurumi math
R1: 4 sc in MR (4)
R2: inc x4 (8)
R3-R5: sc around (8)
R6: (sc 2, dec) x2 (6)
R7-R10: sc around (6)
Stuff lightly and shape into soft curved cones.
Fasten off. Leave 16 cm tail.
Head Crest Pieces (Make 4)
Yarn: Lilac
Source: Standard amigurumi math
R1: 4 sc in MR (4)
R2: sc around (4)
R3: (sc 1, inc) x2 (6)
R4: sc around (6)
Fasten off.
Make 1 taller center piece and 3 slightly shorter ones by adjusting one final round if desired.
Cheek Frills (Make 2)
Yarn: Gray
Source: Standard amigurumi math
R1: ch 6
R2: starting in 2nd ch from hook sl st 1, sc 1, hdc 1, dc 1, sl st in last ch
Fasten off. Leave 12 cm tail.
Sew these beside the head just behind the eye line for the soft frilled look in the photo.
Dorsal Tail Bumps (Make 6)
Yarn: Lilac
Source: Standard amigurumi math
R1: 4 sc in MR (4)
R2: sc around (4)
R3: (sc 1, dec) x2 (2)
Fasten off.
Assembly
- Sew the snout to the head, keeping it compact and centered.
- Attach the two horns to the crown, angled slightly outward.
- Sew the lilac crest pieces between and behind the horns.
- Add the cheek frills on both sides of the head.
- Join the head to the body low and forward so the dragon keeps a resting posture.
- Attach the front legs under the chest so they tuck inward beneath the head.
- Sew the back legs low on the body, rounded and close to the sides.
- Attach the wings behind the shoulder line, angled slightly upward.
- Sew the tail to the rear body and curve it around the dragon before closing the final stitches.
- Add the lilac dorsal bumps from the upper back line down toward the tail tip.
Technical Tips That Actually Matter
Chenille tension:
Do not pull decrease rounds too hard. Chenille yarn can shear or thin out at stressed points, especially around the snout seam.
Head angle:
Pin the head before sewing. Even a small lift at the chin changes the dragon from sleepy to alert.
Eye spacing:
Check the eyes from the exact front, not only from above. Large glossy eyes exaggerate tiny placement errors.
Tail curve:
Underfill the last third of the tail. A fully packed tail resists the wrapped pose and looks stiff.
Wing placement:
Keep the wings behind the head line. If they sit too far forward, they crowd the face and shorten the body visually.
Horn scale:
Do not enlarge the horns much beyond this size. Bigger horns make the plush look older and sharper immediately.
Leg softness:
Leave the upper forelegs underfilled. Firm forelegs push the head upward and ruin the low resting pose.
SEO Notes and Search Positioning
This design fits a strong plush-dragon niche. The best target phrase is gray plush dragon amigurumi crochet pattern, supported by terms like dragon crochet pattern pdf, sleepy dragon amigurumi, chenille dragon crochet pattern, and baby dragon plush crochet. Use those naturally in image alt text, product descriptions, and FAQ sections. The chenille texture, curled tail, and lilac wing details already make the page highly specific.
Conclusion
This gray plush dragon amigurumi crochet pattern works because the whole design stays low, soft, and controlled. The head stays broad, the wings stay secondary, the horns remain small, and the curled tail closes the silhouette instead of trailing away. Keep the forelegs soft, place the head low, and treat the tail curve as a structural feature rather than decoration. Share the finished dragon on Pinterest and Instagram with #GrayPlushDragonPattern.
Question for the post comments: would you keep the gray-and-lilac palette, or turn this same sleepy dragon into a dusty blue body with cream wings?









