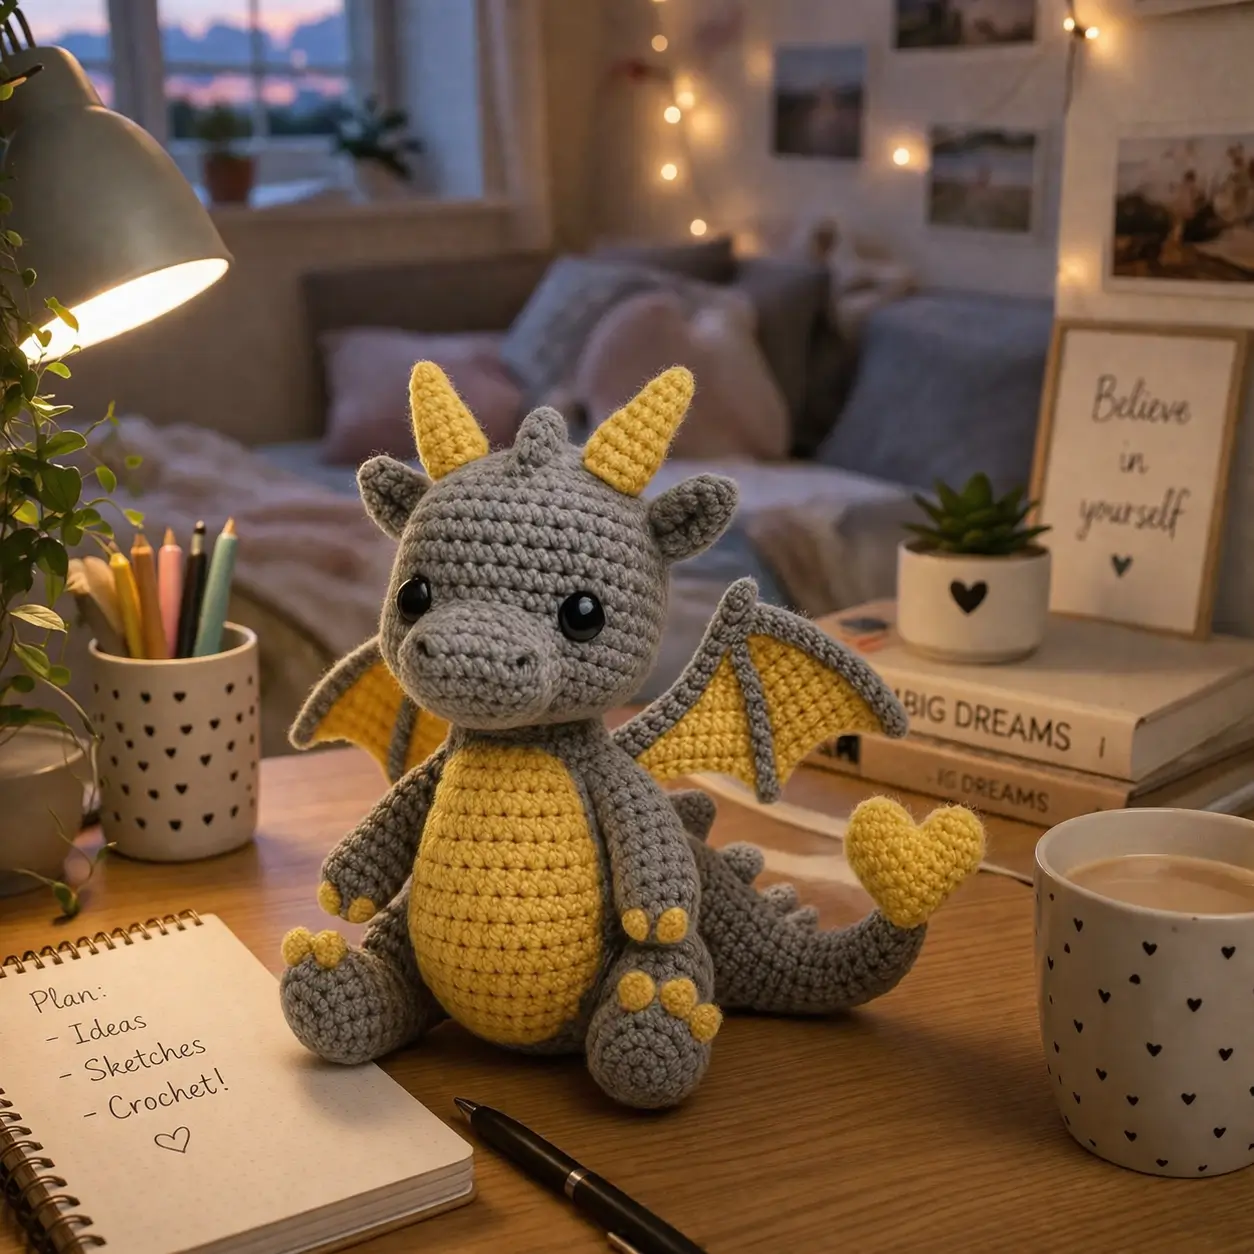
A dragon with a heart on its tail needs the tail balanced before the wings go on. This dragon amigurumi crochet pattern builds that balance into a medium seated plush worked in worsted yarn with a 3.5 mm hook, 15 mm eyes, and intermediate assembly. The result is compact, stable on a desk, and practical as a shelf mascot or handmade gift.
The Design: What Makes This Dragon Different
You are not shaping a generic round animal here. The photo shows a blunt snout, upright horns, broad belly panel, and a tail that stays lifted enough to display a heart, so the structure has to push weight low and backward. The toy reads as a dragon because the forehead ridge sits between the horns and because the wings are short, triangular, and membrane-led rather than feathery.
Another point matters. Many makers overbuild the wings and underbuild the feet on a crochet dragon pattern, and the figure tips backward or twists at the neck. This version keeps the body at a medium plateau, gives the head a larger visual mass through the muzzle, and uses flat-seated legs for front display. That proportion also matches search-leading dragon amigurumi free pattern builds that rely on worsted yarn and firm stuffing rather than oversized plush yarn.
Project Info at a Glance
| Skill Level | Time | Finished Size | Hook | Best For |
|---|---|---|---|---|
| Intermediate | 8–10 hours | about 24 cm seated | 3.5 mm | desk plush, nursery shelf, fantasy gift |
Materials and Tools
Yarn
- Light gray — worsted acrylic — about 120 g — Red Heart Super Saver, Stylecraft Special DK held to gauge, or similar
- Mustard yellow — worsted acrylic — about 45 g — for belly, wing membranes, horns, claws, heart
- Black embroidery floss or sport yarn — small amount — nostrils if desired
Tools
- Hook 3.5 mm
- 15 mm safety eyes
- Polyester stuffing
- Yarn needle
- Stitch markers
- Pins
- Scissors
Comparable dragon benchmark patterns commonly use worsted-weight acrylic, a 3.5 mm hook, and 15 mm safety eyes.
Abbreviations
- MR = magic ring
- sc = single crochet
- inc = 2 sc in one stitch
- dec = invisible decrease
- sl st = slip stitch
- ch = chain
- BLO = back loop only
- hdc = half double crochet
Invisible decrease is worked through the front loops of the next two stitches to reduce bulk on visible shaping rounds.
Pattern — Step by Step
Continuous spiral unless noted.
Head (Make 1)
Yarn: light gray — Standard amigurumi math drafted from the photo
R1: 6 sc in MR (6)
R2: inc x6 (12)
R3: (sc, inc) x6 (18)
R4: (2 sc, inc) x6 (24)
R5: (3 sc, inc) x6 (30)
R6: (4 sc, inc) x6 (36)
R7: (5 sc, inc) x6 (42)
R8-R14: sc around (42)
R15: (5 sc, dec) x6 (36)
R16: (4 sc, dec) x6 (30)
Insert stuffing in the top half only. The snout will add volume later.
R17: (3 sc, dec) x6 (24)
R18: (2 sc, dec) x6 (18)
Insert safety eyes between R11 and R12, spaced 9 stitches apart.
R19: (sc, dec) x6 (12)
R20: dec x6 (6)
Fasten off. Leave a 20 cm tail.
Snout (Make 1)
Yarn: light gray — Standard amigurumi math drafted from the photo
R1: ch 5; starting in 2nd ch from hook, sc 3, 3 sc in last ch, working opposite side sc 2, inc (10)
R2: inc, sc 2, inc x3, sc 2, inc x2 (16)
R3: (3 sc, inc) x4 (20)
R4-R5: sc around (20)
Fasten off. Leave a 25 cm tail.
Stuff lightly so the front stays rounded, not pointed.
Cheek Patches (Make 2)
Yarn: light gray — Standard amigurumi math
R1: 6 sc in MR (6)
R2: inc x6 (12)
Fasten off. Leave a 12 cm tail.
Keep these flat. They sit just below the eye line to widen the face.
Body (Make 1)
Yarn: light gray — Standard amigurumi math drafted from the photo
R1: 6 sc in MR (6)
R2: inc x6 (12)
R3: (sc, inc) x6 (18)
R4: (2 sc, inc) x6 (24)
R5: (3 sc, inc) x6 (30)
R6: (4 sc, inc) x6 (36)
R7-R11: sc around (36)
R12: (4 sc, dec) x6 (30)
R13-R15: sc around (30)
R16: (3 sc, dec) x6 (24)
Fasten off. Stuff firmly. Leave a 45 cm tail.
Belly Panel (Make 1)
Yarn: mustard yellow — Standard amigurumi math drafted from the photo
R1: ch 6; starting in 2nd ch from hook, sc 4, 3 sc in last ch, opposite side sc 3, inc (12)
R2: inc, sc 3, inc x3, sc 3, inc x2 (18)
R3: (2 sc, inc) x6 (24)
R4: (3 sc, inc) x6 (30)
R5: sc around (30)
Fasten off. Leave a 35 cm tail.
Arms / Front Legs (Make 2)
Yarn: light gray with mustard claws — Standard amigurumi math drafted from the photo
R1: 6 sc in MR (6)
R2: inc x6 (12)
R3-R4: sc around (12)
R5: (2 sc, dec) x3 (9)
R6-R10: sc around (9)
At the final 3 stitches of R4 or the first 3 stitches of R5, switch to mustard for three small claws if you want surface color spots.
Fasten off. Stuff lower half only. Flatten top. Leave a 20 cm tail.
Back Legs (Make 2)
Yarn: light gray with mustard claw pads — Standard amigurumi math drafted from the photo
R1: 6 sc in MR (6)
R2: inc x6 (12)
R3: (sc, inc) x6 (18)
R4-R5: sc around (18)
R6: (4 sc, dec) x3 (15)
R7: sc around (15)
R8: (3 sc, dec) x3 (12)
R9-R10: sc around (12)
Fasten off. Stuff front of foot firmly and upper section lightly. Flatten top. Leave a 25 cm tail.
Ears (Make 2)
Yarn: light gray — Standard amigurumi math
R1: 6 sc in MR (6)
R2: (sc, inc) x3 (9)
R3: sc around (9)
R4: (sc, dec) x3 (6)
Do not stuff. Fold flat and sc through both layers for 3 stitches to close base.
Fasten off. Leave a 15 cm tail.
Horns (Make 2)
Yarn: mustard yellow — Standard amigurumi math drafted from the photo
R1: 6 sc in MR (6)
R2: sc around (6)
R3: (2 sc, inc) x2 (8)
R4: sc around (8)
R5: (3 sc, inc) x2 (10)
R6-R7: sc around (10)
Stuff lightly. Fasten off. Leave a 20 cm tail.
Forehead Spike (Make 1)
Yarn: light gray — Standard amigurumi math
R1: 4 sc in MR (4)
R2: inc x4 (8)
R3-R4: sc around (8)
Fasten off. Leave a 15 cm tail.
Wings (Make 2)
Yarn: light gray frame, mustard membrane — Standard amigurumi math drafted from the photo
With gray:
R1: 6 sc in MR (6)
R2: (sc, inc) x3 (9)
R3: (2 sc, inc) x3 (12)
R4: (3 sc, inc) x3 (15)
R5: (4 sc, inc) x3 (18)
Fasten off first wing panel.
With mustard, make the same panel but do not fasten off. Place gray panel behind mustard panel.
Join through both layers: sc 5, ch 4 to first point, sl st back along chain, sc 4, ch 5 to second point, sl st back, sc 5.
Fasten off. Leave a 30 cm tail.
Do not stuff. Pin before sewing; the upper wing edge should angle slightly upward.
Tail (Make 1)
Yarn: light gray — Standard amigurumi math drafted from the photo
R1: 6 sc in MR (6)
R2: sc around (6)
R3: (2 sc, inc) x2 (8)
R4-R5: sc around (8)
R6: (3 sc, inc) x2 (10)
R7-R8: sc around (10)
R9: (4 sc, inc) x2 (12)
R10-R12: sc around (12)
R13: (5 sc, inc) x2 (14)
R14-R18: sc around (14)
Fasten off. Stuff firmly at base, lightly at tip. Leave a 35 cm tail.
Back Spikes (Make 4)
Yarn: light gray — Standard amigurumi math drafted from the photo
R1: 4 sc in MR (4)
R2: inc x4 (8)
R3: sc around (8)
Fasten off. Leave a 12 cm tail.
Heart Tail Accessory (Make 2, join together)
Yarn: mustard yellow — Standard amigurumi heart math
Cup A:
R1: 6 sc in MR (6)
R2: inc x6 (12)
R3: sc around (12)
Fasten off.
Cup B: repeat but do not fasten off.
Join Cup A to Cup B with 1 sc, then:
R4: sc around both cups (24)
R5: (2 sc, dec) x6 (18)
R6: (sc, dec) x6 (12)
Stuff lightly.
R7: dec x6 (6)
Fasten off. Leave a 20 cm tail.
Claw Dots (Make 8)
Yarn: mustard yellow — Standard amigurumi math
R1: 6 sc in MR (6)
Fasten off. Leave a short tail.
Sew three to each back foot front edge and one to each arm tip if you want the photo’s dotted paw look.
Assembly
- Sew the snout centered on the lower front of the head. Stuff as you close the last third.
- Attach the cheek patches just below the eyes and slightly outward from the snout seam.
- Sew the forehead spike between the horn positions.
- Attach the horns on the top sides of the head, angled slightly outward.
- Sew the ears behind the horns, then attach the head to the body.
- Stitch the belly panel to the front of the body.
- Pin and sew the back legs low on the body so the plush sits without rocking.
- Attach the arms at the upper body sides, one to two rounds below the neck join.
- Sew the tail to the back center, then add the back spikes along the upper tail line and attach the heart to the tail tip.
- Sew the wings to the back just below the neck seam, one on each side of the spine. The dragon should sit upright with the tail acting as a rear brace.
7 Technical Tips
- Mark round ends from the first increase round onward. Losing one stitch in a 36-stitch body shows up as a slanted belly panel by round 10.
- Stuff the body harder at the base than at the shoulders. A soft lower half makes the dragon slide forward when the head is attached.
- Use invisible decreases on every visible shaping round. Standard decreases leave ridges that show clearly on gray yarn under warm indoor light.
- Insert the eyes before the final three decrease rounds of the head. On this build, placing them after round 18 is awkward because the opening tightens too fast.
- Keep wing tension slightly tighter than body tension. Loose wing membranes sag and pull the outer frame into a curl.
- Pin the tail before sewing and check rear balance with the heart attached. Even 5 grams at the tip can rotate the tail downward if the base seam sits too low.
- Weave tails back through at least 4 cm of interior stuffing. Short buried ends work loose fastest at the horns, wings, and tail-heart join.
Conclusion
This dragon amigurumi crochet pattern works because the body stays compact, the snout remains blunt, and the tail does more than decorate the silhouette. Build the parts first, dry-pin the full pose, then sew in the order above so the weight distribution stays controlled. Share the finished dragon on Pinterest and Instagram with one front view and one side view that shows the wing angle and heart-tail detail. Use #HeartTailDragon. One useful question remains: did you angle the horns forward like the photo, or did you set them wider to make the forehead ridge stand taller?









