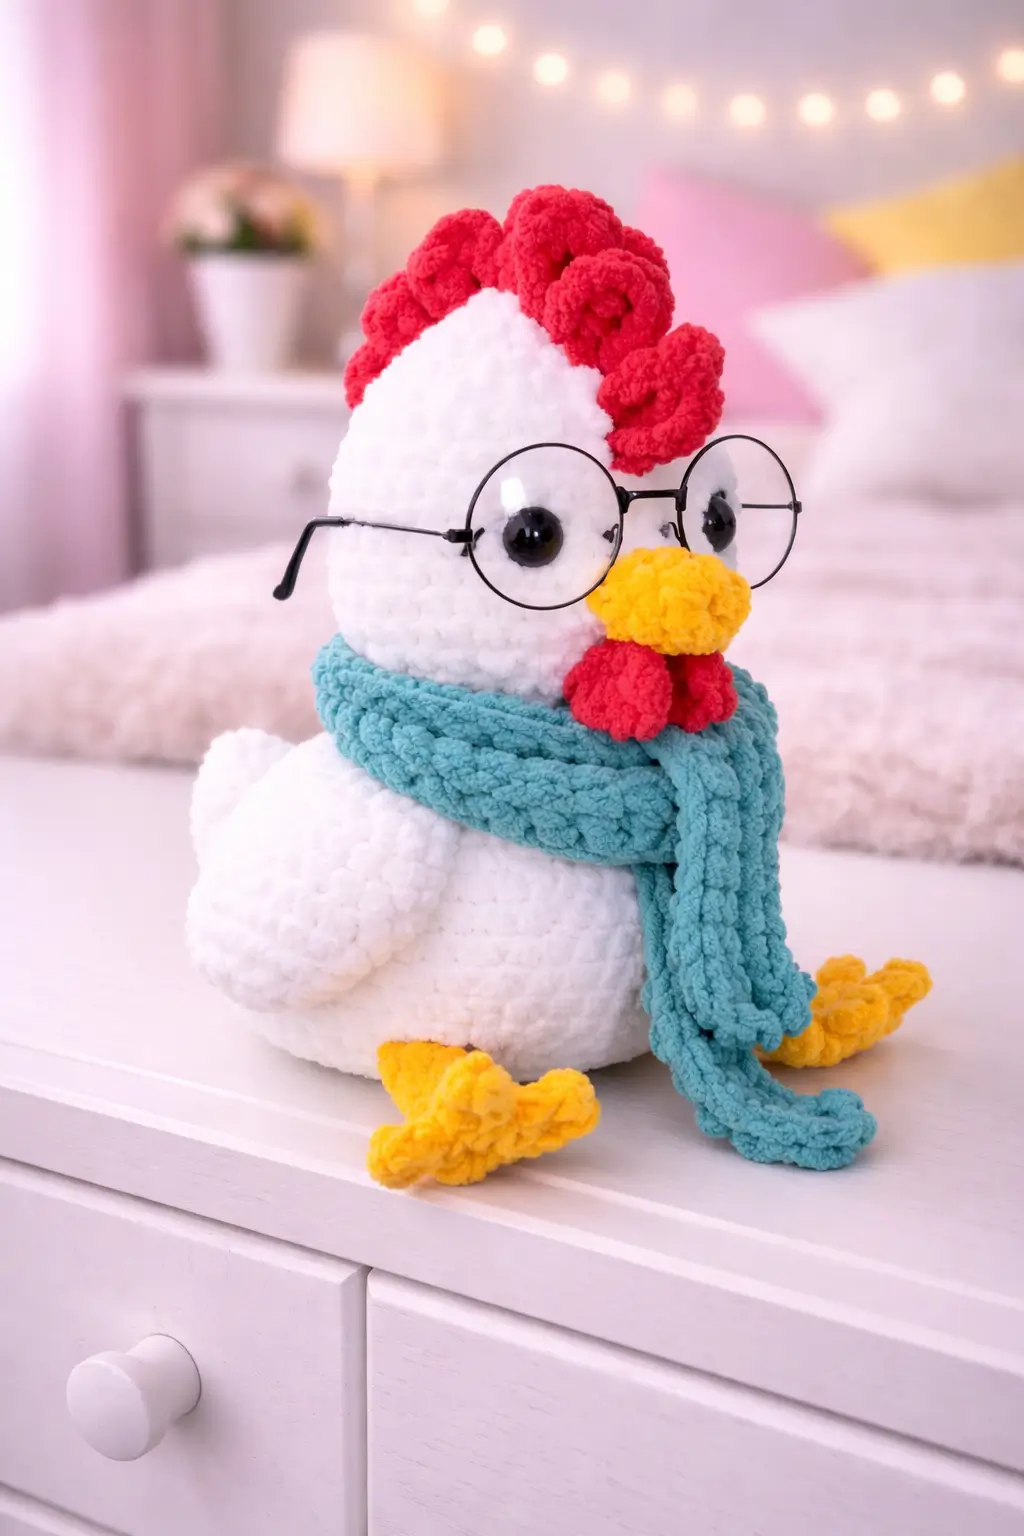
A rooster in round glasses fails instantly if the comb, beak, and scarf fight for the same visual space. This rooster amigurumi crochet pattern gives you materials, size, hook guidance, and a full plush build for the accessory-heavy bird in the photo. You get the head, body, wings, legs, feet, comb, beak, wattles, scarf, and optional glasses placement. The practical reason to make it is simple: one upright body supports many seasonal accessory swaps.
The Design: What Makes This Rooster Different
This rooster is not built like the usual farm-bird amigurumi with a proud tail, broad body, and exposed chest. The photographed plush is more vertical. The head dominates. The body stays compact. The scarf and glasses do the personality work. That shifts the design priorities. Published rooster patterns still treat the comb, beak, and wattle as the key identity markers, and that remains true here, but the accessories force tighter spacing on the face. Too much projection in the beak and the glasses stop fitting. Too tall a comb and the glasses lose clearance above the eye line.
There is another structural choice worth noting. The body in this photo reads as a single plush mass, not a highly segmented bird. Better move. A simplified torso prevents the scarf from looking like an afterthought. One common mistake with a crochet rooster plush is overcomplicating the tail and starving the front silhouette. That works for farmhouse decor. It does not work here. This design needs the face and neck to carry the whole build. The scarf line does the rest. Small change. Big result.
Project Information at a Glance
| Skill Level | Time | Finished Size | Hook | Best For |
|---|---|---|---|---|
| Advanced beginner to intermediate | 2–3 hours | 22–26 cm | 5.0 mm | Gifts, farm-animal decor, character plush displays |
Materials and Tools
Yarn
- White plush yarn — chunky chenille — 90g — Himalaya Dolphin Baby or similar
- Red plush yarn — chunky chenille — 20g — for comb and wattles
- Yellow plush yarn — chunky chenille — 12g — for beak and feet
- Turquoise plush yarn — chunky chenille — 18g — for scarf
- Black yarn or embroidery floss — scrap amount — for eyelash details and optional facial accents
Tools
- 5.0 mm crochet hook
- 12–14 mm safety eyes
- Fiberfill stuffing
- Yarn needle
- Stitch markers
- Pins
- Round wire glasses — optional non-crochet accessory matching the photo
Crochet Abbreviations
MR / sc / inc / dec / sl st / ch / BLO / FLO
Use invisible decrease only on the closing rounds. Standard decreases in plush yarn leave split lines, and white yarn makes those lines impossible to ignore.
Step-by-Step Rooster Crochet Pattern
Work in continuous spiral rounds unless noted.
Head (Make 1)
Yarn: white
Source: Standard amigurumi math
R1: 6 sc in MR (6)
R2: inc x6 (12)
R3: (sc, inc) x6 (18)
R4: (2 sc, inc) x6 (24)
R5: (3 sc, inc) x6 (30)
R6: (4 sc, inc) x6 (36)
R7: sc around (36)
R8: sc around (36)
R9: sc around (36)
R10: sc around (36)
R11: sc around (36)
Insert 12–14 mm safety eyes between R8 and R9, about 8 stitches apart if using them under the glasses.
R12: (4 sc, dec) x6 (30)
R13: (3 sc, dec) x6 (24)
Stuff firmly through the face first. A soft face sinks behind the glasses frame.
R14: (2 sc, dec) x6 (18)
R15: (sc, dec) x6 (12)
R16: dec x6 (6)
Fasten off. Leave a 30 cm tail.
Body (Make 1)
Yarn: white
Source: Standard amigurumi math
R1: 6 sc in MR (6)
R2: inc x6 (12)
R3: (sc, inc) x6 (18)
R4: (2 sc, inc) x6 (24)
R5: (3 sc, inc) x6 (30)
R6: (4 sc, inc) x6 (36)
R7: sc around (36)
R8: sc around (36)
R9: sc around (36)
R10: (4 sc, dec) x6 (30)
R11: sc around (30)
R12: sc around (30)
Stuff lightly. The scarf will add visual bulk at the neck, so the torso should not barrel outward too much.
Fasten off. Leave a 30 cm tail.
Wings (Make 2)
Yarn: white
Source: Standard amigurumi math
R1: 6 sc in MR (6)
R2: inc x6 (12)
R3: sc around (12)
R4: sc around (12)
R5: (4 sc, dec) x2 (10)
Stuff very lightly at the front edge only.
Flatten.
Fasten off. Leave a 20 cm tail.
Legs (Make 2)
Yarn: white
Source: Standard amigurumi math
R1: 6 sc in MR (6)
R2: (sc, inc) x3 (9)
R3: sc around (9)
R4: sc around (9)
R5: sc around (9)
R6: sc around (9)
Stuff firmly enough to hold the standing posture.
Fasten off. Leave a 20 cm tail.
Feet (Make 2)
Yarn: yellow
Source: Standard amigurumi math
R1: 6 sc in MR (6)
R2: inc x6 (12)
R3: sc around (12)
Flatten lightly into an oval pad.
Then crochet three toes:
Toe 1: ch 4, starting in 2nd ch from hook sl st back along chain
Toe 2: ch 4, sl st back
Toe 3: ch 4, sl st back
Fasten off. Leave a 20 cm tail.
Comb (Make 1)
Yarn: red
Source: Standard amigurumi math
R1: ch 13
R2: starting in 2nd ch from hook, *(3 sc in next st, sl st in next st)* repeat across to create six rounded bumps
Fasten off. Leave a 20 cm tail.
Beak (Make 1)
Yarn: yellow
Source: Standard amigurumi math
R1: 4 sc in MR (4)
R2: inc x4 (8)
R3: sc around (8)
Flatten into a short oval beak.
Fasten off. Leave a 15 cm tail.
Wattles (Make 2)
Yarn: red
Source: Standard amigurumi math
R1: 5 sc in MR (5)
R2: sc around (5)
Fasten off. Leave a 12 cm tail.
Scarf (Make 1)
Yarn: turquoise
Source: Standard amigurumi math
R1: ch 46
R2: starting in 2nd ch from hook, sc across (45)
R3: ch 1, turn, sc across (45)
R4: ch 1, turn, sc across (45)
Fasten off. Leave a 20 cm tail.
Keep the scarf flexible. A stiff strip sits like a collar instead of a scarf.
Glasses Placement Guide (Optional Accessory)
Yarn: none
Source: Photo-based accessory adaptation
Use small round wire glasses sized to sit across the eye line without touching the comb.
This is a non-crochet accessory visible in the photo.
Eyelash Detail (Optional)
Yarn: black embroidery floss
Source: Standard amigurumi math
Add 2 short outward stitches at the outer edge of each eye.
Keep them shorter than 5 mm. Longer lashes start reading as eyebrows.
Assembly Instructions
- Sew the head to the body, keeping the chin low and the neck short so the scarf can sit flush against the join.
- Attach the wings to the side seams slightly below the head line.
- Sew the legs low and centered under the body for a vertical standing pose.
- Attach one foot to the bottom of each leg and spread the toes outward before tightening the final stitches.
- Place the comb on the top center of the head, starting slightly behind the forehead so it does not crowd the glasses.
- Sew the beak to the center front of the face between the eyes and slightly below them.
- Attach the two wattles under the beak with a small gap between them.
- Add the optional eyelash stitches after the beak is in place so the face balance is locked first.
- Wrap the scarf around the neck once and let one end hang lower than the other, matching the photo.
- Put the round glasses over the eye line last, then adjust the comb and scarf if either interferes with the frame.
The rooster is complete.
7 Technical Tips for Cleaner Amigurumi
- Mark the 36-stitch head plateau immediately. Missing one increase before R6 shifts the eye line, and the glasses stop sitting level across the face.
- Stuff the head firmer than the body. If both sections are equally dense, the glasses tilt downward because the face compresses faster than the torso.
- Use invisible decreases only on the white rounds. Standard decreases leave six visible channels, and white chenille makes those channels obvious from across the room.
- Keep the comb slightly behind the forehead. Moving it forward even 1 cm causes the frame to bump the comb and ride upward.
- Spread the toes before final knotting. Feet that stay closed under tension make the rooster wobble instead of standing.
- Pin the scarf before deciding its final length drop. A hanging end that is even 2 cm longer than planned can cover the wattles and kill the face shape.
- Add the glasses last. Installing them before the scarf and wattles makes it harder to judge whether the accessory line is balanced.
Conclusion
This rooster amigurumi crochet pattern works because the body stays simple while the comb, scarf, and glasses carry the entire character. Use the verified medium rooster scale, the 5.0 mm plush adaptation, and the 12–14 mm eye range as your baseline, then adjust scarf drape and face spacing instead of rewriting the stitch counts. Post the finished plush on Pinterest and Instagram with #RoosterAmigurumi so the profile and accessories show in one frame. One question before the second version: are you keeping the turquoise scarf, or turning the next rooster into a bow-tie build with the glasses still on?









