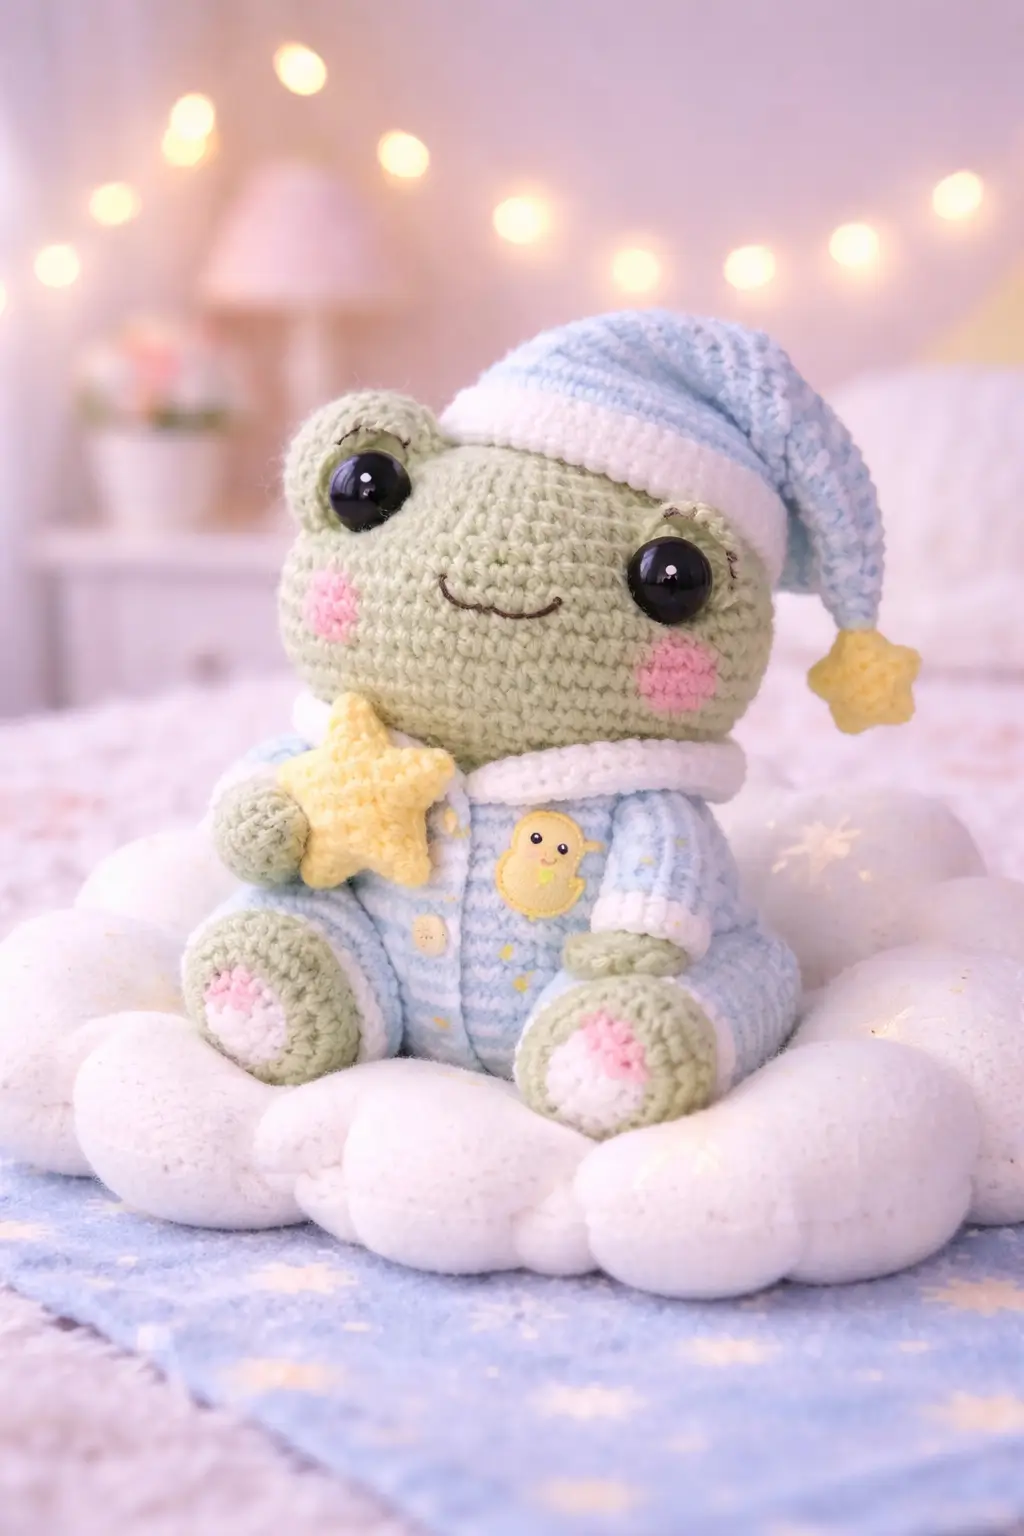
A frog in a nightcap fails the second the hat looks bolted on instead of soft and slouched. This frog amigurumi crochet pattern gives you a seated frog, pajama body, sleep hat, collar, cuffs, and a small star plush in one build. You also get materials, size guidance, and full round-by-round shaping. The practical advantage is obvious. One frog base supports costume variations without rebuilding the face.
The Design: What Makes This Frog Different
This is not a plain frog with an accessory added at the end. The pajamas change the silhouette. The hat changes the head balance. Even the held star affects arm placement. That matters because a standard free frog crochet pattern can rely on a broad head, visible belly, and simple seated legs to read clearly. Here, the clothing covers much of the torso, so the eye mounds and face have to carry more of the identity. Current frog pattern ecosystems also show that dressed frogs and outfit add-ons are already popular, which makes construction clarity more important than novelty alone.
The second structural decision is the hat. A sleep hat must droop, but not so much that it pulls the head visually off-center. Too stiff, and it reads like a cone. Too soft, and it collapses over the eye. The photographed frog solves this by using a long tapered cap with a small star at the tip rather than a bulky pom. Better proportion. A common mistake in plush frog builds is over-enlarging the body and under-sizing the legs. Then the seated pose becomes static and heavy. This version needs a compact body, round feet, and a slightly oversized head so the pajama details do not dominate the character.
Project Information at a Glance
| Skill Level | Time | Finished Size | Hook | Best For |
|---|---|---|---|---|
| Advanced beginner to intermediate | 2.5–3.5 hours | 18–22 cm | 4.0 mm | Gifts, nursery decor, bedtime-themed plush |
Materials and Tools
Yarn
- Sage green yarn — worsted / medium weight — 85g — for head, arms, legs, and visible skin areas
- Baby blue yarn — worsted / medium weight — 45g — for pajamas and hat
- White yarn — worsted / medium weight — 20g — for collar, cuffs, and hat brim
- Pastel yellow yarn — scrap amount — for star plush and chest detail
- Pink yarn — scrap amount — for cheeks and foot pads
- Black or dark brown embroidery floss — scrap amount — for smile, lashes, and tiny facial accents
Tools
- 4.0 mm crochet hook
- 14–16 mm safety eyes
- Fiberfill stuffing
- Yarn needle
- Stitch markers
- Pins
- Small scissors
Crochet Abbreviations
MR / sc / inc / dec / sl st / ch / BLO / FLO
Use invisible decrease only on the closing rounds. On a pale frog face, standard decreases leave dents that stay visible under the eye line.
Step-by-Step Sleepy Frog Crochet Pattern
Work in continuous spiral rounds unless noted.
Head (Make 1)
Yarn: sage green
Source: Standard amigurumi math
R1: 6 sc in MR (6)
R2: inc x6 (12)
R3: (sc, inc) x6 (18)
R4: (2 sc, inc) x6 (24)
R5: (3 sc, inc) x6 (30)
R6: (4 sc, inc) x6 (36)
R7: sc around (36)
R8: sc around (36)
R9: sc around (36)
R10: sc around (36)
R11: sc around (36)
Insert 14–16 mm safety eyes between R8 and R9, about 8 stitches apart.
R12: (4 sc, dec) x6 (30)
R13: (3 sc, dec) x6 (24)
Stuff firmly, concentrating fill in the cheeks and lower face.
R14: (2 sc, dec) x6 (18)
R15: (sc, dec) x6 (12)
R16: dec x6 (6)
Fasten off. Leave a 30 cm tail.
Body (Make 1)
Yarn: baby blue
Source: Standard amigurumi math
R1: 6 sc in MR (6)
R2: inc x6 (12)
R3: (sc, inc) x6 (18)
R4: (2 sc, inc) x6 (24)
R5: (3 sc, inc) x6 (30)
R6: sc around (30)
R7: sc around (30)
R8: sc around (30)
R9: sc around (30)
R10: (3 sc, dec) x6 (24)
R11: sc around (24)
Stuff lightly. The pajama body should compress a little in a seated pose.
Fasten off. Leave a 30 cm tail.
Eye Mounds (Make 2)
Yarn: sage green
Source: Standard amigurumi math
R1: 6 sc in MR (6)
R2: inc x6 (12)
R3: sc around (12)
Fasten off. Leave a 20 cm tail.
Arms (Make 2)
Yarn: start sage green, switch to baby blue, then white cuff
Source: Standard amigurumi math
R1: 6 sc in MR with sage green (6)
R2: inc x6 (12)
R3: sc around (12)
R4: switch to baby blue, sc around (12)
R5: sc around (12)
R6: switch to white, sc around (12)
R7: (4 sc, dec) x2 (10)
Stuff the hand lightly only.
Fasten off. Leave a 20 cm tail.
Legs (Make 2)
Yarn: sage green with pink/white foot pad, then baby blue
Source: Standard amigurumi math
R1: 6 sc in MR (6)
R2: inc x6 (12)
R3: (sc, inc) x6 (18)
R4: sc around (18)
R5: switch upper half to baby blue if desired, sc around (18)
R6: (4 sc, dec) x3 (15)
Stuff the foot firmly and the upper leg lightly.
Fasten off. Leave a 22 cm tail.
Collar (Make 1)
Yarn: white
Source: Standard amigurumi math
R1: ch 22
R2: starting in 2nd ch from hook, sc across (21)
R3: ch 1, turn, sc across (21)
Fasten off. Leave a 15 cm tail.
Pajama Front Band (Make 1)
Yarn: white
Source: Standard amigurumi math
R1: ch 18
R2: starting in 2nd ch from hook, sc across (17)
Fasten off. Leave a 12 cm tail.
Nightcap Body (Make 1)
Yarn: baby blue
Source: Standard amigurumi math
R1: 6 sc in MR (6)
R2: inc x6 (12)
R3: (sc, inc) x6 (18)
R4: sc around (18)
R5: sc around (18)
R6: sc around (18)
R7: sc around (18)
R8: sc around (18)
R9: sc around (18)
R10: sc around (18)
R11: (4 sc, dec) x3 (15)
R12: sc around (15)
R13: (3 sc, dec) x3 (12)
R14: sc around (12)
R15: (2 sc, dec) x3 (9)
R16: sc around (9)
R17: (sc, dec) x3 (6)
R18: sc around (6)
Stuff very lightly near the brim only. Leave the upper section soft so it droops.
Fasten off. Leave a 25 cm tail.
Hat Brim (Make 1)
Yarn: white
Source: Standard amigurumi math
R1: ch 25
R2: starting in 2nd ch from hook, sc across (24)
R3: ch 1, turn, sc across (24)
Fasten off. Leave a 15 cm tail.
Star Plush (Make 2 pieces, join as 1)
Yarn: pastel yellow
Source: Standard amigurumi math
R1: 5 sc in MR (5)
Points: (ch 4, sl st in 2nd ch from hook, sc in next, sl st in next, sl st in next stitch on ring) repeat 5 times
Make 2 identical stars.
Join wrong sides together with sc around outer edge, stuffing lightly before closing.
Fasten off. Leave a 20 cm tail.
Hat Tip Star (Make 1)
Yarn: pastel yellow
Source: Standard amigurumi math
Work as for one flat star piece above.
Fasten off. Leave a 12 cm tail.
Cheek Patches (Make 2)
Yarn: pink
Source: Standard amigurumi math
R1: 6 sc in MR (6)
R2: sc around (6)
Fasten off. Leave an 8 cm tail.
Chest Appliqué (Optional)
Yarn: yellow and white
Source: Standard amigurumi math
R1: 6 sc in MR with yellow (6)
R2: inc x6 (12)
Add a tiny outline or keep as a simple oval badge.
Fasten off. Leave a 12 cm tail.
Smile and Lash Detail
Yarn: dark brown or black embroidery floss
Source: Standard amigurumi math
Embroider a shallow curved smile spanning about 5 stitches.
Add 1–2 short lash stitches above each eye mound.
Keep the smile narrow. A wide mouth fights the sleepy look.
Assembly Instructions
- Sew the eye mounds to the top front of the head, then set the safety eyes through them if you have not already done so.
- Attach the head to the body with the chin low and centered over the pajama torso.
- Sew the legs wide and low so the frog sits securely without rocking.
- Attach the arms slightly above the midpoint of the body and angle one inward to hold the star.
- Add the collar at the neck seam and the pajama front band down the center torso.
- Sew the cheek patches below the eye line and slightly outward from the smile.
- Attach the chest appliqué to one side of the pajama front.
- Sew the hat brim into a band, attach it to the base of the nightcap, then place the cap on a diagonal so it slouches backward.
- Add the yellow star to the tip of the hat and the stuffed star plush into the arm area.
- Check the frog from front and side view, then adjust the hat droop and star position before weaving every tail at least 4 cm into the stuffing path.
The sleepy frog is complete.
7 Technical Tips for Cleaner Amigurumi
- Mark the 36-stitch head plateau immediately. Missing one increase before R6 shifts the eye spacing and makes the face look cross-eyed once the eye mounds go on.
- Stuff the head firmer than the pajama body. If both sections are equally dense, the seated frog tips backward when the hat is attached.
- Do not overstuff the nightcap. A cap that is too full stands upright and loses the sleepy silhouette completely.
- Pin the collar before sewing the pajama front band. If the collar sits even 5 mm too high, the smile area starts looking cramped.
- Match both leg angles before tightening. A difference of only a few millimeters in foot rotation makes the frog sit twisted.
- Add the held star after arm placement. Sewing the star first often pulls one arm outward and ruins the relaxed pose.
- Keep the hat brim flexible. A stiff brim reads like a helmet edge instead of a soft sleep cap.
Conclusion
This frog amigurumi crochet pattern works because the face stays clean while the pajamas and nightcap carry the story. Use the medium seated-frog structure, 4.0 mm hook baseline, and current dressed-frog pattern logic as your guide, then adjust stuffing and hat drape instead of rewriting the stitch counts. Post the finished plush on Pinterest and Instagram with #SleepyFrogAmigurumi so the cap, star, and seated silhouette show clearly in one frame. Final choice: does the next frog keep the star, or are you turning the second version into a moon-holding bedtime pair?