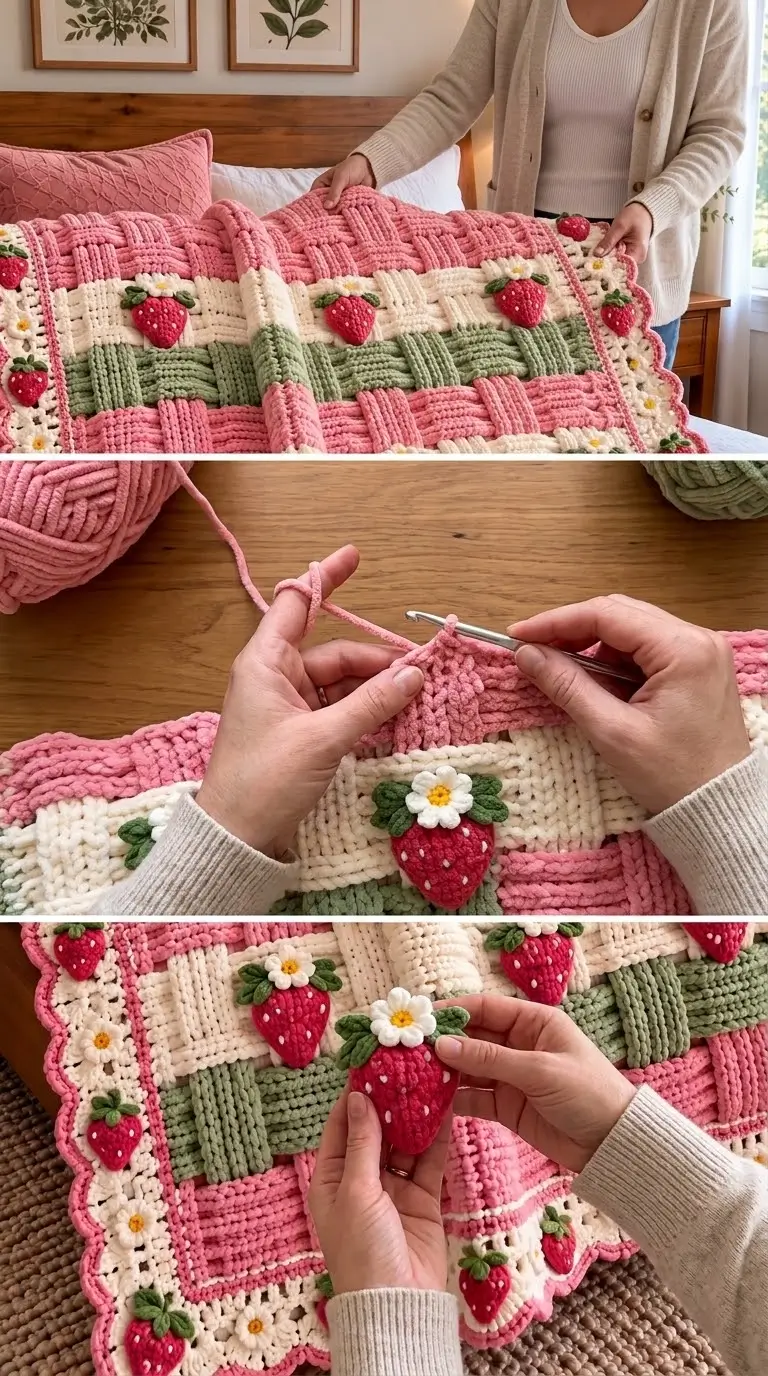
Crochet Strawberry Appliqué Pattern for a Textured Blanket
Introduction
A strawberry needs a tapered lower point and a broad shoulder or it reads as a red oval. This crochet strawberry appliqué pattern builds those proportions into a raised motif suited to a textured blanket. Use pink, green, white and yellow yarn with a hook matched to your yarn; chunky chenille works particularly well for the pictured style. The finished motif is approximately 8–11 cm depending on yarn and tension and suits an intermediate maker decorating blanket panels.
The Design: What Makes This Strawberry Different
The photographed berry is not a conventional stuffed strawberry amigurumi. Its front has visible depth, but its back sits against the blanket, so a lightly stuffed appliqué construction avoids unnecessary bulk. The tapered lower section establishes the fruit silhouette, while the wider upper rounds provide enough area for the green leaf cap.
White embroidered seed stitches are spaced vertically rather than added as beads. That choice keeps hard components out of a blanket surface. The green crown also extends beyond the berry’s upper edge, which makes the strawberry crochet pattern readable against a cream background.
A common mistake with strawberry appliqué crochet is stuffing the lower point too firmly. The maker then gets a spherical berry instead of the flattened, tapered form required for a blanket appliqué.
Project Info at a Glance
| Skill Level | Time | Finished Size | Hook | Best For |
|---|---|---|---|---|
| Intermediate | 35–60 min per motif | Approx. 8–11 cm | 5 mm reference | Blankets, cushions, bags |
A 5 mm hook is a useful reference size for a strawberry appliqué used on a crochet blanket. Chunky chenille may require a different hook according to the yarn manufacturer’s recommendation and your individual tension.
Materials and Tools
Yarn
- Strawberry pink — chunky or chenille-style yarn — approximately 15–25 g per raised motif.
- Sage green — matching or compatible yarn weight — approximately 3–6 g for the leaf crown.
- Cream or white — small quantity for embroidered strawberry seeds and flower petals.
- Yellow — scrap quantity for flower centers.
- Cream, pink and sage blanket yarn — quantities depend on the finished blanket dimensions and panel arrangement.
The quantities above are practical estimates for this photo-inspired version. Actual consumption changes with yarn thickness, hook size, tension and motif dimensions.
Tools
- 5 mm crochet hook
- Tapestry needle
- Polyester stuffing
- Stitch markers
- Scissors
- Pins or removable markers
No safety eyes are required because the strawberry is a decorative fruit appliqué rather than a character.
Abbreviations
- MR — magic ring
- sc — single crochet
- inc — 2 sc in one stitch
- dec — single-crochet decrease
- sl st — slip stitch
- ch — chain
- BLO — back loop only
- hdc — half double crochet
- dc — double crochet
- st/sts — stitch/stitches
For an invisible decrease, insert the hook through the front loops of the next two stitches before completing one single crochet through both.
Pattern — Step by Step
Construction note: This is a raised strawberry appliqué designed to reproduce the general construction and proportions of the pictured blanket. Work in a continuous spiral unless otherwise stated.
Strawberry Body
Yarn: strawberry pink.
R1: 6 sc in MR (6)
R2: inc ×6 (12)
R3: (1 sc, inc) ×6 (18)
R4: (2 sc, inc) ×6 (24)
R5: (3 sc, inc) ×6 (30)
R6: sc around (30)
R7: sc around (30)
R8: (4 sc, inc) ×6 (36)
R9: sc around (36)
R10: sc around (36)
R11: (4 sc, dec) ×6 (30)
R12: sc around (30)
R13: (3 sc, dec) ×6 (24)
R14: (2 sc, dec) ×6 (18)
Add stuffing now. Keep the back surface flatter than the front because the strawberry will be sewn directly to the blanket.
R15: (1 sc, dec) ×6 (12)
R16: dec ×6 (6)
Fasten off. Leave approximately a 25 cm tail if the fruit will be secured through its center as well as around the perimeter.
Green Leaf Crown
Yarn: sage green.
R1: 6 sc in MR (6)
R2: inc ×6 (12)
R3: (1 sc, inc) ×6 (18)
Do not fasten off.
Leaf 1: Ch 6. Starting in the second chain from the hook, work sl st, sc, hdc, dc, dc. Sl st into the next crown stitch.
Repeat the leaf sequence five times, distributing the leaves around the crown. For very bulky yarn, use ch 5 rather than ch 6 so the leaves do not cover too much of the strawberry.
Fasten off and leave approximately 20 cm for sewing.
White Strawberry Seeds
Yarn: cream or white.
Cut approximately 60 cm of yarn and thread it onto a tapestry needle. Bring the needle from the rear of the strawberry to the front.
Make one short vertical stitch approximately 5–7 mm long. Move diagonally downward before making the next seed.
Place approximately 12–18 seeds over the strawberry, adjusting the number according to the actual dimensions of the finished fruit. Offset consecutive rows rather than positioning every seed directly beneath the previous one.
Fasten the yarn securely on the back.
Daisy Center
Yarn: yellow.
R1: 6 sc in MR (6)
R2: inc ×6 (12)
Fasten off and leave a 15 cm tail.
Daisy Petals
Yarn: cream or white.
Join the white yarn to any stitch of the yellow center.
Petal 1: Ch 4, work 2 dc in the same stitch, ch 3, then sl st into the same stitch.
Skip one center stitch and repeat the petal sequence around the flower until there are six petals.
Fasten off and leave approximately 20 cm for attachment.
Position the daisy immediately above the strawberry crown or between neighboring strawberries. Keeping the flower compact prevents it from covering the green leaves.
Optional Flat Decorative Patches — Make 2
The strawberry shown in the reference does not have cheeks or a face. If small circular decorative pieces are needed elsewhere in the blanket, use the following construction:
R1: 6 sc in MR (6)
R2: inc ×6 (12)
Sl st to the first stitch and fasten off.
Omit these pieces when matching the pictured strawberry design.
Blanket Attachment Base
A separate backing disc helps a plush strawberry sit against soft blanket yarn without rolling sideways.
Yarn: strawberry pink.
R1: 6 sc in MR (6)
R2: inc ×6 (12)
R3: (1 sc, inc) ×6 (18)
R4: (2 sc, inc) ×6 (24)
R5: (3 sc, inc) ×6 (30)
R6: (4 sc, inc) ×6 (36)
Fasten off. Leave approximately a 40 cm sewing tail.
Place the disc behind the strawberry. Sew the disc to the fruit around approximately three quarters of its circumference. Keep the rear surface flat while maintaining the rounded front.
Adjust the stuffing before closing the remaining opening. The lower point should remain defined rather than becoming spherical.
Textured Blanket Panels
The pictured blanket alternates broad pink, cream and sage horizontal sections with raised vertical bars. The complete blanket dimensions and stitch counts are not visible in the reference, so the background should be sized independently before the appliqués are positioned.
Crochet the base as rectangular horizontal sections in the required blanket width. Use dense stitches when working with chenille yarn so the finished fabric can support the raised strawberries.
The raised vertical bars can be worked as separate crochet strips and sewn over the background or created with relief-style stitches. Maintain consistent spacing between them across each color section.
Before making every strawberry, complete one test motif and pin it to the cream panel. Use that motif to calculate the number of strawberries required and the spacing between each berry.
Scalloped Border
The pictured blanket has a prominent pink scalloped outer border.
Work one foundation round of sc evenly around the completed blanket. At each corner, place 3 sc into the corner space to prevent the edging from pulling inward.
For the decorative round, repeat:
Skip 1 st, 5 dc in next st, skip 1 st, sl st in next st.
Continue around the blanket. Adjust the spacing slightly near each corner when necessary so a complete shell sits cleanly around the turn rather than being compressed into the corner.
Assembly
- Sew the backing disc to the strawberry body so the rear surface lies flat while the front retains its rounded profile.
- Position the strawberry on the cream blanket section before attaching the leaves.
- Stitch around the backing disc with matching yarn, catching the blanket stitches without pulling tightly enough to pucker the panel.
- Center the green crown over the broad upper section of the strawberry and sew its circular center down first.
- Tack each leaf tip independently so the leaves remain correctly positioned after washing and handling.
- Add the white seed stitches if they were not embroidered before attaching the berry.
- Position the daisy above the strawberry with a small gap between the yellow center and green leaves.
- Sew the daisy center first, then secure each petal near its base while leaving the outside of the petal slightly raised.
- Repeat the motif placement across the blanket, checking alignment against the horizontal panels rather than using the scalloped outer border as the reference line.
- Weave each tail through several neighboring stitches on the wrong side, reverse direction once, trim the excess and inspect every appliqué for loose attachment points.
The completed motif should have a raised strawberry front while keeping the reverse side of the blanket comparatively flat.
7 Technical Tips for a Cleaner Strawberry Blanket
- Control marker drift. Place a stitch marker in the first stitch of every strawberry round. Losing the starting point during the 36-stitch section can shift the decrease columns and twist the berry.
- Avoid overstuffing. Keep the rear third of the strawberry noticeably flatter than its front. A spherical motif will roll away from the blanket and place unnecessary tension on its attachment stitches.
- Hide the decreases. Use invisible decreases from R11 through the final shaping rounds. Standard decreases can produce gaps large enough for white stuffing to become visible.
- Measure the seed spacing. Keep embroidered seeds approximately 10–15 mm apart when making a large chenille strawberry. Placing them too closely changes the visual proportions of the fruit.
- Watch chenille tension. Do not close the magic ring by pulling aggressively on the fuzzy outer fibers. Tighten gradually because some chenille yarns can separate from their internal core.
- Pin four reference points. Pin the strawberry at the top, bottom and both widest side points before sewing. Attaching one side first can distort an 8–11 cm berry into an uneven teardrop.
- Leave long sewing tails. Keep attachment tails at least 20–25 cm long. Weave the tail through several stitches and reverse direction before trimming so the plush yarn cannot work loose easily.
Conclusion
Make one test berry before committing to the complete blanket layout. Measure its width, pin it against the intended cream panel and check that the green crown and daisy do not overlap neighboring raised bars. That test establishes consistent spacing for every remaining motif and identifies yarn-scale problems before final assembly. For a close interpretation of the reference design, repeat pink strawberries across the cream sections and reserve sage for contrasting textured bands. Save this crochet strawberry appliqué pattern to Pinterest and share the completed blanket on Instagram with #StrawberryAppliqueBlanket. Which border arrangement works better for your blanket: alternating strawberries and daisies or daisies between every strawberry?









