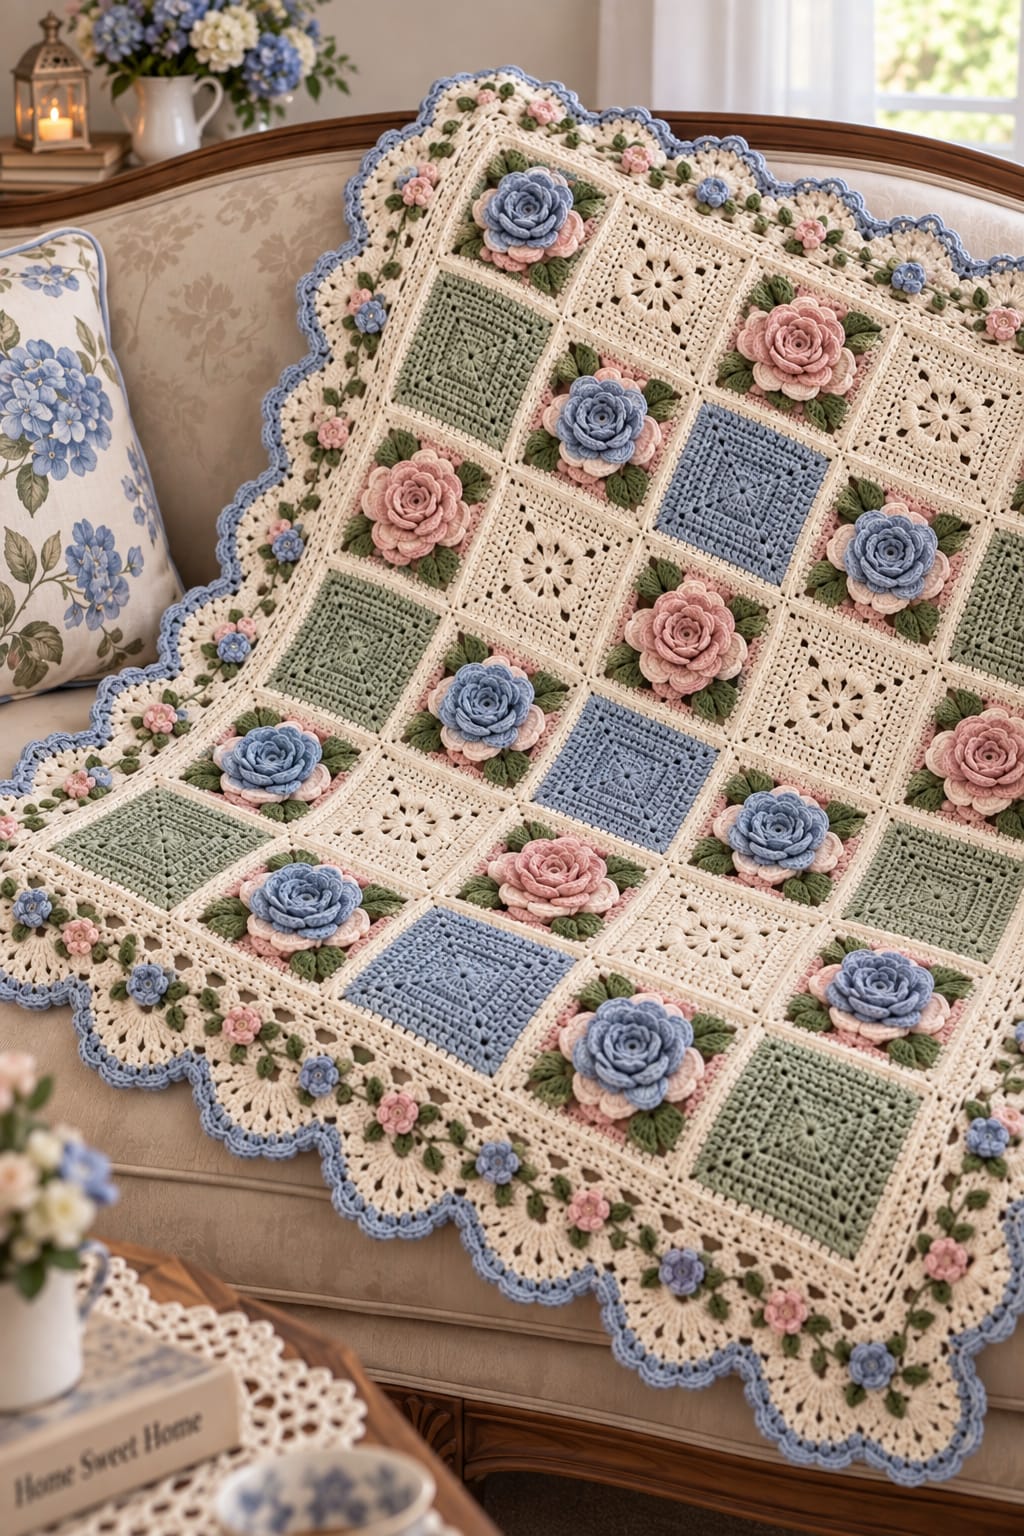
A crochet rose needs several distinct petal levels to create the tightly layered center and broad outer bloom visible in this blanket. This 3D rose granny square blanket crochet pattern combines raised blue and blush roses, sage leaves, ivory openwork squares, colored textured blocks, cream joining seams, and an elaborate floral lace border. Worked with DK or light worsted yarn and a 4.0 mm hook, the modular construction can be adjusted for different blanket dimensions.
What Makes This 3D Rose Granny Square Blanket Different
The central feature is a dimensional rose rather than a flat flower motif. Small inner petals form a compact spiral, medium petals establish the recognizable rose shape, and wider outer petals spread across the square. Keeping those layers separate prevents the flower from collapsing into one thick circular cluster.
Four green leaves frame each large rose. Their placement creates a transition between the sculptural flower and the geometric cream square surrounding it. The blanket then alternates these floral blocks with dusty blue, sage green, and ivory openwork squares.
The joining seams remain visible. Cream yarn outlines each motif and gives the blanket a consistent grid even where neighboring squares use different colors.
The border adds another construction level: openwork cream crochet, small leaves, miniature pink and blue flowers, large lace shells, and a contrasting dusty-blue scalloped edge.
Project Information
| Skill Level | Construction | Square Size | Hook | Yarn |
|---|---|---|---|---|
| Intermediate | Joined crochet motifs | Approx. 14–15 cm after blocking | 4.0 mm | DK / light worsted |
A throw made from approximately 14–15 cm squares can be adjusted by adding or removing complete rows and columns. Allow additional width and length for the substantial lace border.
Materials and Tools
Yarn
- Warm ivory or cream — DK/light worsted — squares, joining seams, flower foundations, and lace border.
- Dusty blue — DK/light worsted — large roses, solid squares, miniature flowers, and outer edging.
- Blush pink — DK/light worsted — large roses, flower underlayers, and miniature border flowers.
- Sage green — DK/light worsted — solid squares and selected leaves.
- Olive green — DK/light worsted — leaves and border vine details.
Purchase the largest quantity in cream because it appears in the joining seams, background motifs, and wide border. Keep every color within the same yarn-weight range so the finished squares block to consistent dimensions.
Tools
- 4.0 mm crochet hook
- Yarn needle
- Scissors
- Locking stitch markers
- Blocking mats
- Rust-resistant blocking pins
- Tape measure
Abbreviations
- MR — magic ring
- ch — chain
- sc — single crochet
- hdc — half double crochet
- dc — double crochet
- tr — treble crochet
- sl st — slip stitch
- st/sts — stitch/stitches
- sp — space
- ch-sp — chain space
- BLO — back loop only
- FLO — front loop only
- yo — yarn over
Keep the unused loops accessible when working the rose foundation. These loops provide attachment points for additional petal layers without requiring the petals to be sewn individually.
3D Rose Granny Square Blanket Pattern
Make all motifs separately before assembling the blanket. The instructions create an image-inspired floral blanket using original modular construction.
Large 3D Rose Granny Square
Use dusty blue or blush pink for the rose, olive or sage green for the leaves, and cream for the surrounding square.
Round 1 — Rose Foundation
With the selected rose color, make an MR.
Ch 1 and work 8 sc into the MR. Pull the ring closed and sl st to the first sc. (8 sts)
Round 2 — Foundation Increase
Ch 1.
Work 2 sc in each stitch around.
Sl st to the first sc. (16 sts)
Round 3 — Inner Rose Petals
Work this round through the front loops only.
In the first front loop work (sc, 2 hdc, sc).
Sl st into the next front loop.
Repeat the petal sequence around the center.
The small petals should curve upward toward the middle rather than lying flat.
Round 4 — Middle Rose Petals
Join the same rose color into an unused back loop from the foundation round.
Ch 1.
Work (sc, hdc, 2 dc, hdc, sc) across the next available foundation area.
Sl st into the following attachment point.
Repeat around, positioning each middle petal behind the gap between two inner petals.
Keep the petal bases compact so the flower develops height at the center.
Round 5 — Outer Rose Petals
Work behind the previous petal layer.
For each outer petal work (sc, hdc, 3 dc, hdc, sc) into the designated attachment space.
Sl st between petals.
Repeat around until the outer rose layer is complete.
Fasten off and weave the tail into the back of the flower.
Rose Leaves
Use olive or sage green yarn.
Join green yarn behind the outer petals.
Ch 7.
Beginning in the second chain from the hook, work:
sc, hdc, dc, tr, dc, hdc.
Working along the opposite side of the foundation chain, work:
hdc, dc, tr, dc, hdc, sc.
Sl st at the base.
One leaf is complete.
Repeat until the rose has four leaves, placing one diagonally toward each future corner of the square.
Fasten off.
Squaring the Rose Motif
Change to warm cream yarn.
Square Round 1
Join cream yarn behind the flower.
Ch 3.
Work dc stitches evenly around the flower foundation, keeping the four leaves on the front of the work.
At four evenly spaced positions work (2 dc, ch 2, 2 dc) to establish the corners.
Sl st to the top of the beginning ch-3.
Square Round 2
Ch 3 and dc in every stitch across the first side.
In the corner ch-2 space work (2 dc, ch 2, 2 dc).
Repeat across all four sides.
Sl st to the beginning ch-3.
Square Round 3
Repeat the established square expansion.
Work one dc in every side stitch and (2 dc, ch 2, 2 dc) into every corner.
Fasten off when the square measures approximately 14–15 cm.
Block the motif without flattening the rose petals.
Dusty Blue Textured Square
Use dusty blue yarn.
Round 1
Make an MR.
Ch 3, 2 dc into the ring, ch 2.
Work (3 dc, ch 2) three more times.
Sl st to the beginning ch-3.
Round 2
Sl st to the first corner.
Work (3 dc, ch 2, 3 dc) into every corner space.
Work dc stitches evenly between the corners.
Round 3
Ch 3 and dc across each side.
Work (2 dc, ch 2, 2 dc) into each corner.
Join with a sl st.
Rounds 4–6
Continue the established square construction until the motif reaches approximately 14–15 cm.
For subtle ridges, work one selected round through the back loops only.
Fasten off and block.
Sage Green Textured Square
Make the sage-green square using the same stitch sequence and dimensions as the dusty-blue square.
Keep the number of rounds identical. If the green yarn behaves differently after washing, adjust hook tension rather than adding an extra round to individual motifs.
Block every sage square to approximately 14–15 cm.
Ivory Openwork Granny Square
Use warm ivory or cream yarn.
Round 1
Make an MR.
Ch 4 to count as one dc and ch 1.
Work (dc, ch 1) seven more times into the ring.
Sl st to the third chain of the beginning chain. (8 dc, 8 spaces)
Round 2
Sl st into the first ch-1 space.
Ch 3, dc in the same space, ch 2.
Work 2 dc in the next ch-1 space, ch 2.
Repeat around.
Sl st to the beginning ch-3.
Round 3 — Establish Corners
Work toward the first designated corner space.
In each corner work (2 dc, ch 3, 2 dc).
Between corners, alternate dc groups and ch-1 spaces to maintain the open floral appearance.
Repeat around.
Rounds 4–6
Continue expanding the square while preserving the four corners and evenly distributing the open spaces.
The completed square should measure approximately 14–15 cm after blocking.
Fasten off.
Planning the Blanket Layout
Block every motif before determining the final arrangement. Large dimensional roses can make an unblocked square appear smaller because the flower pulls fabric toward its center.
Arrange rose squares between solid blue, sage, and ivory openwork squares. Avoid placing several large roses directly beside one another unless a concentrated floral section is intentional.
Alternate blush and dusty-blue roses across the blanket. Position sage squares between stronger blue and pink areas to break up repeated color.
A practical throw can use approximately 7 squares across and 9 squares long. With motifs blocked to 14–15 cm, the center panel will measure roughly 98–105 cm across before the border.
Photograph the complete arrangement before collecting the squares for joining.
Joining the Granny Squares
Use cream yarn to create the visible grid between motifs.
Place two squares with corresponding edges aligned.
Join the edges using slip stitches, single crochet, or a flat crochet join. Insert the hook through corresponding stitches on both motifs so the seam does not drift sideways.
Join individual squares into complete rows first. Once all rows are assembled, join the long horizontal edges.
Check every four-square intersection before fastening off. Bulky knots at these intersections can create raised points that remain visible after blocking.
Wide Floral Crochet Border
The border should be worked only after the complete center panel has been assembled and measured.
Border Round 1 — Foundation
Join cream yarn at any corner.
Ch 1 and sc evenly around the blanket.
At each corner work (sc, ch 2, sc).
Sl st to the first sc.
Border Round 2
Ch 3 and dc in each stitch around.
At every corner work (2 dc, ch 2, 2 dc).
Sl st to the beginning ch-3.
Border Round 3 — Openwork
Ch 1 and sc in the first stitch.
Work ch 3, skip 2 sts, sc in the next stitch.
Repeat along each side.
At the corners work sc, ch 5, sc.
Border Round 4 — Lace Fans
Sl st into the first ch-3 space.
Work 5 dc into the space.
Sc into the next ch-3 space.
Repeat around the blanket.
Use the larger corner spaces to turn the lace without pulling the fabric inward.
Miniature Border Roses
The small flowers distributed around the border repeat the colors of the large central roses without adding the same amount of bulk.
Mini Rose — Make as Needed
With dusty blue or blush pink yarn, make an MR.
Round 1: 6 sc into MR. Sl st to first sc. (6)
Round 2: In each stitch work (sc, 2 hdc, sc).
Sl st after the final petal and fasten off, leaving a sewing tail.
For slightly larger border flowers, work (sc, hdc, 2 dc, hdc, sc) for each petal instead.
Miniature Crochet Leaves
With olive-green yarn, ch 5.
Starting in the second chain from the hook work:
sc, hdc, dc, sc.
Work down the opposite side:
sc, dc, hdc, sc.
Sl st at the base and fasten off.
Make enough leaves to place small green pairs between the miniature border flowers.
Attaching the Floral Border Details
Lay the blanket flat before positioning the small flowers. Place miniature blue and pink roses at regular intervals around the cream border.
Do not sew every flower immediately. Pin the complete arrangement first and check the spacing from several directions.
Position pairs of small green leaves beside selected flowers. The leaves should point along the border rather than toward the blanket center.
Sew through the flower bases only. Avoid pulling the stitches through the outer petals because that flattens the dimensional shape.
Large Cream Lace Shells
Lace Round 1
Join cream yarn beyond the floral-detail section.
Work sc, ch 5, skip the appropriate number of stitches, sc repeatedly around the blanket.
Maintain equal chain arches along each side.
Lace Round 2
Sl st into the first ch-5 space.
Work 7 dc into the space.
Sc into the next ch-5 space.
Repeat around.
Lace Round 3
Work a second openwork round above the shells.
Use ch 3 or ch 4 arches between anchor stitches, depending on the width needed to keep the edge flat.
At each corner, add enough chain space for the lace to turn without cupping.
Dusty Blue Scalloped Edging
Change to dusty-blue yarn for the final contrasting edge.
Join at the beginning of any cream shell.
Sc into the first stitch.
Work 5 dc into the center stitch or space of the shell.
Sc at the opposite side of the shell.
Repeat around the complete blanket.
At each corner, use a larger scallop or an additional chain space if required to keep the corner flat.
Fasten off and weave the yarn tail into the wrong side.
Assembly and Finishing
- Complete all large rose, dusty-blue, sage-green, and ivory openwork squares.
- Block every square to approximately 14–15 cm without pressing the dimensional rose petals flat.
- Arrange all motifs in the planned rectangular grid and photograph their positions.
- Join the squares into horizontal rows with cream yarn.
- Join the completed rows while matching every vertical seam at the intersections.
- Work the cream foundation and openwork border rounds around the complete center panel.
- Make the miniature blue and pink flowers and green leaves separately.
- Pin and sew the miniature floral details around the border before beginning the largest lace shells.
- Complete the cream lace section and finish with the dusty-blue scalloped edging.
- Block the complete blanket, shaping the border scallops and arranging every large rose before allowing the fabric to dry.
The finished blanket should contain a structured grid of dimensional roses, colored textured squares, ivory openwork motifs, green leaves, miniature border flowers, and a broad scalloped lace frame.
7 Technical Tips for 3D Rose Granny Square Blankets
- Rose center opening instead of curling: Keep the first petal layer compact around the center ring. A center opening wider than approximately 1 cm weakens the tightly layered rose appearance.
- Outer petals collapsing: Position each middle and outer petal between two petals from the previous layer. Stacking all petal bases directly above one another creates thick ridges and leaves large gaps elsewhere.
- Rose square becoming distorted: Block the surrounding square to approximately 14–15 cm without stretching the flower itself. Pulling the rose during blocking can flatten the petal layers permanently.
- Leaves disappearing beneath the flower: Pin all four leaves before completing the surrounding square. Each leaf should remain visible for approximately 3–4 cm beyond the outer rose petals.
- Joined rows developing waves: Match one stitch on the first square to one corresponding stitch on the second. Skipping stitches to compensate for mismatched square dimensions shortens the seam and causes puckering.
- Border corners curling: Give each corner more chain space than a normal side repeat. A lace border that turns a 90-degree corner without additional stitches will pull inward as later rounds are added.
- Miniature border flowers flattening: Sew through the flower center and base rather than through the outer petal tips. Attachment stitches placed through the petal edges remove the raised profile visible around the border.
Adjusting the Blanket Size
Change the finished dimensions by adding or removing complete square rows and columns. With blocked squares measuring approximately 15 cm, six motifs span about 90 cm before joining and border allowances, while eight motifs span approximately 120 cm.
For a smaller blanket, reduce both the center grid and the number of lace rounds. A larger bed blanket can use additional square rows while retaining the same rose-to-solid-square ratio.
Avoid changing the hook size only for selected motifs. Every square in one blanket should use compatible yarn and tension so the joining seams remain straight.
Color Placement
Dusty blue and blush pink are the strongest flower colors, so distribute them across the entire grid rather than concentrating one color at either end. Sage-green squares provide lower-contrast areas between the dimensional roses.
Ivory openwork squares should also be spaced throughout the blanket. They connect visually with the cream joins and border while providing open areas between the heavily textured floral blocks.
Alternate blue and pink roses whenever possible. When two flower squares meet diagonally, changing the rose color helps preserve the checkerboard effect.
Photograph the proposed layout and view it in grayscale before joining. This makes uneven concentrations of dark blue, green, or light cream easier to detect.
Blocking the Finished Blanket
Measure the assembled center panel before blocking and record both dimensions. Lay the blanket on blocking mats and align the internal joining seams first.
Square the four corners before pinning the lace. Shape each large cream shell individually, then position the dusty-blue scallops at equal intervals.
Do not place heavy objects over the 3D roses. Arrange the inner, middle, and outer petals by hand so each layer remains visible.
Check the miniature border flowers as well. Turn their petals toward the front and position the green leaves along the direction of the border.
Allow the blanket to dry completely before removing the pins or folding it.
Finishing the Rose Granny Square Blanket
Inspect the reverse side of every large flower and miniature border rose before trimming the final tails. Dimensional motifs place more stress on their attachment points than flat granny squares, so the flower bases and leaves should remain firmly anchored while the petals stay free.
This 3D rose granny square blanket crochet pattern can be resized by changing the number of motifs without altering the individual rose construction. Record the blocked square measurement and final color arrangement before making a second version. Photograph the finished blanket both flat and draped to show the dimensional petals, then save the project to Pinterest or share it on Instagram with #3DRoseGrannySquareBlanket.
For your version, would you place the dusty-blue roses on the blush foundations or reverse the two colors for a stronger contrast?









