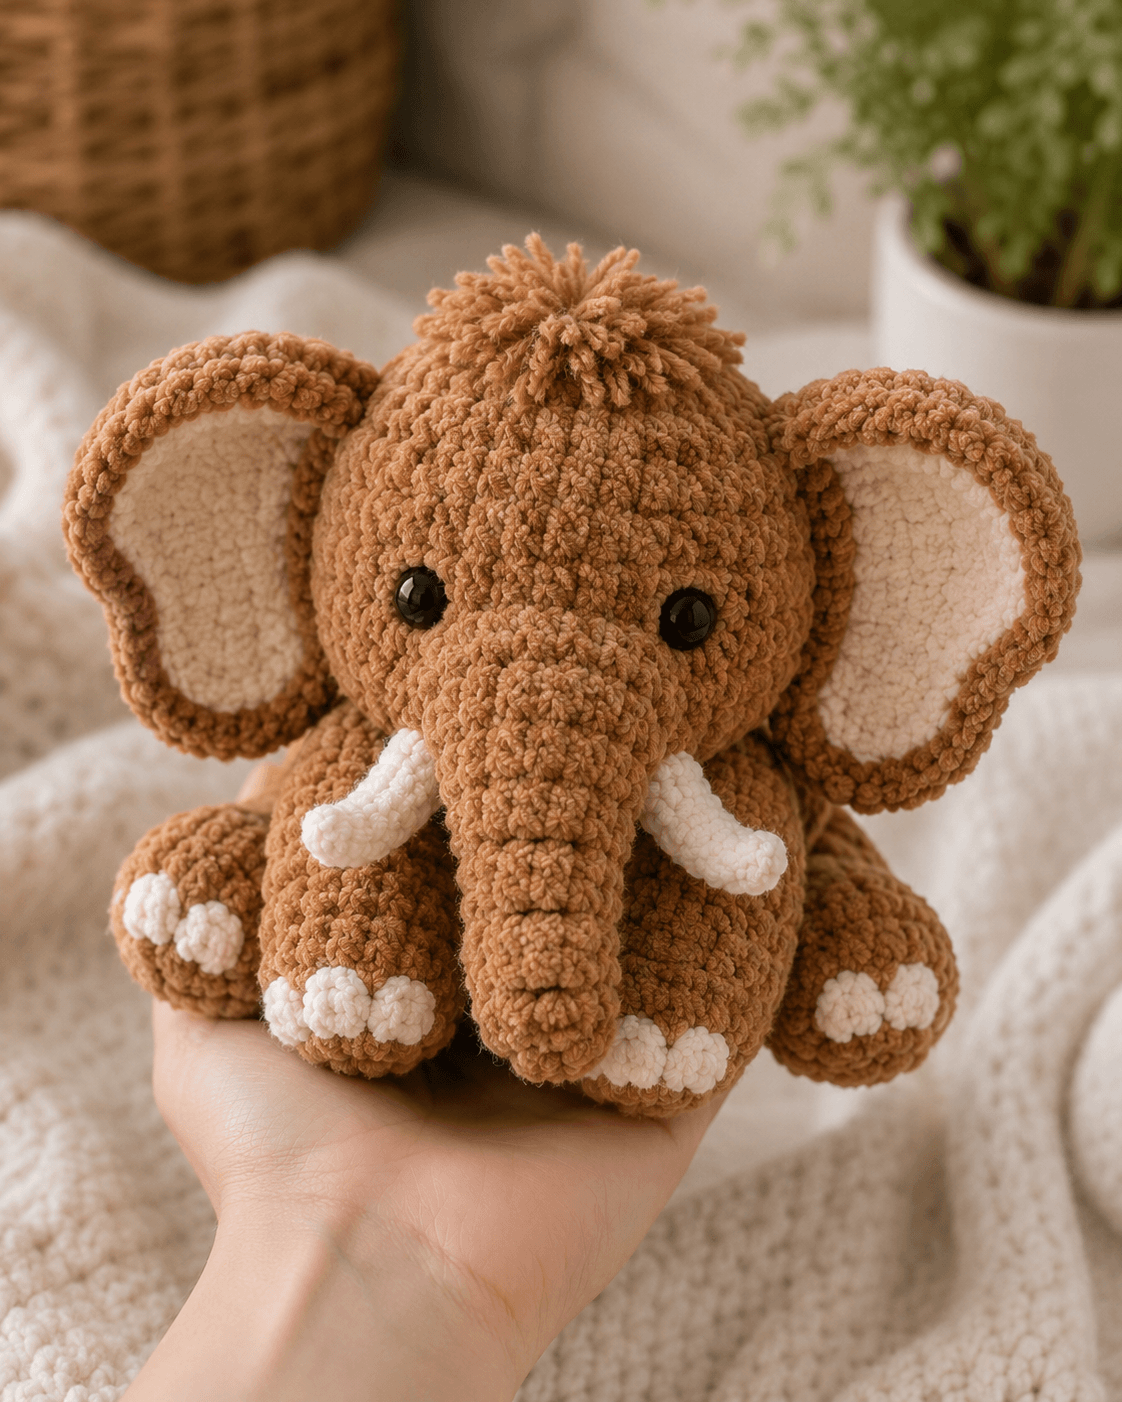
Tusks force the trunk to stay honest. This woolly mammoth amigurumi crochet pattern is built around a long centered trunk, curved white tusks, oversized ears, a compact seated body, and a short top hair tuft in chunky plush yarn. Use a 4.5 mm hook for a hand-sized result of about 16 to 18 cm seated. The project suits an intermediate maker because placement controls the silhouette more than stitch variety.
The Design: What Makes This Mammoth Different
This version is not a plain elephant with brown yarn. The trunk is longer, the ears sit broad but not oversized enough to hide the cheeks, and the tusks project from the lower face instead of drifting outward from the sides. That balance matters because a mammoth loses its species read fast when the trunk thickens too much or the tusks sit too low. A second structural choice is the seated body. The photo shows a squat plush with front feet placed close to the centerline and back feet bracing from the sides. A third choice is the crown tuft. That small section changes the whole top outline and keeps the toy from reading as a standard safari elephant. One common mistake in a mammoth crochet pattern is pushing the eyes too wide to make room for the trunk. Then the face flattens and the tusks stop framing the center properly.
Project Info at a Glance
| Skill Level | Time | Finished Size | Hook | Best For |
|---|---|---|---|---|
| Intermediate | 6–8 hours | About 16–18 cm seated | 4.5 mm | Gift make, shelf display, nursery decor |
Materials and Tools
Yarn
- Warm brown — chunky plush / chenille — about 95 g — for head, trunk, body, ears, arms, legs, tuft
- Cream — chunky plush or soft contrast yarn — about 20 g — for inner ear panels
- White — chunky plush or soft contrast yarn — about 15 g — for tusks and toe details
- Black — scrap amount — for facial embroidery if needed
Tools
- Hook 4.5 mm
- 10–12 mm safety eyes
- Polyester stuffing
- Tapestry needle
- Stitch markers
- Straight pins
- Scissors
Abbreviations
MR = magic ring, sc = single crochet, inc = increase, dec = decrease, sl st = slip stitch, ch = chain, BLO = back loop only, FO = fasten off. Use invisible decrease on visible shaping rounds so the plush face narrows without hard corners beside the trunk base.
Pattern — Step by Step
Continuous spiral unless noted.
Head (Make 1)
Yarn: warm brown — Standard amigurumi math adapted to photo proportions
R1: 6 sc in MR (6)
R2: inc x6 (12)
R3: [sc, inc] x6 (18)
R4: [2 sc, inc] x6 (24)
R5: [3 sc, inc] x6 (30)
R6: [4 sc, inc] x6 (36)
R7–12: sc around (36)
R13: [4 sc, dec] x6 (30)
R14: sc around (30)
R15: [3 sc, dec] x6 (24)
R16: sc around (24)
Insert eyes between R10 and R11, about 8 stitches apart. Stuff firmly before closing.
R17: [2 sc, dec] x6 (18)
R18: [sc, dec] x6 (12)
R19: dec x6 (6)
FO. Leave a 25 cm tail.
Trunk (Make 1)
Yarn: warm brown — Narrow tube shaped for the photo
R1: 6 sc in MR (6)
R2: [sc, inc] x3 (9)
R3–10: sc around (9)
R11: [sc, dec] x3 (6)
R12–13: sc around (6)
Stuff lightly through the upper half only. Keep the tip softer than the base.
FO. Leave a 30 cm tail.
Tusks (Make 2)
Yarn: white — Curved tusks
R1: 6 sc in MR (6)
R2: [sc, inc] x3 (9)
R3–5: sc around (9)
R6: [sc, dec] x3 (6)
R7–8: sc around (6)
Stuff lightly at the base only. Curve each tusk before sewing so the tips angle outward slightly.
FO. Leave 20 cm tails.
Ears (Make 2)
Yarn: outer warm brown, inner cream
Outer ear:
R1: 6 sc in MR (6)
R2: inc x6 (12)
R3: [sc, inc] x6 (18)
R4: [2 sc, inc] x6 (24)
R5: [3 sc, inc] x6 (30)
R6: sc around (30)
R7: [3 sc, dec] x6 (24)
Inner ear patch:
R1: 6 sc in MR (6)
R2: inc x6 (12)
R3: [sc, inc] x6 (18)
R4: [2 sc, inc] x6 (24)
Sew the cream patch centered inside the brown ear. Do not stuff. Curl the upper edge slightly before attaching.
FO. Leave 20 cm tails on outer ears.
Body (Make 1)
Yarn: warm brown — Standard math adapted to seated plush silhouette
R1: 6 sc in MR (6)
R2: inc x6 (12)
R3: [sc, inc] x6 (18)
R4: [2 sc, inc] x6 (24)
R5: [3 sc, inc] x6 (30)
R6–10: sc around (30)
R11: [3 sc, dec] x6 (24)
R12: sc around (24)
R13: [2 sc, dec] x6 (18)
R14: sc around (18)
Stuff the base densely so the mammoth sits level. Keep the upper body slightly softer.
FO. Leave a 30 cm tail.
Arms / Front Legs (Make 2)
Yarn: warm brown
R1: 6 sc in MR (6)
R2: inc x6 (12)
R3–4: sc around (12)
R5: [sc, dec] x4 (8)
R6–8: sc around (8)
Stuff the paw area and lower half only. Flatten the top edge.
FO. Leave 20 cm tails.
Back Legs (Make 2)
Yarn: warm brown
R1: 6 sc in MR (6)
R2: inc x6 (12)
R3: [sc, inc] x6 (18)
R4–5: sc around (18)
R6: [sc, dec] x6 (12)
R7–8: sc around (12)
Stuff moderately. Flatten the top edge so the legs angle outward in a seated pose.
FO. Leave 25 cm tails.
Toe Tufts / Foot Details (Make 8)
Yarn: white — Small toe details
R1: 6 sc in MR (6)
R2: sc around (6)
Attach in clustered groups across the visible front of each foot.
FO. Leave 10 cm tails.
Top Hair Tuft (Make 1)
Yarn: warm brown — Tassel-style tuft
Wrap yarn 18–22 times around two fingers or a small card. Tie tightly at the center with a separate strand. Trim loops evenly and fluff. Leave long attachment tails.
Assembly
- Sew the trunk centered low on the face so its upper edge sits below the eye line.
- Attach the tusks at the lower sides of the trunk base, keeping both curves mirrored.
- Sew the ears high on the head, with the lower edges near the eye line and the top edges flaring outward.
- Sew the head to the body with the face angled slightly downward, not fully upright.
- Attach the back legs low and slightly forward so the mammoth sits without rocking.
- Sew the arms high on the body and angle them inward toward the center front.
- Attach the white toe details to the front of each visible foot.
- Pin the head from front view and check that the tusks do not hide the feet.
- Sew the hair tuft to the top center of the head and trim it to a short rounded crown.
- Reshape the stuffing by hand and adjust the ear curve before weaving in all remaining tails.
The finished mammoth should sit level, with the trunk centered between both tusks and the ears framing the head from the front view.
7 Technical Tips
- Pin the trunk before sewing any stitches. A shift of even one stitch off center is obvious because the trunk runs straight down the face.
- Do not overstuff the trunk. Excess fill makes the base flare outward and pushes into the cheek area below the eyes.
- Attach the tusks only after the trunk is fixed. If the tusks go on first, they often force the trunk seam off line by a few millimeters.
- Keep the body base firmer than the head. A soft lower section makes the mammoth sink backward once the head and tusks add forward weight.
- Test the ear angle with pins before sewing. If the inner ear edge sits more than about 1 cm behind the eye line, the front silhouette narrows too much.
- Use very small stitches on the white toe tufts. On plush yarn, larger stitches disappear into the pile and the foot details lose definition.
- Trim the top tuft after attachment, not before. Precut yarn often ends up too short once it is cinched and fluffed on the head.
Conclusion
This woolly mammoth amigurumi crochet pattern works because each part protects the species outline. The ears hold the width, the trunk controls the face, the tusks define the lower profile, and the tuft finishes the top line without adding bulk. Make the head first, test the trunk placement before locking the tusks, and pin the ears before committing to the final seam. That order keeps the proportions controlled. Share the finished piece on Pinterest and Instagram with #WoollyMammothAmigurumi. One practical question remains: did your tusks sit high enough to frame the trunk without covering the front feet?









