Introduction
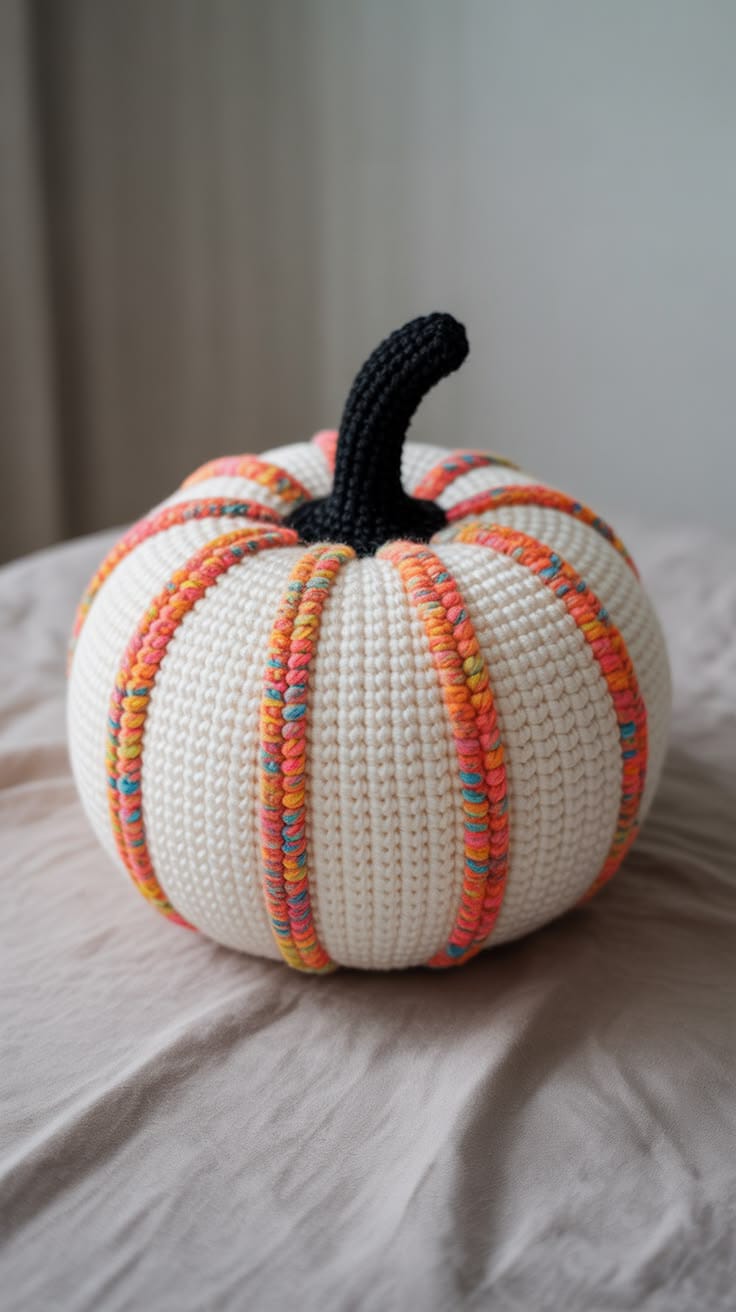
Eight rainbow-colored grooves leave no place to hide a crooked pumpkin section. This white crochet pumpkin pattern uses worsted yarn and a 5 mm hook to make an approximately 22–25 cm body with a tall black stem. A smooth ivory shell is sculpted first, then narrow coral, pink, yellow and blue surface stitches are added inside the grooves to create the raised striped structure shown in the reference.
The Design: What Makes This White Pumpkin Different
The body is crocheted entirely in ivory before any colored ribs are added. That separates structural shaping from decoration: white yarn first compresses the stuffed sphere into eight broad lobes, then a variegated strand follows those recessed lines as raised surface crochet. The two layers matter because decorative yarn alone can cut into the fabric or drift sideways when pulled hard enough to shape a large pumpkin. A 42-stitch plateau gives the body substantial width without creating an excessively tall sphere. The black stem supplies the strongest contrast and is intentionally long enough to bend above the crown. This colorful crochet pumpkin also requires precise groove spacing. One frequent mistake is marking the eight channels by eye only from the front; the spacing may look correct from one angle while several sections become noticeably narrower around the back.
Project Info at a Glance
| Skill Level | Time | Finished Size | Hook | Best For |
|---|---|---|---|---|
| Intermediate | 7–9 hours | Approx. 22–25 cm wide × 26–30 cm high including stem | 5.0 mm | Modern fall decor, shelves and tabletop displays |
Materials and Tools
Yarn
- Warm ivory / soft white — worsted / Aran #4 — approximately 170–220 g — complete pumpkin body and hidden shaping strands.
- Variegated coral, pink, mustard and turquoise — worsted / Aran #4 — approximately 30–40 g — eight raised decorative ribs.
- Black — worsted / Aran #4 — approximately 20–30 g — tall curved stem.
Choose an accent yarn that changes color over fairly short intervals. Long color repeats can produce one rib almost entirely orange and another almost entirely blue, reducing the evenly scattered color effect visible in the reference.
Tools
- 5.0 mm crochet hook
- 4.0–4.5 mm crochet hook for the raised surface ribs if looser definition is needed
- Polyester stuffing — approximately 230–300 g
- Long tapestry or doll needle
- Standard yarn needle
- Eight locking stitch markers
- Scissors
- Measuring tape
Abbreviations
- MR — magic ring
- sc — single crochet
- inc — two single crochet stitches in one stitch
- dec — invisible decrease
- sl st — slip stitch
- ch — chain
- surface sl st — slip stitch worked with the yarn held behind the finished fabric
An invisible decrease is worked through the front loops of the next two stitches before completing one single crochet through both loops.
Pattern — Step by Step
Work the white body in a continuous spiral. Keep a marker in the first stitch of every round.
White Pumpkin Body
Yarn: warm ivory — based on standard six-stitch amigurumi shaping used in round-worked pumpkins.
R1: 6 sc in MR (6)
R2: inc ×6 (12)
R3: (sc, inc) ×6 (18)
R4: (2 sc, inc) ×6 (24)
R5: (3 sc, inc) ×6 (30)
R6: (4 sc, inc) ×6 (36)
R7: (5 sc, inc) ×6 (42)
R8: sc around (42)
R9: sc around (42)
R10: sc around (42)
R11: sc around (42)
R12: sc around (42)
R13: sc around (42)
R14: sc around (42)
R15: sc around (42)
R16: sc around (42)
R17: sc around (42)
R18: sc around (42)
R19: sc around (42)
R20: sc around (42)
R21: (5 sc, dec) ×6 (36)
R22: sc around (36)
R23: (4 sc, dec) ×6 (30)
R24: sc around (30)
R25: (3 sc, dec) ×6 (24)
R26: sc around (24)
R27: (2 sc, dec) ×6 (18)
R28: sc around (18)
R29: (sc, dec) ×6 (12)
R30: sc around (12)
R31: dec ×6 (6)
Begin stuffing after R21. Pack the outer wall evenly, but leave the central vertical axis approximately 15–20 percent softer than the circumference. Add the final stuffing before R31.
Fasten off. Leave a 60 cm tail.
Close the White Body
Thread the remaining yarn tail through the front loops of the final six stitches.
Pull the opening closed.
Pass through the center once more and bury the tail.
The shape should now resemble a firm rounded ball with no major lobe definition.
Compress the Body Vertically
Yarn: white.
Cut approximately 150 cm of white yarn.
Thread the long needle.
Insert through the exact bottom center and exit through the crown center.
Return through the same axis.
Pull slowly until the body loses approximately 1.5–2.5 cm of height.
The sides should widen slightly while the top and bottom develop shallow recesses.
Secure the strand temporarily.
Mark Eight Groove Positions
Look directly at the pumpkin from above.
Place eight stitch markers around the widest circumference at approximately 45-degree intervals.
Pair opposite positions before adding any shaping yarn.
Marker 1 should face Marker 5.
Marker 2 should face Marker 6.
Marker 3 should face Marker 7.
Marker 4 should face Marker 8.
Move any marker when one planned lobe appears more than approximately 10 mm wider than its opposite section.
White Sculpting Channel 1
Yarn: white.
Cut approximately 170 cm of yarn.
Anchor at the bottom center.
Carry the strand over the outside of the pumpkin through the first marked groove.
Insert the needle through the crown center and pass it through the full body.
Exit at the bottom center.
Pull until the groove sits approximately 12–16 mm below the fullest neighboring surfaces.
Do not make the final knot yet.
White Sculpting Channel 2
Work directly opposite Channel 1.
Match the groove depth.
Rotate the pumpkin and confirm that both lobes remain similar in width.
White Sculpting Channels 3 and 4
Move to the next marked position.
Pull the white yarn over that route and pass through the center again.
Complete its opposite groove immediately afterward.
Working in opposing pairs reduces stuffing migration toward the final unfinished section.
White Sculpting Channels 5 and 6
Repeat the same process through the third pair of markers.
Set the pumpkin on a level surface after tightening.
Push filling through the outside toward any lobe that looks noticeably flatter.
White Sculpting Channels 7 and 8
Complete the final opposite pair.
Rotate the pumpkin through 360 degrees.
Adjust all eight shaping lines until groove depths remain within approximately 3–4 mm of one another.
Knot the shaping yarn securely at the bottom.
Bury the structural tails through the stuffing.
Check the Eight-Lobe Body
Measure the pumpkin at its widest point.
Target approximately 22–25 cm.
Measure the body from base to crown.
Target approximately 16–19 cm before the stem.
The crown center should sit approximately 12–16 mm below the top of the surrounding lobes.
Correct shape problems now. The colored surface lines will make every irregular groove easier to see.
Raised Multicolor Rib 1
Yarn: variegated coral, pink, mustard and turquoise.
Hold the accent yarn behind the white pumpkin.
Insert the smaller hook through the fabric near the bottom center and catch the accent yarn.
Pull one loop through to the front.
Move approximately one white stitch upward inside the first sculpted groove.
Insert the hook from front to back, catch the yarn and pull it through the fabric and through the loop already on the hook.
One surface slip stitch is complete.
Continue upward to the crown.
Keep every surface stitch loose enough to rest on top of the white fabric. The colored line should not deepen the groove by more than approximately 2–3 mm.
Fasten off inside the crown recess.
Raised Multicolor Rib 2
Repeat inside the groove directly opposite Rib 1.
Start at the lower center and work upward.
Maintain approximately the same number of surface stitches as the first channel.
Opposite ribs should reach the crown at matching points.
Raised Multicolor Ribs 3 and 4
Add the next opposite pair.
Rotate the body after each rib.
Keep the colored chain centered inside the deepest part of the white sculpted channel.
If a line begins drifting sideways, remove the last three or four slip stitches and realign it rather than pulling the existing chain sideways.
Raised Multicolor Ribs 5 and 6
Repeat through the third pair of grooves.
Allow the variegated yarn to change color naturally.
Do not cut and rearrange color sections unless one long repeat creates a substantially different appearance from the other ribs.
Raised Multicolor Ribs 7 and 8
Complete the final pair.
Inspect all eight lines from above.
Every accent rib should converge within approximately 10–15 mm of the crown center.
Inspect the base in the same way.
Fasten off all accent ends and bury them beneath the white stitches.
Black Stem
Yarn: black.
R1: 6 sc in MR (6)
R2: sc around (6)
R3: sc around (6)
R4: sc around (6)
R5: sc around (6)
R6: sc around (6)
R7: sc around (6)
R8: sc around (6)
R9: sc around (6)
R10: sc around (6)
R11: sc around (6)
R12: sc around (6)
R13: (2 sc, inc) ×2 (8)
R14: sc around (8)
R15: (3 sc, inc) ×2 (10)
R16: sc around (10)
R17: (4 sc, inc) ×2 (12)
R18: sc around (12)
R19: (sc, inc) ×6 (18)
R20: sc around (18)
Stuff R14–R20 lightly. Leave R1–R13 mostly empty so the upper stem can bend without forming a hard kink.
Fasten off. Leave a 45 cm sewing tail.
Shape the Black Stem
Hold the widened lower section in one hand.
Bend the narrow upper stem gradually across approximately 6–8 cm.
The top should shift approximately 3–4 cm from the vertical center line.
If the stem springs upright, make two concealed black stitches along the inside of the curve.
Distribute the bend over several rounds. Folding one round sharply creates a visible hinge.
Optional Stem Base Disc
Yarn: black.
R1: 6 sc in MR (6)
R2: inc ×6 (12)
R3: (sc, inc) ×6 (18)
Fasten off. Leave a 30 cm sewing tail.
Use this disc only when the crown opening or shaping knots remain visible beneath the stem.
Assembly
- Complete the white body through R31 and close the final six stitches before adding any decorative color.
- Compress the body vertically by approximately 1.5–2.5 cm so the crown and base are recessed before marking grooves.
- Divide the circumference into eight sections and work all sculpting lines as four opposite pairs.
- Adjust the white grooves to approximately 12–16 mm depth and correct lobe width before beginning the surface crochet.
- Work one loose multicolor surface-slip-stitch line inside each of the eight grooves from base to crown.
- Inspect the colored ribs from above and below so all eight lines converge within approximately 10–15 mm of the two centers.
- Shape the black stem into a gradual curve across approximately 6–8 cm before sewing it to the pumpkin.
- Center the 18-stitch stem base over the crown recess and sew through several neighboring white lobes rather than only through the center closure.
- Rotate the finished pumpkin and correct any lobe that projects more than approximately 10 mm farther than its opposite section.
- Weave all white, multicolor and black tails through at least 4–5 cm of matching crochet, reverse direction once and trim only after the ends retract beneath the stitches.
The finished pumpkin should have eight broad ivory lobes, eight narrow raised multicolor channels and one long curved black stem centered over the recessed crown.
7 Technical Tips
- Colored ribs wandering sideways: Surface stitches placed outside the deepest point of the groove become visibly crooked over 15–20 cm. Remove the last few stitches as soon as the line shifts more than approximately 3 mm from the groove center.
- Pumpkin staying spherical: A densely packed core resists vertical compression and external sculpting. Leave the center approximately 15–20 percent softer than the outer wall before R31 closes.
- Eight lobes finishing unevenly: Working all grooves clockwise moves stuffing toward the unfinished side. Tighten one shaping line and then its exact opposite, keeping the markers approximately 45 degrees apart.
- Accent chains pulling the white body inward: Tight surface slip stitches act like a second sculpting cord. Keep each colored loop loose enough that the groove deepens no more than approximately 2–3 mm after decoration.
- Crown becoming crowded: Eight surface lines plus a wide stem base can create a bulky center. Stop every colored rib approximately 5–8 mm before the exact central hole and cover that meeting point with the black stem base.
- Stem forming a sharp elbow: Firm stuffing through all twenty rounds forces the bend into one narrow point. Leave R1–R13 almost empty and distribute the curve across approximately 6–8 cm.
- Pumpkin rocking: Strong sculpting can pull the bottom closure below the surrounding lobes. Push the lower center upward by approximately 5–8 mm and redistribute stuffing until at least three neighboring sections contact the surface.
Conclusion
Check the eight white grooves before introducing the variegated yarn because the colored lines magnify even small spacing errors. Next, set the pumpkin on a level surface, compare opposite lobe widths and correct the sculpting tension while every structural strand is still accessible. Work the surface crochet loosely, then attach the black stem only after all eight colored ribs meet cleanly around the crown. Share the finished white crochet pumpkin pattern project on Pinterest with a front image that shows the full rainbow rib arrangement, then post a crown close-up on Instagram using #RainbowRibCrochetPumpkin. For this pumpkin specifically, would you keep the black stem or change it to deep forest green?









