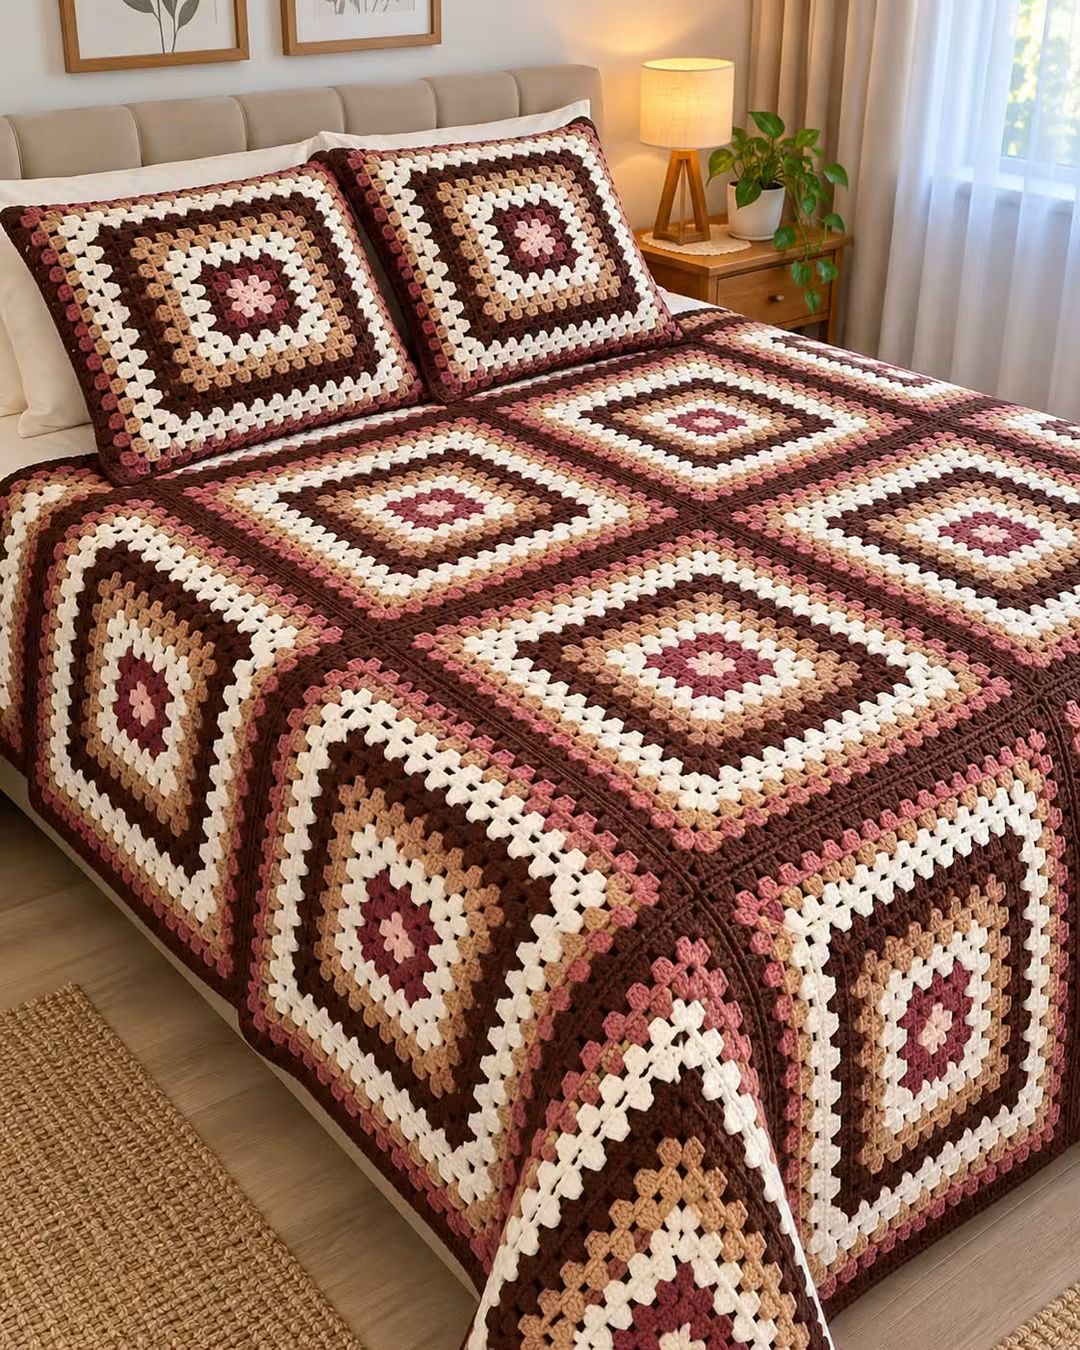
A rose-colored center changes the entire geometry of this blanket because every surrounding round has to preserve that small floral focal point inside a much larger square. This granny square crochet blanket pattern combines dusty rose, blush pink, camel, cream and chocolate brown in oversized motifs joined with dark seams. The modular construction uses classic granny clusters, making the dimensions easy to adjust for a throw, full bed or larger bedspread.
The Design: What Makes This Granny Square Blanket Different
The photographed bedspread uses oversized granny squares rather than dozens of small motifs. Each block begins with a compact pink center and expands through alternating bands of burgundy, cream, tan, chocolate brown and dusty rose. Repeating those colors in the same order gives the finished blanket a strong geometric rhythm.
Dark brown joining seams create another important structural feature. Instead of disappearing into the blocks, the joins form a visible grid that frames every large crochet granny square. This makes individual motifs readable even across a bed-size project.
The final design decision is proportion. Each square contains enough rounds to become a substantial panel. A common mistake is changing yarn tension between colors, especially when switching from dark to light yarn. Even a small gauge change accumulates across multiple rounds and can make the finished squares difficult to join evenly.
Project Info at a Glance
| Skill Level | Time | Finished Size | Hook | Best For |
|---|---|---|---|---|
| Easy to Intermediate | 35–55 hours | Approx. 150 × 190 cm | 5.0 mm | Large throw or bedspread |
The dimensions are a photo-inspired target rather than a direct measurement of the pictured blanket. Final size depends on yarn thickness, gauge, the number of rounds per square and the number of motifs used.
Materials and Tools
Yarn
- Chocolate brown — #4 medium/worsted yarn — approximately 900–1,100 g.
- Cream — #4 medium/worsted yarn — approximately 700–900 g.
- Camel or warm tan — #4 medium/worsted yarn — approximately 450–600 g.
- Dusty rose — #4 medium/worsted yarn — approximately 400–500 g.
- Blush pink — #4 medium/worsted yarn — approximately 150–250 g.
These amounts are working estimates for a large photo-inspired blanket. Make and weigh one complete square before purchasing yarn for a custom bed size. The chocolate brown requires the largest reserve because it appears in several motif rounds, the joining seams and the outer border.
Tools
- 5.0 mm crochet hook
- Tapestry needle
- Locking stitch markers
- Scissors
- Blocking mats
- Rust-resistant pins
- Measuring tape
Abbreviations
- MR — magic ring
- ch — chain
- sc — single crochet
- dc — double crochet
- sl st — slip stitch
- sp — space
- st/sts — stitch/stitches
- FO — fasten off
- 3-dc cluster — 3 double crochet stitches worked into the same space
This blanket uses standard granny-square construction. Each new round adds one additional 3-dc cluster along every side while the four corner spaces maintain the square shape.
Color Sequence
The color order is responsible for much of the photographed blanket’s appearance. Keep the sequence consistent from square to square.
| Round | Color |
|---|---|
| 1 | Blush pink |
| 2 | Dusty rose |
| 3 | Chocolate brown |
| 4 | Cream |
| 5 | Cream |
| 6 | Camel |
| 7 | Camel |
| 8 | Chocolate brown |
| 9 | Chocolate brown |
| 10 | Cream |
| 11 | Cream |
| 12 | Dusty rose |
| 13 | Chocolate brown |
The exact sequence can be adjusted to match available yarn. Keep the major cream and brown bands in the same relative positions if the goal is to reproduce the visual balance of the reference image.
Granny Square Crochet Blanket Pattern — Step by Step
Large Granny Square — Make 20
Hook: 5.0 mm. Change colors according to the sequence above.
Round 1 — Blush Pink Center
Make an MR.
R1: Ch 3, 2 dc in MR, ch 2, 3 dc in MR, ch 2, 3 dc in MR, ch 2, 3 dc in MR, ch 2. Join with sl st to top of beginning ch-3.
You should have four 3-dc groups separated by four corner spaces.
Fasten off.
Round 2 — Dusty Rose
Join dusty rose in any corner.
R2: Ch 3, 2 dc, ch 2, 3 dc in the same corner space. Ch 1. In the next corner work [3 dc, ch 2, 3 dc].
Repeat around, placing ch 1 between corner groups.
Join with sl st and fasten off.
Round 3 — Chocolate Brown
Join chocolate brown in any corner.
R3: Work [3 dc, ch 2, 3 dc] in the corner. Ch 1, 3 dc in the next ch-1 space, ch 1.
Repeat the sequence around the square.
Each side now contains one granny cluster between its two corner groups.
Fasten off.
Round 4 — Cream
Join cream in a corner.
R4: Work [3 dc, ch 2, 3 dc] in the corner. Ch 1, work 3 dc in each ch-1 space across the side, placing ch 1 between groups.
Repeat around.
Fasten off.
Round 5 — Cream
Continue with cream.
R5: Work [3 dc, ch 2, 3 dc] in each corner. Work one 3-dc cluster into every ch-1 space along each side, with ch 1 between clusters.
Fasten off.
Round 6 — Camel
Join camel yarn in a corner.
R6: Repeat the established granny-square construction.
Every side gains one additional 3-dc group compared with the previous round.
Fasten off.
Round 7 — Camel
R7: Continue in camel, working [3 dc, ch 2, 3 dc] in each corner and 3 dc in every side space.
Fasten off.
Round 8 — Chocolate Brown
Join chocolate brown.
R8: Repeat the established granny pattern around.
Check the square after completing the round. All four sides should contain the same number of clusters.
Fasten off.
Round 9 — Chocolate Brown
R9: Continue the granny-square repeat in chocolate brown.
Do not tighten the ch-1 spaces more than on earlier rounds. Uneven chain tension can pull the sides inward.
Fasten off.
Round 10 — Cream
Join cream in any corner.
R10: Work the established granny-square repeat around.
Fasten off.
Round 11 — Cream
R11: Repeat the previous round in cream.
At this stage the light band should form a strong frame around the darker inner square.
Fasten off.
Round 12 — Dusty Rose
Join dusty rose.
R12: Repeat the established granny-square pattern.
Keep the corner ch-2 spaces consistent with earlier rounds.
Fasten off.
Round 13 — Chocolate Brown
Join chocolate brown.
R13: Work [3 dc, ch 2, 3 dc] in each corner and one 3-dc cluster in every ch-1 space across all four sides.
Fasten off with a 25 cm tail.
Block the completed square before measuring it.
Checking the Finished Square
A practical target for this oversized motif is approximately 34–38 cm square after blocking. The exact measurement is less important than consistency across all motifs.
Measure from one outer edge to the opposite outer edge through the center.
Repeat the measurement in the other direction.
The difference should remain within approximately 5 mm.
If the square is significantly smaller than required, add another granny round rather than stretching it aggressively during blocking.
Making All 20 Squares
For a large throw or bedspread, make 20 identical motifs and arrange them in a 4 × 5 layout.
If one blocked square measures approximately 36 cm, four squares across provide roughly 144 cm before joining and border adjustments. Five squares down provide approximately 180 cm.
The outer border adds several additional centimeters to both measurements.
Keep a written color checklist beside the project. With 13 rounds and five colors, reversing two neighboring bands on one square becomes easy to miss until assembly.
Weaving the Color-Change Tails
Do not leave all yarn tails until the entire blanket is finished.
After every three or four rounds, weave the previous tails through stitches of the same color.
Change direction at least once while weaving.
Leave approximately 1 cm untrimmed until the square has been blocked. Trim the final excess only after the stitches have settled.
Avoid carrying dark brown yarn behind the cream rounds. The dark strand can remain visible through the open granny spaces.
Blocking the Granny Squares
Block all squares to identical dimensions before joining.
Pin the four corners first.
Measure both diagonals. They should be approximately equal.
Next, pin the midpoint of each side.
Add additional pins only where needed to maintain a straight edge.
Do not stretch one undersized square to match the others. Correct the crochet or remake the motif if the difference is substantial.
Blanket Layout
Arrange the blocked squares in a 4 × 5 grid.
Because every motif uses the same color order, rotate selected squares by 90 degrees if minor tension differences make one side visually preferable.
Stand several feet away from the arrangement before joining. Check that no single square appears noticeably lighter, darker or smaller than the surrounding blocks.
Take a photograph of the layout. Use it as a reference while joining the individual motifs.
Dark Brown Raised Joining Seam
Yarn: chocolate brown. Hook: 5.0 mm.
The photographed blanket uses dark seams that remain visible between the squares. A single-crochet join produces a similar framed appearance.
Place two squares with wrong sides together.
Join chocolate brown yarn through the corresponding corner spaces.
Work one sc through matching edge spaces on both squares.
Continue evenly across the complete side.
Fasten off at the opposite corner.
Open the squares. The raised brown seam should remain visible on the right side.
Joining Squares into Rows
Join four squares to form the first horizontal row.
Repeat until five separate rows are complete.
Lay the rows flat and check their lengths.
Next, join the horizontal rows together using the same chocolate-brown single-crochet method.
At every four-square intersection, pass through the corner spaces carefully so the crossing remains compact rather than developing a large hole.
Alternative Flat Joining Method
If a raised grid is not wanted, use a mattress stitch from the wrong side.
Align two square edges.
Pass the needle under corresponding edge loops, alternating from one square to the other.
Pull the seam closed every 5–8 cm.
Do not pull hard enough to gather the edges.
The flat method reduces the visible brown framework, so use the raised single-crochet join for the closest match to the photographed bedspread.
First Border Round
Yarn: chocolate brown.
Join yarn in any outer corner.
R1: Ch 1 and sc evenly around the entire blanket.
Work 3 sc into each outer corner.
Where two squares meet, work across the joining seam without adding unnecessary stitches.
Join with sl st.
Second Border Round
R2: Ch 3 and dc in each stitch around.
At each corner work:
2 dc, ch 2, 2 dc in the center corner stitch.
Join with sl st.
Dusty Rose Border Accent
Change to dusty rose.
R3: Ch 1 and sc around.
Work 3 sc in each corner.
R4: Repeat [sc in next 3 stitches, ch 1, skip 1 stitch] around.
Adjust the repeat near each corner if necessary.
Fasten off dusty rose.
Final Chocolate Brown Border
Join chocolate brown.
R5: Sc into every stitch and ch-1 space around.
At each corner work 3 sc.
R6: Reverse sc around for a firm corded edge, or work one conventional sc round if reverse single crochet is not preferred.
Fasten off and weave the final tail through at least 5 cm of border stitches.
Matching Granny Square Pillow Cover
The photograph pairs the blanket with two matching square cushions. A pillow cover can be made from the same motif without changing the basic construction.
Work one granny square using the blanket color sequence.
Continue adding rounds until the square measures approximately 2–3 cm smaller than the intended cushion insert.
Make a second identical square for the back.
Alternatively, make a plain chocolate-brown granny square for the rear panel.
Block both pieces to matching dimensions.
Joining the Pillow
Place the two pillow panels with wrong sides together.
Using chocolate brown yarn, sc through corresponding edge stitches around three sides.
Insert the cushion form.
Join the fourth side with sc.
For a removable cover, leave the final side open and add buttons, ties or a separate envelope-style back instead of permanently closing it.
Assembly
- Make one complete sample square. Block it and record the finished dimensions before calculating the total blanket size.
- Complete all remaining motifs. Follow the same color sequence for every square and weave tails regularly rather than saving all finishing work until the end.
- Block every square. Keep corresponding side measurements within approximately 5 mm.
- Arrange the complete blanket. Place the motifs in a 4 × 5 grid and photograph the layout before moving them.
- Join the horizontal rows. Use chocolate-brown single crochet with the raised seam positioned on the right side.
- Connect the rows vertically. Match all square intersections before fastening the seams permanently.
- Inspect the blanket rectangle. Measure opposite sides and correct any uneven join before adding the border.
- Work the brown foundation border. Keep stitch spacing even across both motif edges and joining seams.
- Add the dusty rose accent and final brown edge. Lay the blanket flat after each round to check for waves or inward pulling.
- Weave the remaining tails. Change direction at least once when securing joining and border yarn before trimming.
The completed bedspread should form a regular grid of oversized granny squares with crisp cream bands, warm brown framing and rose-colored centers.
7 Technical Tips for a Better Granny Square Bedspread
- Prevent square-size drift. Measure every third completed motif after blocking. A repeated 5 mm difference across four squares produces approximately 2 cm of mismatch before the border is added.
- Control corner tension. Keep every ch-2 corner space approximately the same size. Tight corners cause the square to cup, while oversized corner chains create pointed, floppy corners.
- Avoid twisted squares. Rotate the work after selected rounds if your granny squares naturally spiral. A visible rotational shift becomes more noticeable as the motif grows beyond 30 cm.
- Protect the cream bands. Do not carry chocolate-brown yarn behind cream stitches. Dark floats can show through the open spaces and make the light rounds look stained.
- Match joining points. Corresponding sides need the same number of granny spaces. Never force an extra cluster into a seam because it creates a localized ripple along the brown grid.
- Check border stitch density. If the edge waves after one round, too many stitches have been added. If the corners lift or the sides pull inward, the border needs additional spacing or corner increases.
- Secure color-change tails. Weave each tail for at least 4–5 cm and reverse direction once. A short tail running in only one direction can loosen after repeated washing and folding.
How to Keep Large Granny Squares Flat
Oversized granny squares magnify tension problems that remain almost invisible in small motifs. Check the square on a flat surface every three or four rounds.
If the edges begin to wave, the corner chains or spaces between clusters may be too loose. Reduce the chain-space height slightly on the next test square rather than attempting to correct a severe wave during blocking.
If the motif cups upward, inspect the corners first. Tight corner chains restrict expansion.
Maintain the same hook throughout the project unless gauge changes unexpectedly. Switching hooks between colors can create subtle differences in cluster height.
How to Make Clean Color Changes
Complete the final yarn-over of the last stitch with the new color when working consecutive rounds without fastening off.
For this blanket, fastening off after major color bands creates cleaner transitions and prevents unused yarn from being carried across large sections.
Join new yarn in a different corner occasionally. Repeatedly starting in the same corner can make that area thicker because multiple tails accumulate beneath the stitches.
Weave dark tails only beneath dark or medium-colored rounds. Cream stitches can expose darker yarn through the spaces between clusters.
Choosing the Color Palette
The photographed palette depends on five related neutrals and muted pinks rather than high-contrast primary colors.
Chocolate brown forms the visual framework. Cream provides the strongest contrast and prevents the blanket from becoming uniformly dark. Camel creates a transition between those two values.
Dusty rose introduces muted color around the outer portions of each square, while blush pink produces the small central focal point.
For a cooler version, replace camel with taupe and dusty rose with mauve. For a warmer version, use caramel, terracotta and ivory while keeping the same round sequence.
How to Calculate Yarn for a Different Size
Make one complete 13-round square and weigh it after all tails have been trimmed.
If one square weighs 180 g and the planned blanket requires 20 squares, the motifs require approximately 3,600 g of yarn before joining and borders.
Add approximately 10–15 percent for seams, border rounds, gauge differences and swatching.
For more accurate color quantities, weigh the yarn before and after making one square. Record the amount consumed from each skein separately.
This method is more dependable than dividing the total blanket weight equally between colors because chocolate brown and cream occupy substantially more area than blush pink.
How to Adjust the Blanket Size
The modular structure makes resizing simple once one square has been blocked and measured.
For a lap blanket, use a 3 × 4 layout for 12 squares.
For a medium throw, use a 4 × 4 layout for 16 squares.
For a larger bedspread, use a 4 × 5 layout for 20 squares.
A very large bedspread can use a 5 × 6 layout for 30 squares.
Multiply the blocked width of one motif by the number of squares across. Add the expected border width on both sides to estimate the final measurement.
Conclusion
The defining feature of this blanket is the repeated sequence of blush, rose, brown, cream and camel around oversized granny-square centers. Make one complete 13-round motif first, block it and use its actual dimensions to calculate the required number of squares. Keep the dark joining seams visible, match every edge count before assembly and inspect the blanket on a flat surface before adding the border. Your next step is to crochet one five-color sample square and record its blocked width and yarn weight. Save this granny square crochet blanket pattern to Pinterest and share the finished bedspread on Instagram with #RoseBrownGrannyBlanket. Would you keep the rose-colored centers identical or alternate blush and burgundy centers between squares?









