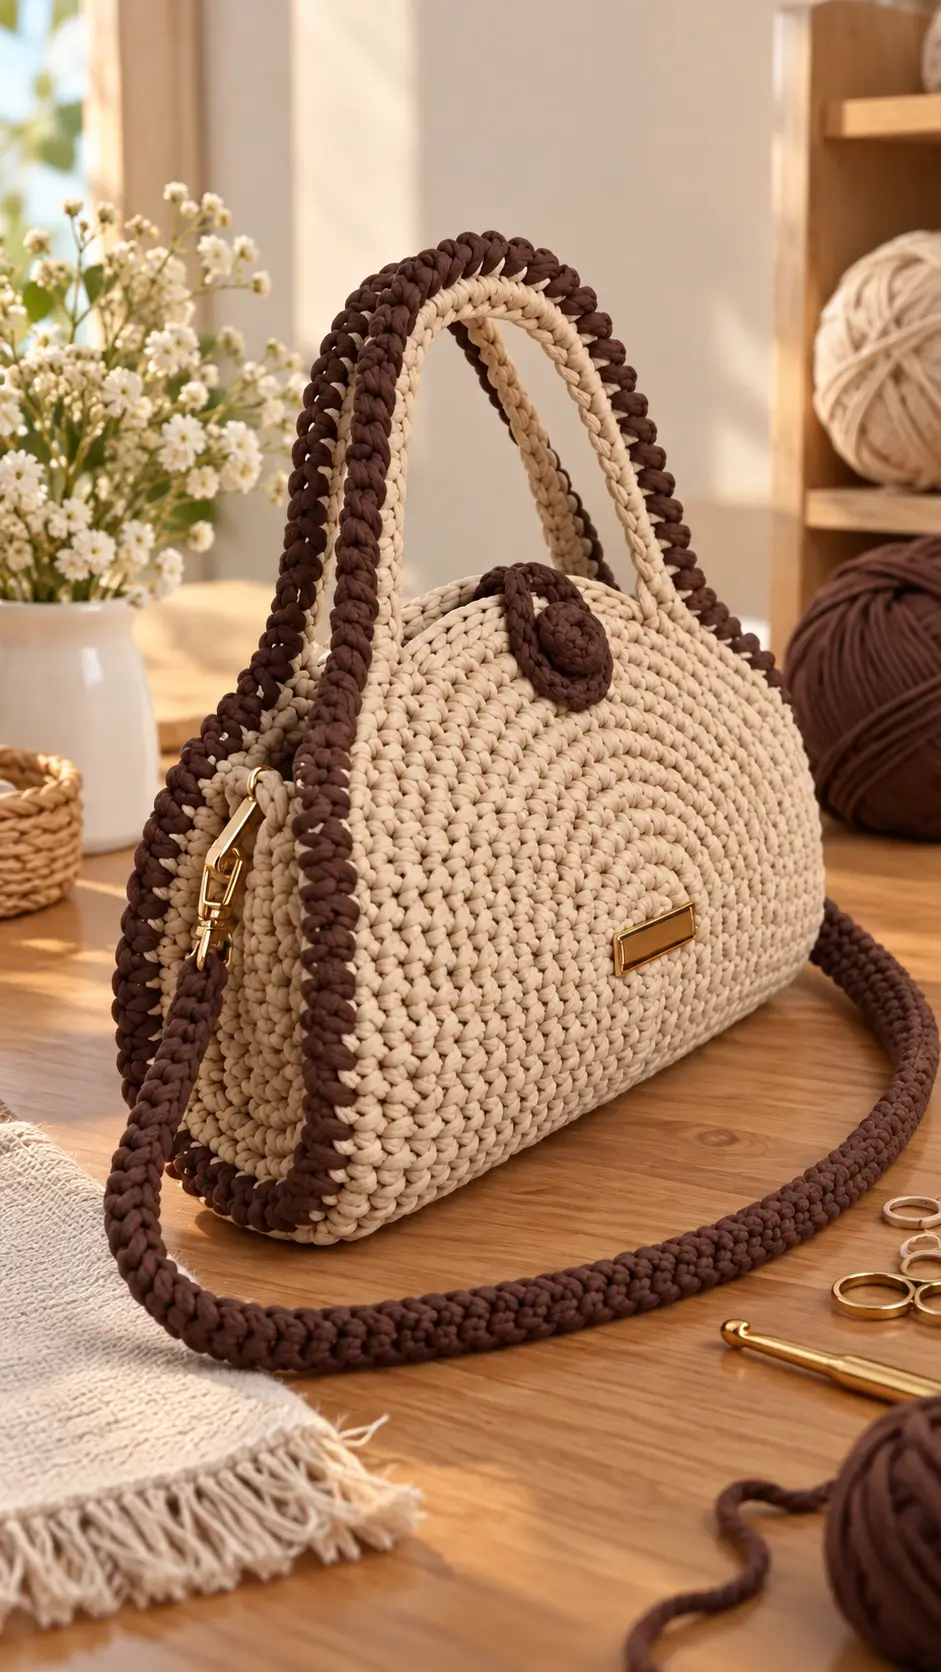
A handbag carrying two thick arched handles plus a full-length crochet shoulder strap needs more structure than an ordinary tote. This crochet handbag pattern uses bulky T-shirt yarn, dense single crochet and chocolate-brown reinforcement over a cream body. Plan for a medium bag near 25 × 20 × 10 cm and intermediate-level construction. The reinforced base and hardware-ready side tabs make it practical for regular carrying.
The Design: What Makes This Handbag Different
The photographed bag depends on three structural decisions. First, the cream body is densely crocheted so the walls remain upright instead of collapsing around the contents. Second, dark-brown edging runs along high-load areas, visually defining the silhouette while adding another layer around the handles and sides. Third, the long strap connects near the upper side structure rather than hanging from weak decorative stitches.
For this chunky crochet handbag, proportion matters. Handles that are too thin look undersized beside the heavy body; handles that are too long change the bag from a handbag into a shoulder tote. The two-tone crochet bag also needs controlled color placement because uneven brown edging immediately exposes differences in tension. A common mistake is attaching a heavy strap directly through one crochet stitch. Load should be distributed through reinforced tabs or suitable hardware instead.
Project Info at a Glance
| Skill Level | Time | Finished Size | Hook | Best For |
|---|---|---|---|---|
| Intermediate | 8–12 hours | Approx. 25 × 20 × 10 cm | 7 mm | Structured everyday handbag |
Materials and Tools
Yarn
- Cream / natural: bulky T-shirt yarn — approximately 400–450 g — Retwisst Large Solid or comparable cotton-rich ribbon yarn.
- Chocolate brown: matching bulky T-shirt yarn — approximately 100–150 g for edging, closure, handles and strap.
The combined target is roughly 550 g of bulky T-shirt yarn. Actual consumption changes with yarn thickness, tension, strap length and finished dimensions.
Tools
- 7 mm crochet hook
- 2 stitch markers
- Large blunt yarn needle
- Sharp scissors
- 2 gold-tone D-rings or O-rings
- 1–2 swivel clasps
- Magnetic snap or suitable bag closure
- Optional rectangular bag label
- Optional plastic canvas for base reinforcement
- Measuring tape
- Sewing thread and lining fabric if lining is added
Abbreviations
- MR — magic ring
- sc — single crochet
- inc — 2 sc in one stitch
- dec — single-crochet decrease
- sl st — slip stitch
- ch — chain
- BLO — back loop only
- st / sts — stitch / stitches
- RS — right side
- WS — wrong side
An invisible decrease is formed by catching the front loops of the next two stitches before completing one single crochet through them.
Pattern — Step by Step
Work the body in a continuous spiral after completing the rectangular base unless a section states otherwise. Keep the fabric dense because T-shirt yarn can stretch considerably when the finished handbag carries weight.
Bag Base
Yarn: cream.
Ch 17.
Row 1: Sc in second ch from hook and each ch across. (16)
Rows 2–7: Ch 1, turn, sc across. (16)
The resulting rectangle should measure approximately 20 × 8–10 cm. Adjust hook size or tension if the base differs substantially from this measurement.
Do not fasten off.
Main Body
Yarn: cream.
Work around the entire perimeter of the base.
Rnd 1: Sc across 16 top stitches, place 7 sc evenly down the short edge, sc across 16 foundation loops, then place 7 sc evenly up the remaining short edge. (46)
Rnd 2: Sc in each st around. (46)
Rnd 3: Sc in each st around. (46)
Rnd 4: Sc in each st around. (46)
Rnd 5: Sc in each st around. (46)
Rnd 6: Sc in each st around. (46)
Rnd 7: Sc in each st around. (46)
Rnd 8: Sc in each st around. (46)
Rnd 9: Sc in each st around. (46)
Rnd 10: Sc in each st around. (46)
Rnd 11: Sc in each st around. (46)
Rnd 12: Sc in each st around. (46)
Rnd 13: Sc in each st around. (46)
Rnd 14: Sc in each st around. (46)
Rnd 15: Sc in each st around. (46)
Rnd 16: Sc in each st around. (46)
Rnd 17: Sc in each st around. (46)
Rnd 18: Sc in each st around. (46)
Measure the body before proceeding. Add or remove complete 46-stitch rounds until the cream section approaches 20 cm high.
Fasten off.
Upper Contrast Edge
Yarn: chocolate brown.
Join the brown yarn at one side of the bag.
Rnd 1: Sc evenly around upper edge. (46)
Rnd 2: BLO sc around. (46)
Rnd 3: Sc around. (46)
Sl st into the next stitch. Fasten off and leave a 20 cm tail for securing the join.
The BLO round creates a defined ridge without substantially increasing the width of the bag opening.
Top Handles — Make 2
Yarn: cream with chocolate-brown reinforcement.
Ch 36 with cream.
Row 1: Sc in second ch from hook and across. (35)
Row 2: Ch 1, turn, sc across. (35)
Row 3: Ch 1, turn, sc across. (35)
Fasten off the cream yarn.
Join brown yarn at one end.
Edging Rnd 1: Sc around the entire handle strip, placing 2 sc at each outer corner.
Edging Rnd 2: Sc around again while keeping the handle flat.
Fasten off. Leave approximately 30 cm of yarn at the attachment areas.
The finished handle should form a firm arch approximately 30–35 cm from one attachment point to the other.
Handle Attachment Tabs — Make 4
Yarn: chocolate brown.
Ch 7.
Row 1: Sc in second ch from hook and across. (6)
Rows 2–5: Ch 1, turn, sc across. (6)
Fasten off. Leave approximately 25 cm for sewing.
Each tab covers the base of one handle end and spreads the pulling force across several body stitches.
Side Hardware Tabs — Make 2
Yarn: chocolate brown.
Ch 9.
Row 1: Sc in second ch from hook and across. (8)
Rows 2–4: Ch 1, turn, sc across. (8)
Fasten off with a 30 cm tail.
Fold each tab around a D-ring or O-ring. Sew through both tab layers and several rows of the handbag wall rather than attaching the ring to a single upper-edge stitch.
Long Shoulder Strap
Yarn: chocolate brown.
Chain until the foundation measures approximately 105–115 cm without stretching.
Row 1: Sc in second ch from hook and every ch across.
Row 2: Ch 1, turn, sc across.
Row 3: Ch 1, turn, sc across.
Fold the strip lengthwise.
Joining Row: Sl st the long edges together through corresponding loops to create a thick rounded strap.
Fasten off with a 30 cm tail.
For a detachable strap, pass each end through a swivel clasp, fold approximately 4–5 cm back onto the strap and sew the overlap securely with matching yarn.
Closure Tab
Yarn: chocolate brown.
Ch 7.
Row 1: Sc in second ch from hook and across. (6)
Rows 2–7: Ch 1, turn, sc across. (6)
Row 8: Dec, 2 sc, dec. (4)
Row 9: Dec ×2. (2)
Fasten off, leaving approximately 25 cm for sewing.
Attach one half of the magnetic closure to the underside before permanently sewing the closure tab to the rear upper edge.
Decorative Closure Pad
Yarn: chocolate brown.
R1: 6 sc in MR. (6)
R2: Inc ×6. (12)
R3: (Sc, inc) ×6. (18)
R4: Sc around. (18)
Fasten off, leaving approximately 20 cm for sewing.
Keep this piece flat rather than stuffing it. Position it around the closure area according to the hardware being used.
Side Contrast Edging — Make 2
Yarn: chocolate brown.
Surface-crochet a line of slip stitches along each side transition from the upper edge toward the base.
Return with one row of sc worked into the surface loops when a heavier raised border is required.
Maintain the same number of picked-up stitches on both sides. Measure the completed edges before cutting the yarn because different stitch spacing can make one side visibly shorter.
Optional Base Reinforcement
Cut a piece of plastic canvas approximately 1 cm smaller on every side than the finished interior base.
Round the corners with scissors and place the reinforcement inside the bag before installing the lining.
A removable insert is preferable to attaching rigid plastic directly to the outer crochet stitches because concentrated pressure can distort the base.
Optional Lining
Measure the interior width, depth and height only after the crochet body is complete.
Cut lining fabric with suitable seam allowances and sew a box-shaped insert. Turn the upper allowance inward and hand-stitch the lining below the chocolate-brown border.
Keep the sewing stitches within the thickness of the crochet fabric so they do not show on the exterior.
Assembly
- Position the first top handle on the front panel, centering it horizontally and keeping both attachment points the same distance from the side edges.
- Position the second handle directly opposite the first. Measure the spacing between the handle ends on both panels before sewing.
- Sew every handle end through several body stitches. Place a chocolate-brown attachment tab over each join and stitch around all four edges.
- Center the closure tab on the rear upper edge. Sew its square end across at least two body rounds.
- Align the corresponding magnetic closure component on the front panel. Test the closure position before permanently fixing the hardware.
- Position the two side hardware tabs at equal heights. Fold each tab around its ring and stitch through the tab, body wall and neighboring stitches repeatedly.
- Attach the long shoulder strap to the rings using swivel clasps or securely sewn loops. Check that neither connection twists the strap.
- Work or attach the dark-brown side edging. Compare the two sides frequently so the raised trim remains symmetrical.
- Insert the optional base reinforcement and lining. Keep both below the upper border so the cream-and-brown rim remains visible.
- Weave each structural yarn tail through at least 5 cm of dense crochet, reverse direction once, then trim. Attach the optional front label after the handbag has reached its final shape.
The completed handbag should stand as a structured rounded rectangle with two arched top handles, a reinforced closure and a load-bearing shoulder strap.
7 Technical Tips for a Structured Crochet Handbag
- Prevent stitch-marker drift. Put the marker into the first actual stitch of every spiral round rather than around the working loop. Moving it one stitch late repeatedly produces a diagonal reference line and can shift the hardware positions.
- Correct a soft base before building the walls. If the approximately 20 cm base bends sharply when held at one end, the fabric is too flexible for this structure. Reduce the hook by roughly 0.5–1 mm or install a removable plastic-canvas insert.
- Watch for loose wall tension. Large openings between T-shirt-yarn stitches allow the handbag to stretch vertically when loaded. The fabric should be firm enough to retain the rounded rectangular profile without stuffing.
- Measure handle placement. A difference of even 1 cm between corresponding attachment points can make the handles sit unevenly. Mark all four positions before sewing the first attachment tab.
- Check the shoulder strap for twisting. Lay the entire 105–115 cm strap flat before attaching the second clasp. A single half-turn creates a permanent spiral once the handbag hangs from the shoulder.
- Prevent puckered contrast edging. Surface crochet worked too tightly shortens the side and pulls the cream body inward. Compare the brown border against the untreated side every 5 cm while working.
- Leave long structural tails. A short yarn tail can pull free at a handle or hardware connection. Leave approximately 25–30 cm at load-bearing joins, sew through several neighboring stitches and reverse the weaving direction before trimming.
Finishing the Crochet Handbag
Check the four handle attachment points before treating the project as finished because these areas carry more concentrated force than the main walls. Load the bag with approximately the weight you expect to carry and inspect the side tabs, handle bases and upper rim for stretching.
Photograph the finished crochet handbag pattern from the front and side so both the cream body and chocolate edging are visible. Save the finished project to Pinterest or share it on Instagram with #TwoToneCrochetHandbag.
Record the final strap length, hook size and yarn consumption before making another version. Which detail would you change first: the chocolate side edging, the arched handles or the long shoulder strap?









