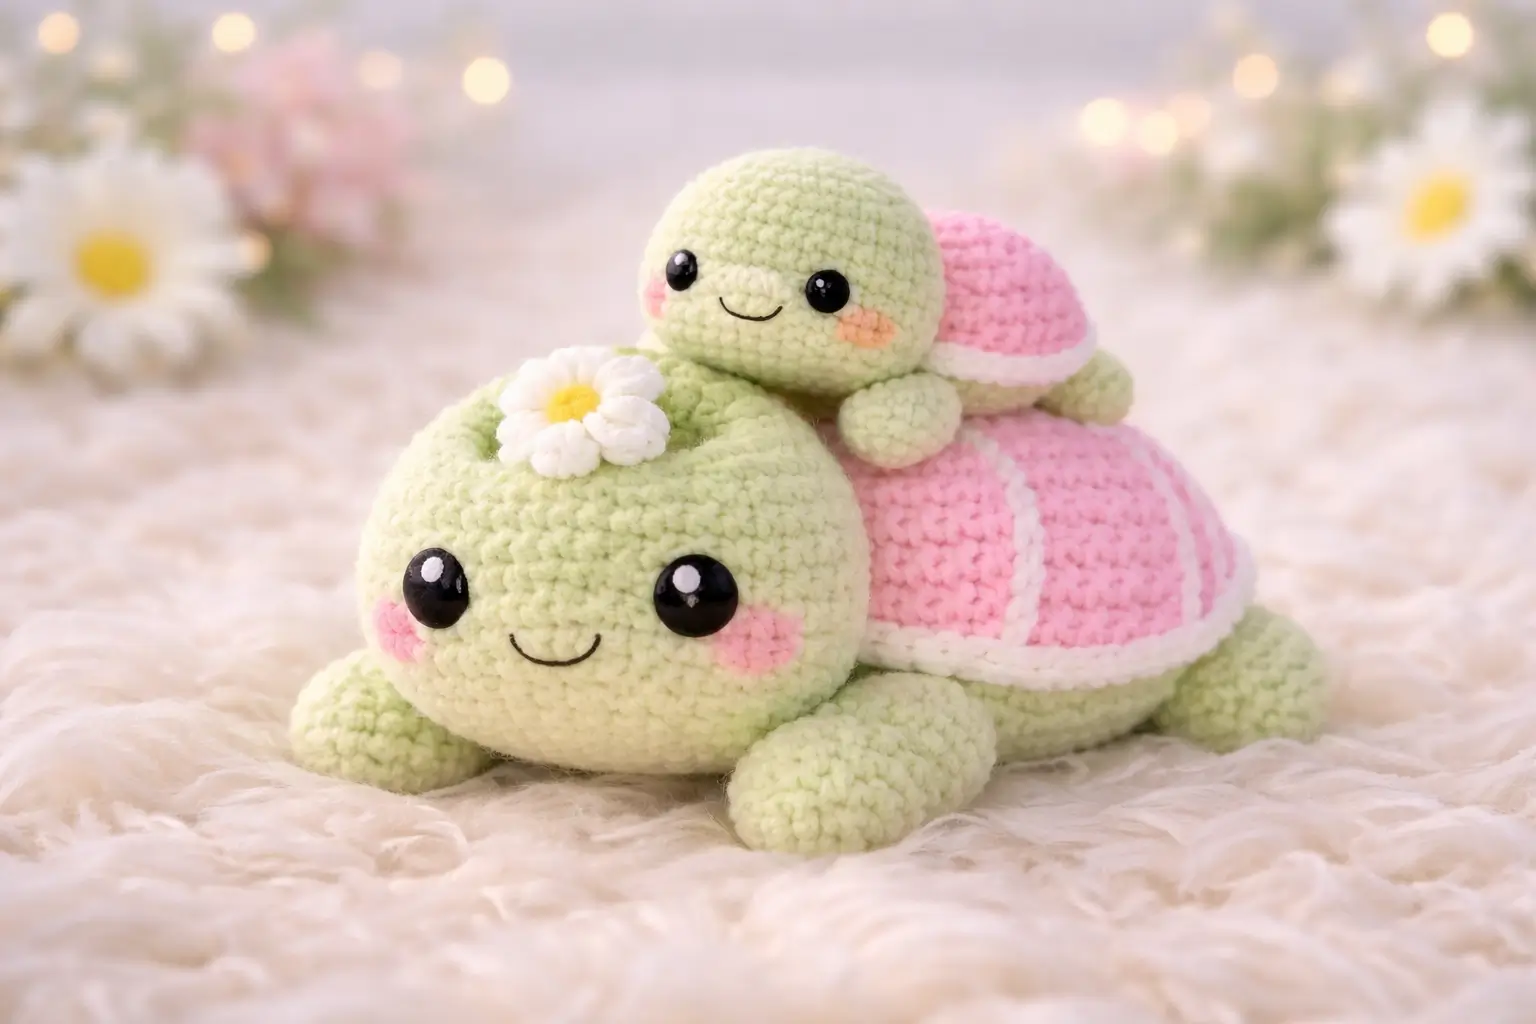
A turtle shell reads as a dome, but this one has to read as a slice of pink candy with white ridges. That changes the build immediately. This turtle amigurumi crochet pattern uses bulky plush yarn, a 4.0 mm hook, and a large rounded body profile that finishes in the flower-turtle size range. It suits an advanced beginner. The result works well as nursery decor or a market display sample.
The Design: What Makes This Turtle Different
Most turtle plush patterns aim for either a sea-turtle silhouette or a simple oval toy. Not this one. The photo shows a loaf-shaped body with the head set low into the front edge, which keeps the toy stable when placed on a shelf. The shell also needs panel lines. Those white ridges break up the pink dome and make the crochet flower turtle look closer to the reference image than a plain spiral cap would. A third decision is scale contrast: the baby turtle is not a duplicate. It is smaller, shallower, and visually lighter, which keeps the stack readable.
A common mistake with a daisy turtle crochet pattern is over-rounding the shell. Then the head disappears under the front lip and the flippers look too short. In plush yarn, that problem gets worse fast.
Project Info at a Glance
| Skill Level | Time | Finished Size | Hook | Best For |
|---|---|---|---|---|
| Advanced beginner | 4–6 hours | about 25 cm | 4.0 mm | Nursery decor, spring market stock, gift plush |
Size, hook, and yarn category are aligned with current flower-turtle references in bulky velvet/chenille yarn.
Materials and Tools
Yarn
- Pastel green — bulky/super bulky velvet or chenille — 40 g — YarnArt Dolce or Premier Parfait Chunky style yarn
- Soft pink — bulky/super bulky velvet or chenille — 40 g — shell top color
- White — bulky/super bulky velvet or chenille — 15 g — shell ridges and daisy petals
- Yellow — bulky/super bulky velvet or chenille — 15–25 g — daisy center
- Black embroidery thread — small amount — mouth
- Pink embroidery thread or blush yarn — small amount — cheek patches
Tools
- Hook 4.0 mm
- Safety eyes — 20 mm for the large turtle, 12 mm for the mini turtle
- Stuffing
- Tapestry needle
- Stitch markers
- Pins
Abbreviations
MR / sc / inc / dec / sl st / ch / BLO / FLO / hdc / dc / tr
Use invisible decrease for the head and body shaping so the plush yarn does not leave open notches at the front profile.
Pattern — Step by Step
This is a photo-inspired original pattern using standard amigurumi math for the stitch counts. Work in a continuous spiral unless noted.
Head (Make 1)
Yarn: pastel green — photo-inspired original shaping
R1: 6 sc in MR (6)
R2: inc x6 (12)
R3: (sc, inc) x6 (18)
R4: (2 sc, inc) x6 (24)
R5: (3 sc, inc) x6 (30)
R6: (4 sc, inc) x6 (36)
R7–R11: sc around (36)
R12: (4 sc, dec) x6 (30)
R13: (3 sc, dec) x6 (24)
Insert 20 mm eyes between R8 and R9, 10 stitches apart. Embroider mouth centered one round below eye line. Add light stuffing, firm at the cheeks and lighter at the neck edge.
R14: (2 sc, dec) x6 (18)
Fasten off. Leave a 25 cm tail.
Body Underside (Make 1)
Yarn: pastel green — photo-inspired original shaping
R1: 6 sc in MR (6)
R2: inc x6 (12)
R3: (sc, inc) x6 (18)
R4: (2 sc, inc) x6 (24)
R5: (3 sc, inc) x6 (30)
R6: (4 sc, inc) x6 (36)
R7: (5 sc, inc) x6 (42)
R8–R10: sc around (42)
Fasten off. Leave a 30 cm tail.
Shell Top (Make 1)
Yarn: soft pink — photo-inspired original shaping
R1: 6 sc in MR (6)
R2: inc x6 (12)
R3: (sc, inc) x6 (18)
R4: (2 sc, inc) x6 (24)
R5: (3 sc, inc) x6 (30)
R6: (4 sc, inc) x6 (36)
R7: (5 sc, inc) x6 (42)
R8: BLO sc around (42)
Fasten off. Leave a 30 cm tail.
Shell Ridge Strips (Make 4)
Yarn: white — photo-inspired detail to match the image
Ch 10.
Row 1: sc in 2nd ch from hook and across (9)
Rows 2–8: ch 1, turn, sc across (9)
Fasten off. Leave a 15 cm tail.
Front Flippers (Make 2)
Yarn: pastel green — Standard amigurumi math
R1: 6 sc in MR (6)
R2: inc x6 (12)
R3: (sc, inc) x6 (18)
R4–R5: sc around (18)
R6: (sc, dec) x6 (12)
R7: sc around (12)
Flatten lightly.
R8: sc through both sides across (6)
Fasten off. Leave a 20 cm tail.
Back Flippers (Make 2)
Yarn: pastel green — Standard amigurumi math
R1: 6 sc in MR (6)
R2: inc x6 (12)
R3: (sc, inc) x6 (18)
R4: sc around (18)
R5: (sc, dec) x6 (12)
Flatten lightly.
R6: sc through both sides across (6)
Fasten off. Leave a 20 cm tail.
Tail (Make 1)
Yarn: pastel green — adapted from common turtle tail treatment
Ch 4.
Work back: sc in 2nd ch, hdc in next, dc in last.
Fasten off. Leave a 12 cm tail.
Cheek Patches (Make 2)
Yarn: blush pink — flat circles
R1: 6 sc in MR (6)
Fasten off. Leave a 10 cm tail.
Daisy Topper (Make 1)
Yarn: white and yellow — photo-inspired accessory using simple flower construction
Center
R1: 6 sc in MR with yellow (6)
R2: inc x6 (12)
Fasten off. Join white.
Petals
In each stitch around: (ch 4, sl st in 2nd ch from hook, sc in next, hdc in next, sl st in same base stitch). Repeat 12 times.
Fasten off. Leave a 15 cm tail.
Mini Turtle Head (Make 1)
Yarn: pastel green — scaled companion version
R1: 6 sc in MR (6)
R2: inc x6 (12)
R3: (sc, inc) x6 (18)
R4: (2 sc, inc) x6 (24)
R5–R7: sc around (24)
R8: (2 sc, dec) x6 (18)
Insert 12 mm eyes between R5 and R6, 7 stitches apart. Embroider mouth. Stuff lightly.
R9: (sc, dec) x6 (12)
Fasten off. Leave a 20 cm tail.
Mini Turtle Body Underside (Make 1)
Yarn: pastel green — Standard amigurumi math
R1: 6 sc in MR (6)
R2: inc x6 (12)
R3: (sc, inc) x6 (18)
R4: (2 sc, inc) x6 (24)
R5: (3 sc, inc) x6 (30)
R6–R7: sc around (30)
Fasten off. Leave a 20 cm tail.
Mini Turtle Shell Top (Make 1)
Yarn: soft pink — Standard amigurumi math
R1: 6 sc in MR (6)
R2: inc x6 (12)
R3: (sc, inc) x6 (18)
R4: (2 sc, inc) x6 (24)
R5: (3 sc, inc) x6 (30)
R6: BLO sc around (30)
Fasten off. Leave a 20 cm tail.
Mini Shell Ridge Strips (Make 3)
Yarn: white — photo-inspired detail
Ch 8.
Row 1: sc in 2nd ch from hook and across (7)
Rows 2–5: ch 1, turn, sc across (7)
Fasten off. Leave a 10 cm tail.
Mini Flippers (Make 4)
Yarn: pastel green — Standard amigurumi math
R1: 6 sc in MR (6)
R2: inc x6 (12)
R3: sc around (12)
Flatten.
R4: sc through both sides across (6)
Fasten off. Leave a 12 cm tail.
Mini Tail (Make 1)
Yarn: pastel green
Ch 3.
Work back: sc in 2nd ch, hdc in next.
Fasten off. Leave a 10 cm tail.
Assembly
- Sew the large head to the front of the large body underside, centering it across about 12 stitches.
- Pin the front flippers slightly below the head seam and the back flippers near the rear third of the body. Sew them in place with the flat edges facing inward.
- Attach the tail at the exact rear center of the body underside.
- Pin the pink shell top over the upper half of the body. Add stuffing before the final third of the seam, keeping the dome soft rather than hard.
- Sew the white shell ridge strips on top of the shell: one central front-to-back line and two curved side divisions, then one rear short divider if needed to match the photo.
- Stitch the cheek patches flat under the eyes, then lightly brush or steam-finger them into an oval if the yarn is very plush.
- Sew the daisy topper slightly off-center on the large shell, not at the crown. The photo reads better with an intentional offset.
- Assemble the mini turtle by sewing its head, four flippers, and tail to the mini body underside, then close with the mini shell top.
- Add the mini shell ridge strips, keeping one center line and two side divisions only.
- Tack the mini turtle onto the large shell with two or three hidden stitches so it sits low and forward without tipping.
The finished turtle amigurumi crochet pattern yields a stable display plush with a broad shell, visible ridges, and a companion piece that stays in position.
7 Technical Tips
- Plush yarn hides the first stitch badly. Move the stitch marker every round or the shell panels will drift off-center by round 6.
- Pack the head firmly at the cheeks but keep the lower third lighter. A hard lower head pushes the face upward and makes the neck seam buckle.
- Standard dec leaves holes in chenille. Use invisible dec on every shaping round from 36 down to 18 so the front profile stays clean.
- Install the large eyes by round 13 at the latest, before the neck opening gets tight. For the mini turtle, place them by round 8.
- A hook that is too large opens the body underside and exposes stuffing between stitches. At this yarn scale, 4.0 mm is the working reference, not a loose drape hook.
- Pin the shell top in four compass points first. Without that step, the white ridges end up skewed and the pink dome twists left or right.
- Leave at least 15 cm tails on flippers and shell strips. Velvet tails pull free more easily than cotton, especially on handled toys.
Conclusion
This turtle amigurumi crochet pattern works because the shell is treated as a graphic surface, not just a rounded cap. Pink dome, white ridge lines, offset daisy, then the mini turtle for scale contrast. Keep the body broad, the head low, and the stuffing controlled. The next step is simple: swatch the green yarn with the 4.0 mm hook and confirm your stitch density before making the shell. Share the finished piece on Pinterest and Instagram with #DaisyShellTurtle. One question remains for this exact design: would you place the daisy at center top, or keep it offset like the reference photo?









