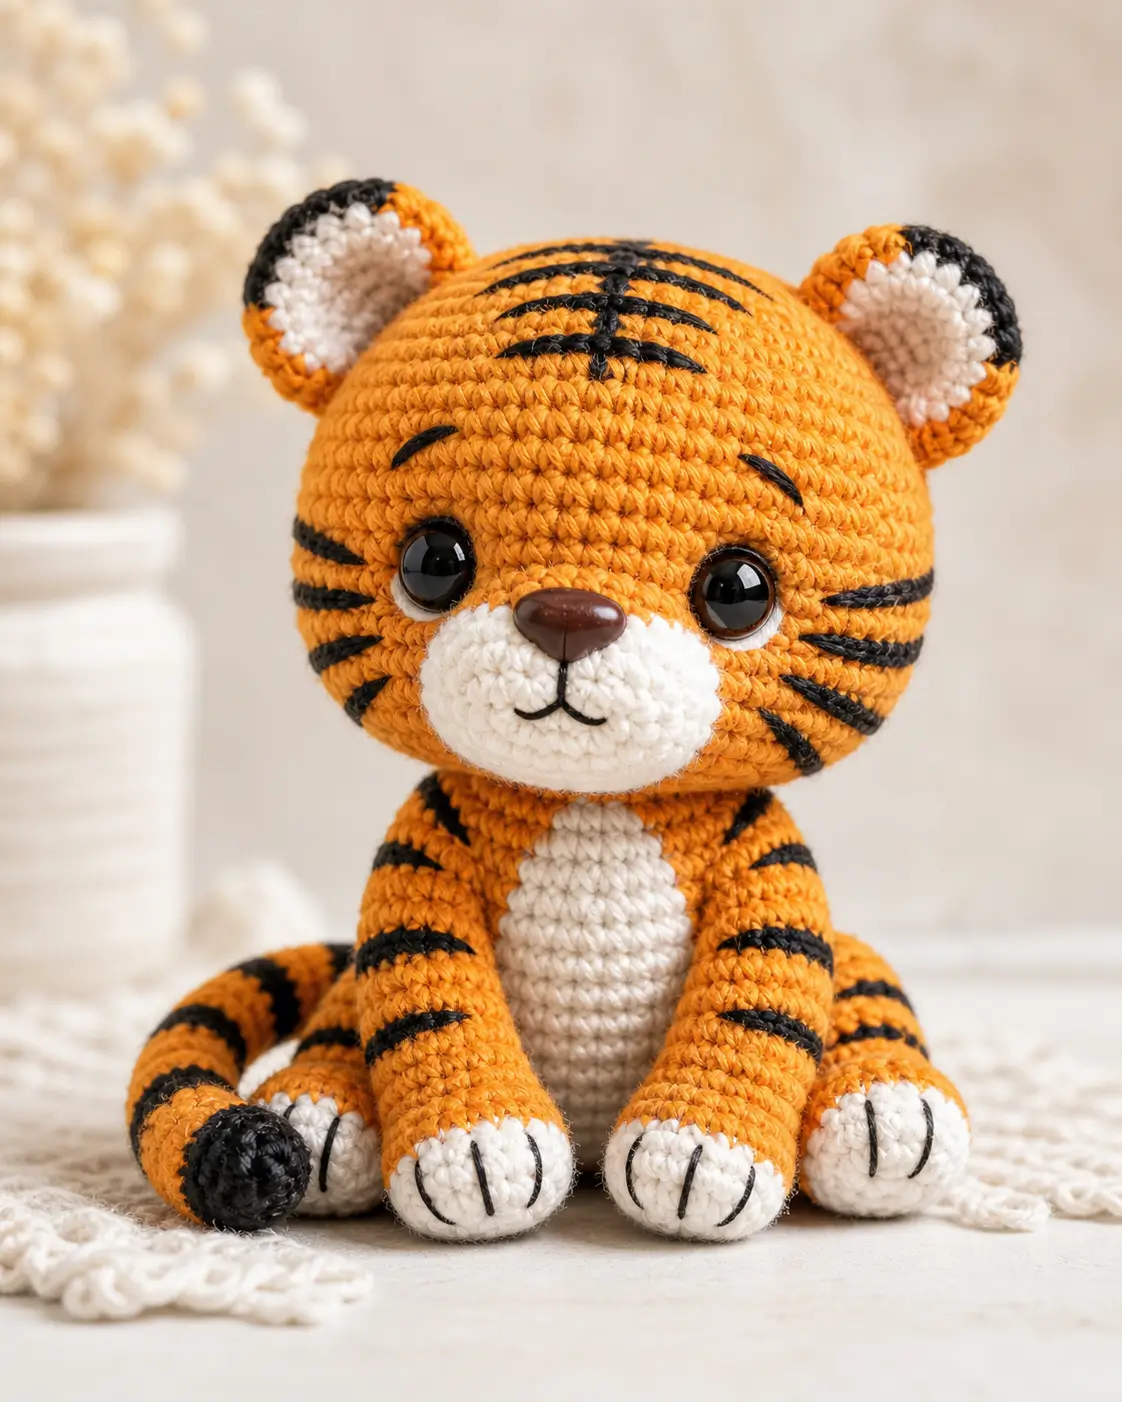
A tiger cub fails when the forehead stripes look like random whiskers. This tiger amigurumi crochet pattern builds a seated cub with a round orange head, white muzzle, cream paws, black embroidery, and a long striped tail. Use lightweight DK yarn, a 2.75 mm hook, and 10 mm safety eyes for an intermediate small toy. Make it when a safari set needs one strong focal animal.
The Design: What Makes This Tiger Different
You need three design choices before the first round: a larger head, a shorter seated body, and stripes added after stuffing. The oversized head supports the wide eye spacing and gives the muzzle room to sit forward without flattening. Small shift. Big face. The body stays narrower so the front legs can frame the white belly instead of hiding it. A common error in a free tiger crochet pattern is placing side stripes too low; the result looks like whiskers growing from the jaw. Here, the crochet tiger amigurumi uses forehead lines, cheek stripes, and limb bands as separate surface work, so the maker can adjust symmetry after assembly rather than fighting color changes inside a spiral.
Project Info at a Glance
| Skill Level | Time | Finished Size | Hook | Best For |
|---|---|---|---|---|
| Intermediate | 5–7 hours | 14–16 cm sitting | 2.75 mm | Safari sets, nursery shelves, handmade animal collections |
Verified tiger amigurumi sources place comparable toys between 12.7 cm and 18 cm depending on yarn and hook choice. This sample stays in that range with lightweight DK yarn and a firm amigurumi gauge. Source
Materials and Tools
Yarn
- Orange — lightweight DK / level 3 — 55–70 g — Lion Brand Coboo, Paintbox Cotton DK, or Schachenmayr Catania
- White or cream — lightweight DK / level 3 — 15–25 g — same fiber family as main yarn
- Black — lightweight DK / level 3 — 8–12 g — for stripes, tail tip, brows, and claws
- Brown — lightweight DK / level 3 — 2–3 g — for crocheted nose, unless using a safety nose
Source patterns confirm lightweight yarn, 2–2.75 mm hooks, and small safety eyes for tiger amigurumi sizing; larger light-worsted versions may use more yarn and bigger eyes. Source
Tools
- Hook 2.75 mm
- 10 mm safety eyes, 1 pair
- Optional 10–12 mm brown safety nose
- Polyester fiberfill
- Tapestry needle
- Stitch markers
- Pins
- Small scissors
Abbreviations
MR = magic ring; sc = single crochet; inc = increase; dec = invisible decrease; sl st = slip stitch; ch = chain; BLO = back loop only; FO = fasten off.
Invisible decrease works through the front loops of the next two stitches so the closing rounds lose 6 stitches without leaving large gaps.
Pattern — Step by Step
Continuous spiral unless noted. Use a stitch marker at the first stitch of every round.
Head
Yarn: orange — Source: standard amigurumi math; scale checked against verified tiger head patterns. Source
R1: 6 sc in MR (6)
R2: inc ×6 (12)
R3: (sc, inc) ×6 (18)
R4: (2 sc, inc) ×6 (24)
R5: (3 sc, inc) ×6 (30)
R6: (4 sc, inc) ×6 (36)
R7: (5 sc, inc) ×6 (42)
R8–R15: sc around (42)
R16: (5 sc, dec) ×6 (36)
R17: (4 sc, dec) ×6 (30)
R18: (3 sc, dec) ×6 (24)
R19: (2 sc, dec) ×6 (18)
R20: (sc, dec) ×6 (12)
R21: dec ×6 (6)
Place eyes between R10 and R11, 9 stitches apart. Stuff firmly after R17, then add small pieces before R20.
Fasten off. Close the last 6 front loops and hide the tail.
Body
Yarn: orange — Source: standard amigurumi math; MR-based tiger body data checked against Little Crochet Farm. Source
R1: 6 sc in MR (6)
R2: inc ×6 (12)
R3: (sc, inc) ×6 (18)
R4: (2 sc, inc) ×6 (24)
R5: (3 sc, inc) ×6 (30)
R6: (4 sc, inc) ×6 (36)
R7–R11: sc around (36)
R12: (4 sc, dec) ×6 (30)
R13–R14: sc around (30)
R15: (3 sc, dec) ×6 (24)
R16–R17: sc around (24)
R18: (2 sc, dec) ×6 (18)
R19: sc around (18)
R20: (sc, dec) ×6 (12)
R21: dec ×6 (6)
Stuff the base flat enough for a seated toy. Keep the neck end firm so the head does not tip forward.
Fasten off. Close and leave a 25 cm tail for sewing.
Front Legs / Arms
Yarn: white, orange, black — Source: standard amigurumi math; photo-matched paw scale.
Make 2.
R1: with white, 6 sc in MR (6)
R2: inc ×6 (12)
R3: (sc, inc) ×6 (18)
R4–R5: sc around (18)
R6: (sc, dec) ×6 (12)
R7: change to orange, sc around (12)
R8: sc around (12)
R9: change to black, sc around (12)
R10: change to orange, sc around (12)
R11–R12: sc around (12)
R13: flatten opening, sc through both layers ×6 (6)
Stuff only the white paw and lower orange section. Leave the top flat for clean sewing.
Fasten off. Leave an 18 cm tail.
Back Legs
Yarn: white, orange, black — Source: standard amigurumi math.
Make 2.
R1: with white, 6 sc in MR (6)
R2: inc ×6 (12)
R3: (sc, inc) ×6 (18)
R4: sc around (18)
R5: (sc, dec) ×6 (12)
R6: change to orange, sc around (12)
R7–R8: sc around (12)
R9: change to black, sc around (12)
R10: change to orange, sc around (12)
R11–R12: sc around (12)
R13: flatten opening, sc through both layers ×6 (6)
Stuff the front half of each foot. Leave the back half softer so the leg sits under the body.
Fasten off. Leave an 18 cm tail.
Ears
Yarn: orange, white, black — Source: layered tiger ear construction verified in Cuddly Stitches and Little Crochet Farm. Source
Make 2 outer ears.
R1: with orange, 6 sc in MR (6)
R2: inc ×6 (12)
R3: (sc, inc) ×6 (18)
R4: sc around (18)
R5: with black, sc 9; with orange, sc 9 (18)
R6: flatten lightly, sl st 9 across the lower edge (9)
Fasten off. Leave a 20 cm orange tail.
Make 2 inner patches.
R1: with white, 6 sc in MR (6)
R2: inc ×6 (12)
Sl st to first stitch (12)
Fasten off. Leave a 12 cm tail. Sew one white circle inside each ear before attaching the ears to the head.
Snout / Muzzle
Yarn: white — Source: standard amigurumi math; photo shows one raised oval muzzle.
R1: 6 sc in MR (6)
R2: inc ×6 (12)
R3: (sc, inc) ×6 (18)
R4: (2 sc, inc) ×6 (24)
R5: sc around (24)
Do not overstuff. A thin layer of filling gives the muzzle lift without turning it into a ball.
Fasten off. Leave a 25 cm tail.
Cheek Patches
Yarn: white — Source: standard amigurumi math; added to match the puffed lower muzzle in the photo.
Make 2.
R1: 6 sc in MR (6)
R2: inc ×6 (12)
R3: sc around (12)
Fasten off. Leave a 15 cm tail on each patch. Sew the patches touching under the snout, then stitch the lower curve of the snout over their top edges.
Belly Patch
Yarn: white — Source: standard amigurumi math; verified tiger patterns commonly use a white belly area. Source
R1: 6 sc in MR (6)
R2: inc ×6 (12)
R3: (sc, inc) ×6 (18)
R4: (2 sc, inc) ×6 (24)
R5: sc around (24)
R6: (2 sc, dec) ×6 (18)
Fasten off. Leave a 25 cm tail. Block flat with fingers before sewing.
Tail
Yarn: black and orange — Source: narrow striped tail construction checked against verified tiger tail pattern data. Source
R1: with black, 6 sc in MR (6)
R2: sc around (6)
R3: change to orange, sc around (6)
R4–R5: sc around (6)
R6: change to black, sc around (6)
R7: change to orange, sc around (6)
R8–R9: sc around (6)
R10: change to black, sc around (6)
R11: change to orange, sc around (6)
R12–R16: sc around (6)
R17: flatten opening, sc through both layers ×3 (3)
Add only a thread of stuffing to the first 8 rounds. The tail must curve, not stand like a rod.
Fasten off. Leave a 25 cm tail.
Nose Cap
Yarn: brown, or use a 10–12 mm brown safety nose — Source: photo feature and verified tiger material lists showing safety nose options. Source
R1: with brown, 6 sc in MR (6)
R2: inc ×6 (12)
R3: sl st around (12)
Fasten off. Leave a 15 cm tail. Fold the circle slightly into a horizontal oval while sewing.
Stripe Embroidery and Claws
Yarn: black — Source: photo placement; stripe embroidery is also documented in tiger amigurumi patterns. Source
Cut seven black strands, each 30 cm long.
Forehead: embroider one vertical center stripe from R4 to R8, then two angled stripes on each side ending around R7.
Brows: stitch one curved line over each eye between R8 and R9.
Cheeks: place three short side stripes on each side of the head between R11 and R15.
Body: stitch two short black bands on each arm and back leg if the crocheted black rounds need more width.
Paws: embroider two vertical claw lines on each white paw, each line 2 rounds tall.
Knot inside the head or limb when possible. For finished pieces, bury the tail through at least 3 cm of stuffing.
Assembly
- Pin the head to the closed top of the body, keeping the face centered over the white belly space.
- Sew the body to the head with small ladder stitches around the neck join.
- Sew the white belly patch to the front of the body from R7 to R16.
- Sew the snout to the head between R11 and R16, then sew the cheek patches under its lower edge.
- Attach the nose cap or safety nose at the top center of the snout, then embroider the vertical mouth line and two small curves.
- Sew the front legs to the body at R12–R15, angled inward so the paws touch the ground.
- Sew the back legs to the lower sides of the body at R6–R9.
- Sew the ears between R4 and R9 of the head, with black edging facing outward.
- Attach the tail to the back of the body at R7, curving it around the left side.
- Add forehead stripes, cheek stripes, brows, and paw claws after all parts are fixed.
The tiger is complete when it sits level without support and the forehead stripe group stays centered between the ears.
7 Technical Tips
- Stitch marker drift: If the marker shifts more than 2 stitches by R12 of the head, the forehead stripe guide will sit off-center. Reset the marker at the back of the head after R7 and again after R15.
- Stuffing firmness: A soft 42-st head collapses under the safety-eye washers. Pack the area behind each eye until the surface springs back but does not stretch.
- Invisible decrease gaps: Standard decreases on R16–R21 can leave six visible holes around the face. Use front-loop invisible decreases only on the closing rounds.
- Eye placement timing: Eye backs are hard to place after R17. Insert the eyes between R10 and R11, check the 9-stitch gap, then lock the washers before final stuffing.
- Velvet tension swap: Velvet yarn makes the 42-st head much larger and can hide black embroidery. Move to a 4 mm hook, use 14 mm eyes, and embroider stripes with cotton yarn rather than velvet.
- Pinning angle: Front legs sewn straight down make the cub look narrow and unstable. Pin each upper arm 4 stitches forward from the side line so the paws frame the belly.
- Tail weaving: A tail sewn with only one pass can loosen after handling. Use the 25 cm tail yarn to stitch through the body wall twice, then bury the end through three nearby rounds.
Conclusion
This tiger uses a simple amigurumi base, but the face depends on exact placement: eyes before closing, muzzle before mouth embroidery, and stripes after assembly. Work the head first, then test the nose and cheek patches with pins before sewing. The next practical step is to crochet one front leg and one back leg in the same sitting session so the paw size stays matched. Save this tiger amigurumi crochet pattern to Pinterest, post the finished cub on Instagram, and tag it with #SittingTigerCub. Which forehead stripe layout fits your tiger better: five narrow lines or one center line with four angled branches?









