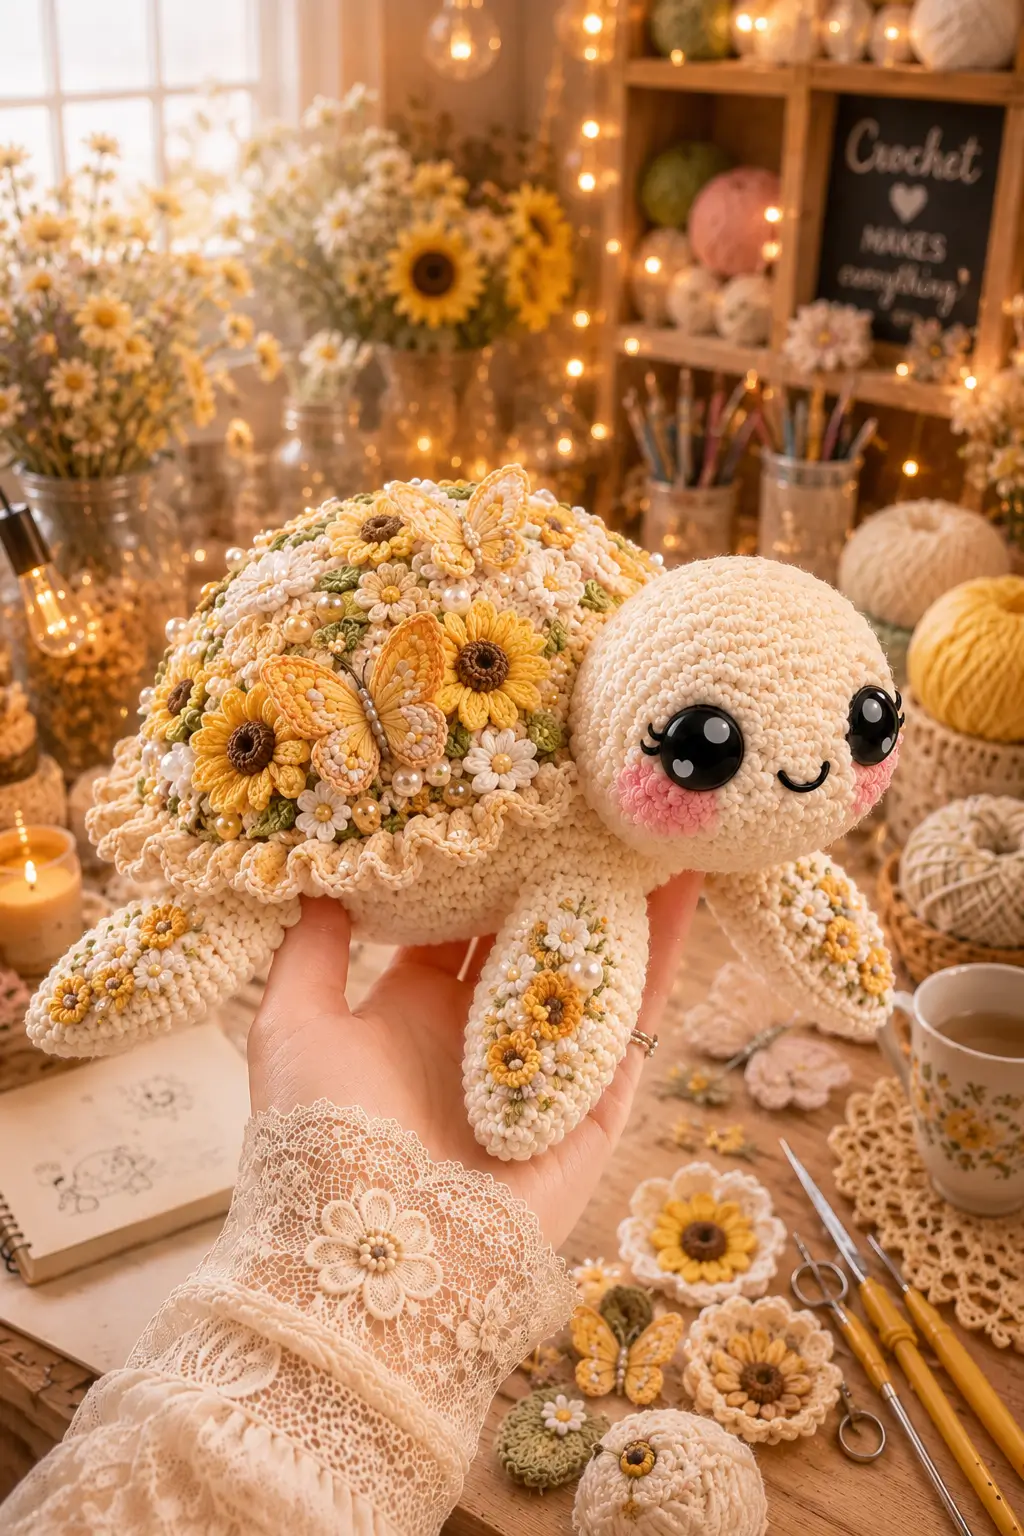
A turtle shell is a load-bearing dome, and this one has to carry flowers. This floral turtle amigurumi crochet pattern uses super bulky chenille, a 7–8 mm hook, 20 mm safety eyes, and DK cotton appliqués to make a 25 cm display turtle at intermediate level. The pattern gives the shell a flatter underside so the figure can sit on a shelf without rolling.
The Design: What Makes This Turtle Different
Most turtle toys fail at the seam between shell and belly. This design separates the soft body from the decorated shell so the shell can hold sunflowers, daisies, butterflies, and pearls without warping the face. You build a 42-stitch head for a round, oversized expression, then place the eyes before the final decreases.
The maker then shifts attention to the shell: it stays broad, shallow, and stable, not tall like a ball. That keeps the crochet turtle pattern close to the photo. A common mistake with a flower turtle amigurumi is adding appliqués before testing balance; heavy decorations pull the turtle sideways. Pin first. Sew second.
The chunky turtle crochet base uses the same plush-size logic seen in chenille turtle patterns: larger hooks, larger eyes, and firmer stuffing.
Project Info at a Glance
| Skill Level | Time | Finished Size | Hook | Best For |
|---|---|---|---|---|
| Intermediate | 6–8 hours | About 25.4 cm long | 7 mm and 8 mm | Display plush, shelf styling, market sample |
Materials and Tools
Yarn
- Cream chenille — super bulky — 130 g — Bernat Blanket, Hobbii Honey Bunny, or similar plush yarn
- Cream accent yarn — DK cotton or worsted cotton — 15 g — ruffle rim and flower bases
- Mustard yellow — DK cotton — 10 g — sunflower petals and butterfly wings
- White — DK cotton — 8 g — daisies and butterfly wing contrast
- Brown — DK cotton — 4 g — sunflower centers
- Olive green — DK cotton — 6 g — leaves and vines
- Pink — DK cotton or embroidery floss — 3 g — cheeks
Tools
- Hook 7 mm for head and body
- Hook 8 mm for shell and flippers
- 20 mm safety eyes
- Fiberfill stuffing
- Yarn needle
- Locking stitch markers
- Straight pins
- Black embroidery floss for mouth and lashes
- Optional pearl beads or embroidered French knots for display-safe decoration
Abbreviations
MR = magic ring; sc = single crochet; inc = 2 sc in one stitch; dec = invisible decrease; sl st = slip stitch; ch = chain; BLO = back loop only; FLO = front loop only; hdc = half double crochet; dc = double crochet; tr = treble crochet.
Invisible decrease uses the front loops of the next two stitches, then one pull-through, so the decrease line sits inside the fabric.
Pattern — Step by Step
Continuous spiral unless noted.
Head
Yarn: cream chenille.
R1: 6 sc in MR (6)
R2: inc ×6 (12)
R3: (sc, inc) ×6 (18)
R4: (2 sc, inc) ×6 (24)
R5: (3 sc, inc) ×6 (30)
R6: (4 sc, inc) ×6 (36)
R7: (5 sc, inc) ×6 (42)
R8–R13: sc around (42)
R14: (5 sc, dec) ×6 (36)
R15: (4 sc, dec) ×6 (30)
Insert 20 mm safety eyes between R10 and R11, about 11 stitches apart. Add the washers now.
R16: (3 sc, dec) ×6 (24)
R17: (2 sc, dec) ×6 (18)
Stuff the head firmly, keeping the front smooth.
R18: (sc, dec) ×6 (12)
R19: dec ×6 (6)
Fasten off. Leave a 15 cm tail and close through the front loops.
Body Underside
Yarn: cream chenille.
R1: 6 sc in MR (6)
R2: inc ×6 (12)
R3: (sc, inc) ×6 (18)
R4: (2 sc, inc) ×6 (24)
R5: (3 sc, inc) ×6 (30)
R6: (4 sc, inc) ×6 (36)
R7: (5 sc, inc) ×6 (42)
R8–R10: sc around (42)
R11: (5 sc, dec) ×6 (36)
R12: (4 sc, dec) ×6 (30)
R13: (3 sc, dec) ×6 (24)
Stuff toward the outer edge first so the belly stays flatter than the head.
R14: (2 sc, dec) ×6 (18)
R15: (sc, dec) ×6 (12)
R16: dec ×6 (6)
Fasten off. Leave a 20 cm tail and close.
Shell Dome
Yarn: cream chenille.
R1: 6 sc in MR (6)
R2: inc ×6 (12)
R3: (sc, inc) ×6 (18)
R4: (2 sc, inc) ×6 (24)
R5: (3 sc, inc) ×6 (30)
R6: (4 sc, inc) ×6 (36)
R7: (5 sc, inc) ×6 (42)
R8–R11: sc around (42)
R12: FLO sc around to form a rim line (42)
Fasten off. Leave a 45 cm tail for sewing. Do not close the shell.
Front Flippers / Arms
Make 2. Yarn: cream chenille.
R1: 6 sc in MR (6)
R2: inc ×6 (12)
R3: (sc, inc) ×6 (18)
R4: (2 sc, inc) ×6 (24)
R5: (3 sc, inc) ×6 (30)
R6–R7: sc around (30)
R8: fold flat and sc through both layers across 15 sts (15)
Fasten off. Leave a 25 cm tail on each flipper.
Back Flippers / Back Legs
Make 2. Yarn: cream chenille.
R1: 6 sc in MR (6)
R2: inc ×6 (12)
R3: (sc, inc) ×6 (18)
R4: (2 sc, inc) ×6 (24)
R5–R6: sc around (24)
R7: fold flat and sc through both layers across 12 sts (12)
Fasten off. Leave a 25 cm tail.
Tail
Yarn: cream chenille.
R1: 6 sc in MR (6)
R2–R4: sc around (6)
R5: fold flat and sc through both layers across 3 sts (3)
Fasten off. Leave a 20 cm tail. Do not stuff.
Cheek Patches
Make 2. Yarn: pink DK cotton.
R1: 6 sc in MR (6)
R2: inc ×6 (12)
R3: (sc, inc) ×6 (18)
Sl st to close.
Fasten off with a 15 cm tail.
Sunflower Appliqués
Make 3 large and 2 small. Yarn: brown and mustard DK cotton.
Center, large:
R1: 6 sc in MR (6)
R2: inc ×6 (12)
R3: (sc, inc) ×6 (18)
Change to mustard.
R4: (sl st, ch 3, dc, ch 3, sl st) in each stitch around (18 petals)
Fasten off. Leave a 20 cm tail.
Center, small:
R1: 6 sc in MR (6)
R2: inc ×6 (12)
Change to mustard.
R3: (sl st, ch 3, hdc, ch 3, sl st) in each stitch around (12 petals)
Fasten off. Leave a 15 cm tail.
Daisy Appliqués
Make 5–7. Yarn: mustard center and white petals.
R1: 6 sc in MR with mustard (6)
Change to white.
R2: (sl st, ch 4, 2 dc, ch 4, sl st) in each stitch around (6 petals)
Fasten off. Leave a 15 cm tail.
Leaves and Vines
Make 6 leaves and 2 vines. Yarn: olive green DK cotton.
Leaf:
R1: ch 7 (7 ch)
R2: sc in 2nd ch from hook, hdc, dc, dc, hdc, 3 sc in last ch; work down the other side with hdc, dc, dc, hdc, sc (14 sts)
Fasten off. Leave a 12 cm tail.
Vine:
R1: ch 28 (28 ch)
R2: sl st in 2nd ch from hook and across (27 sl st)
Fasten off. Leave a 20 cm tail.
Butterfly Appliqués
Make 2. Yarn: mustard and white DK cotton.
Upper wings, make 4:
R1: 6 sc in MR (6)
R2: inc ×6 (12)
R3: (sc, inc) ×6 (18)
R4: sc around (18)
Fasten off. Leave 10 cm tails.
Lower wings, make 4:
R1: 6 sc in MR (6)
R2: inc ×6 (12)
R3: sc around (12)
Fasten off. Leave 10 cm tails.
Body, make 2:
R1: ch 8 (8 ch)
R2: sl st in 2nd ch from hook and across (7 sl st)
Fasten off. Sew two upper wings and two lower wings to each body. Add one white stitch line down each upper wing.
Ruffled Shell Rim
Yarn: cream DK cotton or cream chenille.
Attach yarn to R12 of shell.
R1: sc around the shell edge (42)
R2: (sl st, ch 3, sl st in next st) repeat around (42 loops)
Fasten off. Weave in the end under the rim.
Pearl Dot Accents
Accessory from photo. Use beads only for display items.
Sew 12–18 pearl beads across the shell after all flowers are attached. For a soft toy, replace each bead with a tight French knot using cream embroidery floss.
Assembly
- Pin the shell dome to the body underside, leaving the front 4 cm open for head placement.
- Sew the shell to the body with the long shell tail, catching only the inner edge of the ruffle.
- Pin the head to the front center of the body and sew it on with two passes around the neck join.
- Embroider the smile with black floss, then add three short lash stitches beside each eye.
- Sew the pink cheek patches below the eyes, one round lower than the smile corners.
- Attach the front flippers slightly forward of the shell midpoint, angled down by about 25 degrees.
- Attach the back flippers behind the shell midpoint, angled outward by about 35 degrees.
- Sew the tail at the back center under the shell rim.
- Arrange sunflowers, daisies, leaves, vines, and butterflies on the shell; pin every piece before stitching.
- Add pearl beads or French knots last, then trim hidden yarn tails.
The turtle is complete when the shell sits level and all four flippers touch the surface.
7 Technical Tips
- Spiral drift: If the marker moves more than 2 stitches off center by R13 of the head, the eye line will slant. Stop at the next round and count back to 42 before placing eyes.
- Stuffing firmness: A soft head collapses around 20 mm eyes, while an overstuffed head shows gaps between chenille stitches. Fill until the head springs back but the stitch columns stay closed.
- Invisible decrease bumps: A visible ridge on R14–R19 usually means both loops were used for decreases. Work through front loops only and keep the pull-through loose enough to sit flat.
- Eye placement timing: Place eyes between R10 and R11 before R16 closes the opening too far. Late eye placement forces the washers against stuffing and can make one eye sit higher.
- Velvet tension: Chenille loops wider than 6 mm create stuffing show-through. Drop from an 8 mm hook to a 7 mm hook on the head if the fabric opens when stretched.
- Pinning heavy appliqués: A floral shell can tilt if the largest sunflower sits off center by more than 2 cm. Pin the three largest flowers first, then test the turtle on a flat table.
- Tail weaving: Chenille tails can slip out when woven for fewer than 5 stitches. Run each tail under 5–7 inner stitches, reverse direction once, then bury the cut end inside the shell.
Conclusion
Before adding the final pearl dots, check the turtle from the front, side, and back. The head should not pitch forward, and the shell should not twist toward the largest sunflower. For the next step, make one test daisy and one test butterfly in your chosen cotton before cutting all accent yarn. That confirms scale against the chenille shell. Save this floral turtle amigurumi crochet pattern to Pinterest, then post the finished shell layout on Instagram with #FloralTurtleAmigurumi. Which shell detail should sit at the highest point of this turtle: the large sunflower, the butterfly, or the pearl cluster?









