Introduction
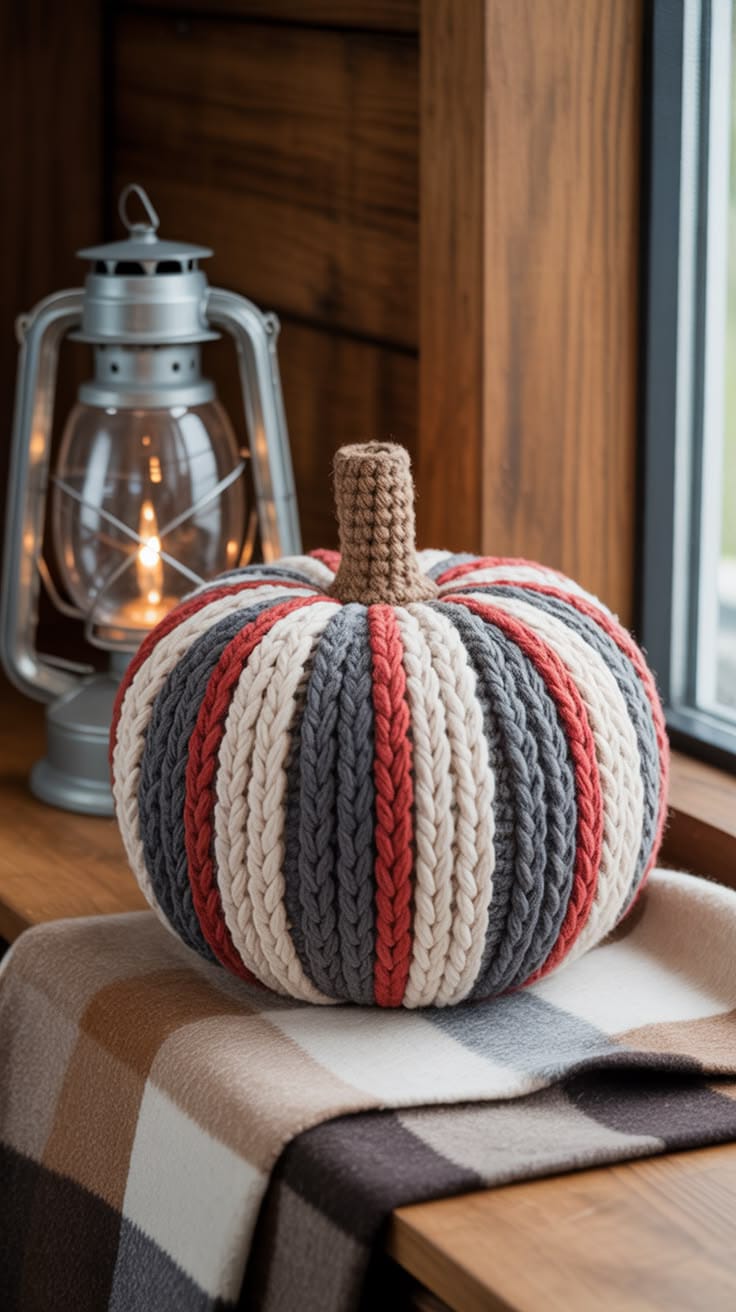
A two-row red stripe has nowhere to disappear if the pumpkin seam lands one rib out of sequence. This striped ribbed crochet pumpkin pattern uses bulky #5 yarn and a 6 mm hook to make an approximately 24–27 cm decoration with cream, charcoal and brick-red vertical ribs. A tall brown stem finishes the easy-intermediate construction, which works well for substantial shelf, hearth or tabletop fall decor.
The Design: What Makes This Ribbed Pumpkin Different
The body begins as one flat rectangle, but its color repeat is planned specifically for the final three-dimensional form. Broad five-row cream and charcoal sections create the dominant ribs, while narrow two-row brick-red strips divide those larger blocks. Working every body row in back-loop-only half double crochet leaves raised horizontal ridges in the flat panel; after seaming, those ridges turn vertically and reinforce the pumpkin shape. The panel is also much longer than it is tall so the finished tube can expand into a broad body rather than a cylinder. A narrow brown stem adds height without covering the striped crown. The common mistake with a striped crochet pumpkin is ending on the wrong point in the color repeat. Once the short edges are joined, mismatched bands create an obvious double-width section at the seam.
Project Info at a Glance
| Skill Level | Time | Finished Size | Hook | Best For |
|---|---|---|---|---|
| Easy–Intermediate | 4–6 hours | Approx. 24–27 cm diameter × 29–32 cm including stem | 6.0 mm | Fall shelves, hearth displays, tables and large seasonal arrangements |
Materials and Tools
Yarn
- Warm cream — bulky #5 — approximately 90–110 g — four broad body stripes.
- Charcoal gray — bulky #5 — approximately 90–110 g — four broad body stripes.
- Muted brick red — bulky #5 — approximately 40–50 g — four narrow separator stripes.
- Medium brown — bulky #5 — approximately 20–25 g — tall crochet stem.
Use yarns from the same weight class and preferably the same product line. Different fiber blends can produce different row heights even when the label lists the same yarn weight, which can make one color band pucker after assembly.
Tools
- 6.0 mm crochet hook
- Polyester fiberfill — approximately 250–320 g
- Long yarn or doll needle
- Standard tapestry needle
- Stitch markers
- Dressmaking pins
- Scissors
- Measuring tape
Abbreviations
- ch — chain
- sc — single crochet
- hdc — half double crochet
- sl st — slip stitch
- BLO — back loop only
- MR — magic ring
- inc — increase
- dec — decrease
An invisible decrease is worked through the front loops of the next two stitches before completing one single crochet through both loops.
Pattern — Step by Step
The pumpkin body is worked flat in rows. The foundation chain determines body height, while the number of rows determines circumference.
Body Foundation
Yarn: warm cream — original reconstruction using standard BLO ribbed-pumpkin geometry.
Foundation: ch 24.
Row 1: Starting in the second ch from hook, hdc across. (23)
Ch 1 and turn. The turning chain does not count as a stitch.
Cream Band 1
Row 2: hdc BLO across. (23)
Row 3: hdc BLO across. (23)
Row 4: hdc BLO across. (23)
Row 5: hdc BLO across. (23)
You now have five cream rows including Row 1.
Change to brick red at the final yarn-over of Row 5.
Red Separator 1
Yarn: muted brick red.
Row 6: hdc BLO across. (23)
Row 7: hdc BLO across. (23)
Change to charcoal gray.
Gray Band 1
Yarn: charcoal gray.
Row 8: hdc BLO across. (23)
Row 9: hdc BLO across. (23)
Row 10: hdc BLO across. (23)
Row 11: hdc BLO across. (23)
Row 12: hdc BLO across. (23)
Cream Band 2
Row 13: hdc BLO across. (23)
Row 14: hdc BLO across. (23)
Row 15: hdc BLO across. (23)
Row 16: hdc BLO across. (23)
Row 17: hdc BLO across. (23)
Red Separator 2
Row 18: hdc BLO across. (23)
Row 19: hdc BLO across. (23)
Gray Band 2
Row 20: hdc BLO across. (23)
Row 21: hdc BLO across. (23)
Row 22: hdc BLO across. (23)
Row 23: hdc BLO across. (23)
Row 24: hdc BLO across. (23)
Cream Band 3
Row 25: hdc BLO across. (23)
Row 26: hdc BLO across. (23)
Row 27: hdc BLO across. (23)
Row 28: hdc BLO across. (23)
Row 29: hdc BLO across. (23)
Red Separator 3
Row 30: hdc BLO across. (23)
Row 31: hdc BLO across. (23)
Gray Band 3
Row 32: hdc BLO across. (23)
Row 33: hdc BLO across. (23)
Row 34: hdc BLO across. (23)
Row 35: hdc BLO across. (23)
Row 36: hdc BLO across. (23)
Cream Band 4
Row 37: hdc BLO across. (23)
Row 38: hdc BLO across. (23)
Row 39: hdc BLO across. (23)
Row 40: hdc BLO across. (23)
Row 41: hdc BLO across. (23)
Red Separator 4
Row 42: hdc BLO across. (23)
Row 43: hdc BLO across. (23)
Gray Band 4
Row 44: hdc BLO across. (23)
Row 45: hdc BLO across. (23)
Row 46: hdc BLO across. (23)
Row 47: hdc BLO across. (23)
Row 48: hdc BLO across. (23)
Fasten off with a tail approximately 90 cm long.
Target panel size: approximately 21–23 cm high and 58–64 cm long. Measure the relaxed fabric without stretching the ribs.
Checking the Color Repeat
Lay the finished panel flat before joining it. The stripe sequence should read cream, narrow red, gray, then repeat four times.
The first edge begins with cream and the final edge ends with gray. When those edges meet, the seam creates a normal gray-to-cream transition rather than doubling one color.
Count the rows in every broad stripe. Cream and charcoal bands should each contain five rows, while every red separator should contain two.
A single extra row changes the circumference and also throws the remaining color sequence out of alignment, so correct the panel before seaming.
Joining the Body Tube
Place the first and last short edges together with the right sides facing outward.
Thread the long tail through a tapestry needle.
Whipstitch or mattress stitch the two edges together, matching one stitch on the first edge to one stitch on the second edge.
There should be 23 matched positions.
Do not pull the seam tighter than the surrounding BLO ribbing.
Turn the tube so the seam sits on the inside if required.
Closing the Bottom
Cut approximately 100 cm of strong matching yarn if the seaming tail is too short.
Work a running stitch around one open edge of the tube. Pass through approximately every row end.
Pull gradually.
The 48-row circumference creates considerable bulk at the center, so tighten in several stages rather than one hard pull.
When the opening reaches approximately 10–15 mm, cross the center with several reinforcing stitches.
Knot securely on the inside.
Stuffing the Pumpkin
Place fiberfill around the inner walls first.
Build an even ring of stuffing beneath the cream, gray and red sections.
Add filling toward the center only after the outside circumference holds its shape.
Target a broad body rather than a hard ball. The pumpkin should compress by approximately 20–25 mm when pressed firmly between the palms.
Keep the upper center slightly softer because it must accept both the gathering stitches and the stem.
Closing the Top
Thread a long yarn strand through the row ends around the open top.
Pull until the opening contracts to approximately 20 mm.
Add any final stuffing through the remaining gap.
Continue tightening until the opening is approximately 8–10 mm.
Pass the yarn across the center several times and secure it.
Do not cut the structural tail yet if you plan to use it for vertical compression.
Vertical Compression
Insert a long needle through the upper center and exit through the exact bottom center.
Return through the pumpkin along the same axis.
Pull until the body loses approximately 15–25 mm of height.
This compression changes the stuffed tube from a round cushion into a squat pumpkin.
Secure the yarn beneath the body.
Adding Structural Grooves
The BLO fabric already creates narrow ribs, but the photographed pumpkin also has broader rounded sections. Add six light shaping passes if your stuffed body looks too spherical.
Cut a strand approximately 180 cm long.
Run it from bottom center to top center, over the outside of the body and back through the centers.
Place the first shaping line near a color transition.
Repeat at approximately equal intervals around the circumference.
Pull only until each valley sits about 8–12 mm below the fullest neighboring surface.
The external lines should support the existing crochet ribs rather than overpower them.
Tall Brown Stem
Yarn: medium brown.
R1: 6 sc in MR. (6)
R2: inc ×2, 4 sc. (8)
R3: sc around. (8)
R4: sc around. (8)
R5: sc around. (8)
R6: sc around. (8)
R7: sc around. (8)
R8: sc around. (8)
R9: sc around. (8)
R10: sc around. (8)
R11: sc around. (8)
R12: sc around. (8)
R13: sc around. (8)
R14: sc around. (8)
R15: sc around. (8)
R16: sc around. (8)
R17: sc around. (8)
R18: sc around. (8)
Stuff the bottom half lightly.
Leave the upper 3–4 cm mostly empty so the stem can develop a small natural bend.
Fasten off with a 35 cm sewing tail.
Target visible stem length: approximately 8–10 cm.
Stem Base
Yarn: medium brown.
R1: 6 sc in MR. (6)
R2: inc ×6. (12)
R3: (sc, inc) ×6. (18)
Fasten off with a 30 cm tail.
This small disc distributes the load of the tall stem across the gathered crown.
Shaping the Stem
Place the stem on the table before sewing it to the pumpkin.
Bend only the upper third by approximately 10–15 degrees.
If it immediately returns upright, make one concealed brown stitch along the inside of the bend.
A sharp fold through one round creates a kink, so distribute the curve across several rounds.
Positioning the Stem
Center the brown base disc over the gathered pumpkin opening.
Pin it through four opposite points.
Place the stem in the middle of the disc and check the pumpkin from the front, side and directly above.
The stem should appear centered even if its tip bends slightly away from the vertical axis.
Sew through the lower 15–20 mm of the stem and into both the base disc and pumpkin crown.
Assembly
- Complete all 48 body rows and confirm that every cream and gray band has five rows while every brick-red band has two.
- Join the short panel edges through all 23 stitch positions without tightening the seam more than the BLO ribbing.
- Gather the lower 48 row ends, close the opening and reinforce the center with several crossing stitches.
- Stuff the body from the outside inward, leaving the center and upper crown approximately 15–20 percent softer.
- Gather the upper edge to an 8–10 mm opening and secure the closure without cutting the structural yarn.
- Compress the pumpkin vertically by approximately 15–25 mm to create the broad squat silhouette.
- Add up to six light external shaping lines with grooves approximately 8–12 mm deep if the ribbed fabric needs stronger segmentation.
- Crochet the brown stem and base disc, then stuff only the lower half of the stem.
- Sew the disc over the crown and attach the stem through its lower 15–20 mm so the base cannot pivot.
- Set the completed pumpkin on a level surface, redistribute any uneven stuffing and weave all yarn tails through matching interior stitches.
The finished body should display four broad cream sections, four broad charcoal sections, four narrow brick-red separators and one centered brown stem.
7 Technical Tips
- Stripe widths change unexpectedly: Losing one BLO stitch makes later rows shorter and shifts the seam. Count all 23 hdc after every color change rather than waiting until the 48-row panel is complete.
- Panel twists after seaming: One short edge has probably been joined several rows higher than the other. Match all 23 stitch positions before sewing and pin the first, middle and final positions before starting the seam.
- Pumpkin looks cylindrical: Insufficient circumference prevents the tube from spreading outward after stuffing. Target a relaxed panel length of approximately 58–64 cm for the 21–23 cm body height.
- Top closure leaves a hard cone: Excess stuffing directly beneath the crown blocks the gathering stitches. Keep the upper center approximately 15–20 percent softer than the outer circumference.
- Red stripes disappear into grooves: Tight structural shaping lines can bury a narrow two-row band. Place the external yarn beside the red rib rather than directly over its center and stop around 8–12 mm of groove depth.
- Stem falls sideways: An 8-stitch tube sewn through one central point behaves like a hinge. Attach at least the lower 15–20 mm through the separate 18-stitch base disc and pumpkin crown.
- Bottom rocks on the table: The gathered center is projecting below the surrounding ribs. Push the closure inward approximately 5–8 mm and redistribute the lowest stuffing until at least three broad sections touch the surface.
Adjusting the Pumpkin Size
The rectangle construction scales more predictably than a round-worked amigurumi body because two measurements control most of the shape. Foundation-chain length determines body height, while row count determines circumference.
For a smaller pumpkin, begin with ch 18–20 and use approximately 36 total rows. Keep the same proportional color system by using four-row cream and gray sections separated by one or two red rows.
For a larger version, begin with ch 28–30 and continue until the relaxed panel circumference measures roughly three times its height. The exact number of rows will vary with yarn and tension.
Do not increase stem diameter automatically when scaling up. A tall narrow stem creates the strongest contrast against a broad pumpkin body.
Color Planning
The reference uses three body colors with unequal stripe widths. That difference is important. Equal cream, red and gray bands would create a conventional striped sphere rather than the narrower red separators visible in the design.
Keep the brick-red section at roughly 40 percent of the width of each broad cream or gray section. With this pattern, two red rows sit between five-row neutral blocks.
For a softer palette, replace charcoal with warm taupe and brick red with muted terracotta. A more graphic version can use ivory, black and dark rust.
The brown stem should remain visually separate from all three body colors. Choosing brown close to the gray value can make the stem disappear when viewed from a distance.
Finishing the Rib Texture
Do not flatten the stuffed pumpkin through aggressive wet blocking. The dimensional ribs are created partly by the elasticity of the BLO fabric, and heavy blocking can reduce that relief.
Instead, shape each broad section by hand after the structural yarn is tied. Press outward between neighboring grooves while supporting the gathered centers.
Rotate the pumpkin and compare opposite sections. Correct any lobe that differs in width by more than approximately 15 mm.
Check the seam last. If it creates a noticeably flatter rib, redistribute filling behind that section rather than tightening the seam further.
Conclusion
Check the color sequence before joining the panel because the seam is the only place where the repeating cream, red and gray rhythm can break. Your next step is to finish all 48 rows, measure the panel at approximately 21–23 by 58–64 cm and pin its short edges together before sewing. Stuff from the outer wall inward, then compress the body only after both openings are secure. Share the finished striped ribbed crochet pumpkin pattern project on Pinterest with a front view and post the tall-stem profile on Instagram using #StripedRibbedCrochetPumpkin. For this pumpkin specifically, would you keep the narrow brick-red separators or replace them with dark forest green?









