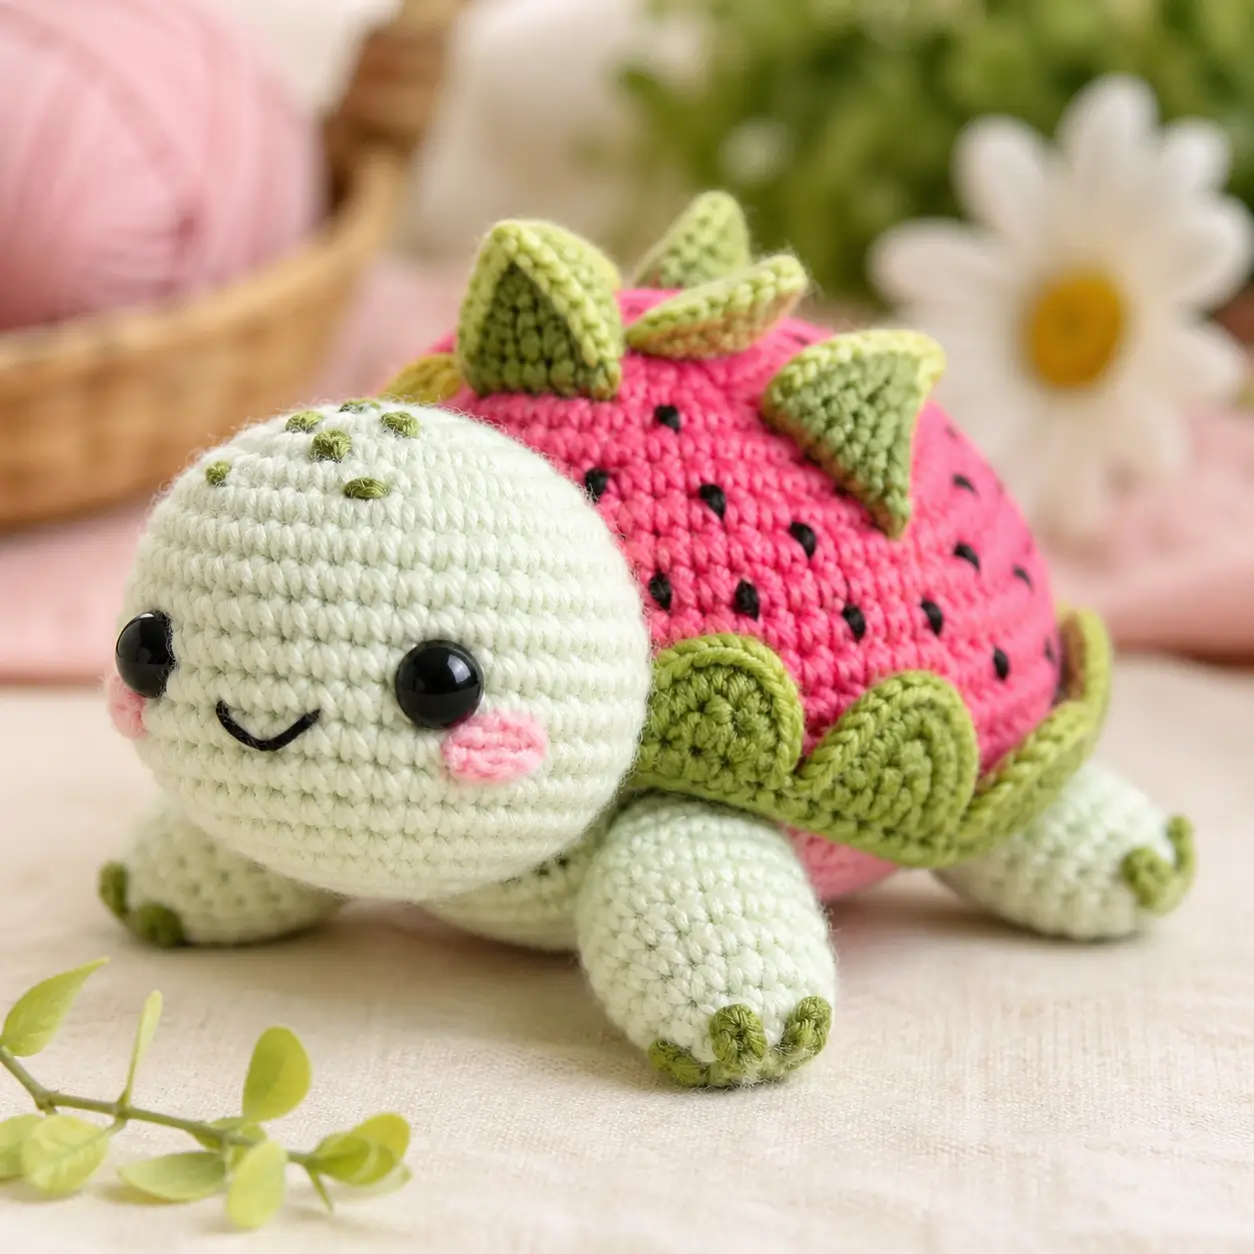
A turtle shell turned into a strawberry has to read as fruit before it reads as armor, which is why this strawberry turtle amigurumi crochet pattern starts with a domed pink shell. You will use DK yarn, a 3.5 mm hook, 8 mm eyes, and tight spiral rounds to make a 10–12 cm confident-beginner turtle for desk displays, craft tables, or bag charms.
The Design: What Makes Strawberry Turtle Different
The main structural decision is separation: the pale head and underbody stay turtle-shaped, while the shell carries the strawberry identity. That keeps the face visible from the front instead of burying it under leaves. A second decision is the green ruffle around the shell edge. On a crochet strawberry turtle, that ruffle does two jobs: it imitates a calyx and hides the seam where pink shell meets mint body. The top leaves stay flat rather than stuffed because raised cones make the shell look like spikes. That matters in a fruit turtle crochet pattern; fruit cues need to remain botanical, not reptile armor. The common mistake is placing seeds too evenly in vertical lines. Offset them by half a stitch every other row so the shell looks curved, not gridded.
Project Info at a Glance
| Skill Level | Time | Finished Size | Hook | Best For |
|---|---|---|---|---|
| Confident beginner with amigurumi experience | About 2 hours; allow longer for seed embroidery | 10–12 cm | 3.5 mm | Bag charm, shelf display, small market-table plush |
Materials and Tools
Yarn
- Pale mint green — DK / size 3 — 10 g — Stylecraft Special DK, Paintbox DK, or Hobbii Friends Cotton 8/6
- Strawberry pink — DK / size 3 — 10 g — Stylecraft Special DK, Paintbox DK, or any smooth pink DK
- Light leaf green — DK / size 3 — 4 g — for top calyx leaves and shell ruffle
- Dark olive green — DK / size 3 — 2 g — for toe stitches and optional seed accents
- Blush pink — DK / size 3 — 2 g — for cheek patches
- Black embroidery floss — scrap amount — for mouth and shell seeds
Tools
- Hook 3.5 mm
- Safety eyes 8 mm, 1 pair
- Polyester stuffing
- Tapestry needle
- Embroidery needle
- Locking stitch markers
- Straight pins
- Scissors
Use removable eyes or embroidered eyes when making toys for children under 3, because hard safety eyes are still small parts after installation.
Abbreviations
MR = magic ring / sc = single crochet / inc = increase / dec = decrease / sl st = slip stitch / ch = chain / BLO = back loop only / FLO = front loop only / hdc = half double crochet / dc = double crochet
An invisible decrease catches the front loops of the next 2 stitches, then finishes as one sc; use it on visible head, body, and shell decrease rounds.
Pattern — Step by Step
Continuous spiral unless noted. Mark the first stitch of every round. Counts appear in brackets.
Head
Yarn: pale mint green
R1: 6 sc in MR (6)
R2: inc ×6 (12)
R3: (sc, inc) ×6 (18)
R4: (2 sc, inc) ×6 (24)
R5: (3 sc, inc) ×6 (30)
R6: (4 sc, inc) ×6 (36)
R7–R11: sc around (36)
R12: (4 sc, dec) ×6 (30)
R13: (3 sc, dec) ×6 (24)
Insert eyes between R8 and R9, 8 stitches apart. Embroider the mouth after the head is stuffed but before final assembly.
R14: (2 sc, dec) ×6 (18)
R15: (sc, dec) ×6 (12)
Stuff firmly, keeping the lower front slightly rounded.
R16: dec ×6 (6)
Fasten off. Leave 30 cm tail for sewing.
Body / Underbody
Yarn: pale mint green
R1: 6 sc in MR (6)
R2: inc ×6 (12)
R3: (sc, inc) ×6 (18)
R4: (2 sc, inc) ×6 (24)
R5: (3 sc, inc) ×6 (30)
R6: (4 sc, inc) ×6 (36)
R7–R10: sc around (36)
R11: (4 sc, dec) ×6 (30)
R12: (3 sc, dec) ×6 (24)
R13: (2 sc, dec) ×6 (18)
Stuff lightly. A flat underside helps the turtle sit without rolling.
R14: (sc, dec) ×6 (12)
R15: dec ×6 (6)
Fasten off. Leave 35 cm tail.
Strawberry Shell
Yarn: strawberry pink
R1: 6 sc in MR (6)
R2: inc ×6 (12)
R3: (sc, inc) ×6 (18)
R4: (2 sc, inc) ×6 (24)
R5: (3 sc, inc) ×6 (30)
R6: (4 sc, inc) ×6 (36)
R7–R11: sc around (36)
R12: BLO sc around (36)
R13: (4 sc, dec) ×6 (30)
R14: (3 sc, dec) ×6 (24)
R15: (2 sc, dec) ×6 (18)
Stuff only the dome. Do not pack the shell flat against the underbody.
R16: (sc, dec) ×6 (12)
R17: dec ×6 (6)
Fasten off. Leave 30 cm tail.
Front Legs
Yarn: pale mint green
Make 2.
R1: 6 sc in MR (6)
R2: inc ×6 (12)
R3: (sc, inc) ×6 (18)
R4–R6: sc around (18)
R7: (sc, dec) ×6 (12)
R8–R9: sc around (12)
Stuff the paw end only. Leave the upper edge flat for sewing.
R10: flatten opening; sc through both layers ×6 (6)
Fasten off. Leave 20 cm tail on each leg.
Back Legs
Yarn: pale mint green
Make 2.
R1: 6 sc in MR (6)
R2: inc ×6 (12)
R3: (sc, inc) ×6 (18)
R4–R7: sc around (18)
R8: (sc, dec) ×6 (12)
R9–R10: sc around (12)
Stuff the paw end only. Back legs should be slightly longer than front legs.
R11: flatten opening; sc through both layers ×6 (6)
Fasten off. Leave 20 cm tail on each leg.
Shell Leaf Ruffle
Yarn: light leaf green
Make 8.
R1: 6 sc in MR (6)
R2: inc ×6 (12)
R3: (sc, inc) ×6 (18)
Fold the circle in half with wrong sides together.
R4: sc through both layers across the folded edge ×9 (9)
Fasten off. Leave 18 cm tail on each leaf.
Top Calyx Leaves
Yarn: light leaf green
Make 5.
Row 1: ch 7; starting in 2nd ch from hook, sl st, sc, hdc, dc, hdc, sc (6)
Row 2: work along the opposite side of the chain, sc, hdc, dc, hdc, sc, sl st (6)
Edge: sl st around the leaf edge (12)
Fasten off. Leave 15 cm tail on each leaf.
Center Stem
Yarn: light leaf green
R1: 6 sc in MR (6)
R2–R4: sc around (6)
Do not stuff. Roll the stem between fingers to make it stand upright.
Fasten off. Leave 15 cm tail.
Tail
Yarn: pale mint green
R1: 6 sc in MR (6)
R2–R4: sc around (6)
Do not stuff. Pin at the back under the shell before sewing.
Fasten off. Leave 15 cm tail.
Cheek Patches
Yarn: blush pink
Make 2.
R1: 6 sc in MR (6)
R2: inc ×6 (12)
R3: sl st around (12)
Fasten off. Leave 15 cm tail on each cheek.
Shell Seeds
Yarn: black embroidery floss
Make 18–22 seed stitches. Place the first row of seeds between shell R7 and R8, then stagger every next row by half a stitch. Keep seeds 3–4 stitches apart horizontally and 2 rounds apart vertically. Use one short vertical stitch per seed. Knot inside the shell before final sewing.
Toe Claws
Yarn: dark olive green
Make 12 toe stitches total. Place 3 short vertical stitches on each foot, centered over the front half of the paw. Each stitch should cover 1 round in height. Tie off inside the leg or bury the end through stuffing.
Assembly
- Close the head opening first, then shape it with the tail through the center so the face stays round.
- Sew the head to the front of the underbody across a 9-stitch-wide contact area.
- Place the strawberry shell on top of the underbody with shell R12 aligned around the widest body round.
- Sew the face details next: cheeks sit 1 round below the eyes, and the mouth curves across 4 stitches.
- Attach the front legs under the head-side edge, angled 20–30 degrees outward.
- Attach the back legs near the rear shell edge, matching the visible spread in the reference photo.
- Sew the tail under the back of the shell, centered between the back legs.
- Add the 8 shell ruffle leaves around the lower pink shell edge, overlapping each leaf by 1 stitch.
- Sew the 5 top calyx leaves in a star on the shell crown, then place the stem in the center.
- Weave every tail through at least 3 cm of fabric, trim close, and roll the turtle on a flat surface to test balance.
The finished strawberry turtle should sit with the head slightly lifted and the shell centered over all four legs.
7 Technical Tips
- Stitch marker drift creates a twisted seed map. Move the marker at the start of every round, and check shell R7, R9, and R11 before embroidering seeds.
- Understuffing collapses the head seam. Use enough fiberfill that the head holds a sphere, but stop before the 36-stitch rounds begin to stretch open.
- A visible decrease ridge flattens the pink shell. Work invisible decreases on R13–R17 and keep the hook under the front loops only for those paired stitches.
- Late eye placement blocks washer access. Set the 8 mm eyes between R8 and R9 before R14, then test cheek placement with pins before locking the backs.
- Velvet tension changes the finished size by several centimeters. Match this DK version with smooth yarn first, or shift to bulky yarn only after making a gauge sample.
- Pinning only the shell center makes the ruffle uneven. Use 8 pins for 8 leaf ruffle pieces, spacing each piece about 4–5 shell stitches apart.
- Short tail weaving loosens the cheek patches. Bury each cheek tail through the head twice, crossing the second path at a different angle.
Conclusion
Use this final check before publishing or making multiples: weigh the mint yarn after the head, place the shell ruffle before sewing the top crown, and photograph the seed map from above. The strawberry turtle amigurumi crochet pattern works best when the shell reads as one rounded berry, not a flat cap. Pin the post to Pinterest with a top-view image that shows the calyx. Share the finished turtle on Instagram with #StrawberryTurtleAmigurumi, and list yarn weight, hook size, and eye size in the caption. For the next sample, would you keep the shell bright strawberry pink or shift it toward raspberry red while keeping the mint turtle body?









