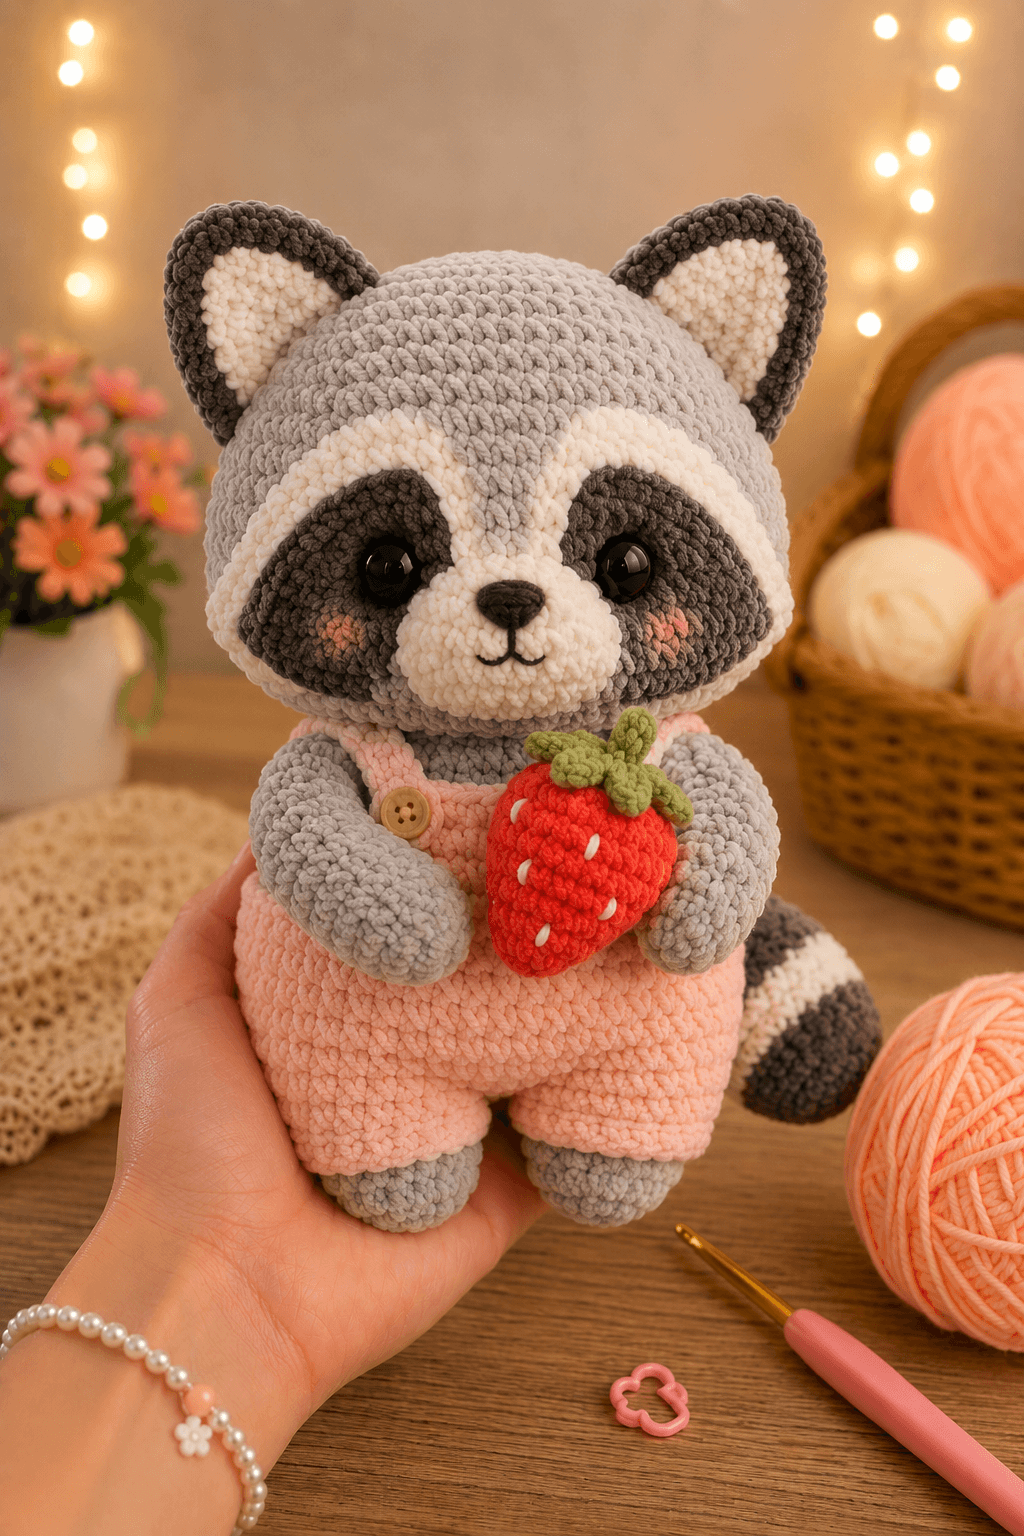
A raccoon’s eye mask must angle toward the muzzle without joining beneath the nose. This strawberry raccoon amigurumi builds that marking as two separate charcoal patches over a cream facial base. Super-bulky chenille, a 3.5 mm hook and 18 mm safety eyes produce an approximately 28 cm intermediate project. The broad seated body and fixed strawberry make it suitable for stable shelf display.
The Design: What Makes Berry Different
The head expands to 42 stitches because the cream face border and two dark mask panels require enough width to remain distinct. A smaller head would compress the mask against the muzzle and conceal the light center stripe. The body stops at 36 stitches, creating a compact torso that fits inside the peach overalls without excessive fabric at the waist. Arms are long enough to meet over the strawberry, while the feet remain wider than the lower legs to support the figure. The striped tail uses equal-length color blocks near the center and shorter shaping rounds at both ends. One common error in a plush raccoon crochet pattern is sewing the mask panels after installing the muzzle. That order traps their inner points beneath the muzzle edge. This velvet raccoon amigurumi positions both patches first, checks the eye spacing and adds the raised muzzle afterward.
Project Info at a Glance
| Skill Level | Time | Finished Size | Hook | Best For |
|---|---|---|---|---|
| Intermediate | 11–14 hours | Approximately 28 cm seated | 3.5 mm | Woodland displays, nursery shelves and seasonal photography |
Materials and Tools
Yarn
- Light gray — category 6 chenille — approximately 150 g — Himalaya Dolphin Baby, Premier Parfait Chunky or similar
- Charcoal gray — category 6 chenille — approximately 45 g — for the mask, ear borders and tail rings
- Cream — category 6 chenille — approximately 30 g — for the face, muzzle and inner ears
- Peach — category 6 chenille — approximately 85 g — for the overalls
- Red — category 6 chenille — approximately 20 g — for the strawberry
- Olive green — worsted or bulky yarn — approximately 8 g — for the strawberry leaves
- Pink — DK cotton — less than 3 g — for the cheeks
- Brown and black — DK cotton — less than 3 g combined — for the nose, mouth and seeds
Tools
- 3.5 mm crochet hook
- 18 mm black safety eyes
- Polyester stuffing, approximately 220–260 g
- One 18–20 mm button
- Large-eye yarn needle
- Locking stitch markers
- Long sewing pins
- Scissors
Abbreviations
- MR — magic ring
- sc — single crochet
- inc — two single crochets in one stitch
- dec — single-crochet decrease
- sl st — slip stitch
- ch — chain
- hdc — half double crochet
- dc — double crochet
- BLO — back loop only
- FLO — front loop only
An invisible decrease passes through the front loops of the next two stitches before completing one single crochet.
Pattern — Step by Step
Work in a continuous spiral unless a section states otherwise. Mark the first stitch of every round.
Head
Yarn: light gray — original shaping based on standard six-stitch amigurumi math.
R1: 6 sc in MR (6)
R2: inc ×6 (12)
R3: (1 sc, inc) ×6 (18)
R4: (2 sc, inc) ×6 (24)
R5: (3 sc, inc) ×6 (30)
R6: (4 sc, inc) ×6 (36)
R7: (5 sc, inc) ×6 (42)
R8–R15: sc around (42)
Do not install the eyes until both mask panels have been pinned.
R16: (5 sc, dec) ×6 (36)
R17: (4 sc, dec) ×6 (30)
R18: (3 sc, dec) ×6 (24)
Stuff the crown and sides firmly. Maintain a shallow recess at the center front for the muzzle.
R19: (2 sc, dec) ×6 (18)
R20: (1 sc, dec) ×6 (12)
R21: dec ×6 (6)
Fasten off. Leave a 20 cm tail, pass it through the six remaining front loops and close.
Cream Face Panel
Yarn: cream; worked as an oval.
R1: ch 13, sc in second ch from hook, 10 sc, 3 sc in final ch; continue along the opposite side with 10 sc, inc (26)
R2: inc, 10 sc, inc ×3, 10 sc, inc ×2 (32)
R3: (1 sc, inc), 10 sc, (1 sc, inc) ×3, 10 sc, (1 sc, inc) ×2 (38)
R4: sc around (38)
Fasten off. Leave a 40 cm tail. Pin the panel vertically over the lower front half of the head.
Eye-Mask Patches — Make 2
Yarn: charcoal gray; worked as tapered ovals.
R1: ch 7, sc in second ch from hook, 4 sc, 3 sc in final ch; work along the opposite side with 4 sc, inc (14)
R2: inc, 4 sc, inc ×3, 4 sc, inc ×2 (20)
R3: sc around (20)
Fasten off. Leave a 30 cm tail. Fold one end slightly inward to form the point beside the muzzle.
Muzzle
Yarn: cream.
R1: 6 sc in MR (6)
R2: inc ×6 (12)
R3: (1 sc, inc) ×6 (18)
R4–R5: sc around (18)
R6: (1 sc, dec) ×6 (12)
Fasten off. Leave a 30 cm tail and add a small amount of stuffing.
Ears — Make 2
Yarn: light gray.
R1: 6 sc in MR (6)
R2: sc around (6)
R3: (1 sc, inc) ×3 (9)
R4: (2 sc, inc) ×3 (12)
R5: (3 sc, inc) ×3 (15)
R6: sc around (15)
Fasten off. Leave a 30 cm tail and flatten without stuffing.
Inner Ears — Make 2
Yarn: cream.
Row 1: ch 6, sc in second ch from hook and across (5)
Row 2: ch 1, turn, dec, 1 sc, dec (3)
Row 3: ch 1, turn, dec, 1 sc (2)
Row 4: ch 1, turn, dec (1)
Fasten off. Leave a 15 cm tail. Sew one inner panel to each ear and add a charcoal surface-crochet border.
Body
Yarn: light gray.
R1: 6 sc in MR (6)
R2: inc ×6 (12)
R3: (1 sc, inc) ×6 (18)
R4: (2 sc, inc) ×6 (24)
R5: (3 sc, inc) ×6 (30)
R6: (4 sc, inc) ×6 (36)
R7–R12: sc around (36)
R13: (4 sc, dec) ×6 (30)
R14–R15: sc around (30)
R16: (3 sc, dec) ×6 (24)
R17: sc around (24)
R18: (2 sc, dec) ×6 (18)
Stuff the lower body firmly and leave the neck moderately filled.
Fasten off. Leave a 40 cm tail.
Arms — Make 2
Yarn: light gray.
R1: 6 sc in MR (6)
R2: inc ×6 (12)
R3–R5: sc around (12)
R6: (1 sc, dec) ×4 (8)
R7–R13: sc around (8)
Stuff the paw firmly and the upper arm lightly.
R14: dec ×4 (4)
Fasten off. Leave a 30 cm tail and flatten the top.
Back Legs — Make 2
Begin with light gray.
R1: 6 sc in MR (6)
R2: inc ×6 (12)
R3: (1 sc, inc) ×6 (18)
R4–R6: sc around (18)
R7: (1 sc, dec) ×6 (12)
R8–R11: sc around (12)
Stuff firmly through R7 and lightly above it.
R12: dec ×6 (6)
Fasten off. Leave a 30 cm tail.
Striped Tail
Alternate light gray and charcoal as listed.
R1: 6 sc in MR with charcoal (6)
R2: inc ×6 (12)
R3: (1 sc, inc) ×6 (18)
R4–R6: sc around with charcoal (18)
R7–R10: sc around with light gray (18)
R11–R14: sc around with charcoal (18)
R15–R18: sc around with light gray (18)
R19–R21: sc around with charcoal (18)
R22: (1 sc, dec) ×6 with light gray (12)
R23–R24: sc around (12)
R25: dec ×6 (6)
Stuff the tip and center firmly, then reduce the filling near the attachment end.
Fasten off. Leave a 35 cm tail.
Cheek Patches — Make 2
Yarn: pink DK cotton.
R1: 6 sc in MR (6)
R2: inc ×6 (12)
Fasten off. Leave a 15 cm tail and flatten each circle.
Overalls Body
Yarn: peach.
R1: ch 37, join without twisting and work 36 sc (36)
R2–R8: sc around (36)
R9: (4 sc, dec) ×6 (30)
R10–R11: sc around (30)
R12: (3 sc, dec) ×6 (24)
R13: sc around (24)
Fasten off. Leave a 35 cm tail. Place the piece over the body before attaching the legs.
Overall Bib
Yarn: peach; worked in rows.
Row 1: ch 13, sc in second ch from hook and across (12)
Rows 2–8: ch 1, turn, sc across (12)
Fasten off. Leave a 25 cm tail and sew the lower edge to the front of the overalls body.
Overall Straps — Make 2
Yarn: peach.
Row 1: ch 25, sc in second ch from hook and across (24)
Row 2: ch 1, turn, sc across (24)
Fasten off. Leave a 20 cm tail. Cross or position the straps over the shoulders according to fit.
Strawberry
Yarn: red.
R1: 6 sc in MR (6)
R2: inc ×6 (12)
R3: sc around (12)
R4: (1 sc, inc) ×6 (18)
R5–R6: sc around (18)
R7: (2 sc, inc) ×6 (24)
R8–R10: sc around (24)
R11: (2 sc, dec) ×6 (18)
Stuff firmly while preserving a pointed lower end.
R12: (1 sc, dec) ×6 (12)
R13: dec ×6 (6)
Fasten off. Leave a 20 cm tail and close the opening.
Strawberry Leaves — Make 5
Yarn: olive green.
Row 1: ch 7, sl st in second ch from hook, sc, hdc, dc, hdc, sc (6)
Fasten off. Leave a 15 cm tail. Arrange all five leaves around the strawberry opening.
Assembly
- Center the cream face panel over the lower front of the head and pin its upper edge around R8.
- Position both charcoal mask patches over the cream panel, leaving a cream strip approximately two stitches wide between their inner points.
- Insert the 18 mm safety eyes through the mask panels and head between R11 and R12, with approximately nine visible stitches between the posts.
- Sew the cream panel and mask patches flat, then attach the lightly stuffed muzzle between R12 and R17.
- Embroider the charcoal nose and divided mouth, attach the cheek patches and sew the ears between R4 and R8.
- Fit the overalls body around the torso, attach the bib and secure both straps over the shoulders with one visible button.
- Sew the body beneath the head, adding stuffing through the final 3 cm of the neck seam.
- Attach both back legs at the lower front of the body, then sew the striped tail to the rear-right side.
- Sew the arms at shoulder level with the paws angled inward, leaving enough space for the strawberry.
- Attach five leaves and short cream seed stitches to the strawberry, then secure the fruit between both paws with hidden stitches.
The finished raccoon should sit on both feet with the tail touching the surface behind the right leg.
7 Technical Tips
- Mask misalignment: A two-stitch difference between the mask points makes the center stripe appear crooked. Count from the nose center and pin both inner points at equal distances before sewing.
- Buried eye washers: Three chenille layers can make the safety-eye posts too short. Test the post through the mask, cream panel and head before closing R15.
- Head collapse: Loose stuffing beneath the large face pieces creates a flat forehead. Pack 3 cm portions behind the mask while keeping the fabric free of visible lumps.
- Decrease gaps: Standard decreases expose stuffing along the lower head and strawberry. Work every shaped decrease through the front loops only.
- Uneven velvet tension: Gaps larger than 1 mm indicate that the 3.5 mm hook is producing fabric that is too loose. Reduce the hook by 0.5 mm rather than pulling each stitch harder.
- Twisted overalls: A rotated foundation ring moves the bib away from the face center. Mark the first stitch and align it with the body’s back seam before sewing the bib.
- Loose strawberry: Two paw stitches alone allow the accessory to rotate. Add one hidden anchoring stitch through the fruit, bib and upper body at the strawberry’s rear center.
Conclusion
The raccoon’s identity depends on three controlled placements: the cream center stripe, the paired charcoal masks and the horizontal tail rings. Complete the head markings before joining the body, then test the strawberry between the loose arms before sewing either shoulder. Save the finished strawberry raccoon amigurumi to a woodland-themed Pinterest board and post front, side and rear photographs on Instagram with #BerryRaccoonAmigurumi. A rear view documents the strap and tail placement that the front image cannot show. For the next version, will you keep the five broad tail bands shown here or add a narrower charcoal ring near the tip?









