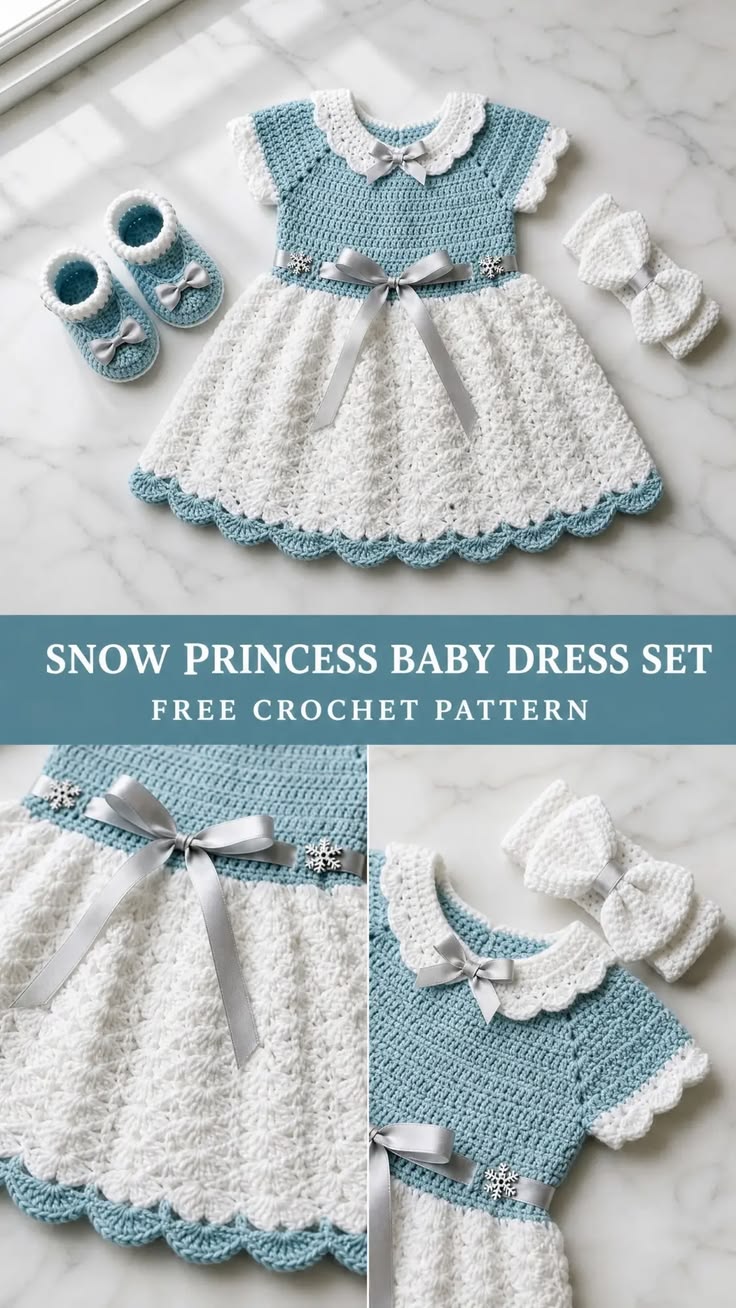
A scalloped white Peter Pan collar above an icy-blue bodice gives this set its snow-princess structure before the skirt even begins. This Snow Princess baby dress crochet pattern includes a top-down dress, textured white skirt, blue scalloped hem, matching booties, and a white bow headband. The pictured design also uses silver ribbon and small snowflake accents. The written version below is sized for approximately 0–3 months.
The Design: What Makes the Snow Princess Set Different
The dress uses three distinct construction zones. First, a fitted blue yoke establishes the neckline, shoulders, and short sleeves. A separate white scalloped collar frames that yoke without adding bulk through the body. Second, an eyelet waistband provides a controlled transition from the fitted bodice to the fuller white skirt. Finally, a blue scalloped hem repeats the bodice color and visually closes the design.
The accessories follow the same color placement. Blue booties receive white cuffs, while the white headband keeps the larger bow separate from the dress itself. Silver ribbon supplies the narrow accent visible at the collar, waist, and shoes.
A common mistake with a crochet baby dress set is judging size from age alone. Measure the intended baby and compare those measurements with the finished garment because infant sizing varies between patterns.
Project Info at a Glance
| Skill Level | Size | Dress Length | Chest | Hook |
|---|---|---|---|---|
| Intermediate | 0–3 months | Approx. 33 cm | Approx. 40.5 cm circumference | 3.25 mm |
A published Snow Princess Baby Dress Set using this construction specifies DK cotton, a 3.25 mm hook, approximately 40.5 cm chest circumference, and approximately 33 cm shoulder-to-hem length for 0–3 months. Its bootie sole measures approximately 9 cm and its headband approximately 35.5 cm unstretched. A separate DK baby-dress reference uses a 3.5 mm hook and includes 0–3, 3–6, and 6–12 month sizing, confirming that gauge rather than hook size alone should determine fit.
Materials and Tools
Yarn
- Light icy blue — DK / Category 3 cotton or cotton blend — approximately 183 m / 200 yd.
- White — DK / Category 3 cotton or cotton blend — approximately 229 m / 250 yd.
Additional Materials
- 3.25 mm crochet hook
- Silver satin ribbon — approximately 3/8 inch / 10 mm wide
- 4 small buttons — approximately 10 mm for the back opening
- 2 flat snowflake embellishments — optional
- Tapestry needle
- Scissors
- Stitch markers
- Measuring tape
- Blocking mat and pins
For an infant garment, sew every decorative component securely. Avoid loosely attached beads, charms, bows, or buttons, and supervise a baby while decorative handmade clothing is being worn.
Gauge
Work a gauge swatch before beginning the dress.
Target gauge: approximately 22 sc × 24 rows = 10 × 10 cm using DK yarn and a 3.25 mm hook.
The shell-pattern skirt should produce approximately four pattern rows per 2.5 cm. Wash and dry the swatch according to the yarn care instructions before measuring it.
If 22 stitches measure less than 10 cm, move to a larger hook. If they measure more than 10 cm, use a smaller hook.
Abbreviations
- ch — chain
- sl st — slip stitch
- sc — single crochet
- hdc — half double crochet
- dc — double crochet
- sc2tog — single crochet two together
- st/sts — stitch/stitches
- sp — space
- RS — right side
- WS — wrong side
- BLO — back loop only
- V-st — dc, ch 1, dc in indicated stitch or space
For an invisible sc decrease, insert the hook through the front loops of the next two stitches, yarn over and pull through both loops, then complete the single crochet.
Snow Princess Baby Dress Crochet Pattern
The dress is worked from the neckline downward. The yoke begins flat so a back opening can be incorporated, while the skirt is joined and worked in rounds.
Blue Bodice Foundation
Use icy-blue DK yarn.
Ch 57.
Foundation Row: Sc in second ch from hook and in every remaining chain. (56 sc)
Place markers at the four raglan positions corresponding approximately to stitches 8, 16, 40, and 48.
Row 1: Ch 1, turn, sc in each st across. (56)
Row 2: Ch 1, turn. Increase immediately before and after each of the four raglan markers by working 2 sc in the designated stitch. (64)
Row 3: Ch 1, turn, sc across.
Continue alternating a plain row with a raglan increase row through Row 13, repositioning the markers as the yoke expands.
Check the yoke against the target chest measurement rather than relying solely on row count.
Divide for the Sleeves
On the next RS row, crochet across the first back section.
Ch 4 for the first underarm.
Skip the first sleeve section.
Sc across the front.
Ch 4 for the second underarm.
Skip the second sleeve section and sc across the remaining back stitches.
Work the following row across both body stitches and underarm chains.
Continue in sc until the bodice measures approximately 15.2 cm from shoulder to waist.
Waist Eyelet Row
Eyelet Row: Ch 4, turn. Skip one stitch, dc in next st, *ch 1, skip 1 st, dc in next st*. Repeat across.
Next Row: Ch 1, turn. Sc in each dc and each ch-1 space.
The silver waist ribbon will be threaded through this eyelet row during finishing.
White Textured Skirt
Change to white.
Join the lower back edges at the waist so the skirt can be worked in rounds. Leave the upper back opening accessible for dressing.
Work one setup round of sc, distributing stitches evenly and adjusting the total to a multiple compatible with the shell repeat.
Shell-and-V Stitch
Shell: 5 dc in the indicated stitch or space.
V-st: dc, ch 1, dc in the indicated stitch or space.
Skirt Round 1: Work alternating shells and V-stitches around, spacing them evenly. Join with sl st.
Skirt Round 2: Work each new shell into the ch-1 center of the V-st below. Work each new V-st into the center dc of the shell below.
Continue alternating the placement in every round.
This offset construction produces the textured white skirt visible in the reference while allowing the fabric to flare below the waist.
Continue until the white skirt measures approximately 14 cm from waist to the beginning of the hem border.
Blue Scalloped Hem
Change to icy blue.
Hem Round 1: Ch 1 and sc evenly around the complete skirt edge. Join.
Hem Round 2: *Skip 2 sts, work 5 dc in next st, skip 2 sts, sl st in next st.* Repeat around.
Adjust the spacing slightly at the end if necessary rather than forcing an additional shell into insufficient stitches.
Fasten off and weave in the ends.
White Peter Pan Collar
The collar is made separately in two mirrored halves and attached after the yoke is complete.
Collar Half — Make 2
Use white.
Ch 25.
Foundation: Sc in second ch from hook and across. (24)
Row 1: Ch 1, turn, sc across. (24)
Row 2: Increase five times at evenly distributed positions. (29)
Row 3: Sc across. (29)
Row 4: Increase five times evenly. (34)
Row 5: Sc across. (34)
Row 6: Increase five times evenly while maintaining a smooth outer curve. (39)
Row 7: Sc across. (39)
Collar Scallops
Along the curved outer edge work:
*Sl st, skip 2 sts, 5 dc in next st, skip 2 sts, sl st in next st.*
Repeat across the curved edge.
Make the second half as a mirror image.
Join the halves neatly at center front and block the complete collar before sewing it to the neckline.
Short Sleeves
Use icy blue for the sleeve body and white for the edging.
Join blue yarn at the first underarm.
Work sc across the underarm chains and held sleeve stitches.
Work approximately 5–6 short rows, decreasing at both edges on selected RS rows to shape the cap.
Change to white.
Along the sleeve edge work:
*Skip 2 sts, 5 dc in next st, skip 2 sts, sl st in next st.*
Repeat across.
Fasten off.
Repeat for the second sleeve, matching its stitch and row counts to the first.
Back Button Bands
Join blue yarn at the lower edge of one back opening.
Work sc evenly toward the neckline.
Turn and work one additional sc row.
Fasten off.
On the opposite side, work a corresponding band with four evenly distributed buttonholes.
A buttonhole can be formed with ch 2, skip 2 sts, followed on the next row by two sc into the ch-2 space.
Sew four approximately 10 mm buttons to the opposite band.
Silver Waist Ribbon
Cut enough silver ribbon to pass around the waist with additional length for a front bow.
Weave it alternately over and under the eyelet spaces.
Bring both ends to center front and tie a flat bow.
The photograph also shows small snowflake decorations near the waistband. If these are added, sew flat embellishments securely rather than relying on adhesive.
Matching Crochet Baby Booties — Make 2
Published newborn DK booties commonly use approximately a 3.5 mm hook and finish around 8–9 cm at the sole. The booties below are designed to coordinate with the 0–3 month dress.
Blue Sole
Use icy blue.
Ch 11.
Round 1: Sc in second ch from hook and across the chain. Work 4 sc into the final chain. Rotate and work along the unused side of the foundation chain. Finish with 3 sc in the first chain. Join. (24)
Round 2: Increase around both curved ends while working one sc in each straight-side stitch. (32)
Round 3: Repeat evenly distributed increases around the toe and heel. (40)
Bootie Sides
Round 4: BLO sc around. (40)
Rounds 5–6: Sc around. (40)
Shape the Toe
Round 7: Sc across the first 14 sts, sc2tog ×6 across the toe, sc across remaining 14 sts. (34)
Round 8: Sc across 12 sts, sc2tog ×5, sc across final 12 sts. (29)
Round 9: Sc across 10 sts, sc2tog ×4, sc across remaining stitches. (25)
White Bootie Cuff
Change to white.
Round 10: Sc around. (25)
Round 11: Increase evenly to approximately 30 sts.
Rounds 12–13: Sc around. (30)
Round 14: *Skip 2 sts, 5 dc in next st, skip 2 sts, sl st in next st.* Repeat around.
Fasten off.
Add a small silver ribbon bow to the front only if it can be sewn securely. Repeat the complete pattern for the second bootie.
White Crochet Bow Headband
The reference uses a broad white band with a large structured bow positioned to one side.
Headband
Use white DK yarn.
Ch enough stitches to produce approximately 35.5 cm unstretched circumference at the required gauge.
For the published 0–3 month version, a 76-chain foundation is used.
Row 1: Sc in second ch from hook and across.
Rows 2–3: Ch 1, turn, sc across.
Fasten off with a long tail.
Join the short ends securely to form the band.
Large Bow
Ch 30.
Row 1: Sc in second ch from hook and across.
Rows 2–5: Ch 1, turn, sc across.
Fasten off.
Fold or pinch the rectangle at its center.
Make a small white strip approximately 6–8 stitches wide and long enough to wrap around the center of the bow.
Wrap the strip around the pinched center and sew it securely at the back.
Attach the finished bow to the headband with multiple passes of yarn.
Assembly and Finishing
- Block the blue dress yoke to the target chest and bodice measurements before attaching decorative components.
- Block both white collar halves, join them at center front, and pin the collar around the neckline.
- Sew the collar to the dress with small stitches placed along its inner edge.
- Finish both sleeves and compare them side by side before weaving in their final tails.
- Attach the four back buttons opposite their corresponding buttonholes and test every closure.
- Thread the silver ribbon through the waist eyelets and secure the center-front bow so it cannot pull free easily.
- Complete both booties and compare their soles; the pair should measure approximately 9 cm each for the stated size.
- Make the headband to approximately 35.5 cm unstretched circumference and attach the white bow securely.
- Weave every yarn tail through several centimeters of matching stitches and inspect all optional embellishments.
- Block the complete set according to the yarn care instructions and allow every piece to dry flat before use.
The completed set consists of one blue-and-white dress, two matching booties, and one white bow headband.
7 Technical Tips for the Snow Princess Baby Dress Set
- Yoke too narrow: Check the chest measurement before beginning the skirt. A completed decorative skirt cannot correct a bodice that is several centimeters too small.
- Unequal raglan lines: Keep one marker at every increase position and move it after each increase row. Missing a single raglan increase changes both sleeve and body stitch distribution.
- Skirt pulling inward: Keep the V-stitch chain spaces relaxed. Tight ch-1 spaces reduce the circumference when the next shell is worked into them.
- Scalloped hem ruffling: Do not force an extra 5-dc shell into the final few stitches. Excess shells add width and make the blue border wave outward.
- Collar lifting: Block both halves before attachment and pin the complete neckline before sewing. A collar that is several stitches too long will stand away from the blue bodice.
- Different bootie sizes: Measure both soles immediately after Round 3. Correct a tension difference before building the sides and cuffs.
- Loose decorations: Test every button, ribbon bow, and optional snowflake individually after sewing. Infant garments should not contain decorations that can detach under gentle pulling.
How to Adjust the Dress to 3–6 or 6–12 Months
Do not enlarge an infant dress by adding arbitrary rows only to the skirt. The neckline, chest, armholes, bodice depth, and total length must all change together.
A published DK baby-dress pattern using a 3.5 mm hook includes 0–3, 3–6, and 6–12 month sizes, demonstrating that the same general yarn category can cover all three sizes when stitch counts and measurements are recalculated.
For a larger Snow Princess dress, begin with the intended baby’s chest measurement. Add appropriate ease, then calculate the required stitch count from a washed gauge swatch. Continue raglan increases until both the chest and armhole depth are sufficient.
The booties and headband must also be resized independently. Do not assume that enlarging the dress automatically supplies the correct accessory measurements.
How to Keep the White Skirt Full Without Making It Heavy
The skirt needs enough expansion to flare from the fitted waist, but excessive stitches add weight and can pull the bodice downward.
Use the shell-and-V structure to create visual fullness through open spaces rather than continuously adding dense stitches. A shell provides width while the V-stitch creates the next attachment point.
DK cotton or a cotton blend gives the textured stitches clear definition. If the selected cotton is unusually heavy, a lighter DK blend can reduce the finished garment weight.
Lay the dress flat every few rounds. The skirt should expand gradually without forming deep waves around the circumference.
Making the Scalloped Collar Symmetrical
Make both collar halves from the same yarn ball and hook. Record the row counts and increase positions from the first half before beginning the second.
After both pieces are complete, place them together before blocking. Their inner edges and widest points should align closely.
Pin the center-front join first during blocking. Next pin the two back ends, followed by the outer scallops.
Attach the collar only after it is dry. Sewing an unblocked scalloped collar directly to the neckline can lock uneven curves into the finished garment.
Choosing Yarn for a Baby Dress Set
The documented Snow Princess pattern uses DK / Category 3 cotton or cotton blend with a 3.25 mm hook. A comparable multi-size baby dress uses DK yarn with a 3.5 mm hook and a reported gauge of 20 stitches per 10 cm. These specifications place the pictured design firmly within the light-yarn range used for structured crochet baby clothing.
Select a yarn with clear care instructions and make a washed swatch. Colorfastness matters particularly when strong blue fabric sits directly against a white skirt and collar.
A smooth yarn also keeps the scallops, shell stitches, and collar edges visible. Highly fuzzy fibers can obscure those details and make it more difficult to inspect the fabric for loose ends.
Baby Garment Finishing Checks
Inspect the wrong side of the dress before use. No long yarn tails or loose loops should remain around the neckline, sleeves, or waist.
Check the back opening while the garment is lying flat. Buttons should pass through the buttonholes without requiring excessive force, but the holes should not be so large that they open by themselves.
Inspect the ribbon separately. Decorative waist and shoe bows should be securely attached rather than left as easily removable pieces.
Check the booties for symmetry and confirm that the cuffs are not restrictive. The headband should fit without leaving a deep indentation; sizing should be based on the baby’s actual head circumference.
Conclusion
Start this set with the gauge swatch and blue yoke because the bodice determines every later dress measurement. Complete the white shell skirt only after confirming the chest and armhole fit, then add the collar, scalloped sleeves, blue hem, and silver ribbon. Make both booties from the same recorded stitch counts and size the headband from an actual circumference measurement rather than age alone. Before use, inspect every button and decorative attachment. Save this Snow Princess baby dress crochet pattern to Pinterest and share the finished set on Instagram with #SnowPrincessBabyDress. Will you keep the icy-blue and white palette from the reference or replace the blue with another winter shade? “`0









