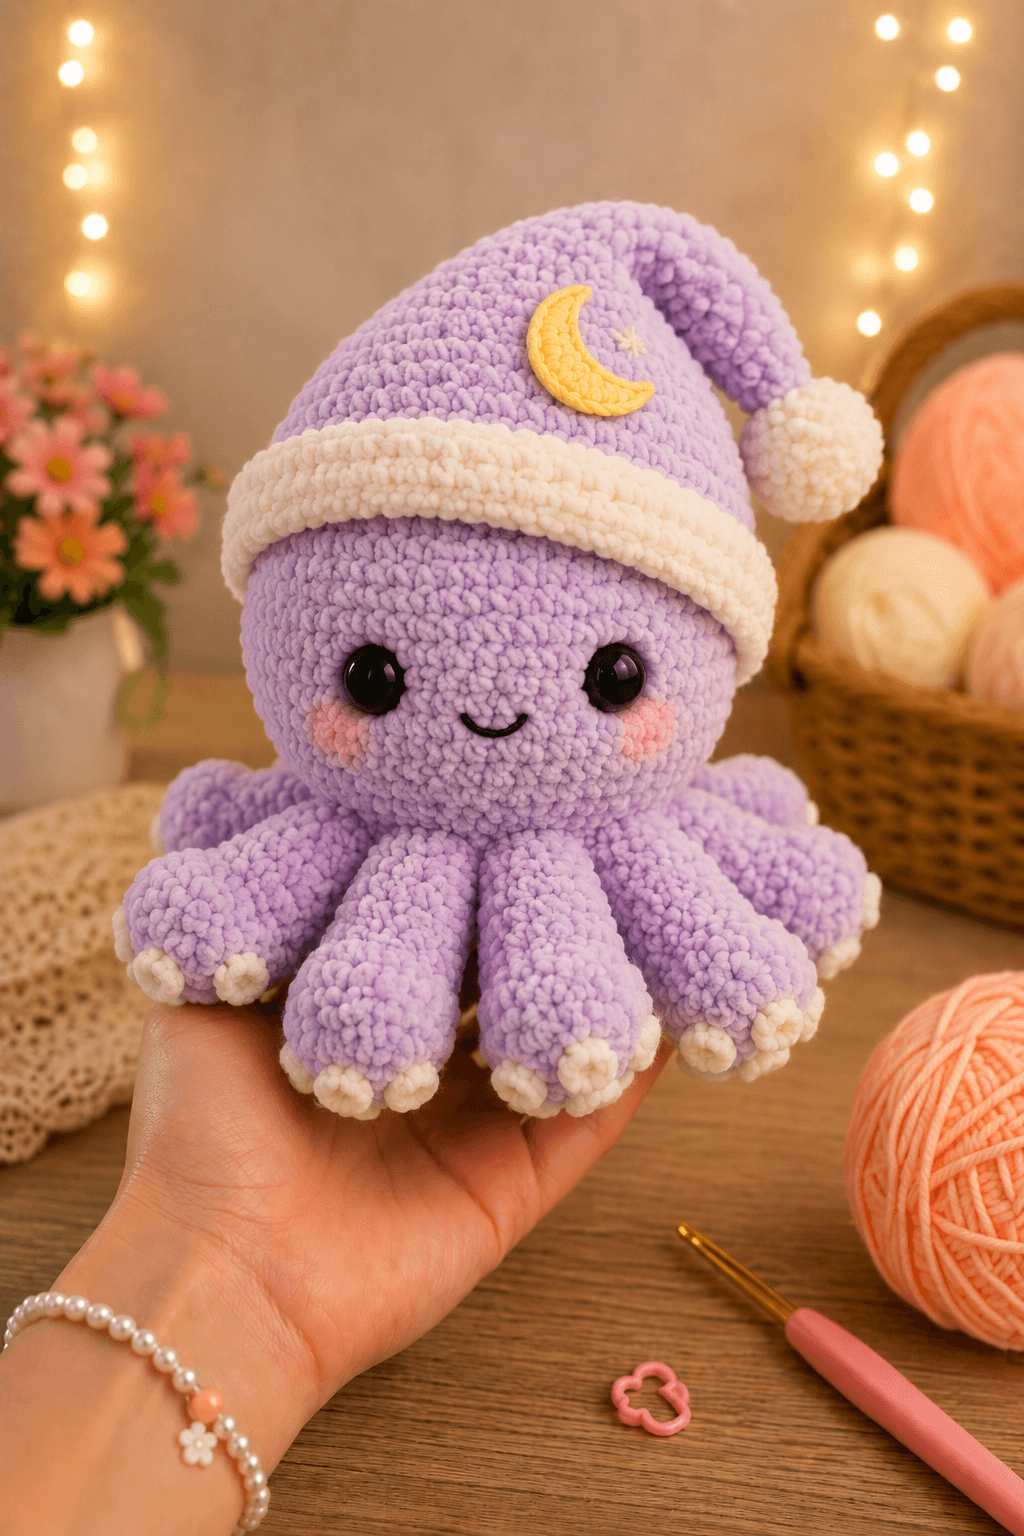
An octopus cannot wear a narrow sleeping cap unless its widest head round remains clear of all eight arm seams. This sleepy octopus amigurumi uses super-bulky chenille, a 5 mm hook and 18 mm safety eyes to create a 26 cm intermediate project. Eight stuffed tentacles form a broad seated base, making the finished figure practical for shelf displays and nursery photographs.
The Design: What Makes Luna Different
The head reaches 42 stitches before tapering into a short neck, giving the face enough width for large eyes without turning the profile into a flat disc. Beneath it, a 36-stitch body creates a firm attachment zone for eight separate tentacles. Each arm begins with a rounded cream-tipped end and narrows gradually toward the body, so the octopus can sit level without wire. The sleeping cap uses a broad lower circumference followed by offset decreases that force the upper section to curve toward one side. That bend matters; a symmetrical cone would stand upright and lose the photographed nightcap shape. A frequent error in a plush octopus crochet pattern is spacing all eight arms by eye. Small placement differences compound around the body, leaving a visible gap at the back. This velvet octopus amigurumi marks eight attachment sectors before any arm is sewn.
Project Info at a Glance
| Skill Level | Time | Finished Size | Hook | Best For |
|---|---|---|---|---|
| Intermediate | 10–13 hours | Approximately 26 cm including cap | 5 mm | Nursery shelves, bedtime decor and photography props |
Materials and Tools
Yarn
- Lavender — category 6 chenille — approximately 220 g — Premier Parfait Chunky, Himalaya Dolphin Baby or a comparable plush yarn
- Cream — category 6 chenille — approximately 75 g — for the hat band, pom-pom and sucker tips
- Yellow — worsted cotton or smooth chenille — approximately 15 g — for the crescent moon and star
- Pink — DK cotton — less than 3 g — for the cheek patches
- Black — embroidery thread or DK cotton — less than 2 g — for the mouth
Tools
- 5 mm crochet hook
- 18 mm black safety eyes
- Polyester stuffing, approximately 250 g
- Large-eye yarn needle
- Locking stitch markers, at least nine
- Long sewing pins
- Scissors
Published plush-octopus patterns pair super-bulky yarn with larger eyes and hooks than their DK counterparts. A 2024 pattern uses a 5 mm hook and 10 mm eyes for a small chenille octopus, then increases to a 9 mm hook and 18 mm eyes for its larger version. This adaptation keeps the 18 mm eyes but uses a tighter 5 mm hook because its head and arms are stuffed firmly.
Abbreviations
- MR — magic ring
- sc — single crochet
- inc — two single crochets in one stitch
- dec — single-crochet decrease
- sl st — slip stitch
- ch — chain
- hdc — half double crochet
- dc — double crochet
- BLO — back loop only
- FLO — front loop only
An invisible decrease passes through the front loops of the next two stitches before one single crochet is completed.
Pattern — Step by Step
Work in a continuous spiral unless a section states otherwise. Place a locking marker in the first stitch of every round.
Head
Yarn: lavender — original shaping based on standard six-stitch amigurumi math.
R1: 6 sc in MR (6)
R2: inc ×6 (12)
R3: (1 sc, inc) ×6 (18)
R4: (2 sc, inc) ×6 (24)
R5: (3 sc, inc) ×6 (30)
R6: (4 sc, inc) ×6 (36)
R7: (5 sc, inc) ×6 (42)
R8–R15: sc around (42)
Insert 18 mm safety eyes between R11 and R12 with eight visible stitches between the posts.
R16: (5 sc, dec) ×6 (36)
R17: (4 sc, dec) ×6 (30)
R18: (3 sc, dec) ×6 (24)
Stuff the crown firmly. Add smaller pieces behind and below each eye to prevent shallow facial dents.
R19: (2 sc, dec) ×6 (18)
R20: (1 sc, dec) ×6 (12)
R21: dec ×6 (6)
Fasten off. Leave a 20 cm tail, pass it through the remaining front loops and close the opening.
Body
Yarn: lavender — the broad lower rounds support eight separately attached arms.
R1: 6 sc in MR (6)
R2: inc ×6 (12)
R3: (1 sc, inc) ×6 (18)
R4: (2 sc, inc) ×6 (24)
R5: (3 sc, inc) ×6 (30)
R6: (4 sc, inc) ×6 (36)
R7–R10: sc around (36)
R11: (4 sc, dec) ×6 (30)
R12–R13: sc around (30)
R14: (3 sc, dec) ×6 (24)
R15: sc around (24)
R16: (2 sc, dec) ×6 (18)
Stuff the body firmly at its lower edge and moderately near the neck.
R17: sc around (18)
Fasten off. Leave a 40 cm tail for joining the body to the head.
Tentacles — Make 8
Begin with cream. Change to lavender after the rounded sucker end.
R1: 6 sc in MR (6)
R2: inc ×6 (12)
R3: (1 sc, inc) ×6 (18)
R4: sc around (18)
Change to lavender.
R5–R7: sc around (18)
R8: (1 sc, dec) ×6 (12)
R9–R13: sc around (12)
R14: (1 sc, dec) ×4 (8)
R15–R16: sc around (8)
Stuff the cream end firmly. Reduce stuffing gradually toward the open end so the arm can curve around the body.
Fasten off. Leave a 30 cm tail and flatten the final round.
Sucker Clusters — Make 16
Yarn: cream. Two clusters are attached to the visible tip of each tentacle.
R1: 6 sc in MR (6)
Fasten off. Leave a 12 cm tail. Pull the ring almost closed but retain a small central depression.
Cheek Patches — Make 2
Yarn: pink DK cotton.
R1: 6 sc in MR (6)
R2: inc ×6 (12)
Fasten off. Leave a 15 cm tail. Flatten each circle before attaching it beneath the outer half of an eye.
Sleeping Cap
Yarn: lavender. The lower edge must fit around the 42-stitch head without covering the eyes.
R1: 6 sc in MR (6)
R2: inc ×6 (12)
R3: (1 sc, inc) ×6 (18)
R4: (2 sc, inc) ×6 (24)
R5: (3 sc, inc) ×6 (30)
R6: (4 sc, inc) ×6 (36)
R7: (5 sc, inc) ×6 (42)
R8–R12: sc around (42)
R13: (5 sc, dec) ×6 (36)
R14–R16: sc around (36)
R17: (4 sc, dec) ×6 (30)
R18–R20: sc around (30)
R21: (3 sc, dec) ×6 (24)
R22–R23: sc around (24)
R24: (2 sc, dec) ×6 (18)
R25: sc around (18)
R26: (1 sc, dec) ×6 (12)
R27: sc around (12)
R28: dec ×6 (6)
Stuff only the lower eight rounds. Leave the upper section empty so it bends to the right.
Fasten off. Leave a 20 cm tail and close the tip.
Cream Hat Band
Yarn: cream; worked in rows and joined into a ring.
Row 1: ch 7, sc in second ch from hook and across (6)
Rows 2–42: ch 1, turn, sc in BLO across (6)
Fasten off. Leave a 30 cm tail. Join Row 42 to the foundation edge, then sew the upper edge of the band around R8 of the sleeping cap.
Hat Pom-Pom
Yarn: cream.
R1: 6 sc in MR (6)
R2: inc ×6 (12)
R3: (1 sc, inc) ×6 (18)
R4–R5: sc around (18)
R6: (1 sc, dec) ×6 (12)
Stuff firmly.
R7: dec ×6 (6)
Fasten off. Leave a 25 cm tail, close the opening and attach the pom-pom to the cap tip.
Crescent Moon — Make 2 Panels
Yarn: yellow; worked in rows. Sew the two matching panels together for a padded applique.
Row 1: ch 9, sc in second ch from hook and across (8)
Row 2: ch 1, turn, inc, 6 sc, inc (10)
Row 3: ch 1, turn, inc, 8 sc, inc (12)
Row 4: ch 1, turn, 2 sc, skip 2 stitches, 6 sc, skip 2 stitches, 2 sc (10)
Row 5: ch 1, turn, dec, 6 sc, dec (8)
Fasten off. Leave a 25 cm tail on one panel. Curve the pieces into matching crescents, stitch around the outer edge and add a thin layer of stuffing before closing.
Small Star
Yarn: yellow DK cotton or embroidery thread.
R1: 5 sc in MR (5)
R2: (sl st, ch 3, sl st in second ch from hook, sc in next ch, sl st in next base stitch) ×5
Fasten off. Leave a 15 cm tail for attaching the star beside the moon.
Assembly
- Center the body beneath the head and pin its 18-stitch opening across the lower head between R18 and R20.
- Sew twice around the neck seam, adding a final piece of stuffing before closing the last 3 cm.
- Divide the lower body into eight equal attachment sectors and mark each sector with a locking stitch marker.
- Pin one tentacle in every sector, placing four arms toward the front, two at the sides and two behind the body.
- Sew each flattened arm opening across approximately four body stitches, then secure both corners with a second pass.
- Attach two cream sucker clusters near the rounded end of every arm, keeping the clusters visible from the front.
- Sew the cheek patches below the eyes and embroider a shallow black smile across four stitches between R14 and R15.
- Fit the cap so its cream band sits above the eyes, then take six hidden holding stitches through the back half of the band and head.
- Bend the empty upper cap toward the right and secure the pom-pom at the final round without pulling the tip flat.
- Attach the padded crescent to the front-left side of the cap and sew the small star approximately 2 cm to its right.
The completed octopus should rest on all eight tentacles without the body touching the work surface.
7 Technical Tips
- Lost round position: Lavender chenille can conceal the first stitch and move facial placement by several stitches. Insert the marker immediately after working the first stitch and count every 42-stitch head round before continuing.
- Flattened head crown: Large stuffing pieces create corners beneath the cap. Add pieces no wider than 3 cm and rotate the head after every five additions.
- Decrease holes: Standard two-loop decreases can expose white stuffing along R16–R21. Work every head decrease through the front loops only.
- Locked-out eye posts: The washers cannot be installed after R18 narrows the opening. Fit both 18 mm eyes between R11 and R12 before beginning the first decrease round.
- Uneven velvet tension: Loose stitches make the tentacle tips show stuffing. Test a 12-stitch cup with the 5 mm hook and reduce the hook size when gaps exceed approximately 1 mm.
- Radial arm gap: Sewing the arms without markers can leave one uncovered body section. Mark eight sectors before pinning and keep adjacent arm edges no more than one stitch apart.
- Escaping chenille tails: A short woven end can shed through the seam after handling. Bury each structural tail through at least 6 cm of stuffed fabric, reverse direction once and trim inside the body.
Conclusion
Three checks control the final shape: a 42-stitch head, eight equally marked arm sectors and an unstuffed upper cap. Complete the head and one tentacle first, then compare the arm length with the head diameter before making the remaining seven pieces. Save the finished sleepy octopus amigurumi to a Pinterest crochet board and post front, side and overhead photographs on Instagram with #LunaSleepyOctopus. The overhead view is especially useful because it exposes uneven spacing that a front image can hide. Will you place Luna’s crescent on the left side shown here, or reverse the cap bend and moon placement for a mirrored version?









