Introduction
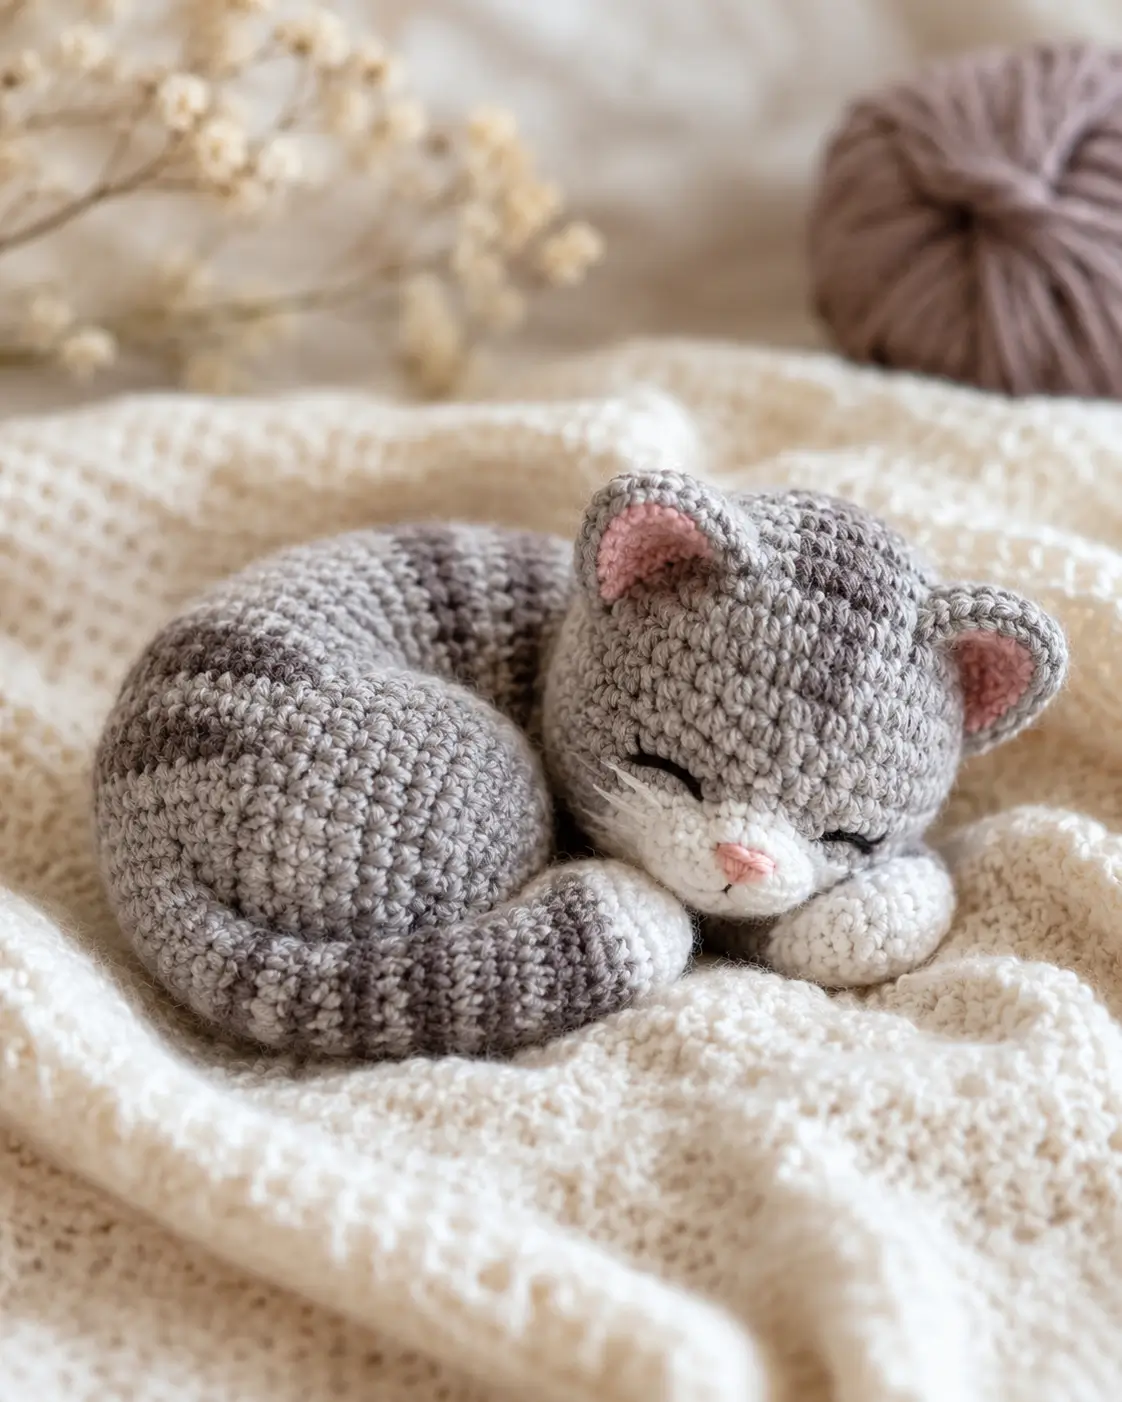
A curled tabby only reads as asleep when the tail forms a comma around the body. This sleeping cat amigurumi crochet pattern uses worsted yarn, a 3.5 mm hook, embroidered closed eyes, and firm shaping to finish at about 12 cm long. It suits a confident beginner ready for color changes. Make it as a desk-size memorial cat, shelf piece, or prop for kitten-themed photos.
The Design: What Makes the Sleeping Tabby Different
This cat amigurumi crochet pattern is built around posture, not height. The body uses a medium 36-stitch plateau so the cat stays compact, then the tail supplies most of the visible curve. The head is not centered on top of the body; it sits low and forward so the muzzle can rest beside the front paws. Third, the face avoids plastic eyes. A crochet sleeping cat pattern needs eyelids, not shine, so black embroidery gives the correct closed expression. A common mistake with a tabby cat amigurumi pattern is making every stripe a full ring. Realistic toy stripes work better as short bands, surface stitches, and uneven dark sections.
Project Info at a Glance
| Skill Level | Time | Finished Size | Hook | Best For |
|---|---|---|---|---|
| Confident beginner to intermediate | Within a day | About 12 cm long | 3.5 mm | Curled cat display, photo prop, memorial gray tabby |
Skill and size data align with current cat pattern references that list basic-skill tabby work, 12 cm gray tabby scale, and 3.5 mm worsted sleepy cat materials.
Materials and Tools
Yarn
- Light gray — worsted / aran — 35 g — smooth acrylic or cotton blend
- Dark gray — same weight — 6 g — stripe color
- White — same weight — 10 g — muzzle, cheeks, paws
- Pink — same weight or embroidery cotton — 1–2 g — inner ears and nose
- Cream — worsted — 20 g — optional blanket photo mat
Comparable cat references list worsted yarn with a 3.5 mm hook, DK yarn for small cats, and yarn amounts ranging from part of a 50 g skein to larger multi-color gram counts.
Tools
- Hook 3.5 mm
- Optional 8–10 mm safety eyes, omitted for the photographed sleepy face
- Polyester stuffing
- Yarn needle
- Embroidery needle
- Stitch markers
- Straight pins
- Scissors
Abbreviations
MR = magic ring; sc = single crochet; inc = 2 sc in same stitch; dec = invisible single crochet decrease; sl st = slip stitch; ch = chain; BLO = back loop only; FO = fasten off. An invisible decrease is worked through the front loops of the next 2 stitches before completing one sc, reducing bulk on the surface.
Pattern — Step by Step
Continuous spiral unless noted. Use US crochet terms. The medium plateau for this pattern is 36 stitches.
Head Make 1
Yarn: light gray — Source: Standard amigurumi math.
R1: 6 sc in MR (6)
R2: inc ×6 (12)
R3: (sc, inc) ×6 (18)
R4: (2 sc, inc) ×6 (24)
R5: (3 sc, inc) ×6 (30)
R6: (4 sc, inc) ×6 (36)
R7–R13: sc around (36)
R14: (4 sc, dec) ×6 (30)
R15: (3 sc, dec) ×6 (24)
R16: (2 sc, dec) ×6 (18)
R17: (sc, dec) ×6 (12)
R18: dec ×6 (6)
Stuff firmly before R17. Embroider closed eyes later across R10–R11, 6 stitches apart.
Fasten off. Leave 15 cm tail for closing.
Body Make 1
Yarn: light gray with dark gray stripe rounds — Source: Standard amigurumi math.
R1: 6 sc in MR (6)
R2: inc ×6 (12)
R3: (sc, inc) ×6 (18)
R4: (2 sc, inc) ×6 (24)
R5: (3 sc, inc) ×6 (30)
R6: (4 sc, inc) ×6 (36)
R7–R9: light gray sc around (36)
R10: dark gray sc around (36)
R11–R12: light gray sc around (36)
R13: dark gray sc around (36)
R14–R19: light gray sc around (36)
R20: (4 sc, dec) ×6 (30)
R21: (3 sc, dec) ×6 (24)
R22: (2 sc, dec) ×6 (18)
R23: (sc, dec) ×6 (12)
R24: dec ×6 (6)
Stuff medium-firm. Flatten the underside slightly with your palm before closing.
Fasten off. Leave 25 cm tail.
Front Legs Make 2
Yarn: white, then light gray — Source: Standard amigurumi math.
R1: white, 6 sc in MR (6)
R2: inc ×6 (12)
R3–R5: sc around (12)
R6: change to light gray, sc around (12)
R7–R8: sc around (12)
R9: dec ×6 (6)
Stuff only the white paw end. Leave the upper gray section flatter so it tucks under the muzzle.
Fasten off. Leave 20 cm tail.
Back Legs Make 2
Yarn: light gray — Source: Standard amigurumi math.
R1: 6 sc in MR (6)
R2: inc ×6 (12)
R3: (sc, inc) ×6 (18)
R4–R6: sc around (18)
R7: (sc, dec) ×6 (12)
R8: dec ×6 (6)
Stuff lightly. These back legs should read as rounded haunches, not standing feet.
Fasten off. Leave 20 cm tail.
Ears Make 2
Yarn: light gray — Source: Standard amigurumi math.
R1: 6 sc in MR (6)
R2: inc ×6 (12)
R3: (sc, inc) ×6 (18)
R4–R5: sc around (18)
Do not stuff. Flatten each ear, pinch the base, and sew the base into a shallow triangle.
Fasten off. Leave 25 cm tail.
Inner Ear Patches Make 2
Yarn: pink — Source: Standard amigurumi math.
R1: 6 sc in MR (6)
R2: inc ×6 (12)
Sl st to finish (12)
Press flat. Sew one patch inside each ear before attaching the ears to the head.
Fasten off. Leave 15 cm tail.
Muzzle Patch Make 1
Yarn: white — Source: Standard amigurumi math.
R1: 6 sc in MR (6)
R2: inc ×6 (12)
R3: (sc, inc) ×6 (18)
R4: (2 sc, inc) ×6 (24)
Sl st to finish (24)
Pin the patch horizontally across the lower head. Stretch it slightly into an oval before sewing.
Fasten off. Leave 25 cm tail.
Cheek Patches Make 2
Yarn: white — Source: Standard amigurumi math.
R1: 6 sc in MR (6)
R2: inc ×6 (12)
Sl st to finish (12)
Place one cheek patch on each side of the muzzle so the lower edges overlap by 1 stitch.
Fasten off. Leave 15 cm tail.
Striped Tail Make 1
Yarn: light gray and dark gray — Source: Standard amigurumi math.
R1: light gray, 6 sc in MR (6)
R2: inc ×6 (12)
R3: (sc, inc) ×6 (18)
R4–R6: light gray sc around (18)
R7–R8: dark gray sc around (18)
R9–R11: light gray sc around (18)
R12–R13: dark gray sc around (18)
R14–R20: light gray sc around (18)
R21: (sc, dec) ×6 (12)
R22: dec ×6 (6)
Stuff lightly so the tail bends. Curve it around the body before sewing.
Fasten off. Leave 35 cm tail.
Pink Nose Embroidery Make 1
Yarn: pink embroidery strand — Source: photo-specific embroidery detail.
Work 5 short horizontal stitches over the center of the muzzle, each about 1.2 cm wide. Add one tiny vertical stitch below the nose if a mouth line is wanted.
Tabby Stripe Embroidery Make 5–7 Marks
Yarn: dark gray — Source: photo-specific surface detail.
Add 3 short forehead marks between the ears, each 1.5–2 cm long. Add 2–4 short side marks on the body if the full stripe rounds look too even.
Cream Blanket Photo Mat Optional Prop Make 1
Yarn: cream — Source: accessory from photo; flat row crochet.
R1: ch 17, sc in 2nd ch from hook and across (16)
R2–R24: ch 1, turn, sc across (16)
This small mat gives the cat a stable display base and echoes the cream blanket in the reference image.
Fasten off. Weave in ends.
Assembly
- Sew the head to the front-right side of the body, not centered on top.
- Pin the body so the striped rounds sit high on the back.
- Sew the muzzle patch across the lower head.
- Sew the cheek patches over the lower left and right edges of the muzzle.
- Embroider the closed eyes across R10–R11 of the head.
- Embroider the pink nose at the center of the muzzle.
- Sew the front legs under the muzzle, with the white paws touching.
- Sew the back legs to the rear lower body as low haunches.
- Sew the ears between R5–R8 of the head, then add forehead stripes.
- Wrap the tail around the body and sew it down at 4 anchor points.
The finished cat should sit low, curled, and stable without tipping forward.
7 Technical Tips
- Lost round start: a shifted marker will move the muzzle off-center by 2–3 stitches. Reset the marker at the back of the head after every decrease round.
- Stuffing bulge: the body will look like a ball if packed hard to the final round. Stop stuffing when the underside can still flatten to about 1.5 cm against the table.
- Visible decrease scars: standard decreases leave diagonal holes on gray yarn. Work invisible dec stitches on R14–R18 of the head and R20–R24 of the body.
- Eye placement error: embroidered sleepy eyes placed above R9 make the cat look awake. Keep each eye on R10–R11 and curve the outer end down by one stitch.
- Tail stiffness: overstuffing the tail prevents the comma curve. Add stuffing only to 60–70% firmness, then bend it around the body before sewing.
- Ear spread: ears sewn too wide make the head read as a bear. Keep the inner ear edges about 7 stitches apart across the top of the head.
- Weak tail weaving: one anchor point lets the tail twist after handling. Sew the tail at the base, midpoint, front curve, and tip, then bury the final yarn tail through the body.
Conclusion
Block the toy only by hand; steam can flatten acrylic stitches and soften the ear points. The sleeping cat amigurumi crochet pattern works best when the body seam is hidden under the tail, because that keeps the curled outline readable from the front. Your next step is to pin all limbs for ten minutes before sewing, then take one overhead photo to check the comma-shaped tail. Share the finished cat on Pinterest and Instagram with #SleepingTabbyCat. Add the project size, hook, and yarn weight in the caption so other makers can compare gauge. Which stripe layout did you choose for the forehead: one center mark, three short marks, or no stripes?









