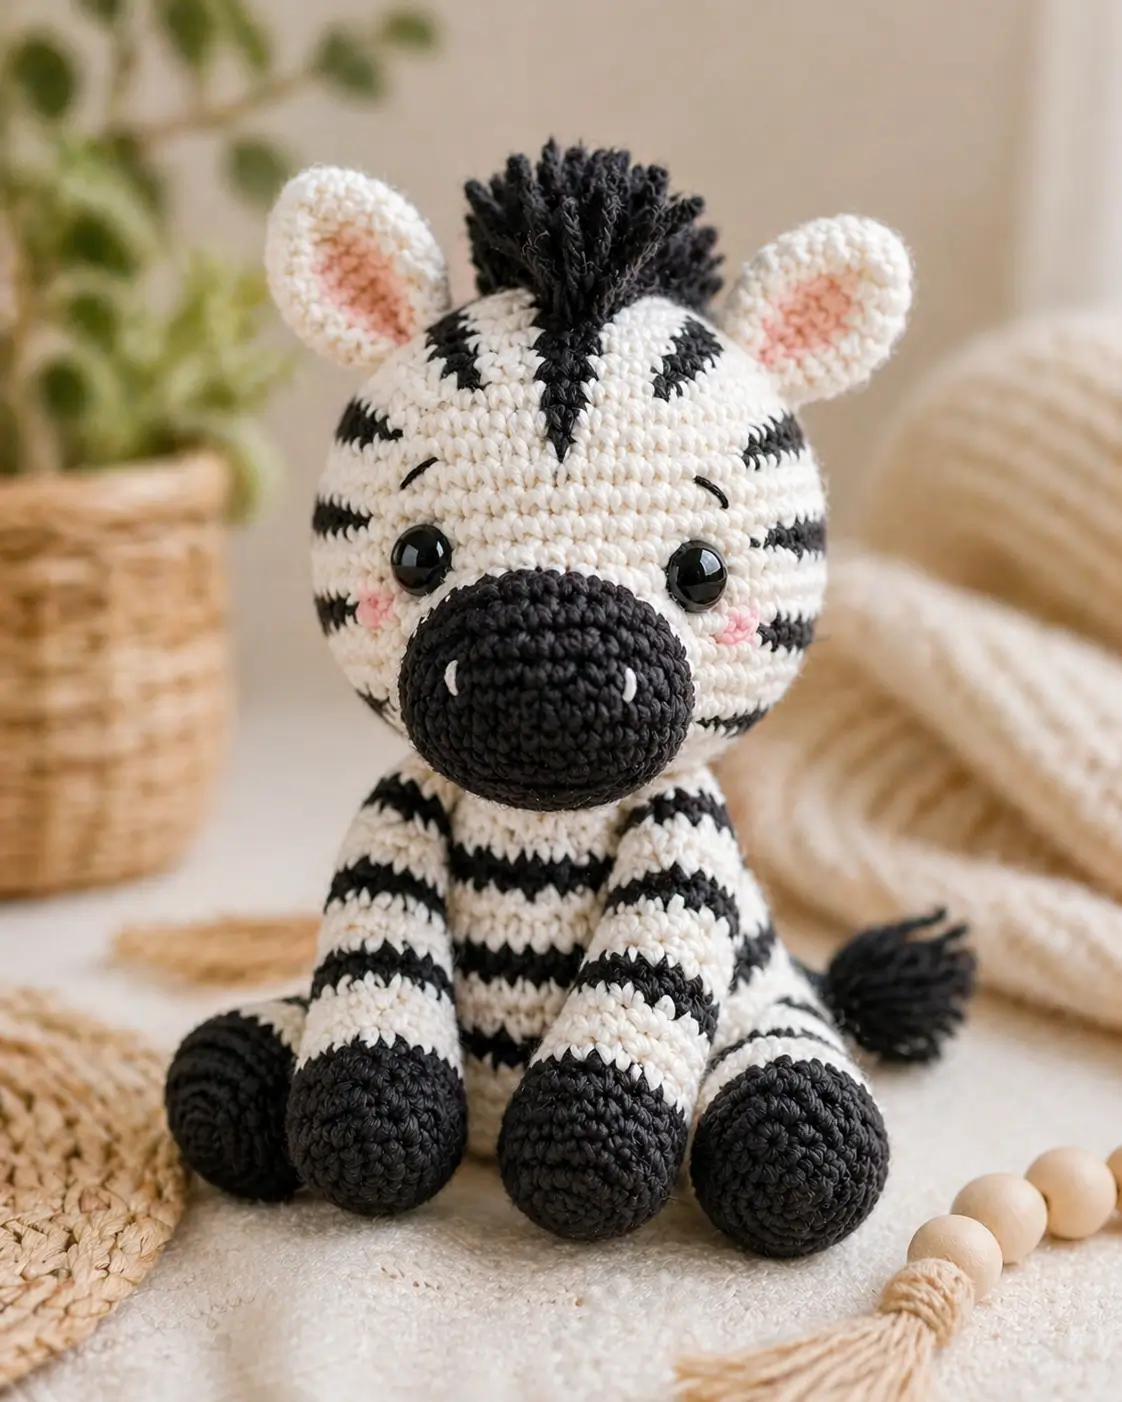
Zebra stripes do not mirror across the face, so the first decision is where the black center blaze breaks. This zebra amigurumi crochet pattern builds a 25 cm sitting toy with worsted yarn, a 3.5 mm hook, 12 mm safety eyes, and intermediate color-control work. Make it when a safari set needs one high-contrast animal that reads clearly in photos.
The Design: What Makes This Zebra Different
You build the head as a rounded white form first, then add the black blaze and muzzle as separate visual anchors. That choice keeps the face readable, because zebra markings can turn muddy when every stripe is worked directly into the head rounds. The body stays smaller than the head, which matches the sitting zebra amigurumi pose in the photo and gives the front legs space to lean forward. A black muzzle is made larger than a horse muzzle; the maker needs that blunt oval to separate the zebra from a pony. Ears stay round with pink centers, not pointed, so the face remains juvenile. The common error in a crochet zebra amigurumi is making all stripes evenly spaced. Real zebra striping changes direction at the face, shoulder, and hip. Controlled irregularity. That is the mark of the pattern.
Project Info at a Glance
| Skill Level | Time | Finished Size | Hook | Best For |
|---|---|---|---|---|
| Intermediate | 5–6 hours | 25 cm / 10 in | 3.5 mm | Safari set, nursery shelf, market sample |
Finished size, hook, worsted yarn, 12 mm eyes, and 25 g yarn references are based on verified Grace and Yarn project data.
Materials and Tools
Yarn
- White / cream — size 4 worsted — 25 g — Lion Brand Vanna’s Choice, Paintbox Simply Aran, or similar.
- Black — size 4 worsted — 25 g — same yarn line as the white for matching stitch height.
- Blush pink — worsted or DK scrap — 2 g — for cheek patches and inner ears.
- Natural beige — worsted cotton scrap — 5 g — optional tassel photo prop only.
Tools
- Hook 3.5 mm
- 12 mm safety eyes
- Polyester stuffing
- Yarn needle
- Stitch markers
- Sewing pins
- Scissors
- Optional wooden beads for display prop only; do not attach beads to a child’s toy
Abbreviations
MR = magic ring; sc = single crochet; inc = 2 sc in one stitch; dec = invisible decrease; sl st = slip stitch; ch = chain; BLO = back loop only; FO = fasten off; CC = color change.
An invisible decrease works through front loops only and prevents the black-and-white stripe fabric from opening at closure points.
Pattern — Step by Step
Continuous spiral unless noted. Count every round before moving on. Standard amigurumi math is applied: MR starts with 6 sc, increase rounds add 6 stitches, and decrease rounds remove 6 stitches.
Head
Yarn: white with black stripe sections
R1: 6 sc in MR (6)
R2: inc ×6 (12)
R3: (sc, inc) ×6 (18)
R4: (2 sc, inc) ×6 (24)
R5: (3 sc, inc) ×6 (30)
R6: (4 sc, inc) ×6 (36)
R7: (5 sc, inc) ×6 (42)
R8: sc around in white (42)
R9: sc around in white (42)
R10: sc around in white (42)
R11: 3 sc white, 5 sc black, 26 sc white, 5 sc black, 3 sc white (42)
R12: sc around in white (42)
R13: 4 sc white, 4 sc black, 26 sc white, 4 sc black, 4 sc white (42)
R14: sc around in white (42)
R15: 5 sc white, 4 sc black, 24 sc white, 4 sc black, 5 sc white (42)
R16: sc around in white (42)
R17: sc around in white (42)
Place 12 mm safety eyes between R13 and R14, 8 stitches apart. Do this before the head narrows.
R18: (5 sc, dec) ×6 (36)
R19: (4 sc, dec) ×6 (30)
R20: (3 sc, dec) ×6 (24)
Stuff firmly, adding small pieces under the cheek area.
R21: (2 sc, dec) ×6 (18)
R22: (sc, dec) ×6 (12)
R23: dec ×6 (6)
Fasten off. Leave 20 cm tail and close the remaining hole.
Body
Yarn: white and black
R1: 6 sc in MR with white (6)
R2: inc ×6 (12)
R3: (sc, inc) ×6 (18)
R4: (2 sc, inc) ×6 (24)
R5: (3 sc, inc) ×6 (30)
R6: (4 sc, inc) ×6 (36)
R7: sc around in white (36)
R8: sc around in white (36)
R9: sc around in black (36)
R10: sc around in white (36)
R11: sc around in white (36)
R12: sc around in white (36)
R13: sc around in black (36)
R14: sc around in white (36)
R15: sc around in white (36)
R16: (4 sc, dec) ×6 in white (30)
R17: sc around in black (30)
R18: sc around in white (30)
R19: (3 sc, dec) ×6 in white (24)
R20: sc around in white (24)
R21: sc around in black (24)
Stuff the lower body heavily enough that it sits without tipping.
R22: (2 sc, dec) ×6 in white (18)
R23: (sc, dec) ×6 in white (12)
R24: dec ×6 (6)
Fasten off. Leave 25 cm tail for sewing the body to the head.
Front Legs / Arms
Make 2. Yarn: black and white
R1: 6 sc in MR with black (6)
R2: inc ×6 (12)
R3: (sc, inc) ×6 (18)
R4: sc around in black (18)
R5: sc around in black (18)
R6: sc around in white (18)
R7: sc around in white (18)
R8: sc around in black (18)
R9: sc around in black (18)
R10: sc around in white (18)
R11: sc around in white (18)
R12: sc around in black (18)
R13: sc around in white (18)
R14: (sc, dec) ×6 in white (12)
R15: sc around in white (12)
R16: sc around in white (12)
Stuff the hoof and lower half only. Fasten off. Leave 22 cm tail for sewing.
Back Legs
Make 2. Yarn: black and white
R1: 6 sc in MR with black (6)
R2: inc ×6 (12)
R3: (sc, inc) ×6 (18)
R4: (2 sc, inc) ×6 (24)
R5: sc around in black (24)
R6: sc around in black (24)
R7: sc around in black (24)
R8: sc around in white (24)
R9: sc around in white (24)
R10: sc around in black (24)
R11: sc around in white (24)
R12: sc around in white (24)
R13: sc around in black (24)
R14: sc around in white (24)
R15: (2 sc, dec) ×6 in white (18)
R16: sc around in white (18)
R17: (sc, dec) ×6 in white (12)
R18: sc around in white (12)
Stuff the hoof firmly and the upper leg lightly. Fasten off. Leave 25 cm tail for sewing.
Ears
Make 2. Yarn: white
R1: 6 sc in MR (6)
R2: inc ×6 (12)
R3: (sc, inc) ×6 (18)
R4: sc around (18)
R5: sc around (18)
R6: (sc, dec) ×6 (12)
Flatten the ear and sc through both layers for 6 stitches (6). Fasten off. Leave 18 cm tail for sewing.
Inner Ear Patches
Make 2. Yarn: blush pink
R1: 6 sc in MR (6)
R2: inc ×6 (12)
R3: sl st around loosely (12)
Fasten off. Leave 15 cm tail. Sew one patch into each white ear, keeping the lower edge open and flat.
Muzzle
Yarn: black
R1: 6 sc in MR (6)
R2: inc ×6 (12)
R3: (sc, inc) ×6 (18)
R4: (2 sc, inc) ×6 (24)
R5: (3 sc, inc) ×6 (30)
R6: sc around (30)
R7: sc around (30)
R8: (3 sc, dec) ×6 (24)
Fasten off. Leave 30 cm tail. Stuff lightly, then embroider two short white vertical nostril stitches across R5 and R6.
Cheek Patches
Make 2. Yarn: blush pink
R1: 6 sc in MR (6)
R2: inc ×6 (12)
R3: sl st around loosely (12)
Fasten off. Leave 12 cm tail. Keep the circle flat; do not stuff.
Face Blaze and Side Stripes
Yarn: black
Line 1: Surface sl st from top center of head R7 down to R16 between the eyes (10)
Line 2: Surface sl st diagonally from head R10 left side toward center blaze (7)
Line 3: Surface sl st diagonally from head R10 right side toward center blaze (7)
Line 4: Surface sl st on left cheek from R14 to R16 (6)
Line 5: Surface sl st on right cheek from R14 to R16 (6)
Line 6: Embroider one short black eyebrow over left eye (4)
Line 7: Embroider one short black eyebrow over right eye (4)
Fasten off each line on the wrong side. Bury ends inside the head before final assembly.
Mane
Yarn: black
R1: Cut 24 strands of black yarn, each 10 cm long (24)
R2: Mark two center columns from head R5 to head R13 (2 columns)
R3: Root one folded strand through every other marked stitch (12)
R4: Root one folded strand through the skipped spaces (12)
R5: Trim the mane to 2.5–3 cm height (24)
Tie each strand with a lark’s-head knot. Pull knots tight against the fabric, not through it.
Tail
Yarn: white and black
R1: 6 sc in MR with white (6)
R2: sc around in white (6)
R3: sc around in white (6)
R4: sc around in black (6)
R5: sc around in white (6)
R6: sc around in white (6)
R7: sc around in black (6)
R8: sc around in white (6)
R9: sc around in white (6)
R10: sc around in white (6)
Fasten off. Leave 20 cm tail. Add 8 black yarn strands to the end and trim to 2 cm.
Photo Tassel Prop
Optional. Yarn: natural beige. Display prop only.
R1: ch 16, sl st in 2nd ch from hook and across (15)
R2: Cut 12 strands, each 12 cm long (12)
R3: Fold strands around the end of the cord and wrap with 40 cm beige yarn (12)
R4: Trim tassel ends level at 7 cm (12)
Wooden beads may be added for styling, but the prop should stay separate from the toy.
Assembly
- Pin the body under the head with the body’s final round centered at the head base.
- Sew head to body through R22–R24 of the body and the lower 8 stitches of the head.
- Pin the muzzle between the eyes, with its top edge touching head R14.
- Sew the muzzle down, adding stuffing before the final 8 stitches close.
- Sew cheek patches beside the muzzle, one round below each eye.
- Attach front legs to the upper body at a forward angle, 5 stitches apart.
- Attach back legs to the lower body so the hooves face front and sit flat.
- Sew ears to the top of the head across R6–R8, then bend slightly inward.
- Attach the tail to the back of the body at R10 and shape the mane upright.
- Weave all tails through stuffed sections twice, then trim only after tension testing.
The finished zebra sits upright with a large head, black muzzle, striped limbs, upright mane, and separate display tassel.
7 Technical Tips
- Stripe drift: A missed marker moves the black bands one stitch sideways every round. Place the marker in the first stitch of every round and recount at 36 or 42 stitches before each color change.
- Loose head stuffing: A soft head collapses around the muzzle seam. Add stuffing in 1 cm pieces until the head resists finger pressure without stretching the stitches.
- Visible decrease holes: Standard decreases leave pale stuffing visible on black rounds. Work every dec through front loops only on head R18–R23 and body R16–R24.
- Eye placement timing: Late eye placement fails because the washer cannot pass through a closed head. Insert eyes between R13 and R14 before working R18.
- Velvet yarn tension: Velvet substitution creates tall, loose loops at the color changes. Drop to a 3.0 mm hook and hold the carried strand under no more than 6 stitches at a time.
- Leg rotation: Unpinned back legs twist outward and make the zebra sit like a frog. Pin both back hooves flat on the table before sewing the first stitch.
- Tail weaving: A tail sewn through one stitch can pull out during handling. Pass the yarn tail through the closed 6-stitch end twice, then bury it into the body for 4 cm.
Conclusion
Check the stripe map before sewing anything permanent. The head carries most of the zebra identity: black muzzle, center blaze, side stripes, pink ears, and upright mane. After assembly, place the toy on a flat surface and adjust the back legs until both hooves touch at the same angle. The next step is to photograph the face from the front and side so the stripe spacing is clear for later makes. Save this zebra amigurumi crochet pattern to Pinterest, then share the finished toy on Instagram with #SittingZebraAmigurumi. Which part should carry the strongest black stripe on your version: the center blaze, the legs, or the tail tuft?









