Introduction
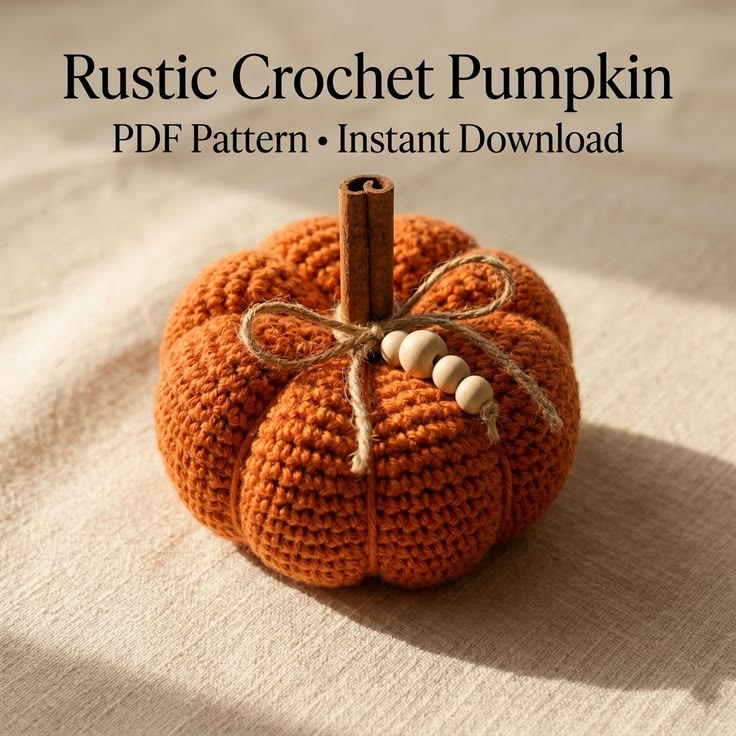
A cinnamon-stick stem needs a deep crown recess or it looks inserted into an orange ball instead of growing from a pumpkin. This rustic crochet pumpkin pattern uses worsted yarn and a 4.5 mm hook to make a body approximately 15–17 cm wide. Six sculpted lobes, a natural cinnamon stem, jute bow and wooden beads create a compact intermediate fall decoration with no crocheted stem required.
The Design: What Makes This Rustic Pumpkin Different
The body is worked as one continuous stuffed form so the horizontal crochet rounds remain visible across all six lobes. External shaping strands are added only after stuffing, allowing the maker to control each groove independently and produce the pronounced vertical segmentation shown in the reference. A 42-stitch plateau gives the pumpkin enough circumference for a broad tabletop silhouette while keeping the crown compact. The natural cinnamon stick replaces a yarn stem and sits inside a recessed central opening created by vertical compression. Jute and unfinished wooden beads add detail without covering the sculpted surface. This farmhouse crochet pumpkin depends on balanced filling. One common mistake is packing the central axis as firmly as the outer wall; that makes the body resistant to compression and prevents the six grooves from becoming deep enough.
Project Info at a Glance
| Skill Level | Time | Finished Size | Hook | Best For |
|---|---|---|---|---|
| Confident beginner / intermediate | 4–6 hours | Approx. 15–17 cm wide × 16–18 cm high including stem | 4.5 mm | Fall shelves, Thanksgiving tables and farmhouse displays |
Materials and Tools
Yarn
- Burnt pumpkin orange — Aran / worsted #4 — approximately 90–120 g — complete pumpkin body and sculpting strands.
A firm, smooth worsted yarn shows the horizontal rows and recessed lobe channels more clearly than a heavily brushed fiber. Acrylic, wool-blend or cotton-blend yarn can be used if the fabric remains dense after stuffing.
Tools and Natural Details
- 4.5 mm crochet hook
- Polyester fiberfill — approximately 140–180 g
- Long tapestry or doll needle
- Standard yarn needle
- Six locking stitch markers
- Cinnamon stick — approximately 6–8 cm long
- Jute twine — approximately 55–65 cm
- Natural wooden beads — approximately 4, with holes large enough for the jute
- Scissors
- Measuring tape
Abbreviations
- MR — magic ring
- sc — single crochet
- inc — two single crochet stitches in one stitch
- dec — invisible decrease
- sl st — slip stitch
- ch — chain
- FLO — front loop only
An invisible decrease is worked through the front loops of the next two stitches before completing one single crochet through both loops.
Pattern — Step by Step
Work the pumpkin body in a continuous spiral. Place a marker in the first stitch of every round and move it upward as the work progresses.
Pumpkin Body
Yarn: burnt pumpkin orange — standard six-stitch amigurumi math adapted to the photographed rustic pumpkin.
R1: 6 sc in MR (6)
R2: inc ×6 (12)
R3: (sc, inc) ×6 (18)
R4: (2 sc, inc) ×6 (24)
R5: (3 sc, inc) ×6 (30)
R6: (4 sc, inc) ×6 (36)
R7: (5 sc, inc) ×6 (42)
R8: sc around (42)
R9: sc around (42)
R10: sc around (42)
R11: sc around (42)
R12: sc around (42)
R13: sc around (42)
R14: sc around (42)
R15: sc around (42)
R16: sc around (42)
R17: sc around (42)
R18: (5 sc, dec) ×6 (36)
R19: sc around (36)
R20: (4 sc, dec) ×6 (30)
R21: sc around (30)
R22: (3 sc, dec) ×6 (24)
R23: sc around (24)
R24: (2 sc, dec) ×6 (18)
R25: sc around (18)
R26: (sc, dec) ×6 (12)
R27: dec ×6 (6)
Begin stuffing after R18. Pack the outer circumference first and keep the vertical center approximately 15–20 percent softer than the outer wall. Add the final stuffing before R27.
Fasten off. Leave a 50 cm tail and close the final six front loops.
Flatten the Pumpkin Profile
Yarn: matching burnt orange.
Cut approximately 120 cm of yarn and thread the long needle.
Insert through the lower center and exit through the exact crown center.
Return through the pumpkin along the same vertical path.
Pull gradually until the body loses approximately 1–1.5 cm of height.
The sides should spread outward while the crown and base become shallow depressions.
Secure the strand temporarily at the lower center.
Mark Six Lobe Positions
Set the pumpkin on a flat table.
View the crown directly from above.
Place six stitch markers around the widest circumference, approximately 60 degrees apart.
Trace each position visually from the crown to the lower center.
Move any marker that creates a section more than approximately 10 mm wider than its opposite lobe.
First Sculpted Channel
Yarn: matching orange.
Cut approximately 140 cm of yarn.
Anchor at the lower center.
Carry the strand up the outside of the pumpkin through the first marked groove position.
Enter through the crown center and pass the needle through the complete body.
Exit at the lower center.
Pull until the groove sits approximately 10–14 mm below the fullest part of the adjacent lobes.
Do not make the final knot yet.
Second Sculpted Channel
Work the groove directly opposite the first.
Match its depth.
Set the pumpkin down and compare the two halves.
If one side becomes noticeably smaller, loosen the shaping strand and redistribute filling before continuing.
Third and Fourth Channels
Add the next groove approximately 60 degrees from the first.
Work its opposite channel immediately afterward.
Rotate the pumpkin and check the lower contact points.
The body should remain stable without leaning toward one pair of lobes.
Fifth and Sixth Channels
Add the final opposite pair.
Rotate the pumpkin slowly while comparing all six sections.
Adjust individual strands until the lobe widths remain within approximately 10 mm of one another.
Knot securely at the bottom center.
Bury the yarn tails deeply through the stuffing.
Deepen the Crown Recess
The cinnamon stick needs a stable central seat.
Thread approximately 60 cm of orange yarn.
Pass from the top center to the bottom center and back once more.
Pull until the crown recess is approximately 12–15 mm deep.
Do not exceed about 15 mm or the six upper lobes can fold inward around the stem.
Secure the yarn and bury the tail.
Prepare the Cinnamon Stick
Select a cinnamon stick approximately 6–8 cm long.
The lower 20–25 mm will sit inside the pumpkin.
Check that the stick enters the crown recess without forcing the crochet stitches apart.
If the cinnamon is much wider than the central opening, enlarge the opening by shifting stitches with a blunt yarn needle rather than cutting the fabric.
Insert the Cinnamon-Stick Stem
Push the lower 20–25 mm of the cinnamon stick into the crown center.
Compress the surrounding stuffing around its base through the outside of the pumpkin.
The exposed stem should measure approximately 4–5.5 cm.
Angle the stem no more than approximately 5–10 degrees from vertical.
The photograph uses a mostly upright natural stem, so a strong sideways tilt will change the silhouette.
Secure the Stem with Yarn
Thread approximately 50 cm of matching orange yarn.
Bring the yarn through the pumpkin close to the stem base.
Make four to six small stitches around the crown, catching crochet fabric immediately beside the cinnamon stick.
Pull each stitch firm enough to hold the stem but not enough to distort the crown.
Knot on the underside or bury the yarn through the pumpkin body.
Jute Bow
Material: natural jute twine.
Cut approximately 55–65 cm of twine.
Wrap the center around the cinnamon-stick base once.
Tie one firm overhand knot.
Form two loops approximately 4–5 cm wide.
Tie a bow and adjust both loops to similar size.
Leave the tail intended for the bead strand approximately 12–15 cm longer than the opposite tail.
The bow should sit directly against the crown rather than halfway up the cinnamon stick.
Wooden Bead Strand
Thread approximately four unfinished wooden beads onto the longer jute tail.
Use beads approximately 10–14 mm in diameter for the proportions shown in the reference.
Slide the first bead to within approximately 15–20 mm of the bow knot.
Arrange the remaining beads closely together.
Tie a firm knot immediately after the final bead.
Trim the jute approximately 10–15 mm beyond the knot.
The bead strand should rest over one upper lobe rather than hanging vertically down the side of the pumpkin.
Shape the Bow and Beads
Turn the pumpkin so the largest, most even lobe faces forward.
Rotate the bow until one loop sits to each side of the cinnamon stick.
Lay the wooden bead strand diagonally across the upper-right or upper-left lobe.
Trim the plain jute tail to approximately 8–10 cm if necessary.
No sewing is required when the bow holds securely.
Controlling the Six-Lobe Shape
The body should remain broader than it is tall after sculpting. If the six channels are tightened without vertical compression first, the pumpkin can become narrow and elongated.
Measure the body before adding the cinnamon stick. A target of approximately 15–17 cm across and 9–11 cm high produces the squat proportions visible in the image.
Check the base from table height. At least three lower lobes should contact the surface. A pumpkin resting only on its center closure will rock when the natural stem and bead decoration are added.
Assembly
- Complete the orange body through R27, keeping the center slightly softer than the outer circumference during stuffing.
- Compress the pumpkin vertically by approximately 1–1.5 cm before marking any external lobe channels.
- Mark six equally spaced groove positions and shape them as three opposite pairs to keep the stuffing centered.
- Adjust each channel until it sits approximately 10–14 mm below the neighboring lobe surfaces.
- Deepen the crown center to approximately 12–15 mm so the cinnamon stick has a stable recessed seat.
- Insert approximately 20–25 mm of the cinnamon stick into the pumpkin and secure its base with several concealed orange stitches.
- Tie the jute twine directly around the stem base and form two loops approximately 4–5 cm wide.
- Thread approximately four natural wooden beads onto one longer jute tail and knot immediately after the final bead.
- Rotate the bow and bead strand until they sit over the upper lobes without hiding the deepest sculpting channels.
- Set the pumpkin on a hard surface, correct any rocking by redistributing lower stuffing, then weave all crochet yarn tails through at least 4 cm of dense fabric.
The completed pumpkin should have six clearly recessed channels, a broad stable base, an upright cinnamon-stick stem and one compact jute-and-wood crown decoration.
7 Technical Tips
- Pumpkin remaining spherical: A hard central core resists shaping even when the exterior strands are pulled firmly. Keep the center approximately 15–20 percent softer than the outer circumference before R27 is closed.
- Lobes becoming unequal: Working all six grooves clockwise pushes stuffing into the final unfinished section. Shape one channel and then its opposite, maintaining roughly 60-degree spacing around the crown.
- Shaping yarn cutting into the fabric: Excess tension can bury the strand between single crochet stitches. Stop when the groove is approximately 10–14 mm below its neighboring lobe surfaces.
- Cinnamon stick wobbling: Inserting only 5–10 mm of stem gives too little contact with the filling. Seat approximately 20–25 mm inside the body and compress the surrounding stuffing against it before securing the crown stitches.
- Crown collapsing around the stem: Pulling the central compression deeper than approximately 15 mm folds the upper lobes inward. Measure the recess before permanently knotting the vertical shaping strand.
- Wooden beads pulling the bow downward: Heavy or oversized beads can rotate the twine knot. Keep the beads around 10–14 mm and use approximately four pieces rather than loading the tail with a long strand.
- Pumpkin rocking after decoration: A hard knot directly beneath the lower center creates a single contact point. Push the bottom center upward by about 5 mm and move filling into the surrounding lobes until at least three sections touch the table.
Conclusion
Check the crown recess before adding the natural stem because the cinnamon stick makes any asymmetry at the top immediately visible. The next practical step is to rotate the stuffed body on a level surface, compare all six lobe widths and correct the shaping tension before the jute is tied. Keep the wooden beads close to the bow so they remain a crown detail rather than a hanging ornament. Share the finished rustic crochet pumpkin pattern project on Pinterest with a front three-quarter image, then post a close view of the cinnamon stem and bead detail on Instagram using #RusticCinnamonCrochetPumpkin. For this pumpkin specifically, would you keep four natural beads or use three larger beads?









