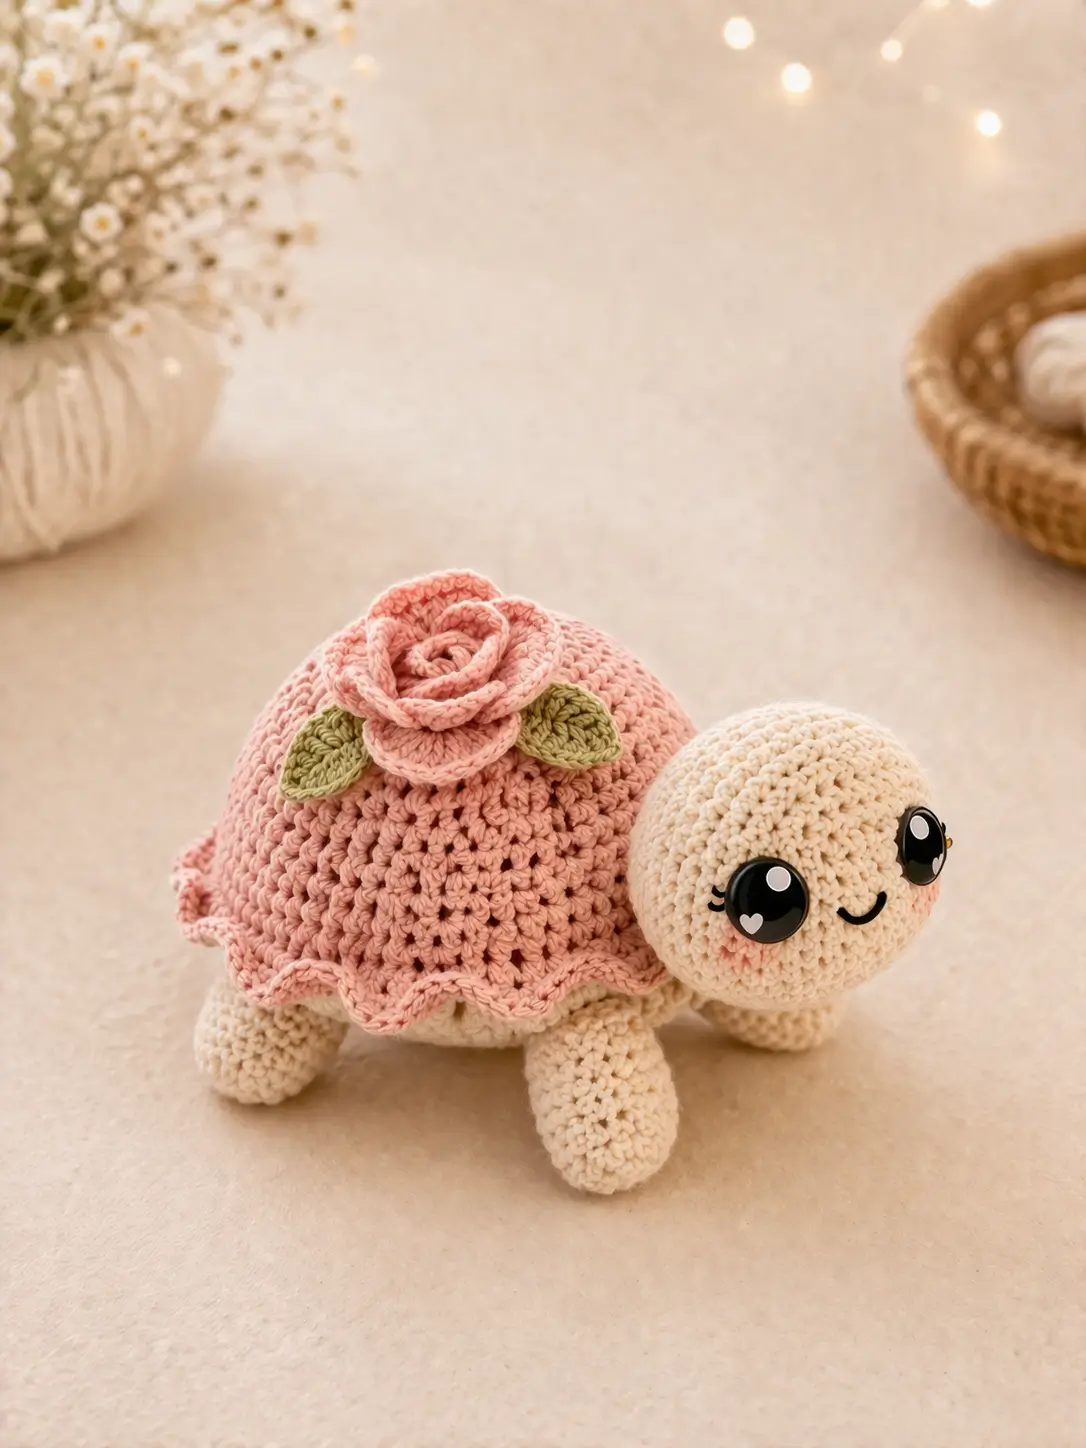
A turtle shell cannot rise into layered petals unless the neck line stays clear. This rose turtle amigurumi crochet pattern solves that problem first, then builds the head, shell, legs, and rose topper in a compact display format. Expect DK or light worsted cotton, a 3.0 mm hook, an intermediate layout, and a small finished toy that works well for shelf decor, market tables, or photo styling.
The Design: What Makes Rose Turtle Different
A rose turtle has three structural demands that a plain turtle does not. First, the shell top has to hold vertical petal depth without collapsing onto the neck. That is why the shell is worked separately and finished with a ruffled edge rather than built as one flat disk. Second, the head must project forward enough to read as turtle, not snail. A longer neck transition fixes that. Third, the floral topper needs a stable center so the rose stays upright after stuffing settles.
Most search-visible rose turtle patterns currently cluster around plush chenille builds, no-sew construction, and larger hooks in the 4.5 mm to 5.0 mm range. That works for a soft plush silhouette, but the photographed version reads more like a cotton display piece with sharper stitch definition. A common maker mistake with any flower turtle crochet pattern is placing the rose too far forward, which shortens the visible neck and hides the face.
Project Info at a Glance
| Skill Level | Time | Finished Size | Hook | Best For |
|---|---|---|---|---|
| Intermediate | 4–6 hours | 15 x 18 cm reference size | 4.5 mm reference spec | Floral turtle plush builds |
Search-verified market references for rose turtle patterns commonly use super bulky chenille, around 15 x 18 cm finished size, and 4.5 mm to 5.0 mm hooks. This article adapts the photographed look into a smaller cotton version with clearer stitch detail.
Materials and Tools
Yarn
- Cream — DK/light worsted cotton — 35 g — Paintbox Cotton DK, Ricorumi DK, or similar
- Dusty pink — DK/light worsted cotton — 25 g — shell top and outer rose petals
- Light blush pink — DK/light worsted cotton — 12 g — inner rose petals
- Sage green — DK/light worsted cotton — 6 g — leaves
- Soft peach or blush — small amount — cheek tint or embroidery accent
Tools
- Hook 3.0 mm
- Safety eyes 10 or 12 mm
- Polyester stuffing
- Tapestry needle
- Stitch markers
- Fine black thread or yarn for smile
- Pins
Abbreviations
MR / sc / inc / dec / sl st / ch / BLO / FLO / hdc / dc
Use invisible decrease for the head and body closing rounds so the cream fabric stays smooth and the face line does not break.
Pattern — Step by Step
Continuous spiral unless noted. This is an original cotton adaptation drafted from the photographed toy style, not a transcription of any searched pattern.
Head (Make 1)
Yarn: cream — Source: standard amigurumi math
R1: 6 sc in MR (6)
R2: inc x6 (12)
R3: (sc, inc) x6 (18)
R4: (2 sc, inc) x6 (24)
R5: (3 sc, inc) x6 (30)
R6: (4 sc, inc) x6 (36)
R7–11: sc around (36) 5 rounds
R12: (4 sc, dec) x6 (30)
R13: (3 sc, dec) x6 (24)
Insert safety eyes between R8 and R9 with 7 stitches between them. Embroider smile centered one round below.
R14: (2 sc, dec) x6 (18)
Stuff firmly, especially the cheek line.
R15: (sc, dec) x6 (12)
R16: dec x6 (6)
Fasten off. Close opening. Leave a 25 cm tail.
Body Base / Belly (Make 1)
Yarn: cream — Source: standard amigurumi math
R1: 6 sc in MR (6)
R2: inc x6 (12)
R3: (sc, inc) x6 (18)
R4: (2 sc, inc) x6 (24)
R5: (3 sc, inc) x6 (30)
R6: (4 sc, inc) x6 (36)
R7–8: sc around (36) 2 rounds
Fasten off. Leave a 30 cm tail for joining.
Shell Top (Make 1)
Yarn: dusty pink — Source: standard amigurumi math
R1: 6 sc in MR (6)
R2: inc x6 (12)
R3: (sc, inc) x6 (18)
R4: (2 sc, inc) x6 (24)
R5: (3 sc, inc) x6 (30)
R6: (4 sc, inc) x6 (36)
R7: BLO sc around (36)
R8: sc around (36)
Do not fasten off.
Ruffled Shell Edge
Ch 1. Work in FLO of R7 around shell: (sl st, hdc, dc, hdc, sl st) in next 3 sts, sl st in next 1 st; repeat around 9 times.
Fasten off. Weave end.
Front Legs (Make 2)
Yarn: cream — Source: standard amigurumi math
R1: 6 sc in MR (6)
R2: inc x6 (12)
R3–5: sc around (12) 3 rounds
R6: (4 sc, dec) x2 (10)
R7–8: sc around (10) 2 rounds
Stuff lightly at foot only. Flatten opening and crochet 5 sc through both layers.
Fasten off. Leave a 20 cm tail.
Back Legs (Make 2)
Yarn: cream — Source: standard amigurumi math
R1: 6 sc in MR (6)
R2: inc x6 (12)
R3–4: sc around (12) 2 rounds
R5: (4 sc, dec) x2 (10)
R6–7: sc around (10) 2 rounds
Stuff lightly at foot only. Flatten opening and crochet 5 sc through both layers.
Fasten off. Leave a 20 cm tail.
Tail (Make 1)
Yarn: dusty pink or cream — Source: standard amigurumi math
R1: 4 sc in MR (4)
R2: sc around (4)
R3: dec x2 (2)
Fasten off. Leave a 12 cm tail.
Leaves (Make 2)
Yarn: sage green — Source: standard amigurumi math
Ch 6.
Row 1: Starting in 2nd ch from hook, sc, hdc, dc, hdc, sc. Turn.
Row 2: Ch 1, sl st in first st, hdc, dc, hdc, sl st.
Work 1 sl st around tip to sharpen leaf point.
Fasten off. Leave a 15 cm tail.
Rose Center (Make 1)
Yarn: light blush pink — Source: standard amigurumi math
Ch 16.
Row 1: Starting in 2nd ch from hook, 15 sc. Turn.
Row 2: Ch 1, (sc, hdc, 2 dc, hdc, sc) in next 2 sts, sl st in next st; repeat 5 times.
Roll strip tightly from first petal to last. Stitch base closed.
Fasten off. Leave a 25 cm tail.
Rose Outer Petal Strip (Make 1)
Yarn: dusty pink — Source: standard amigurumi math
Ch 24.
Row 1: Starting in 2nd ch from hook, 23 sc. Turn.
Row 2: Ch 1, (sc, hdc, 2 dc, hdc, sc) in next 3 sts, sl st in next st; repeat 5 times, then (sc, hdc, 3 dc, hdc, sc) in next 3 sts, sl st in next st for final petal section.
Wrap this strip around the rose center. Stitch in place at base only so petals remain open.
Fasten off. Leave a 25 cm tail.
Cheek Patches (Make 2)
Yarn: blush pink — Source: standard amigurumi math
R1: 6 sc in MR (6)
Fasten off. Leave a short tail.
Accessory Mount Circle (Make 1)
Yarn: dusty pink — Source: standard amigurumi math
R1: 6 sc in MR (6)
R2: inc x6 (12)
Fasten off. Leave a 20 cm tail.
This hidden circle sits under the rose to spread the pull of the sewing stitches across the shell.
Assembly
- Sew the head to the front of the body base, centered across 8–10 stitches. The head should angle slightly upward.
- Pin the front legs just behind the head, one on each side of the belly. Sew through the flattened top edge only.
- Pin the back legs near the rear third of the belly. Match distance from center on both sides before sewing.
- Sew the tail centered at the back edge of the body base.
- Fill the shell top with moderate stuffing. Keep the outer edge softer than the center so the ruffle can drop naturally.
- Place the shell top over the body base. Whipstitch through matching outer rounds, leaving the neck opening exposed at the front until the last few stitches. Add final stuffing, then close.
- Sew the cheek patches to the head slightly below and outside each eye, or brush on blush instead.
- Stitch the rose center to the mount circle first, then wrap and attach the outer petal strip.
- Sew the two leaves under the rose, angled outward, then sew the whole floral unit to the top center of the shell with the rose set slightly back from the neck line.
- Weave all tails inside the shell and body, then tack the head to the shell with one hidden stitch if extra stability is needed.
The piece is complete when the turtle stands on four legs without the rose tipping the shell forward.
7 Technical Tips
- Mark the front-center stitch before attaching the head. If the head shifts even 1 stitch off center, the eyes read crooked once the shell is added.
- Keep stuffing firm in the head and moderate in the shell. Overstuffing the shell pushes the ruffle flat and lifts the floral unit too high.
- Use invisible decreases on cream yarn. Standard decreases leave a small ridge that shows clearly across the forehead and chin line.
- Install eyes before the final third of the head is closed. After R13, access tightens fast and eye washers become harder to seat cleanly.
- Pin the rose 1.5 to 2 cm behind the neck opening. Any closer, and the flower crowds the face instead of framing it.
- Flatten the leg tops to exactly 5 stitches before sewing. A wider leg join makes the turtle wobble; a narrower join tucks the leg too far under the belly.
- Weave tails through at least 3 direction changes inside the shell. A single straight bury can loosen when the rose is handled or pressed for photos.
Conclusion
A rose shell changes the whole build order of a turtle. The neck opening, shell height, and flower placement all matter more than the basic body math. This rose turtle amigurumi crochet pattern works best when you finish the face first, keep the shell center firm, and mount the flower slightly behind the neck line. The next step is simple: make one in the exact photo palette, then test a second version with deeper outer petals or darker leaf contrast. Share the finished piece on Pinterest and Instagram with #RoseTurtlePattern. On your version, did you keep the shell rose centered, or shift it back to show more neck?









